Art of the DBA Rotating Header Image

SQLPS

A Month of SQLPS: Managing Availability Group Replicas

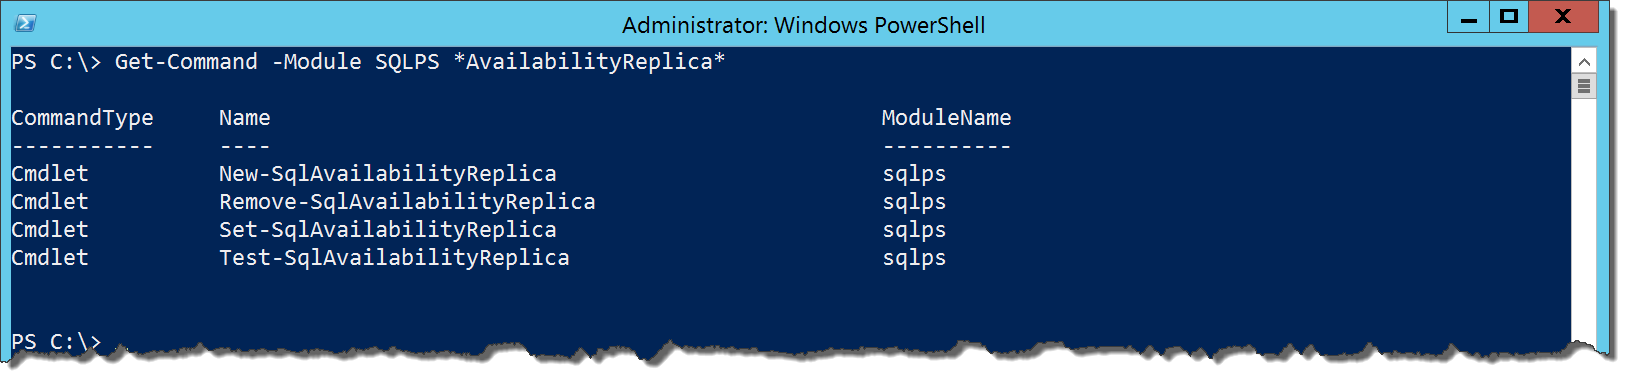
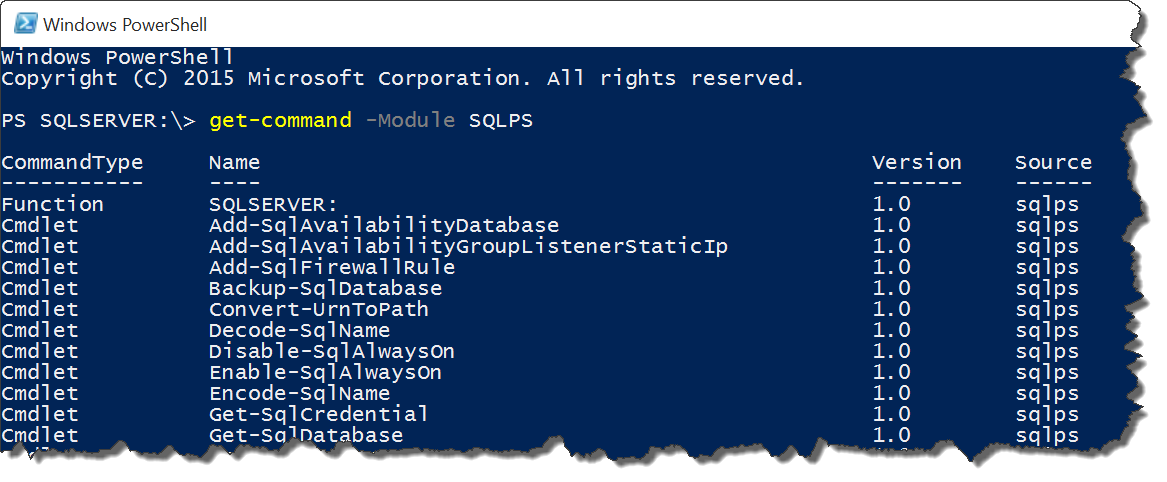
Now that we understand how to prepare our machines for an Availability Group, we can go about the business of creating an Availability Group. This can be fairly involved, but the SQLPS cmdlets can make this a more manageable process. To start the process, we need to look at the components that make up an Availability Group, the replica nodes. Let’s look at the available cmdlets for managing replicas:

Get-Command -Module SQLPS *AvailabilityReplica*

SQLPS-17-1

Starting with New-SqlAvailabilityReplica, how we use this cmdlet depends on whether or not we are creating a new Availability Group or adding a replica to a group that already exists. For an existing AG, we need to reference it using either its provider path or its related Smo.AvailabilityGroup object:

New-SqlAvailabilityReplica -Path 'SQLSERVER:\SQL\KIRK\DEFAULT\AvailabilityGroups\ENTERPRISE' -Name SPOCK -EndpointUrl 'TCP://SPOCK:5022' -AvailabilityMode SynchronousCommit -FailoverMode Automatic

Note the path we use, not to be confused with the path of the SQL Server instance. This path should be within the context of the primary node for the AG. Running this command will create the replica.

If we are creating a brand new AG, the process is slightly different. This is because we don’t have an existing AG to reference, we need to create our replicas in memory so they can be referenced later. We need to make use of the -AsTemplate switch, which creates the replica object in memory. We also need to specify what version of SQL replica we’re creating, by using the -Version argument, specifying 11 or 12 for 2012 or 2014 respectively:

$replicas = @()
$replicas += New-SqlAvailabilityReplica -Name SPOCK -EndpointUrl 'TCP://SPOCK:5022' -AvailabilityMode SynchronousCommit -FailoverMode Automatic -AsTemplate -Version 12

Note, with this command we’re adding the output of the cmdlet to a collection. This is our reference for when the new AG is created.

There is one other step required, for both scenarios, to make a replica fully part of the AG: we need to join it using Join-SqlAvailabilityGroup. To do this, run the cmdlet and specify either the provider path for the instance or its Smo.Server object. This completes your replica creation.

In the above examples, we specified the failover, endpoint URL, and availability options. To change these within Powershell, we can use the Set-SqlAvailabilityReplica cmdlet. The trick to this cmdlet is if we want to reference the replica, we need a different provider path to the object:

Set-SqlAvailabilityReplica -Path 'SQLSERVER:\SQL\KIRK\DEFAULT\AvailabilityGroups\Enterprise\AvailabilityReplicas\SPOCK' -FailoverMode Manual

To check on the state of the replica, we can use Test-SqlAvailabilityReplica, which will evaluate the AG Policy Based Management policies and return a special object, PowerShell.Hadr.AvailabilityReplicaHealthState (you can examine this with Get-Member on the Test-SqlAvailabilityReplica output):

Test-SqlAvailabilityReplica -Path 'SQLSERVER:\SQL\KIRK\DEFAULT\AvailabilityGroups\Enterprise\AvailabilityReplicas\SPOCK'

SQLPS-17-2

Finally, you can use Remove-SqlAvailabilityReplica by using the same path to the replica:

Remove-SqlAvailabilityReplica -Path 'SQLSERVER:\SQL\KIRK\DEFAULT\AvailabilityGroups\Enterprise\AvailabilityReplicas\SPOCK'

All of these cmdlets are wrappers for T-SQL, which means they all accept -Script to output the T-SQL instead of actually executing the command. Again, it’s the same output as if you had done the action in SSMS and used the script button to examine your output. This is a useful check if you’re learning how to use the module cmdlets to validate that what you’re trying to do is actually what is specified.

There’s a lot involved here to manage your replicas, from all the different cmdlet options to the different provider paths needed to execute the functions properly. A request I would make of the SQLPS team at Microsoft is to provide a series of Get- cmdlets that will accept the name strings and return the appropriate SMO objects, since these cmdlets will accept an -InputObject of the appropriate type. Next up, we’ll cover the actual Availability Group cmdlets, using these functions to create and manage our SQL Availability Groups from the Powershell command line.

A Month of SQLPS: AlwaysOn Support

When SQL Server 2012 rolled out, the big feature for the release was Availability Groups. This new technology to support high availability in SQL Server is pretty impressive and has become a cornerstone for database operations in many shops. When it was introduced, the SQL team added more than twenty new cmdlets for Availability Groups in SQLPS. For those keeping score at home, this is about half of the available cmdlets in the module. Microsoft has documented them fairly well online, making them some of the more useful cmdlets available in the SQLPS module.

While the full details of Availability Groups are outside the scope of this series, we will cover many details of Availability Group management and creation as we review the different cmdlets in the module. The first of these have to do with the SQL Server service and enabling AlwaysOn for that service. Normally, we would open up the properties of the service in the Configuration Manager, check off the box for the functionality, and restart the service:

SQLPS-16-1

That’s a lot of clicking, isn’t it? Fortunately, Powershell gives us an easier way. Let’s do a quick lookup of of all the cmdlets containing SqlAlwaysOn:

Get-Command -Module SQLPS *SqlAwaysOn

Running this returns two cmdlets, one for enabling the feature, the other for disabling. Pretty handy, eh? Now, instead of having to open up all sorts of Windows, we can run Enable-SqlAlwaysOn to enable the feature:

Enable-SqlAlwaysOn -ServerInstance KIRK -Force

The cmdlet will accept the instance name, the provider path, or a Smo.Server object to identify the service it needs to alter. By default, running the command will force a service restart, but you can postpone that by using the -NoServiceRestart switch. Disable-SqlAlwaysOn works in the same way, just disabling the feature instead of turning it on.

Before we can create an Availability Group, there’s one other piece of prep that needs to be done within SQL Server. In order for databases to replicate their data to replicas, it needs an endpoint. Normally, we would create this via T-SQL, but fortunately there are cmdlets within SQLPS that make creating these easier:

Get-Command -Module SQLPS *HADREndpoint

Setting up the endpoint is a simple two step process. First we create it using the New-SqlHADREndpoint cmdlet, which creates the endpoint with all the options we want use. Once we have the endpoint created, we need to start it, using the Set-SqlHADREndpoint to alter its state. Fortunately, we can combine these two steps into one using the pipeline:

New-SqlHadrEndpoint HADR_Endpoint -Port 5022 -Path SQLSERVER:\SQL\KIRK\DEFAULT | Set-SqlHadrEndpoint -State ‘Started’

Note, this only creates the endpoint and makes it available. We still have to map the Availability Group to the endpoint, which we will do when we create it.

One difference with the endpoint commands from some of the other cmdlets is that they don’t accept ServerInstance as an argument. We can only pass the provider path or an Smo.Server object. This is where having a cmdlet for retrieving the instance as an SMO object would be handy, but we’ll have to settle for either creating the Smo.Server object ourselves or using the provider path.

With this, we’ll have an instance ready for creating an Availability Group. I’ve skipped over cluster creation, as that is handled by cmdlets from the FailoverCluster Powershell module. Hint, it’s pretty easy. Next up, we’ll go over the cmdlets and steps for building our Availability Group.


A Month of SQLPS: Azure Managed Backups

SQL 2014 introduced some new features to expand capabilities into Azure. One of these features is Azure Managed Backup. There is some SQLPS support provided for this new feature, grouped under the SqlSmartAdmin cmdlets:

SQLPS-15-1

These cmdlets give us some limited control over managed backups, allowing us to set up and configure the managed backup settings. I’m going to save that for another post, but for the detailed instructions you can follow the blog post linked above or the Microsoft documentation.

Once we have the managed backups setup, we can retrieve the smart admin object using Get-SqlSmartAdmin. While it accepts the usual parameters, I prefer to use the -ServerInstance argument for simplicity reasons. As with other cmdlets, we’ll call it and pass the output to Get-Member to see what the underlying type is:

Get-SqlSmartAdmin -ServerInstance PICARD | Get-Member

SQLPS-15-2

The object is another member of the SMO library, the Smo.SmartAdmin class. There’s not much to say about this class. It contains a lot of properties you would expect, such as BackupEnabled, EncryptionType, and StorageUrl. It should be noted that this class only contains the instance level settings, so you can’t use it to show what individual databases you’ve set up for managed backups.

Set-SqlSmartAdmin will allow us to update those instance level settings. The documentation for this cmdlet lies a little, as it says you can pass the provider path as one of the arguments. I’ve tried this and couldn’t get it to work, but did find that we could use Get-SqlSmartAdmin and the pipeline to get this to work:

Get-SqlSmartAdmin -ServerInstance PICARD | Set-SqlSmartAdmin -BackupRetentionPeriodInDays 10

SQLPS-15-3

In addition to managing our instance level settings, we can also validate that the managed backups are working correctly. SQL 2014 included two new Policy Based Management policies: SmartAdminSystemHealthPolicy and SmartAdminUserActionsHealthPolicy. These two policies will validate that your managed backup processes are working correctly. Test-SqlSmartAdmin will essentially evaluate these policies and report if there’s a failure:

Get-SqlSmartAdmin -ServerInstance PICARD | Test-SqlSmartAdmin

SQLPS-15-4

Managed backups are a cool concept and can be of great value for DBAs. The Azure Managed Backup system not only takes care of your backups for you without a lot of intervention, but also stores them offsite in the cloud, giving you additional insurance for a disaster recovery scenario. These SQLPS cmdlets feel like a good start for managing this functionality, but it feels incomplete.

I’ll confess I’m not as strong on using Azure with SQL Server, so I would have to further investigate this in combination with the Azure Powershell support. Once I finish this series, I plan to return to these and explore them a little more in detail. I think there is a lot of appeal with managed backups and being able to script them out in Powershell can be a huge boon to automating work in smaller shops.

A Month of SQLPS: Firewalls and Networking

All IT professionals have to deal with firewalls in some capacity or another. Protecting communication with servers is a fundamental component of any security plan. By default, whenever we install SQL Server we will need to do two things to allow us to talk to our SQL Servers: enable communication (usually TCP) and create a firewall rule allowing inbound traffic. Performing these steps are so standard that it only makes sense to automate them.

Enabling TCP communication is usually something handled within the SQL setup. It is one of the command line options, so this means we can include it in a config.ini and consistently enable it as part of our setup. Firewall rules are an OS operation, though, and are not part of the SQL Server setup. There have been command line options for a long while courtesy of netsh, but since Powershell 3 we’ve also had New-NetFirewallRule to execute this task:

New-NetFirewallRule -DisplayName "Allow SQL Server" -Direction Inbound –LocalPort 1433 -Protocol TCP -Action Allow

SQLPS-14-1

Respectively, these cmdlets will create and remove a firewall rule for SQL Server. The help file shows only a handful of parameters to use. It also states a dependency on our friend, the Cloud Adapter Service. So let’s see how it works.

The command is easy enough to run:

Add-SqlFirewallRule -ServerInstance PICARD -Credential $cred

All we need to make this happen is an instance name and credential that has enough rights on the host machine to create a firewall rule. We could use an SMO Server object or a provider path to the instance. With any of these options, what we get is a firewall rule to the SQL Server application for that named instance:

SQLPS-14-2

This is actually an extremely convenient way to allow firewall access for our instance. Because it allows access specifically for the application executable, it helps minimize port management. However, that’s about all the control you get. The rule will always be for all your profiles, meaning you are opening access to anyone who can reach the machine. This kind of blanket security change could easily expose your data in a way you were not planning on.

Removing a firewall rule does not work quite as expected. Running Remove-SqlFirewallRule will not remove your firewall rule, only disable it. This is not such hassle, but nice to be aware of. If you add it back, the rule just gets re-enabled and there are not any naming conflicts.

There’s one other cmdlet to look at relating to firewalls and that’s the Set-SqlNetworkConfiguration cmdlet. It is used to change the IP address port that instance is listening on. The parameters are similar to any other cmdlet using the Cloud Adapter Service, where you will need the instance name and a credential with permissions to alter the service:

Set-SqlNetworkConfiguration -ServerInstance PICARD -Protocol TCP -Port 13000 -ForceServiceRestart -Credential $cred

SQLPS-14-3

It’s a handy way to change your IP port. However, doing this has no impact on the firewall rule created by Add-SqlFirewallRule, as that firewall maps to the application executable for the instance.

Overall, these cmdlets can be useful, but I am not sure I would recommend them. The lack of fine grained control over how the rule gets created is a big concern for me. Add to this the dependency on the Cloud Adapter Service, which opens up another vector to accessing the server. We’re trading ease for control and the benefits do not outweigh the drawbacks. Since we already have a full set of Network Security cmdlets that allow us to manage firewall rules, I would not use the SQLPS module cmdlets.

A Month of SQLPS: Managing Credentials

Security is an important aspect of SQL Server management. It’s important to control permissions within the instance and only allow the minimal level of rights to our users. This is the principle of least privilege, a fundamental concept for computer security. SQL Server provides a variety of tools to manage these permissions within the instance, but what if SQL Server has to interact with either the operating system or another application? For this, we have credentials, a way to manage authentication to other resources.

The next series of cmdlets to review from SQLPS are the ones used to manage these credentials. We’ll go through the usual process and use Get-Command to list the options:

Get-Command -Module SQLPS *SqlCredential

The result is four cmdlets for creating, retrieving, altering, and removing a credential. We’ll start by using New-Credential to create one for a windows domain login:

$pw = Read-Host 'Enter the password' -AsSecureString
New-SqlCredential -Path 'SQLSERVER:\SQL\PICARD\Default\' -Name SQLTest_Windows -Identity 'SDF\SQLTest' -Secret $pw

This command will create the credential in the PICARD instance. Unlike some of the other cmdlets, though, the -SqlCredential cmdlets do not support a -ServerInstance parameter. The way to specify the instance is to use the provider path to the instance. It also, unfortunately, doesn’t accept a Powershell credential object to create the SQL credential. It will accept a secure string for the password, meaning that the password will be encrypted as the cmdlet processes it.

Now that we’ve created our credential, let’s crack it open with Get-Member and see what kind of object we’re working with:

Get-SqlCredential -Path 'SQLSERVER:\SQL\PICARD\Default\' -Name SQLTest_Windows | Get-Member

SQLPS-13-1

It’s an Smo.Credential object, which matches with the other object types found within the provider.

The Set-SqlCredential gives us the capability to update the identity or the password for an existing credential. This means if something changes externally with credential information, we can update the credential to reflect that. Remove-SqlCredential rounds out the functionality by giving us a cmdlet to remove a credential using Powershell. These two cmdlets will also support the -Script switch, allowing you to output the resulting T-SQL for these calls.

Why would you use these? The functionality they provide does not really offer any real savings over doing the same work in T-SQL. Conversely, it is about the same amount of code. If you use Powershell for deploying these objects, the secure string functionality can be helpful to keep your credentials encrypted. The choice between T-SQL and Powershell is a matter of having different options to create your credentials, letting you choose the appropriate tool for your deployment.

A Month of SQL PS: Backups and Restores

Backups and restores are a key task for any database administrator. Our primary job is safeguarding the data and backups provide us with a redundant, point-in-time state of our data that we can use to recover from in the event of a Bad Thing(tm). Not taking backups is a great way to make sure your resume is up to date.

It’s no surprise that the SQLPS module has two cmdlets specifically designed for these functions, respectively named Backup-SqlDatabase and Restore-SqlDatabase. Go ahead and take a moment to look at the help files for these using Get-Help. The first thing you should see is there’s quite a bit of documentation for these two cmdlets. They have some of the most thorough help files for any of the SQLPS cmdlets.

Backing up a database with Backup-SqlDatabase is easy, much like it would be if we were to use BACKUP DATABASE in T-SQL:

Backup-SqlDatabase -ServerInstance PICARD -Database AdventureWorks2012 -BackupFile 'C:\Backups\AW2012_cmdlettest.bak’

If you run this, you’ll note that you get a nice little progress bar for the backup action. Not to much else to worry about here, because it’s straightforward in how it operates. This cmdlet does run T-SQL behind the scenes, meaning we can use the -Script argument generate the T-SQL statement the cmdlet will run when it backs up our database:

SQLPS-12-1

Looks suspiciously like what you would get if you scripted out a backup action in SQL Server Management Studio, doesn’t it? We’re going back to the concept that the SQLPS components all use the SMO, meaning they work the same way as other tools that use the components, like SSMS. This becomes handy if you want to use the cmdlets to shortcut creating scripts for your backups.

Most of the other arguments for this cmdlet are simply additional options for the T-SQL BACKUP command. This means we can have the same level of customization of our backups as we would if we were writing straight T-SQL. I’ll let you explore those on your own and consider which options make sense and how to use them.

So why would we use this, if all it’s doing is duplicating T-SQL? Mostly because it becomes easier to integrate with Powershell in this manner, allowing us to use Powershell for what it’s good at it. One pattern I like to advocate around this is using Powershell to create backup directories as part of my backup process, then backup the database, then again use Powershell to remove old backups. Consider this script:


$dbs = dir SQLSERVER:\SQL\localhost\DEFAULT\databases | Where-Object {$_.status -eq 'Normal'}

foreach ($db in $dbs.name){
 $backuppath = "C:\DBBackups\$db"
 if(!(Test-Path $backuppath )){New-Item -ItemType Directory -Path $backuppath}
    $backupfile = Join-Path -Path $backuppath -ChildPath "$db-$(Get-Date -Format 'yyyyMMddhhmm').bak"
    Backup-SqlDatabase -ServerInstance LocalHost -Database $db -BackupFile $backupfile -Initialize 
    dir $backuppath | Where-Object {$_.FullName -ne $backupfile} | Remove-Item
}


This will dynamically backup all the user databases on the local instance with a unique name in its own directory. The script also uses Powershell to handle the file system tasks of creating the folder if it does not exist and cleaning up any backups outside of the one we just created. We have a simple, dynamic backup script all with a fairly minimal amount of coding.

The counterpart to this is the Restore-SqlDatabase. After all, our backups are not all that useful if we can’t restore them. The cmdlet is very similar to Backup-SqlDatabase with its arguments, where most of them are direct translations of the T-SQL RESTORE command options. One gotcha to call out is how relocating database files is handled.

Moving database files with a restore is a pretty common operation. The way the cmdlet handles it makes sense if you remember that everything is working through the SMO. What we need for moving files is a collection of RelocateFile objects, which the cmdlet will then use to establish the restore:

$MoveFiles = @()
$MoveFiles += New-Object Microsoft.SqlServer.Management.Smo.RelocateFile ('AdventureWorks2012_Data','C:\DBFiles\data\AdventureWorks2012New_Data.mdf')
$MoveFiles += New-Object Microsoft.SqlServer.Management.Smo.RelocateFile ('AdventureWorks2012_Log','C:\DBFiles\log\AdventureWorks2012New_Log.ldf')

Restore-SqlDatabase -ServerInstance PICARD -Database AdventureWorks2012New -RelocateFile $MoveFiles -BackupFile 'C:\DBBackups\AdventureWorks2012\AdventureWorks2012-201510101251.bak

As with our Backup-SqlDatabase cmdlet, we can see the T-SQL that would execute this by using the -Script argument.

Again, this cmdlet is useful by including within a larger script. I like using it for quick and dirty script generation for point in time restores:

$LastFull= Get-ChildItem 'C:\Backups\AdventureWorks2012\*.bak' | Sort-Object LastWriteTime -Descending | Select-Object -First 1
$logs = Get-ChildItem 'C:\Backups\AdventureWorks2012\*.trn' | Where-Object {$_.LastWriteTime -gt $LastFull.LastWriteTime} | Sort-Object LastWriteTime

$MoveFiles = @()
$MoveFiles += New-Object Microsoft.SqlServer.Management.Smo.RelocateFile ('AdventureWorks2012_Data','C:\DBFiles\data\AdventureWorks2012New_Data.mdf')
$MoveFiles += New-Object Microsoft.SqlServer.Management.Smo.RelocateFile ('AdventureWorks2012_Log','C:\DBFiles\log\AdventureWorks2012New_Log.ldf')

$db = 'AdventureWork2012New'
Restore-SqlDatabase -ServerInstance 'PICARD' -Database $db -RelocateFile $MoveFiles -BackupFile $LastFull.FullName -RestoreAction Database -NoRecovery -Script | Out-File 'C:\Temp\Restore.sql'
foreach($log in $logs){
    if($log -eq $logs[$logs.Length -1]){
        Restore-SqlDatabase -ServerInstance 'PICARD' -Database $db -BackupFile $log.FullName -RestoreAction Log -Script | Out-File 'C:\Temp\Restore.sql'
    }
    else{
        Restore-SqlDatabase -ServerInstance 'PICARD' -Database $db -BackupFile $log.FullName -RestoreAction Log -NoRecovery -Script | Out-File 'C:\Temp\Restore.sql'
    }
}

While it seems like a lot of code, it follows an understandable pattern. The first to Get-ChildItem calls collect our most recent full backup and any log backups that have occurred after that. Next up is to build our RelocateFile collection. Then we just run the Restore-SqlDatabase cmdlet with the -Script argument for each file, piping the output to a file. The result is a full restore script with all of our transaction log files sorted for us. This kind of script saves me a lot of time when I have to execute database restores and I can avoid wading through a lot of transaction log backups.

For my money, the Backup- and Restore-SqlDatabase cmdlets are two of the more useful functions from the module. They make it easy to combine my SQL Server work with the file system tasks that needed to happen as well. They also make it simpler because they reduce the amount of code I need to write to within Powershell, reducing the overall complexity of the work. While much of this could be done using straight T-SQL, leveraging the right parts of Powershell makes for robust and reliable processes.

A Month of SQLPS: SqlDatabase cmdlets

In the last post we covered the cmdlets that are used to acquire, start, and stop SQL Instances. Naturally, the next area to talk about are cmdlets designed for SQL databases. Let’s see what we have using Get-Command again:

Get-Command -Module SQLPS *SqlDatabase

SQLPS-11-1

Three cmdlets are available, each one easily understandable from their names. We’ll start by looking at Get-SqlDatabase’s help file (using Get-Help Get-SqlDatabase -ShowWindow). Fortunately, this is one of the better documented cmdlets, though I’m still disappointed that the help information doesn’t show the output object type.

I know I sound like a broken record, but it is so vital to remember that everything in Powershell is an object. This means that knowing what our output objects are is key to being able to use our cmdlets. What we need to do now is use Get-Member to investigate the output of the cmdlet:

Get-SqlDatabase -ServerInstance PICARD -Name AdventureWorks2012 | Get-Member

SQLPS-11-2

Our output is an Smo.Database object, with all of those methods and properties. As we previously covered, this is the same object that the provider gives you. This means the Get-SqlDatabase cmdlet is functionally equivalent to:

Get-Item SQLSERVER:\SQL\PICARD\DEFAULT\Databases\AdventureWorks2012

This means we have a couple different paths to the same result, so whichever technique is used is a matter of preference. Interestingly enough, the Get-SqlDatabase cmdlet takes a -Path argument, but only works for the instance. We can not use the -Path to define the database, which seems weird to me. Anyway, this command will use the path and result in the same output:

Get-SqlDatabase -Name AdventureWorks2012 -Path SQLSERVER:\SQL\PICARD\DEFAULT

Another little gotcha with this cmdlet has is there’s a -Script switch argument for the cmdlet. Typically, when you see the -Script argument, this is a way for the cmdlet to call the .Script() method and produce a T-SQL script for the action. The thing is, Get-SqlDatabase is not actually performing a T-SQL action, just acquiring a SMO object. If you use the -Script argument, nothing will get returned because of this.

One significant difference between getting the option via the cmdlet versus the path and Get-Item is that Get-SqlDatabase will take a PSCredential object for -Credential. This means we can use alternate authentication for getting our objects. While we know we can do this using the provider, this can save us a step.

There’s a lot of variations here and we would use this cmdlet in any situation where we wanted to get the database object. What I do want to call out is the disconnection between Get-SqlDatabase and Get-SqlInstance. The fact that Get-SqlInstance returned a different type of object than the Smo.Server class when everything else with the provider works using SMO objects makes it a little weird. At least Get-SqlDatabase maintains that consistency with the SMO, giving us a handy way to manage and manipulate database objects for our scripts.

A Month of SQLPS: Starting and Stopping

Before you can learn how to drive a car, you have to know how to stop it and start it. This carries over to many things, including SQL Server. Most of us are used to controlling SQL Server through either SQL Server Management Studio or the SQL Server Configuration Manager, stopping and starting the service through the management UI. Others may go into the general Services control panel to manage these services. However we do it, knowing how to stop, start, and restart SQL Server is necessary to managing instances.

Since managing all Windows services is an important management task, Powershell has supported it from the beginning. To manage services involves Get-Service, Start-Service, and Stop-Service. Using these cmdlets is easy and they are my go-to way to manage my services:

#Powershell console must be run as Administrator
Get-Service MSSQLSERVER
Stop-Service MSSQLSERVER -Force
Start-Service MSSQLSERVER
Start-Service SQLSERVERAGENT

Nothing complex, right? So let’s move to the SQLPS module. Using our Get-Command call, let’s look up the cmdlets that relate to SQL Instances:

Get-Command -Module SQLPS *SqlInstance

SQLPS-10-1

The resulting three cmdlets seem pretty straight forward with their names. Shouldn’t be too difficult, right? Unfortunately, this is where things start to break down. First, if we look at the help files for each of these cmdlets, we find them woefully lacking in any useful information. There are one or two examples for their use, but no detailed examples and no documentation on the parameters or their use (with an exception for Get-SqlInstance).

Time for some detective work, right? I started with using Get-SqlInstance and quickly discovered I needed something called the Cloud Adapter Service, an add on for SQL Server. This service is apparently something born out of Azure for working with SQL Server on Azure VMs. It needs to be running to support these commands and also needs permissions to affect the Windows firewall.

Next up we need a credential. No, it’s not a SQL credential. Instead, it’s a Windows credential that has administrator rights on the target machine. Once this is all in place, we can use it to retrieve our information. For good measure, we’ll pipe the output to Get-Member to investigate what kind of object we’re dealing with:

$cred = Get-Credential
$instance = Get-SqlInstance -MachineName PICARD -Credential $cred
$instance
$instance | Get-Member

SQLPS-10-2

While this doesn’t have any surprising information, what’s critical here is the object type. Note that it’s a IaaS.SqlInstanceInfo object, specifically designed to manage instances on Azure VMs. I believe the idea was to give users of SQLPS a consistent way to manage their instances, regardless of whether they were on-premises or in the Azure cloud.

Understanding Get-SqlInstance helps us make sense of the Start-SqlInstance and Stop-SqlInstance cmdlets as well. When I ran them they performed the same operation as Start- and Stop-Service, including the gotcha that when you start a SQL instance/service, it will not automatically start the corresponding Agent service. All we get is the ability to retrieve information and manipulate our services through a specialized communication service.

Honestly, I can’t see any benefit to the inclusion of these cmdlets. When working with SQL Instances, I would expect to get and manage SMO server objects, as that is what most of the other interfaces use. When it comes to managing services, WinRM access allows me to use the traditional service management cmdlets included in the core of Powershell. These -SqlInstance cmdlets add an additional level of overhead that simply isn’t needed, even in the case of Azure VMs.

A Month of SQLPS: The SQL cmdlets

There’s more to the SQLPS module than just a fancy way to browse SQL Server components. While the provider gives us an effective way to interact with different sections of our database environment, we need more. That’s why there is a series of cmdlets included in the module to manage things like backups and availability groups, as well as retrieve SMO objects without having to always rely on provider paths or complex SMO objects.

To get a listing of all cmdlets is the same as with any Powershell module: Get-Command -Module SQLPS. This will list out the 45 cmdlets in the module along with the provider:

Get-Command -Module SQLPS

SQLPS-9-1

While I want to spend the next week or so covering these cmdlets in detail, I want to begin by re-emphasizing the foundational elements of the language will help us figure out these cmdlets on our own. We’ve already seen how we can see what cmdlets are available to us by using Get-Command, allowing to narrow down our focus for what we might be searching for.

Next, if we examine the names of the cmdlets, we will have a general idea of what they do based on the verb plus noun naming convention. By using a little pipeline magic, we can see what the different verb options are:

get-command -Module SQLPS | Group-Object verb

SQLPS-9-2

We can use the verb list to further narrow down the cmdlets. If we’re looking for a cmdlet to create something, we’d look at cmdlets starting with ‘New-’. If we wanted to retrieve an object, we’d look for a cmdlet named ‘Get-’. This continues on, but helps us intuitively narrow down the cmdlets by what they do.

Finally, once we have a cmdlet in mind, we can look at the specific help file to learn how that cmdlet is used with the Get-Help cmdlet. I usually recommend calling Get-Help with the -ShowWindow switch because it gives us a separate window where the help information is displayed:

Get-Help Get-SqlInstance -ShowWindow

Unfortunately, this is where we run into some additional problems with the module. While the cmdlets available with the core installation of Powershell have some pretty detailed help, the help files for the module are thin and incomplete. Many cmdlets have only basic descriptions and no information on outputs . This means we’re going to have to use a little detective work to evaluate these cmdlets and figure out what they do.

This is the main reason why I wanted to write this series. There’s actually some useful functionality built here, but the lack of documentation is a real struggle and leads to many database folks not using these cmdlets because of the lack of explanation around them. Some will turn to the SMO and write a lot of code to accomplish the same tasks. Others will simply give up on Powershell completely and turn to other tools. Stick around over the next few weeks and we’ll try and fill this gap, showing you what’s availble, how they work, and help build some patterns for their use.

A Month of SQLPS: Collecting

It’s one thing for us to talk about what your options are for a piece of tech, but that rarely shows what you can do. Whenever I talk about Powershell, I want to show people what can actually be done with the language so people can make practical use of it. The provider gives us more than just a nice way to browse SQL Server.

Treating SQL Server like a file system lets us easily gather up objects as collections for processing. The strength of this should be obvious to database folks, who like to work with sets of data. For example, we can use them to quickly gather information across our servers.

Ever wonder what your SQL Server versions are? Wouldn’t be nice if you could just query the build number of all our instances? Well, using the provider we can do that. Here’s my pattern for using your Central Management Server to getting a list of all our servers:

$servers = @(‘PICARD’)
$servers += (dir "SQLSERVER:\SQLRegistration\Central Management Server Group\$servers").Name

Now, if we combine this with Get-Item and Select-Object and we can have a quick list of our version information across all our servers:

$servers = @(‘PICARD’)
$servers += (dir "SQLSERVER:\SQLRegistration\Central Management Server Group\$servers").Name
foreach($server in $servers){
    Get-Item "SQLSERVER:\SQL\$server\DEFAULT" | Select-Object Name,VersionString
}

SQLPS-8-1

We can extend this to retrieving other properties and drilling down into other aspects of our environment. We can use this to gather inventory information quickly. But wait, there’s more! We’re not just limited to displaying properties, we can also change them.

Have you ever connected to an instance to create some database objects and accidentally created it in master because that’s set as your default? Not only is it annoying, but it can be problematic and difficult to clean up. This is why I like to set user logins to tempdb. The provider makes it extremely easy to do this:

$logins = dir SQLSERVER:\SQL\localhost\DEFAULT\logins
foreach($login in $logins){
    $login.DefaultDatabase = ‘TempDB’
    $login.Alter()
}

This is a pretty simple approach that can be extended easily to suit our purposes. If we wanted to update only SQL Logins, we could add an additional filter to build our collection:

$logins = dir SQLSERVER:\SQL\localhost\DEFAULT\logins | Where-Object {$_.LoginType -eq ‘SqlLogin’}

I can hear you saying “So what, I can do that in T-SQL”. And you can by writing a T-SQL cursor and some dynamic SQL. The immediate advantage here is we avoid that dynamic SQL. But there’s another advantage: the ability to easily combine multiple collections. If we go back to the CMS pattern and combine it with this loop, we can now update all our default databases on all our servers:

$servers = @(‘PICARD’)
$servers += (dir "SQLSERVER:\SQLRegistration\Central Management Server Group\$servers").Name

foreach($server in $servers){
    $logins = dir "SQLSERVER:\SQL\$server\DEFAULT\logins"
    foreach($login in $logins){
        $login.DefaultDatabase = ‘TempDB’
        $login.Alter()
    }
}

This means we are using collections to drive our automation. Also, because our collections are based on the current state of the data, our scripts become dynamic, adapting as the state of the data changes. This is awesome, because we’re used to letting data determine how our work gets done in our database scripts and now we get to do it easily in Powershell.

We’ve spent a lot of time on the provider because it’s the biggest piece of functionality in the module, but there’s more there. Contained within the module are several cmdlets for handling specific actions in and around SQL Server. Tomorrow we’ll start looking at what’s provided and how we can use them.