Art of the DBA Rotating Header Image

May, 2012:

Power(shell)ing your CMS

If you’re looking at Powershell scripts for SQL Server management, you’ll find a lot of them consume a list of servers in order to perform an action. For example, I put a script out a couple of weeks ago that can monitor the service state for your SQL Servers, emailing out a notice if services are down. This is handy, but maintaining a server list in a file is hardly elegant. For something more dynamic, many shops(including my own) will maintain a list of their servers in their own tracking database, giving you a resource you can query. However, there’s an easier way to handle this if you’re using Central Management Server.

The nice thing about Central Management Server is that, just like SQL Server instances, it can be accessed through the SMO with Powershell. This gives us a handy way to browse our sever listings as a folder structure. Just open up your Powershell window and (assuming you’ve loaded your SQLPS module/snapin), change your directory to:

CD SQLSERVER:\SQLRegistration\Central Management Server Group

Once you’re there, get a listing of the contents with your favorite command (dir/ls/gci) and you’ll see your registered Central Management Server repositories. You can browse from there into the appropriate repository and see a listing of all your registered instances. Now, keep in mind, you’ll still have to browse the directory structure if you’ve created folders to organize your servers into, but now we have access to them as if they were files in a folder.

Let’s take it a step further now and build out a server listing using some pretty basic commands within Powershell. We only have to keep in mind two gotchas:

  • The SMO recognizes both the folders and the instances as “containers”, so we can’t filter by PSIsContainer being false (the object property indicating container-ship).
  • The instance object has both Name and ServerName properties. The Name is the descriptive name, while ServerName is the specific name of the instance we can connect to.

Keeping this in mind, we can build a list by running the following command in the repository:

ls –recurse | where {$_.ServerName –ne $NULL}

Breaking this down, it’s a standard looking command for Powershell. By using “-recurse”, we tell Powershell to recursively browse through all the folders and subfolders in our directory for the lookup. Filtering on “$_.ServerName –ne $NULL” means we exclude the directories (since they don’t have a ServerName). Now we have an array of all of our servers that we can use for processing loops:

$srvs= ls –recurse | where {$_.ServerName –ne $NULL}

ForEach ($srv in $srvs)
{
  $inst=$srv.ServerName
  #do some stuff
}

Another handy element in that object is the ConnectionString property. This provides you with a ready made connection string to use if you need to connect to SQL Server using OLEDB or ODBC calls. While I haven’t had a need to use this yet, I can definitely see the benefits. There are also other properties that can be explored and used, depending on your scenario.

All of this makes for a great extension of Central Management Server, allowing DBAs to leverage the repository for more than just centralizing lookups in Management Studio. This can be a handy tool if you need something with a little less administrative overhead than a server inventory database or some sort of file listing. This means that the Central Management Server, which most of us see as something we only really use within Management Studio, can be leveraged to be so much more.
I need more power!

Man, sometimes blogging is hard. I meant to get this out earlier in the week, but better late than never, right?

When I was out at SQL Rally a couple weeks ago, I went to Argenis Fernandez(b|t) and Robert Smith’s(b|t) pre-con for SQL Server best practices. It was a good session, with lots of interesting discussion on ways to configure your environments for SQL. One gotcha we talked about was SQL 2008’s annoying power plans and how they get set to Balanced by default. Now, I get what Microsoft is trying to do with these plans, but defaulting to Balanced on servers? Really? Let’s use some common sense.

Anyway, before I get on a rant (don’t worry, I’ve got a couple of those in store for later blog posts), the question that popped into my mind when we started talking about this was how to do it on Server Core. Changing the plans on your standard Windows installs is easy, you just browse into Power Plans (click your start and type “power plans” in the search box). What about when we have no GUI? Do we panic? Of course not, because we have the command line!

Some quick Googling provided me with two items. One is powercfg, a command line utility that Microsoft has provided to allow us to edit these plans. It’s handy, but a little confusing, especially because the power plans use GUIDs for management and that adds a whole new level of trickiness. So, the second Google nugget to appear was this handy script from Aaron Saikovski, where he wraps powercfg in some Powershell to give us more graceful management. Here it is with some editing/tweaking from me for use:

function Set-PowerPlan(
    [ValidateSet("High performance", "Balanced", "Power Saver")] [string]$PreferredPlan)
{
	$currplan = powercfg -getactivescheme
	Write-Host "Current plan is $currplan.substring($currplan.Indexof('{')) [$(Get-Date)]"

    Write-Host "Setting Powerplan to $PreferredPlan"
    $guid = (Get-WmiObject -Class win32_powerplan -Namespace root\cimv2\power -Filter "ElementName='$PreferredPlan'").InstanceID.tostring()
    $regex = [regex]"{(.*?)}$"
    $newpowerVal = $regex.Match($guid).groups[1].value

    #Set the powerplan
    powercfg -S  $newpowerVal

	$currplan = powercfg -getactivescheme
	Write-Host "Current plan is $currplan.substring($currplan.Indexof('{')) [$(Get-Date)]"
}

#set Preferred powerplan
Set-PowerPlan $args[0]

Save the script and call it with whatever plan you want as the argument, or put it in your profile and call it as a function. Technically, you can use this to set the power plan to any of the default options, but my main use of it is to set the plan to High Performance for my Core servers.

UPDATE: Kendall Van Dyke (b|t) provides a handy way to update the plan using the WMI. I’ve not used it much, but I’ll definitely play around with it. In general, I think you could go either way for managing your powersettings.

Get-WmiObject -Class win32_powerplan -Namespace root\cimv2\power | ? { $_.ElementName -ieq 'high performance' } | % { $_.Activate() }

SQL Rally 2012: It’s all about the sauce

Consider, for a moment, the Eggs Benedict.  Most breakfasts involve egg, sometimes with toast, sometimes with meat (bacon, sausage, etc.), various combinations.  However, this one signature dish is special because it combines all this and then covers everything in tasty hollandaise sauce.  This unique combination sets the dish apart from your normal breakfast.

Our database careers are similar.  Any of us can get the job done with some basic combination of study, practical experience, and some community involvement.  What sets one path apart from another?  What gives us that extra boost that makes us stand out from our peers, that carries us up to a new level of success?  What, in short, is the hollandaise sauce of our own personal careers, providing that flavor that makes us special and unique?

This week I had the opportunity to attend the second annual SQL Rally.  For those of you following along, I wrote about my experience at SQL Rally Orlando last year and the profound impact it had on me.  This year, it was a little different for a couple reasons, though the impact was no less significant on my work and my professional growth.

First off, I’m now a community “veteran”.  This doesn’t mean I’ve got a special status, but it does mean that it was now my turn to reach out to people who were attending for their first time.  I met many new folks, shared war stories and terrible jokes, and generally spread the infection that is the SQL Family.  This infection strengthens us, since having a good professional network provides us knowledge and opportunity on a logarithmic scale.

Secondly, this year I attended as a speaker.  Instead of just trying to soak it all in, now I had to get up and talk on my own topic.  That was a particular thrill on its own, because while I’ve done several local and regional events now, now I was speaking on a national stage to the largest audience I’ve had to date.  While I haven’t seen the feedback forms yet, I was blown away by the number of people who came up and personally thanked me for presenting.  Because of the encouragement I received from my audience, I’ve gone ahead and submitted to the PASS Summit for 2012.  It wasn’t on my goal sheet for the year, but I see no reason to hold back now.

Finally, these conferences are still primarily about learning, not just networking and speaking.  I still wanted to make time to attend sessions and add advance my own personal learning.  The sessions this year were better than last year and I got a LOT of great knowledge.  On top of that, all the rooms were packed with the exception of the very last slot on Friday.  My focus on administration and internals topics and saw some great sessions on extended events, integration processes, 2012 features (and, yes, Bob Ward pulled out the debugger), and other topics.  I also mixed in a couple development sessions to broaden my experience.  Overall, some great sessions from some top notch talent.

Sure, the Summit is bigger with larger names, but Rally is incredibly valuable on its own.  Since it’s a smaller conference, you can have more direct access to some incredibly smart people.  I had conversations with at least 4 MCMs , a number of other authors and MVPs, and members of the SQL CAT team.  I got guidance on professional development as well as technical problems, without the crush or general busy-ness that comes with the size of the Summit.

I want to reiterate that we can go through our daily work, study the blogs, and go to technical courses.  We’ll still be moderately successful in our professional lives.  Community involvement is what adds that special kick, that extra flavor.  It’s the hollandaise sauce that completes the Eggs Benedict and makes it more than just eggs, an English muffin, and Canadian bacon.  If you want to be that person in your company who makes a difference, who is recognized as being something more than a database administrator or developer, then conferences like these will not only give you the knowledge you need to succeed, but also connect you to the community that drives change and sets the trends.

I want to extend a huge thank you to the NTSSUG guys who made this all possible, like Sri(b|t), Tim(b|t), Ryan(b|t), and Dave(b|t) (as well as many others I KNOW I’m forgetting).  The fact that such a great event is hosted and supported directly by members of the community shows the strength of what PASS is doing.  I can only hope that reading this inspires you to go to your own local user group or attend a SQL Saturday.  Get involved, get connected, because if you aren’t you’re, quite simply, doing it wrong!

FILESTREAM on Server Core

A couple weeks ago, I did a post for T-SQL Tuesday on the Filetable, a cool new SQL 2012 feature. One thing I glossed over a little bit was enabling FILESTREAM for your SQL Server, where I just linked the MSDN article walking you through configuring the service using the Configuration Manager.  This is great as long as you have the GUI to use. However, I’ve said previously that I’m trying to do all my work (demos and blog posts) using SQL 2012 on Server core, which means no GUI. This makes it a leeeeeeeeeeeeeetle trickier and requires some more advanced techniques.

We need to flex our Powershell muscles for this. For me, this still means hitting the Google search to find the command syntax I need, though I understand it a little better. I found this excerpt from Wrox’s Microsoft SQL Server 2008 Administration with Windows PowerShell on Google Books.  The example shows, quite clearly, how to use Powershell to hit the WMI and the appropriate methods to enable FILESTREAM with the right perms and names.

I took the example there and reworked it slightly, mostly to change the namespace so that it will use the correct SQL 2012 interface.  It’s not much, when you get right down to it.  The core purpose is to create the WMI object and then use the EnableFilestream method (which may be hard to do if you don’t know the appropriate namespace to use):

instance="MSSQLSERVER"
$wmi=Get-WmiObject -namespace "root\Microsoft\SqlServer\ComputerManagement11" -class FILESTREAMSettings | where {$_.InstanceName -eq $instance}
$wmi.EnableFILESTREAM(3,$instance)

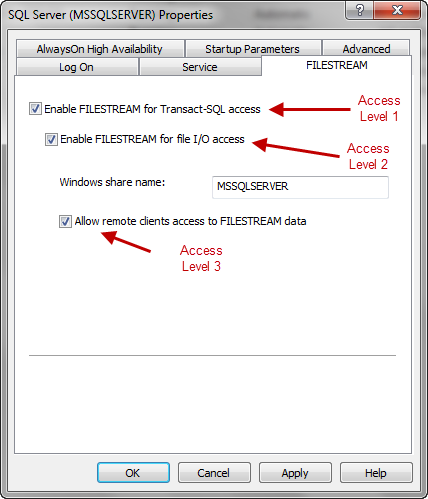
There are two parameters to the EnableFILESTREAM method. The first is access level, with 4 possible values that relate to how much access is granted to the filesystem. The easiest way to understand it is to relate the values to the settings in the GUI:

(Access level 0 is where no boxes are checked, essentially disabling FILESTREAM)

The second parameter is simply the share name, so in this example we would create\\<SERVER NAME>\MSSQLSERVER for our FILESTREAM objects.  Now, note that you still have to run the SQL to configure the SQL Server side of things (see my previous post).  This step just replaces activating the service properties from the Configuration Manager.

The other alternative to this method is to use the remote management tools to connect to the instance and alter the service settings through the GUI. I like this way better, though, because I have more control over it and I don’t need any additional connections or tools.

Edit:  I forgot to mention that this will require you to restart the SQL Service to apply (thanks Hayden Hancock for pointing this out in the comments).  Since we’re Powershelling it:

Get-Service $instance = “MSSQLSERVER” | Restart-Service