Art of the DBA Rotating Header Image

February, 2012:

Upcoming Presentations

More on the how later, but I wanted to let folks know about some presenting I’ll be doing over the next couple of months. I’m extremely excited for all of this speaking and the opportunities to share with the SQL Server community.

My partitioning presentation, Eating the Elephant, is now slotted for three upcoming events:

  • PASS Virtual Performance Chapter – For those following this group, Jes Borland-Schulz(b|t) did a great presentation on filegroups last week. Partitioning will be a natural follow up to this topic and I’ll be presenting to this group on March 22.
  • PASS Virtual Data Architecture Chapter  – Tom LeBlanc(b|t) asked me to give this presentation in April 19 after we talked at SQL Saturday #104 in Colorado Springs.
  • SQL Rally in Dallas – Seriously, I’m giddy about this. The SQL Community selected me as part of the Community Choice vote and I’ll be giving this presentation sometime during the conference. For those of you interested, I blogged about the first SQL Rally last year. It’s a great event, much cheaper than the Summit, and was a fantastic boost for my career. Even if you don’t come to see my presentation (I forgive you), you really should go.

I’m extremely excited and honored that people want to hear me speak. Presenting is a lot of fun for me and very rewarding, both on a personal and professional level. It’s a vicious cycle, too, because while I’m giving the same presentation three times over the next three months, I’ve already got 2-3 more presentation ideas bubbling around in my head that I plan to give by the end of the year. Stay tuned, 2012 is turning out to be pretty awesome!

Thursday Bonus Series: Core Mechanics Part One

I’m not sure how many folks out there have heard of Server Core yet. The quick and dirty is that it’s a version of Windows Server that has most of the GUI elements stripped out. No, Microsoft didn’t develop this version for technological masochists (like me), but wanted to provide administrators with a Server installation that was leaner, meaner, and more secure. By taking out the graphical portions, you get some nice benefits for your environment, including a smaller footprint for your install, tighter security, and reduced security patching (look at how many of those updates fix bugs with IE).

Up until SQL 2012, SQL Server was too dependent on the graphical libraries in Windows to run on Server Core. Now with the next version, we get the support to install SQL Server to Core, something I’m pretty excited about it. I went ahead and created a VM installation of Core with SQL 2012 and then provide some blog posts to walk you through the process so that hopefully you can do the same in your lab environment.

First things first

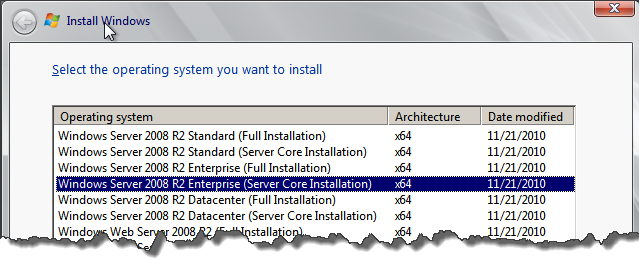
Before we do anything, we must (of course) get Core installed on a VM. For information on setting up a blank VM, check out my virtualization posts. Then just fire up the machine with your OS install and make the usual selections. Well, usual until you get to the install version:

I’ve gone ahead and selected the 2008 R2 Enterprise version, Server Core installation. There’s also corresponding Core installations for the other versions, so go with what works for you. Once you click ‘Next’ here, the install will happily churn along (go progress bar, go) until it’s ready for you to enter an administrator password. Once that’s set, you’ll boot into the OS and see…

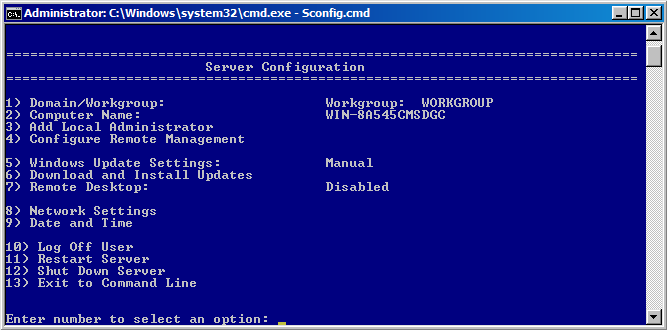
BAM! Command line! “But wait!” you say, “There’s so much to do before I’m ready for this!” Server Core hears ya’, Server Core don’t care. Fear not, though, because with Server Core, we get a utility that allows us to do some of the basic configuration of your machine. Just type ‘SConfig.cmd’ at the prompt and you’ll see:

Ah, much more comfortable, right? The utility is easy to use, just select and option and respond to the prompts. Using this utility, I’ll do the following:

  • Change my computer name to ‘ALBEDO’
  • Update Windows with all current patches
  • Go into Network Settings and set my IP as 192.168.56.102 (Static)
  • Confirm that my date and time settings are correct.
  • Create a local admin account – ‘mfal’ (Because only bad people use the default Administrator)

This is just the start, of course. We still have several things to do to prep our machine for SQL 2012. In the next post, I’ll cover the basic OS setup, including setting up Powershell as our default shell, enabling the firewall to support SQL Server, and making sure we have the correct Windows features installed.


VirtualBox Networking

There was a request over the Twitterverse for me to blog a little more on my experiences with VirtualBox, which I use for creating lab SQL Server boxes for demos and play around on. I figured I’d start with some tips and tricks on how I’ve configured networking for my virtual machines.

A brief word about my setup: I configure my environment so my virtual machines work like servers and I connect to them as if they were a remote computer. More or less how you should do it in your workplace, except that I have no domain controller. The biggest drawback so far is that I can’t do Windows authentication and I have to log into these SQL instances with a SQL login, but otherwise the setup works just dandy.

I’m going to retract some things I said in my previous Virtual Box post (almost a year ago, yeesh!). I had said that I thought bridged networking was the way to go. This would work fine in a controlled environment, but when I’m working on my laptop I like to keep my guests contained, so I go with a slightly different setup. First off, let’s review:
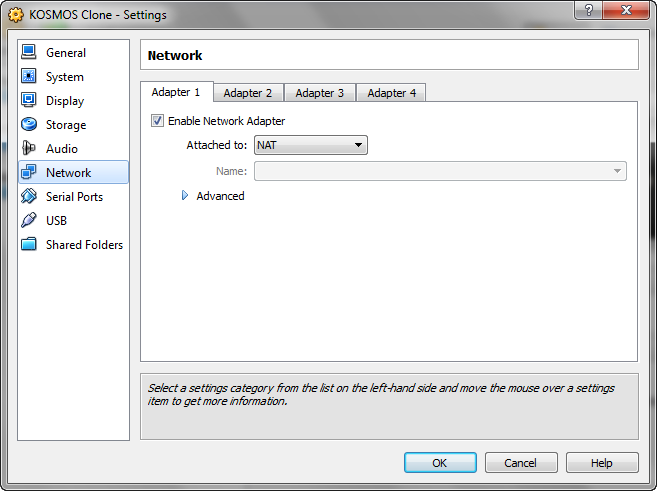
These are our Networking options in Virtual Box. If you want to know all the options, check out the Virtual Box documentation (it’s really quite good). You can have up to 4 different network adapters for your virtual machine, which gives you a lot of flexibility. Before I had one adapter set to bridged networking, now I make use of two adapters (before, I only used one) to give me a better setup.

The first adapter is set simply to NAT (Natural Address Translation), which allows my virtual machine to pass through my network adapter straight to the intarwebz. This allows me to get all my updates and maintaining a level of insulation from the rest of my network. It’s easy enough to set up, simply enable the adapter and set the drop down to NAT.
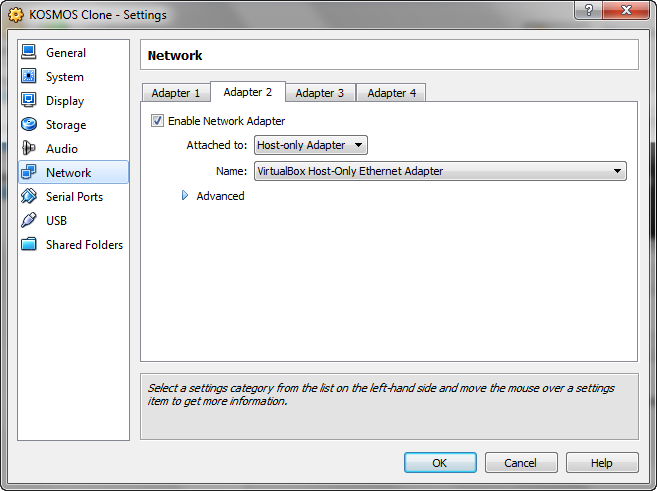
On the second tab, I set up a mini-network for my host computer and any other VMs I have on my host. To do this, I’ll enable the adapter and select “Host-Only Adapter”. VirtualBox has some special drivers that are installed to your host that allow for this communication. This allows me to allow for machine to machine communication without these machines interfering with my actual network.

If you’re familiar with networking, you know that you have to have something managing the IP addresses and communication protocols. This is configured and handled by VirtualBox itself. To manage this, open up the main VirtualBox console and select “File->Preferences”. Within that preferences dialog, then select network. You’ll then see a configuration screen with a listing for the VirtualBox Host-Only Ethernet Adapter. You’ll also see a little screwdriver on the right which will allow you to edit your Ethernet settings.
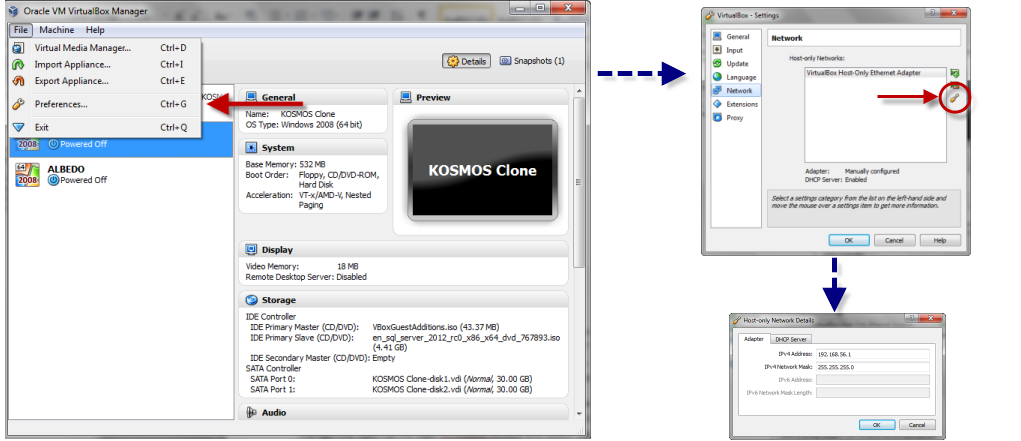
Within these settings, you have a couple options for your Host Only network. On the first tab is your IP address and Subnet for your host machine. This is NOT the same as the IP Address for the rest of your network, this is only how your machine is visible to the mini-network you’re setting up for your VMs. On the second tab, you have DHCP server settings for your network. Basically, you are setting up your host machine to be the DHCP controller for your mini-network.

Now, 99% of the time you will not need to change any of the settings. I use the defaults and they work perfectly fine, but knowing where these settings are gives you some options. The biggest thing you’ll see here is the IP set your network will be based on (default 192.168.56.x), so when you start trying to communicate between machines, knowing what those IPs are will make them easier to fine.

Now, what’s missing from this is some sort of DNS server so that you can reference your VMs by name. Unfortunately, to manage this, you need to go old school here and update your HOSTS file. You can find your HOSTS file buried in the Windows system directory, but once you’ve found it, it’s very simple to edit. In Windows 7, you can find it under C:\Windows\System32\drivers\etc and to view the contents, just open it up in Notepad (or be like me and use Notepad++) as Administrator.

WARNING: This is a SYSTEM file, take care in editing it and make a backup! 
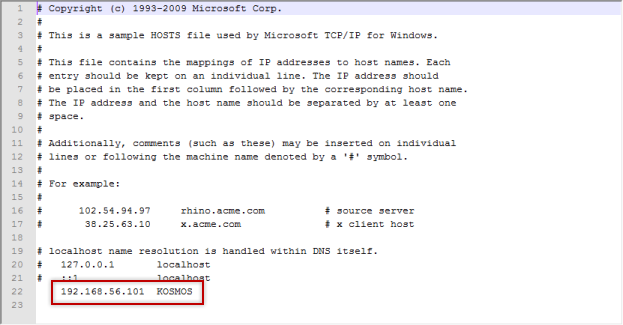
Once you have file open, add a line with your guest machine’s IP and the name you will reference it by. As you can see, I have an entry in mine for KOSMOS at IP 192.168.56.101. The gotcha here is if you’re using DHCP, your guests might grab a different IP than what you have in your HOSTS file, so what I’ll typically do after I get my guest up and running is take the IP the machine grabs from DHCP and make it static.

So after all of this, I can fire up my VM hosting my SQL instance, and call the instance by name on my host. It may seem like a lot of work, but it’s not so bad for me once I get in the habit and makes my life much easier when working with my VMs.
 

Professionals have standards

A couple weeks ago I wrote about establishing Service Level Agreements (SLAs) before you actually start building out a monitoring solution for your environment. These SLAs help you define what you need to be monitoring and give yourself some control when dealing with the non-DBAs in the company. Now that these expectations have been set on service, your next step is to define the other side of the equation: What you should expect from the databases you must manage. After all, we can promise a level of service, but it’s difficult to meet that promise if there are underlying issues with a database. So now we need to define database standards.

Remember that SLAs are agreements, where both sides have come to an understanding about service expectations. Once we have these, we have to tell developers and third party solutions what is required of them so that we can meet these expectations. Do you want to be saddled with another poorly designed database or not have the hardware to support your transaction load? With a standards document, we can give our non-DBAs clear and certain documentation of what our systems should look like.

Feelings?

Just like many other things we do as DBAs, we know what a good database looks like. The problem is no one else does. Many developers don’t understand the impact of not having a clustered index or the value of defining foreign keys. Executives get confused by disk requirements or backup strategies. Often, because they don’t know what we know, decisions will be made without these considerations. By providing documented standards, the folks who don’t “get it” don’t have to, they can refer to the standards document. If they don’t, we have that document to show them why we can’t support an application the way they want.

Unfortunately, standards are a little harder to define because there are just so many things to go in to what makes a database. This is why we want to start with an SLA framework, so we have some targets to use for building these standards out. We also need an understanding of our environments and what sort of systems our business can and will support (after all, we can’t all get PDWs). The key is to start with what you know and, as you start to lay out these requirements, your standards will start to fall in to place. Consider these examples as bread crumbs to get you headed in the right direction:

  • Database file layouts: Require separation of your database files, so that you can have documentation to back up disk requests for servers.
  • Naming standards: Keep your developers from creating those pesky “sp_” stored procedures. Also, help keep things organized across your environments.
  • Archiving: While you may not be able to explicitly define an archiving strategy, by putting requirements on what kind of data retention you can support , you can proactively manage your disk usage and performance.
  • Indexing strategy: Keep those heap tables from cluttering your database as well as provide guidelines to your developers so that they don’t over-index.

Keep in mind this is not anywhere close to an exhaustive list of what you can build standards on. It will probably take you a fair amount of work to construct your standards document, but it is effort well spent. Remember that you’re not only trying to educate the non-DBAs in your company, but providing a safety net as well for yourself.

The difference is…

We all hate documentation. It is tedious work that keeps us away from all the fun stuff. A lot of times, it feels like wasted work because who reads it, right? The thing is, people will read your documentation, if you make it available. You read a lot of blogs? That’s just us, documenting. So if you create your SLAs and standards and publish them internally, people will pay attention. And if they don’t? Well, you will have a starting point when you say “no”. “Sorry, that design is not supported by our published standards,” has a lot more weight when you actually have published standards.

The developers, the executives…they just want things to work, but they won’t give you what you need unless they know what you need. It’s your job to be proactive and create these policies, because no one else will do it for you. You hear it a lot, how you should be a proactive DBA, not the one that’s always fighting fires, and to do that you need a plan. SLAs and standards, these are your plan, and I challenge you to start on them today so you can take back control of SQL Server and your DBA life.

P.S.  Thematic content for the post headings can be found here (PG-13ish).

Excuse me sir, are you using that partition?

So last week we had to puzzle out a little weirdness at work. One of our development teams is working to implement partitioning and they came to us about their scheme. They had applied a partitioning scheme, but it wasn’t being used by their queries. Their scheme was pretty simple, but the oddity was that they had partitioned on a nvarchar(10) field. Best practice is to use an integer, though I’ve seen date fields used as well. Though I knew that you could partition on a character field, I usually avoided it.

Now, using an nvarchar field shouldn’t have altered the query process that much, right? This is where it got odd, because what we were seeing was that a query on that partition scheme was still querying across all partitions. Here’s the query and what we were seeing in the query plan:

One of the advantages of partitioning is to improve query performance with range scans, so that the engine will only query across partitions. However, even though our query was specifically using the partition key, the engine was still querying across all partitions for its result. And we were specifically using a nvarchar value for the query criteria, so it shouldn’t be doing any sort of conversion, right? Well, that’s where you (and we, as well) would be wrong. We tried the query again, this time with an explicit conversion to nvarchar(10):

Bang! By converting it to the same datatype as the partition key, the query engine can now properly take advantage of our partitioning. The results are further reinforced by looking at the query costs of our two queries:

  • Query 1: 0.0131291
  • Query 2: 0.0032831

What just happened?

What’s going on behind the scenes is that in query 1 our predicate datatype does not match the datatype of our partition key. The SQL Server engine sees the query predicate of CUSTOMERID=N’2’ as an nvarchar(4000), not as an nvarchar(10). Just take away the “N” in front of our string value and have it declared as a character string and force an implicit conversion. Then, if you look at the query operator, you’ll see SQL Server do a CONVERT_IMPLICIT to nvarchar(4000), not a nvarchar(10).

I also went through this exercise using varchar as my datatype and got the same results. If I simply declared the predicate as CUSTOMERID=’2’, my query would seek across all partitions. If I used CUSTOMERID=convert(varchar(10),’2’), then I would only have the one active partition.

I’m not sure if this is a bug or working as intended, but there’s definitely a couple of lessons we can take from this:

  1. To best take advantage of querying across partitions, you need to make sure your query criteria is explicitly the same datatype as your partition key. Otherwise, the engine can’t make use of your partitioning.
  2. Obviously character strings have some weirdness about them for partitioning, so it’s best to avoid them for partition keys.
  3. Mike is weird for geeking out about this stuff. Seriously. My co-workers gave me some odd looks as we were puzzling this out.