Art of the DBA Rotating Header Image

Virtualization

VirtualBox Networking

There was a request over the Twitterverse for me to blog a little more on my experiences with VirtualBox, which I use for creating lab SQL Server boxes for demos and play around on. I figured I’d start with some tips and tricks on how I’ve configured networking for my virtual machines.

A brief word about my setup: I configure my environment so my virtual machines work like servers and I connect to them as if they were a remote computer. More or less how you should do it in your workplace, except that I have no domain controller. The biggest drawback so far is that I can’t do Windows authentication and I have to log into these SQL instances with a SQL login, but otherwise the setup works just dandy.

I’m going to retract some things I said in my previous Virtual Box post (almost a year ago, yeesh!). I had said that I thought bridged networking was the way to go. This would work fine in a controlled environment, but when I’m working on my laptop I like to keep my guests contained, so I go with a slightly different setup. First off, let’s review:

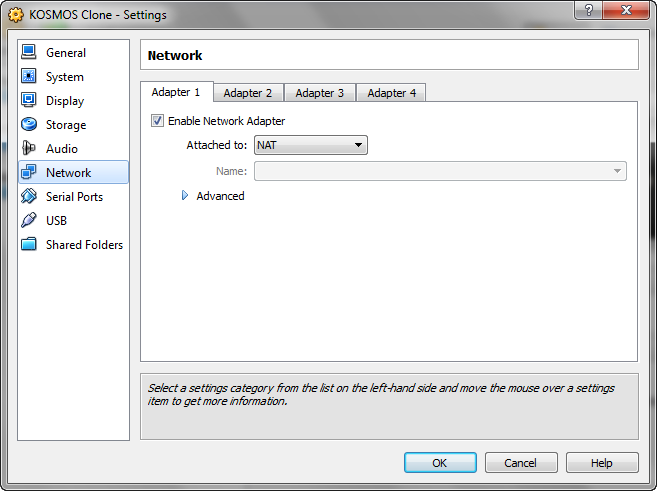
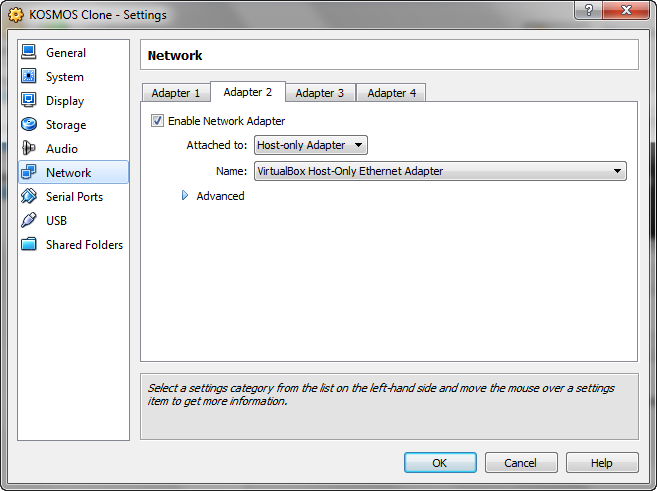
These are our Networking options in Virtual Box. If you want to know all the options, check out the Virtual Box documentation (it’s really quite good). You can have up to 4 different network adapters for your virtual machine, which gives you a lot of flexibility. Before I had one adapter set to bridged networking, now I make use of two adapters (before, I only used one) to give me a better setup.

The first adapter is set simply to NAT (Natural Address Translation), which allows my virtual machine to pass through my network adapter straight to the intarwebz. This allows me to get all my updates and maintaining a level of insulation from the rest of my network. It’s easy enough to set up, simply enable the adapter and set the drop down to NAT.

On the second tab, I set up a mini-network for my host computer and any other VMs I have on my host. To do this, I’ll enable the adapter and select “Host-Only Adapter”. VirtualBox has some special drivers that are installed to your host that allow for this communication. This allows me to allow for machine to machine communication without these machines interfering with my actual network.

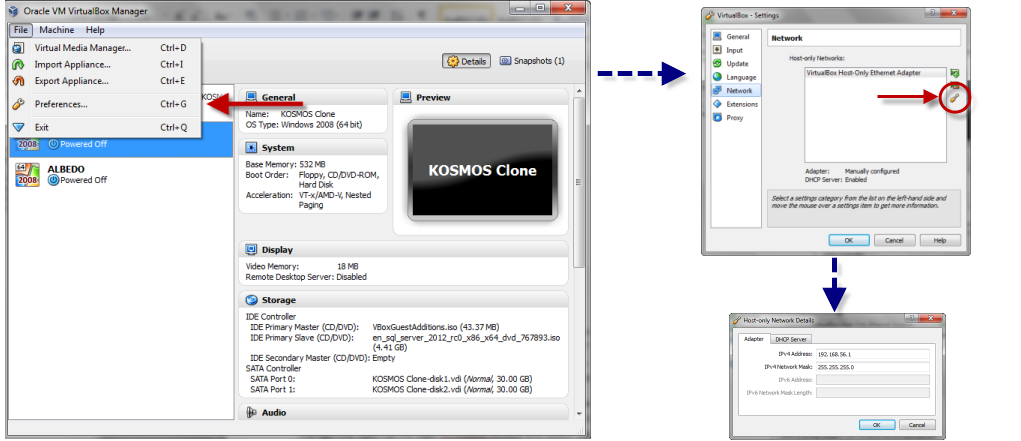
If you’re familiar with networking, you know that you have to have something managing the IP addresses and communication protocols. This is configured and handled by VirtualBox itself. To manage this, open up the main VirtualBox console and select “File->Preferences”. Within that preferences dialog, then select network. You’ll then see a configuration screen with a listing for the VirtualBox Host-Only Ethernet Adapter. You’ll also see a little screwdriver on the right which will allow you to edit your Ethernet settings.

Within these settings, you have a couple options for your Host Only network. On the first tab is your IP address and Subnet for your host machine. This is NOT the same as the IP Address for the rest of your network, this is only how your machine is visible to the mini-network you’re setting up for your VMs. On the second tab, you have DHCP server settings for your network. Basically, you are setting up your host machine to be the DHCP controller for your mini-network.

Now, 99% of the time you will not need to change any of the settings. I use the defaults and they work perfectly fine, but knowing where these settings are gives you some options. The biggest thing you’ll see here is the IP set your network will be based on (default 192.168.56.x), so when you start trying to communicate between machines, knowing what those IPs are will make them easier to fine.

Now, what’s missing from this is some sort of DNS server so that you can reference your VMs by name. Unfortunately, to manage this, you need to go old school here and update your HOSTS file. You can find your HOSTS file buried in the Windows system directory, but once you’ve found it, it’s very simple to edit. In Windows 7, you can find it under C:\Windows\System32\drivers\etc and to view the contents, just open it up in Notepad (or be like me and use Notepad++) as Administrator.

WARNING: This is a SYSTEM file, take care in editing it and make a backup! 
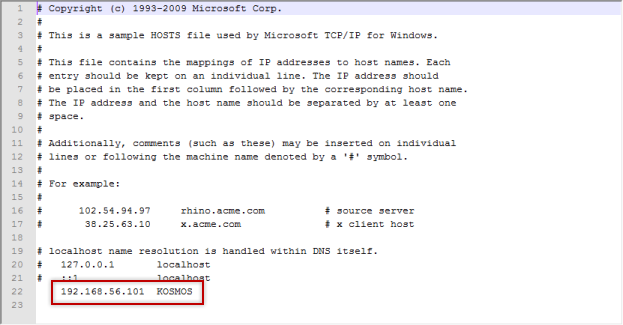
Once you have file open, add a line with your guest machine’s IP and the name you will reference it by. As you can see, I have an entry in mine for KOSMOS at IP 192.168.56.101. The gotcha here is if you’re using DHCP, your guests might grab a different IP than what you have in your HOSTS file, so what I’ll typically do after I get my guest up and running is take the IP the machine grabs from DHCP and make it static.

So after all of this, I can fire up my VM hosting my SQL instance, and call the instance by name on my host. It may seem like a lot of work, but it’s not so bad for me once I get in the habit and makes my life much easier when working with my VMs.
 

Virtualization at Home

As tech geeks, we love to poke, prod, and play with all sorts of new software. We love to tinker. We love to explore. Most of all we love to be able to do all of this without wrecking our own machines.  Having a sandbox where it’s easy to play and not worry about rolling back changes or uninstalling software is ideal, but that isn’t so easy to do on just one machine and very few of us have 5-10 computers that we can wipe/reinstall at a moments notice. That is, until we start building our own virtual servers at home.

I’m sure most of you are familiar with virtual servers now. I always considered it heavy hitting stuff, enterprise level tech that I really couldn’t use at home. Well, at least up until I discovered VirtualBox. Since then, I have fallen in love with this particular piece of software and I’m trying to use it as much as possible. Walk with me for a bit and I’ll show you the some of what I learned when I created a machine to host SQL Denali CTP 1. Hopefully it helps you enough so you can set up your own virtual host and take your learning to another level.

Installation

VirtualBox is available on pretty much any platform and you can download it for Windows, Linux, and Mac OS X. I’ve installed it on my XP laptop and an Ubuntu 9.0 desktop I have at home, finding both installations to be pretty straightforward. For Windows, just download the latest setup executable and fire it off. You’ll walk through the typical series of setup screens and there aren’t really any options to worry about. Ubuntu was even easier, just typing in sudo apt-get install virtualbox-4.0 with my admin password(’cause I’m a su-doer not a su-don’t-er) and off to the races.

Quick Tour

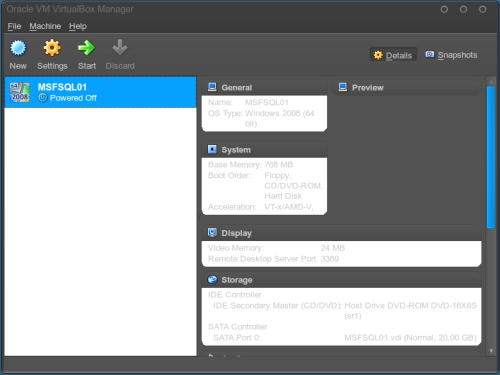
With the installation complete let’s take a quick look at the interface:

VirtualBox Main Screen

The three big buttons there at the top are really what we want to be concerned with:

  • New – Create a new machine
  • Settings – Look at the setup of the selected machine
  • Start – Power on the selected machine.

As you can see, it’s pretty simple. Of course, the devil is in the details, so let me show you how I got a machine ready for Denali.

Creating a new machine

The wizard for creating a new machine is very good, just select the OS type and version that’s appropriate (for Denali, I did Windows 2008 64-bit) and go with all the defaults. Some things to keep in mind:

  • Base Memory – This is only the minimum amount of memory VirtualBox will reserve for the machine. The virtual machine will grab whatever free memory is available on the host, so keep this in mind if you get specific with the memory settings on your SQL Server install on the virtual machine. If running multiple virtual machines, be careful that your total base memory allocations don’t exceed total memory on the box!
  • I typically do dynamically sized storage. Unless you have a space crunch on your box, it should be fine to allow it to grow.

Starting a new machine

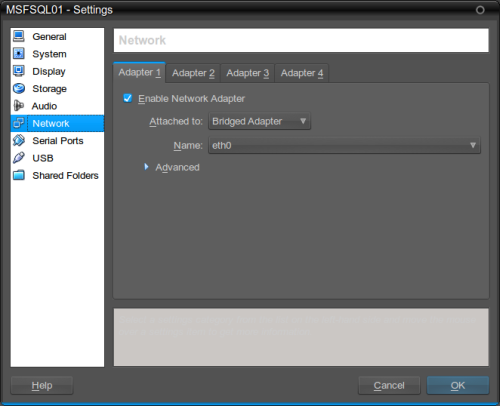
Before you actually start the machine, there’s two items you’ll want to look at first. The first thing to consider is the virtual machine’s network settings. VirtualBox offers you four options (found under Settings->Network) which are described in full detail on the manual page.

VirtualBox Network Settings

While in all cases your virtual machines will piggy-back on the host’s network card, the setting you select will determine how it shows itself to the world. I won’t get into the details of each specific setting, but this is the place where you do not want to used the default setting of NAT (Natural Address Translation). Instead, I suggest you go with one of these two settings, depending on what you intend to use the machine for:

  • Bridged Networking – This allows the machine to appear as any other machine on your local network. It can join domains and workgroups, as well as receive an IP address from your network DHCP host. I usually use this setting, since at home my virtual host machine is different than the machine where I sit and do my work.
  • Host-only Adapter – This ones a little trickier to setup, but is useful if you’re running VirtualBox on a laptop that you’re doing demos on. The virtual machine will join a network that is only visible to the host and virtual machines on that host. At this point, VirtualBox itself will act as the DHCP provider, which is setup under File->Preferences->Network.

The other gotcha to address only applies to 64-bit machines. When I created my machine for Denali, I kept getting an error message about “VT-x/AMD-V hardware acceleration has not been enabled”. After some Googling, I discovered that this is a BIOS setting and you’re basically enabling your CPU to handle virtualization. Now it’s called different things for different motherboards, so you’ll need to do a little research on yours, but for my Asus board (M4785-M) I had to enable Secure Virtual Machine Mode under Advanced/CPU Configuration. Note, you’ll only have to enable this once on your hardware.

Now we can start the machine. There’s a wizard to guide you through the first run, which all you’re going to do is tell it where the CD-ROM drive is so it can find your install media. I didn’t do anything fancy here, like mapping it to a shared folder or a network drive, and it just worked for me. On both Windows and Ubuntu, VirtualBox had no issues finding the drive and using it on boot of the new machine.

Installing the OS and software

From this point forward, everything was a normal Windows and SQL install. I used a demo copy of SQL Server 2008 R2 and had no issues with the install. While I didn’t join the virtual machine to a domain (I’m not that fancy at home), it found my local workgroup just fine(since I was using bridged networking).

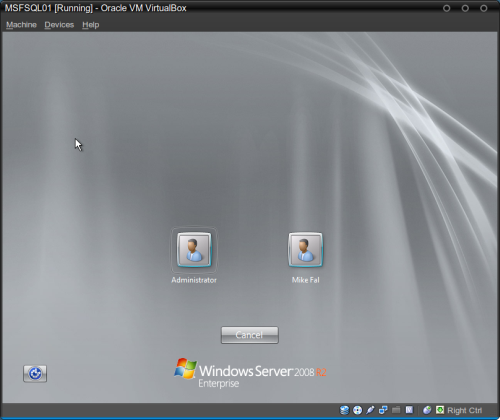
Virtual Box - Running!

The only other setup piece I had to do was to make sure the the network configuration within the virtual machine was setup properly.  First off, I disabled the Windows Firewall on the virtual machine. I’m sure with some time you could configure it appropriately, but I’m a DBA, not a network administrator.  Then I went into the SQL Server Configuration Manager and made sure Named Pipes and TCP/IP protocols for my instance were enabled.

When you’re using the virtual machine on the host (not RDC-ing into it, which is what I usually do), there’s a couple tricks to keep in mind:

  • The cursor will lock itself into the virtual machine when you click on it. To release the cursor from the virtual machine back to the host, press right CTRL.
  • CTRL+ALT+DEL is not registered within the machine itself due to the VirtualBox application. To send that command to the virtual machine, release the cursor, then in your toolbar go to Machine->Insert CTRL+ALT+DEL.

This should help you get started with virtual machines at home. While it’s not specific to SQL Server, I’ve found this tool to be immensely helpful for building demos at home and testing out new versions of the software. Hopefully this will be just as useful to you. Feel free to contact me, either by email or twitter me with any questions or experiences you’ve had using virtualization at home.