Art of the DBA Rotating Header Image

SQLPS

A Month of SQLPS: Of Drives and Shortcuts

When we think of file systems and drives, we know that we can navigate to almost anything in a network by using the Universal Naming Convention (UNC) path. This usually takes the following form: \\SERVERNAME\SharedFolder. Now, may be cumbersome to always type in this path or perhaps you want to always make use of this share, but commonly we will map these drives to a local drive letter. To do this in Powershell, we would use the New-PSDrive cmdlet:

#Mount a remote share to the Z drive 
New-PSDrive -Name Z -PSProvider FileSystem -Root '\\PICARD\C$\Backups'

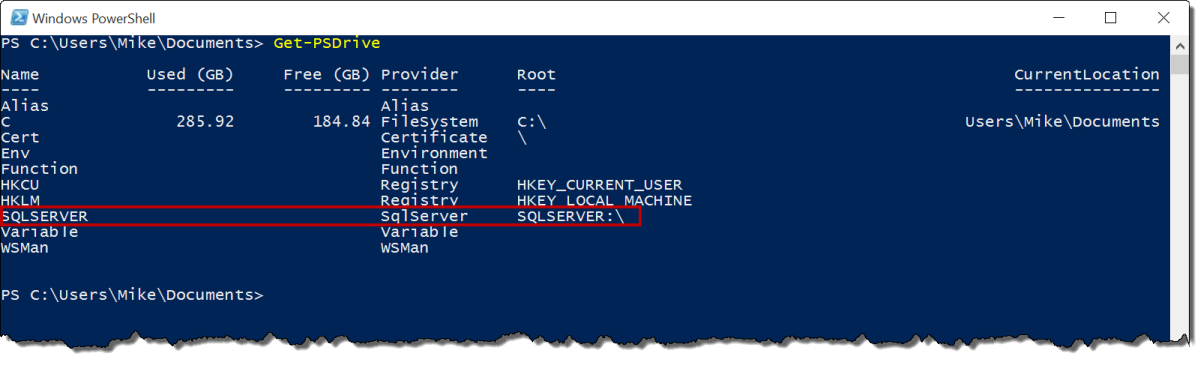
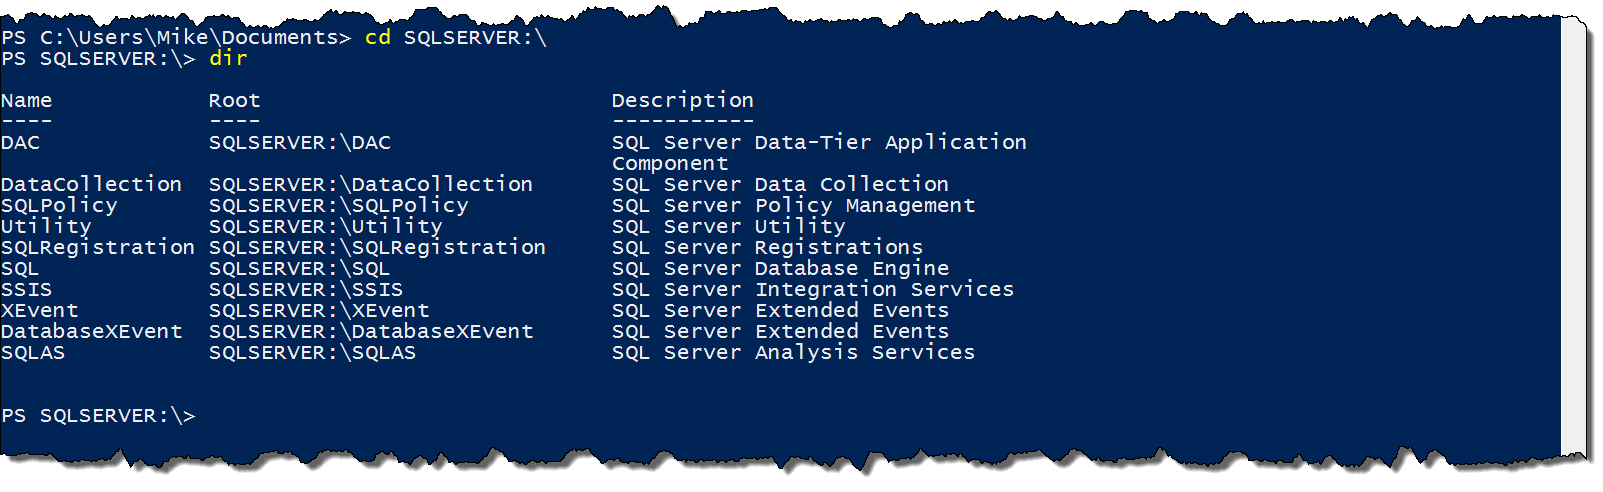
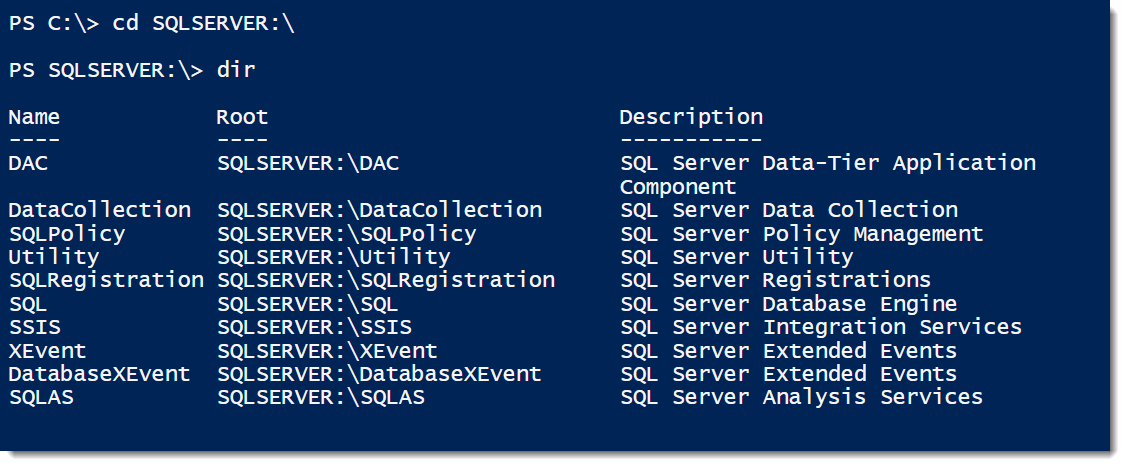
Now here’s where things get cool. If providers are meant to give us an interface that behaves like a file system, doesn’t it stand to reason that we can use the provider to mount parts of SQL Server as their own drives? This opens up a new area of management of SQL Server using Powershell.

I’ve blogged before about using the SQL Provider and Central Management Server as a driver for running my Powershell scripts. I love this trick as it gives me a lot of flexibility for managing my environments. Unfortunately, it can get a little cumbersome always browsing down to that path. So let’s mount it as a drive and make our lives a little easier:

New-PSDrive -Name CMS -PSProvider SqlServer -Root ‘SQLSERVER:\SQLRegistration\Central Management Server Group\PICARD’
dir CMS:\
Get-PSDrive | Format-Table Name,Root -AutoSize

SQLPS-7-1
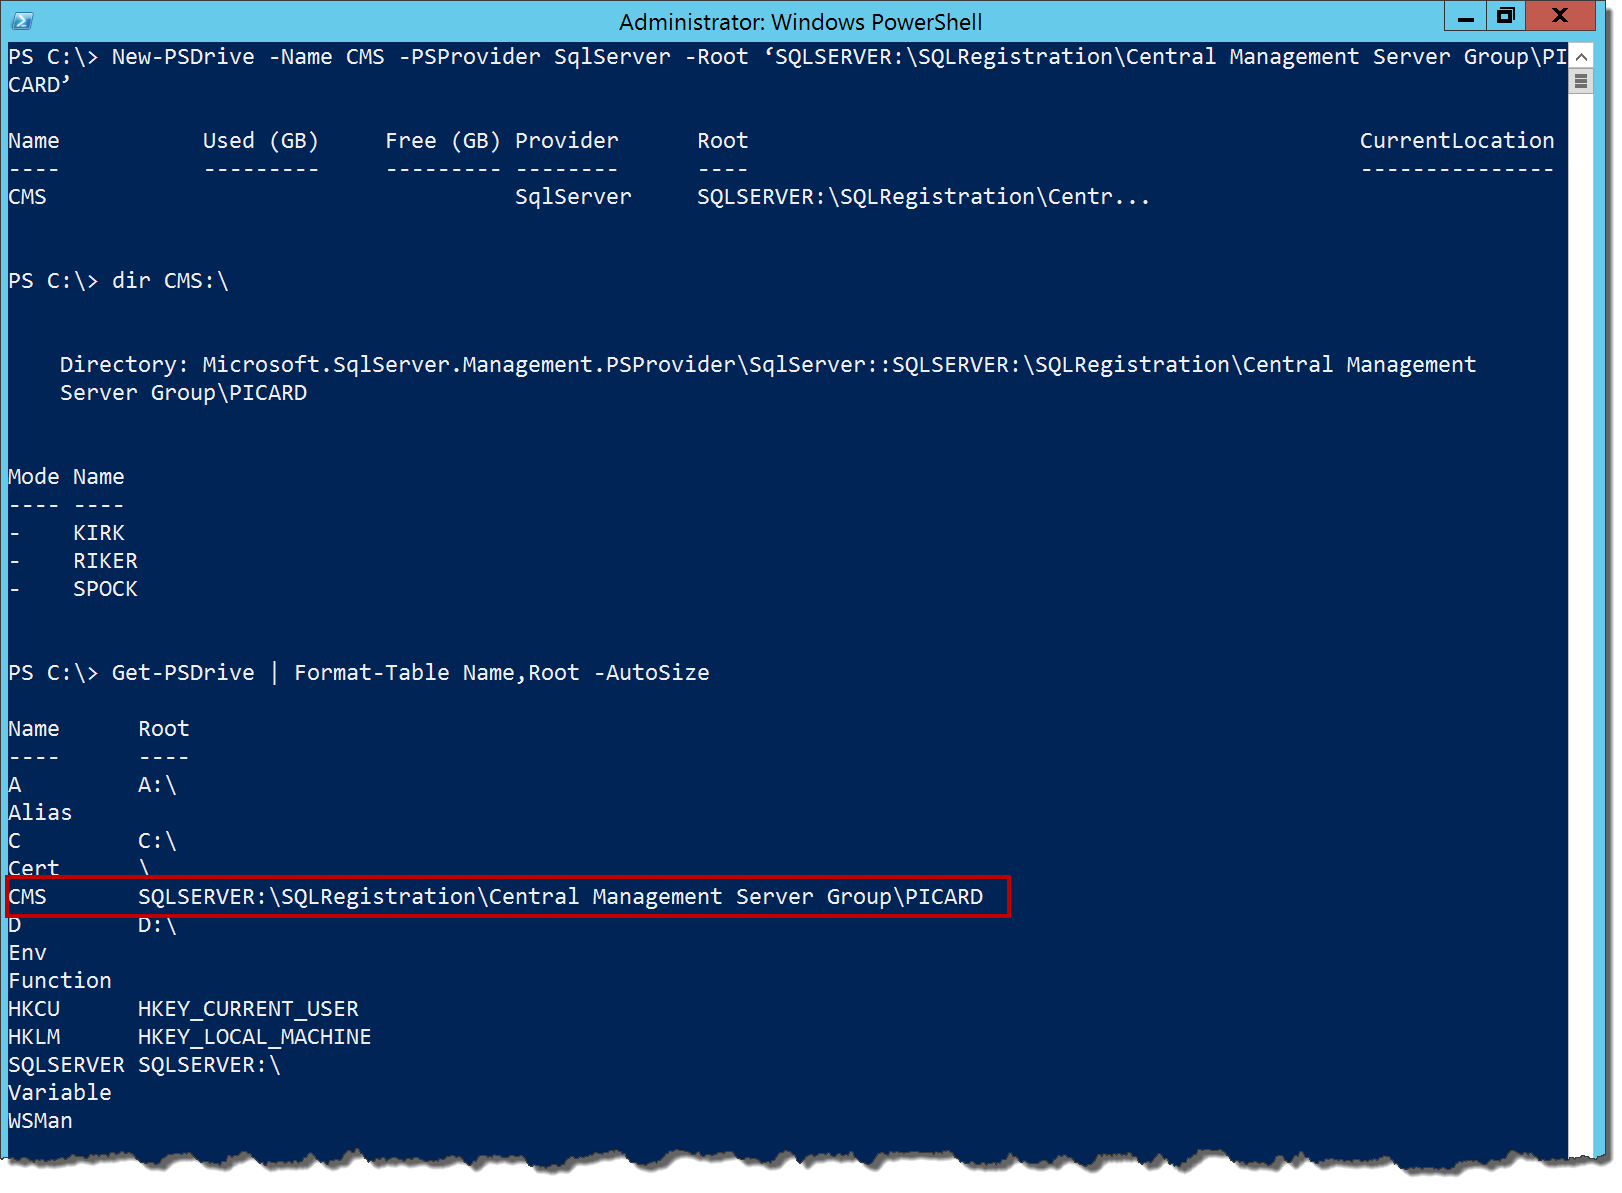
Now we have a handy and easy way to reference the servers in our CMS. As with any other mapped drive, this mapping is only good for as long as we are in this current Powershell session, but there are options in the New-PSDrive cmdlet that will allow us to persist this mapping globally, as well as define other options.

One of those other options is using a different credential to connect to the mapped target. Remember how yesterday we talked about the security context of the provider and how it passed through your current user? Well, by creating a new mapped PSDrive for a SQL component, we can connect to a database in the provider using a different context, including a SQL login.

Doing this takes a little more work, but doable. What we need to do is create a credential object for our SQL login, then create the New-PSDrive with that credential. Let’s try it out:

#Create a SQLTest2 login on the server and add it to AdventureWorks2012 db_datareader role
$pw = Read-Host 'Enter sqltest2 password' | ConvertTo-SecureString -AsPlainText -Force 
$cred = New-Object System.Management.Automation.PSCredential ('sqltest2',$pw) 
New-PSDrive -Name SQLTest2 -PSProvider SqlServer -Root 'SQLSERVER:\SQL\PICARD\DEFAULT\' -Credential $cred

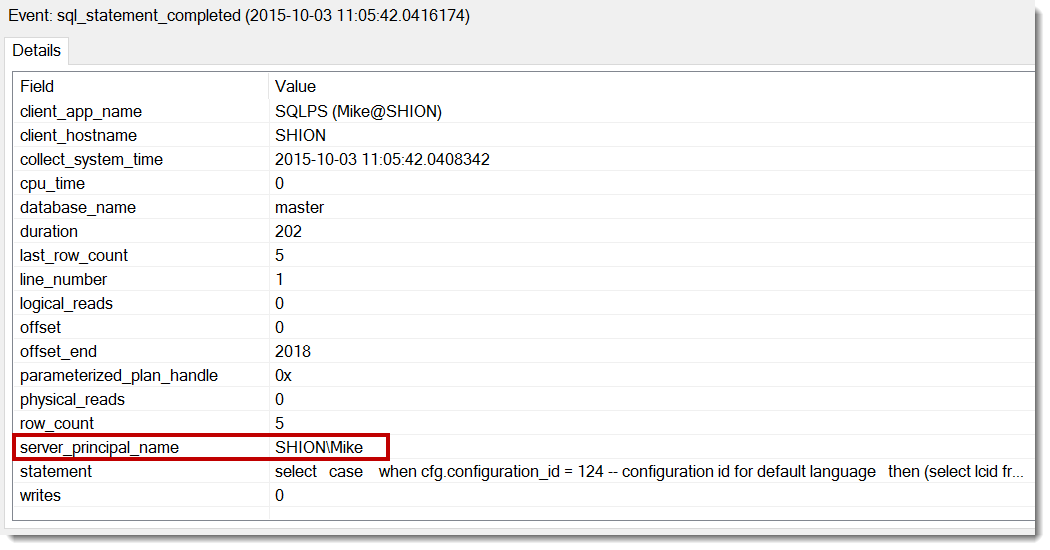
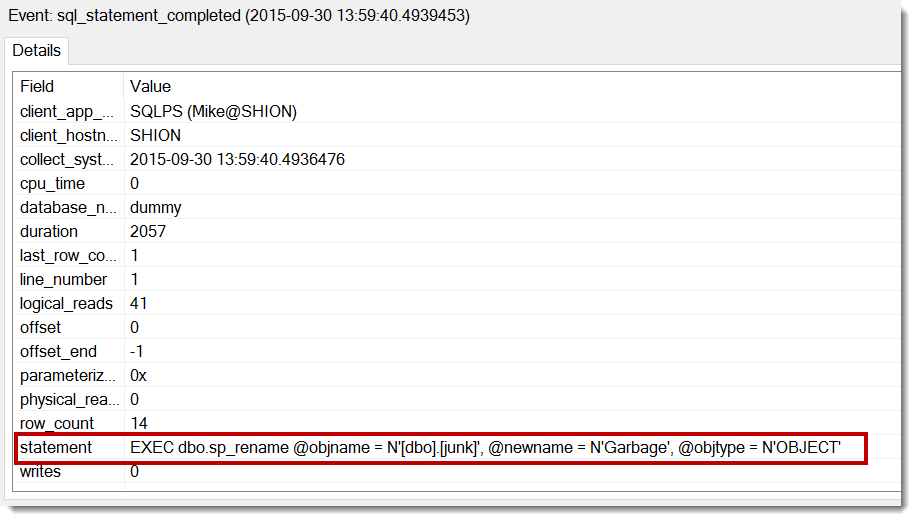
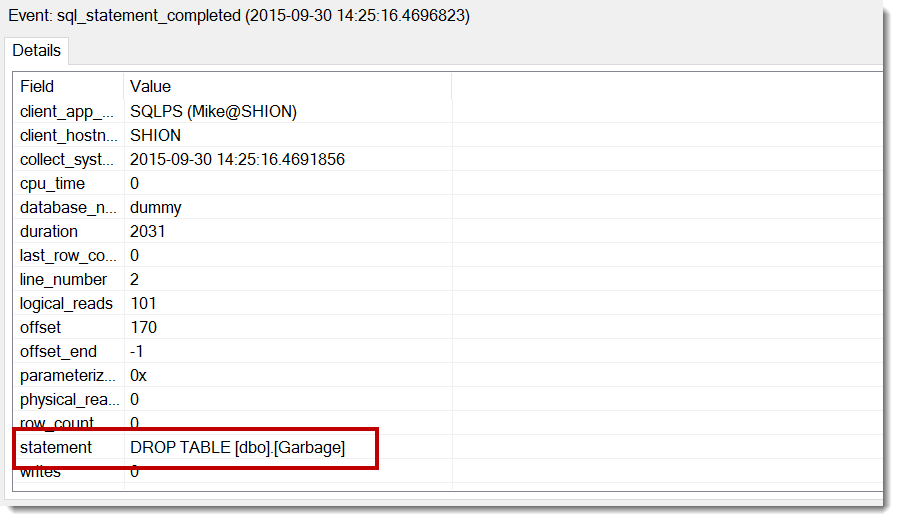
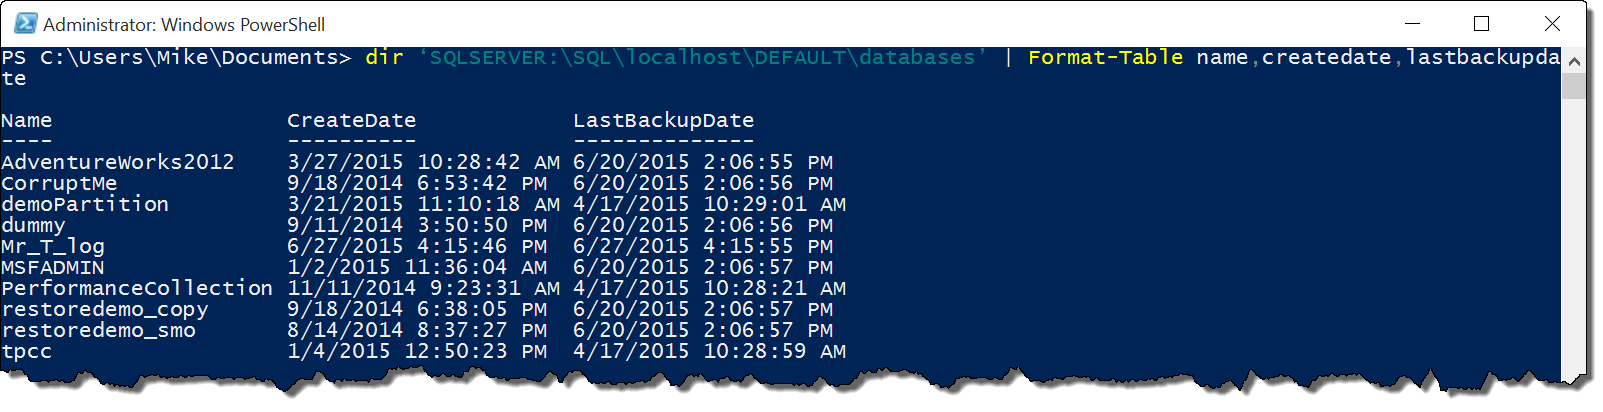
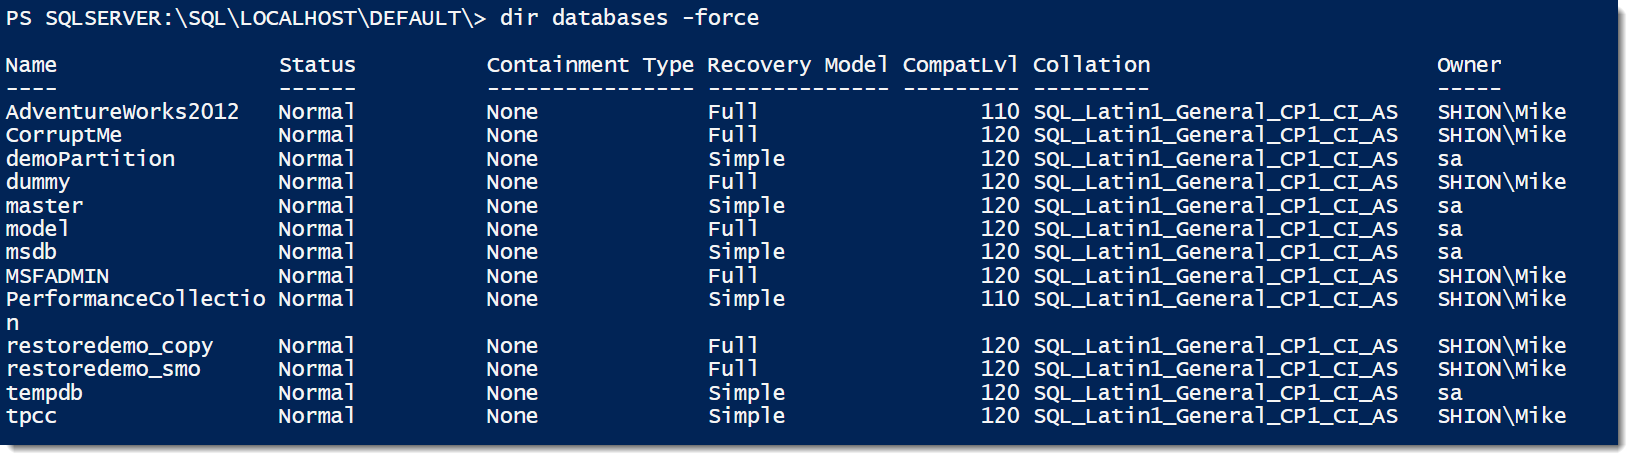
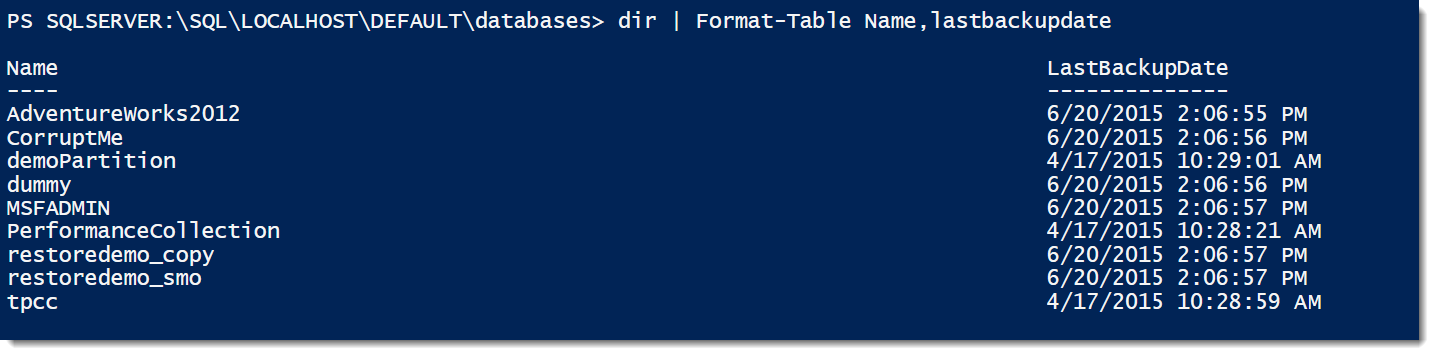
Now if we do a lookup on the databases and check our extended events info, we should see exactly how we’re connecting to the information:

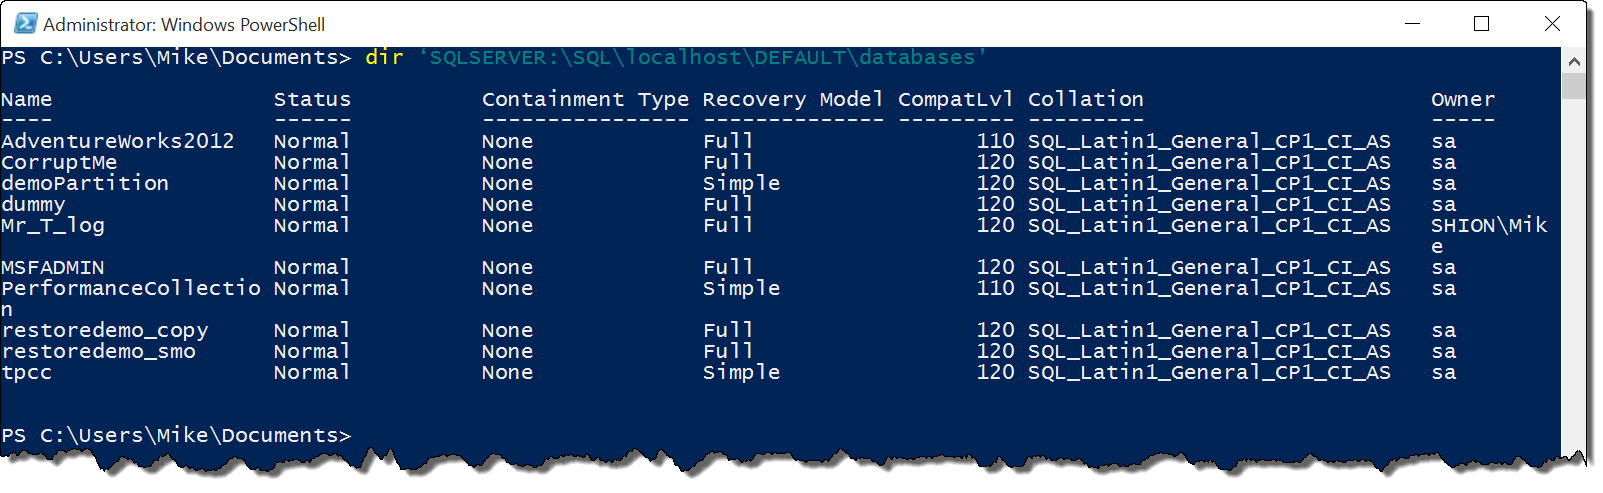
dir SQLTest2:\Databases

SQLPS-7-2
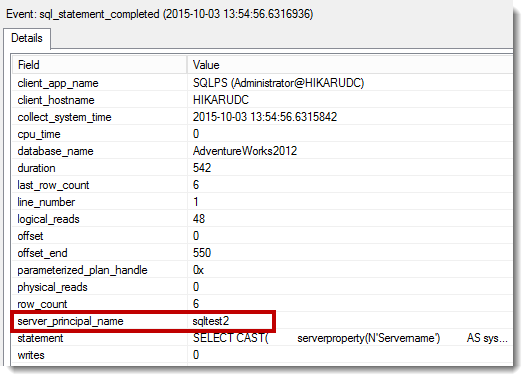
This clearly shows that any work we do through this new mapped drive is done via the context of the SQL login we created the drive with. While the default behavior is going to be using objects in the provider with our default Windows login, it is necessary to know that there you can connect to SQL assets using other logins and contexts. Hat tip to Shawn Melton(@wsmelton) for showing me this technique. His blog covers it in a little more detail along with some other tips and tricks.

Mapping drives can really help us customize our Powershell environment for how we want to manage SQL Server. Mapping components we use frequently can aid us in scripting and give us short cuts to the things we use frequently. It is also good to know that these tools also provide different paths for security management while maintaining the integrity of our SQL servers.

Next up, we’ll look at some practical applications for using the provider. We’ll dip our toe a little into the SMO, but we should be able to keep it pretty basic. There’s a lot of depth to the provider, so it is easy to get lost. The focus here should be understanding the foundation, allowing you to build on it for your own scripts and processes.

A Month of SQLPS: Security

One of the frequent questions I get about the SQL Server provider is “Who is it when it connects to the SQL Server?” Security is important to DBAs and, as we’ve seen, there’s a lot of things that can be done through the provide that can be dangerous if we’re not careful. Just like any other tool, we want to make sure that the user in the SQL Server provider can only do what they are allowed to do.

Let’s go back to our extended events session. Since I didn’t share it Friday, here’s the T-SQL for creating the session:

CREATE EVENT SESSION [SQLPS_Tracking] ON SERVER
ADD EVENT sqlserver.sql_statement_completed(
ACTION(package0.collect_system_time
,sqlserver.client_app_name
,sqlserver.client_hostname
,sqlserver.server_principal_name
,sqlserver.database_name)
WHERE ([sqlserver].[client_app_name] like N'SQLPS%'))
ADD TARGET package0.event_file(SET filename=N'C:\Temp\SQLPS_Tracking.xel');

ALTER EVENT SESSION [SQLPS_Tracking] ON SERVER STATE = START;

This is a simple session that will capture SQL statements that were executed, where they were executed, and by whom. We filter on any application that starts with ‘SQLPS’, since this is how SQL Provider actions will show up in SQL Server. With that running, let’s perform some action and see who we are:

dir SQLSERVER:\SQL\localhost\DEFAULT\databases

This will give us a list of our databases on the default instance. Since we know this boils down to a SQL statement, let’s see what our extended events session captured:

SQLPS-6-1

It should not be a surprise that the user we’re working on is our Windows login for our Powershell session. We’re essentially passing our credential through to the SQL Server. This means the reason I’ve been able to do all the things I have is because I have high enough permissions to do all these things.

To validate, I’ve created a user in my SQL lab called SDF\SQLTest. I’ve created this user and given him the db_datareader role in AdventureWorks2012. Let’s see what happens:

#Launch powershell.exe with runas SDF\SQLTest
whoami
cd SQL\localhost\DEFAULT\databases\AdventureWorks2012

#Get only tables in dbo schema
dir Tables | Where-Object {$_.Schema -eq ‘dbo’}

SQLPS-6-2

We’re able to see the tables with no problem. The db_datareader role grants us SELECT rights on all objects within the AdventureWorks2012 database. Let’s try and drop something now:

Remove-Item Tables\dbo.ErrorLog

SQLPS-6-3

The red text tells the whole story. Looking at this error, we can see the familiar T-SQL message ‘Cannot drop the table….it does not exist or you do not have permissions.’ This clearly shows that permissions are enforced using the provider, so even if you can connect you can still only do what your login will allow.

This default behavior is great, because not only are we restricting the activities of our logins, by default the only logins that can connect are Windows logins. This adds all the typical domain account protections that we get within our active directory. However, what if we want to connect using a SQL credential? There is a way to do this, but it’s a little more obscure. Tomorrow, we’ll review how we can do that along with providing some handy shortcuts to SQL Server components.

A Month of SQLPS: Other Common cmdlets

Yesterday we looked at how you can navigate and retrieve items in the SQL Server provider using common Powershell cmdlets like Get-ChildItem and Set-Location. These are part of a set of core cmdlets that are implemented across providers to give a consistent experience to users. The remaining two cmdlets that we did not cover handle other tasks than simply finding and getting objects and, as such, require a little more care.

Rename-Item does exactly what the name says, rename something. With this, we can rename database objects directly from the command line. Nothing fancy, but gives us an easy way to manage our objects. Let’s see how it’s used:

#Change to the context of my dummy database
CD SQLSERVER:\SQL\localhost\DEFAULT\Databases\dummy

#Rename a table within dummy
dir tables
Rename-Item tables\dbo.Junk Garbage
dir tables

SQLPS-5-1

Because of the intricacies of implementing a cmdlet like Rename-Item, it is specific about the information you pass to it. You’ll note that our Rename-Item call references the table object specifically by schema name, but the new table name is simply the new name within the schema.

This is due to how Rename-Item is working behind the scenes. Remember how we talked about using the SMO? The SMO performs all of its actions via T-SQL, meaning that everything we do via the provider also can be boiled down to a T-SQL command. If we start an extended events session to track SQL statements, our rename action becomes exposed:

SQLPS-5-2

As you can see, the rename is being executed by sp_rename. DBAs have been using this to rename objects for decades and SQLPS is no different. While we’re using a different interface to manage our SQL Servers, the underlying action is the same.

What does this mean for the Remove-Item cmdlet? We already know that it is meant to delete files in our file system provider, so that means we’re probably going to be dropping objects in the SQL Server provider. Let’s take a look by using Remove-Item to drop our table:

#Drop the Garbage table
dir tables
Remove-Item tables\dbo.Garbage
dir tables

SQLPS-5-3

Just like that, our table is gone. Note, we still had to specify the schema in order to remove the correct table. If you had left the schema out, the provider would have thrown an error to warn you that it didn’t have enough information to carry out the action. We can also go back to our extended events session to validate what was done:

SQLPS-5-4

Now, while we can rename and remove database objects, what about creating new objects? As of this time, New-Item is currently not officially implemented. This makes sense because of all the variance within SQL for how different objects can be created and what would need to be declared for that. Creating a new login, table, or index have vastly different statements for those objects, meaning it would be simpler to create database objects using T-SQL than through a provider method.

New-Item can be used in certain spots in the provider, but those methods are currently undocumented and hard to find. I still don’t have a good grasp on where this cmdlet has been implemented. We will cover this a little more as well, but for the time being assume that New-Item can not be used.

Wrapping up the first week of this series, you should have a good idea of what the provider is and how to use it. If you’re getting started with Powershell to manage SQL Server, this is where to start. Even with just accessing and querying objects through the provider, a lot of scripting and automation options open op. Next week we’ll cover some basic scripting and automation patterns that can be used within the provider, helping you build out your use of Powershell within your SQL Server environments.

A Month of SQLPS – Common Powershell cmdlets in SQLPS

One of the reasons to create a provider is so administrators have a common interface for using a section of the Windows ecosystem. Whether it’s the file system, the registry, or some other slice of the stack, you should be able to use a provider to browse, explore, and manipulate that part of Windows in the same way as you can in other providers. Because each part of the ecosystem is different, each provider will have its own way of functioning. A file or directory is simply not the same as a registry key. This means that some cmdlets will be implemented and some will not, all depending on how the provider is built.

With the SQL Server provider, there are only a handful of common cmdlets implemented:

  • Get-Location: Gets the current node.
  • Set-Location: Changes the current node.
  • Get-ChildItem: Lists the objects stored at the current node.
  • Get-Item: Returns the properties of the current item.
  • Rename-Item: Renames an object.
  • Remove-Item: Removes an object.

None of these are surprise, as they provide most of the basic navigation and retrieval of the provider. You probably know these cmdlets better by their aliases:

Set-Location SQLSERVER:\SQL
cd SQLSERVER:\SQL

Get-Location
pwd

Get-ChildItem SQLSERVER:\SQL\localhost\DEFAULT\Databases
dir SQLSERVER:\SQL\localhost\DEFAULT\Databases

As you can probably guess, if these cmdlets weren’t included, we’d have a pretty tough time getting around the provider. They are also core to our provider experience, so most users don’t even think about them. Having the cmdlets may not seem like a big deal, but without them we’d be stuck. It’s all about that common navigation experience.

Of these cmdlets, Get-ChildItem is most commonly used to work with objects in the provider. We’ve already covered how we can combine Get-ChildItem with either Select-Object or Format-Table to view specific properties of our objects. Add to this Get-Item, which covers the same function, just up a level, allowing us to work directly with a specific object:

Get-Item SQLSERVER:\SQL\localhost\DEFAULT\Databases\AdventureWorks2012 | Format-List Name,Version,CompatibilityLevel,LastBackupDate,ActiveConnections

SQLPS-4-1

This small handful of functions let us get around. We can use Set-Location to browse to the path we need to work in, then leverage Get-Item and Get-ChildItem to acquire objects and work with them. The benefit here is we can use the same syntax for reviewing database objects, files, or environment variables. This common experience eases the use of Powershell and helps administrators move from one stack to another.

There are two other cmdlets on this list that I want to talk about, along with another one that is conspicuously missing. What we’ve covered here handles navigation, but the remaining cmdlets are more about object manipulation. In my next post, we’ll dive a little into those, why they are there, and what’s missing.

A Month of SQLPS: SMO Building Blocks

So far, we’ve covered how to start up SQLPS and some of how we can navigate within the provider. These are the first few steps along the path of using SQL Server and Powershell together. Next is to understand how it works behind the scenes. SQLPS makes a lot more sense once you understand how it’s constructed.

A key concept of Powershell is that everything in it is an object, specifically a .Net object. Everything. I stress this to new users of the language because so much of Powershell’s strength comes from this foundation. For people using other scripting languages, such as Korne or Bash, artifacts are simple strings or integers. Objects add an entirely new level of functionality to the language, giving scripters access to properties and methods for their scripts.

To see what the SQL provider is built on is a simple matter of using Get-Member to interrogate the components:

Get-ChildItem 'SQLSERVER:\SQL\localhost\DEFAULT\databases' | Get-Member

SQLPS-3-1

Note the object type, a Microsoft.SqlServer.Management.Smo.Database object. This is part of the SQL Server Management Objects (SMO) .Net library, an API that’s been around since 2002. What does this mean? That the way SQLPS interacts with SQL Server and its components is the same as if we were using almost any other SQL Server tool out there, including our age old standby, SQL Server Management Studio. There’s not strange voodoo magic going on here.

Because of this foundation on objects, we can leverage their methods and properties for our specific purposes. For example, let’s do a directory lookup on the path we use above:

dir 'SQLSERVER:\SQL\localhost\DEFAULT\databases'

SQLPS-3-2

Unsurprisingly, we get a listing of our databases, but the output columns are predefined. This is baked into formatting definitions within the provider, displaying these properties by default. That’s key, all the displayed columns are properties of the SMO database object. So what if we wanted to show different columns? It’s just a matter of displaying the properties we want:

dir 'SQLSERVER:\SQL\localhost\DEFAULT\databases' | Format-Table name,createdate,lastbackupdate

SQLPS-3-3

We could then start to leverage the methods to automate many of our tasks. Say, for example, you wanted to script off your instance’s logins. While we could use the script task within management studio, we could also use Powershell and the SMO’s .Script() method to accomplish the same task:

dir 'SQLSERVER:\SQL\localhost\DEFAULT\logins' | ForEach-Object {$_.Script() | Out-file C:\TEMP\logins.sql -Append}

SQLPS-3-4

Note that this is exactly the same as if you had scripted these objects out in SSMS. This is because both tools are using the same .Net libraries under the hood. There’s very little difference between these tools, except the interface. This means that, as you make the transition from one tool to the other, you can expect similar behaviors.

Properties and methods are the secret sauce of Powershell and open up many avenues for automation and script writing that we’ll explore as we continue this series. The emphasis here is to understand that using the SQLPS provider isn’t a whole different from other tools you’re used to using. Next up, we’ll start talking about some of the standard Powershell cmdlets available to us in the SQLPS module and how we can use them.

A Month of SQLPS: The Provider

Next up in my series on the SQLPS module is to talk about the fundamentals of the provider. This is the core of the SQL Server module, providing an extension to the shell for managing and working with SQL Server. Providers intended togive administrators a file system-like interface for a part of the Windows ecosystem, allowing for a more intuitive way for managing parts of their environment.  

To list all your providers, just use Get-PSDrive:

GET-PSDrive

SQLPS-2-1

We have several different types of providers, including FileSystem, Environment, and Registry. SqlServer is  listed once you’ve imported the module. Once loaded, we can treat the SQL Server components as a file system, with many of the usual commands. Let’s switch to that drive and see what we have available to us:

CD SQLSERVER:\
dir

SQLPS-2-2

Right away we can see many familiar components. Each of these folders is a different part of the SQL Server stack where we can access and manage our environment. We’ll go ahead and browse into the SQL Engine to see what’s there:

CD SQL
dir

CD SHION
dir

CD DEFAULT
dir

It’s that easy to start browsing around our SQL Servers.

Entering the ‘SQL’ folder means we will be working directly with the SQL Engine. Now, by default the provider will only list the local machine under the SQL folder, but we can access any SQL host from here. Just change your location to that machine name. Note, it’s the machine, not the SQL Server instance.

Once you’re in the target machine, the provider will list all instances on that server. Most of the time you’ll probably see DEFAULT, but if you’re using named instances, then those names will be listed. Next, we’ll move down into the instance itself to get all the components for the instance. It should look pretty familiar, since you probably see those components whenever you open up the object explorer in SSMS.

Powershell providers were written to provide an intuitive interface so that administrators wouldn’t get bogged down in trying to get to different parts of their environment, so it’s not surprising that navigating SQL Servers is easy. Take note of the this pattern:

SQLSERVER:\Folder\Machine\Instance\Components

This is the path for SQL Server components and is key to referencing objects with the SQL Server provider.

However, it’s still a little rough sailing. Since using the provider can involve remote servers, your experience will be bound by the ability to communicate with your SQL Instances. It also means that if you’re using tab complete or Intellisense in the Powershell ISE, it will likely not work with provider components because it will timeout when trying to communicate. You will need to rely more on your knowledge of your instances and some of the components than using auto-completion elements.

Why does this happen? It has to do with the provider’s fundamental building blocks the Server Management Objects (SMO). This is a standard .Net library and brings with it rich, consistent functionality that is used throughout the Microsoft ecosystem. In the next post, we’ll go into detail of the SMO and how it’s implemented in the provider, why this an advantage, and what considerations we need to keep in mind as we use it.

A Month of SQLPS: Getting Started

Time for me to get off the bench and start blogging again. What better way to go than to explore the oft-maligned SQL Server Powershell module, SQLPS. Over the course of the next month-ish, I want to explore the SQLPS module, the cmdlets it provides, and the functionality within the provider. We’ll look at the good and the bad within this module, seeing how we can leverage its functionality to our benefit.

Before we can start using SQLPS, we’ll need to get it installed and loaded. Installing the SQL Server Powershell tools is part of the SQL Server setup, included when you install the SQL Server components, but not separately declared. This is good and bad, because while it will always be available to you on a machine with SQL Server components (client or server), you don’t have the ability to control this.

Once installed, loading it is simple. Just open a Powershell session and use the Import-Module command:

SQLPS-1-1

Uh oh! A warning already? What’s that about? Don’t worry, a little investigation can show us what’s going on. Let’s run that same command with the -Verbose switch:

SQLPS-1-2

Using the -Verbose switch gives us a lot of additional detail and we can see what the problem is. Powershell uses a list of approved verbs, which can be listed using the Get-Verb cmdlet. However, when writing the SQLPS module, the SQL Server team included Encode-SqlName and Decode-SqlName for converting SQL Instance names to the SQLPS path syntax. Encode- and Decode- are not approved verbs, which is why we see that warning.

(Don’t worry about what path syntax is, we’ll cover that in this series.)

What does this mean? Not much, the module still gets loaded just fine. All Powershell is trying to do is warn you that you have some code that doesn’t match the language standards and could be hard for users to find. As we’re already pretty far down the path with the language, this warning probably won’t go away anytime soon. Now, you can have Powershell skip all that verb checking stuff with the -DisableNameChecking switch, but I don’t think it’s really necessary. I just accept the warning message for what it is.

Once the module loads, your Powershell session is put into the context of the SQL Server provider, SQLSERVER:\. This can be a bit of a gotcha because many file lookup patterns change once you are in the SQL Server provider. A notable example is you won’t be able to browse UNC paths until you are back in the context of a file system provider. This is why I recommend this pattern for loading the SQLPS module:

$pwd = Get-Location
Import-Module SQLPS
Set-Location $pwd

This simply captures your current working location and, once the SQLPS module is loaded, will switch you back to it.

It should be noted that the SQLPS module is only available on SQL Server 2012 or better and requires Powershell 2.0. Previous versions will require other logic to load the SQL Server snap-in. In general, I recommend always using the current client tools when possible, but this behavior could limit you if you are SQL Server 2008 R2 or earlier.

Feels a bit like a rough start, doesn’t it? This initial experience is one of the biggest challenges for DBAs getting into Powershell. It’s another language and since the first experience is filled with gotchas, it’s hard to embrace. The reason I want to call these out early, though, is to help you over that first hill. Over this series of posts, I hope to show you the ins and outs so you can effectively use the SQLPS module and not get tripped up on it.

#Powershell and SQL Server: SQLPS Challenges and Hurdles

Over the last two posts, I’ve covered what the SQLPS provider is and how you can get started with it. Now it’s time for other side of the story. If you’ve started working with the provider or done some reading on the web, various hurdles have probably popped up. These hurdles can frustrate and discourage you, so let’s discuss them before that happens.

Slower than Molasses in January

The initial complaint you’ll usually see with the provider is that it’s slow. Mind numbingly slow. So slow that it breaks tab completion in the ISE. Unfortunately, due to the way the provider was implemented using the SMO, we don’t have a lot of options

What can we do? Unfortunately, there are no magic workarounds to implement. This limitation is why you will see a lot of Powershell/SQL development either use the SMO directly or implement .Net code that avoids this completely. The challenge here is that these approaches can be too advanced for administrators who are not used to code development. My recommendation is to be patient with it. The provider is your entry point and is your starting point. As you get more comfortable with Powershell, you will find SMO and other .Net methods will perform better for you. Begin with understanding the language.

What You Least Expect

Another challenge with the provider is that sometimes it will behave in a fashion that doesn’t quite make sense. As with the speed, we’re tied to how the SQL Server team at Microsoft implemented the provider. It is, after all, an API and this means we can only use the it as it was written. What I struggle with is that there there are elements of the provider that weren’t thought all the way through and occasionally they catch me by surprise.

One example of this is an interesting piece of behavior I discovered recently with a several online colleagues (Paul Timmerman, Chris Sommer, Derik Hammer, and Johan Bijnens). Basically, we found that there was no real way to refresh a Central Management Server listing within an existing Powershell session. Once a CMS registry was populated in your provider session, you were stuck with it. If you made changes to your CMS in SSMS, you wouldn’t see those changes propagated until you opened a new Powershell session.

While frustrating, it’s not a show stopper. The challenge, however, is that there are other little land mines like this in the provider and they pop up when you least expect it. This particular issue is not really a problem because you can always save a script and re-open your host. However, it should behave a little more consistently and at least give the user the opportunity to execute a manual refresh of the cached object. I’m hoping that the SQL Server team will be able to address this in future versions of SQL Server.

The Mini-Shell

SQLPS_warts_1Speaking of things that behave not as you would expect, I want to cover the notorious mini-shell. If you have ever right clicked in Management Studio Object Explorer, you’ve probably seen a Start Powershell option.

The intent of this option is to open up a command window with the SQL provider already loaded. This shell also duplicates what SQL Server does if you ever run a Powershell script within a SQL Server Agent job step. What catches people by surprise is how it behaves. In SQL Server 2012 or prior, the host machine will load using Powershell version 1.0 or 2.0, no matter what version you have installed on the host machine. This can be annoying because modules won’t be automatically loaded and some cmdlets aren’t available to you. This was fixed in SQL 2014, so whatever version is installed on the host machine will be used.

While this can present a hurdle for developing scripts to be used in the SQL Agent, it will not block you completely. You can always double check this by starting the Powershell task in Management Studio and interrogating the $PSVersionTable system variable. Beyond that, I haven’t had much reason to use the mini-shell for any Powershell tasks and prefer to work in the ISE or the standard Powershell command window host.

A Fixer-Upper

The SQLPS provider is klunky. It suffers from a little neglect by the SQL Server team and some slapdash coding to implement it. In light of some of the Powershell tools provided for Windows Server, Exchange, and Active Directory, it’s pretty frustrating to see the SQLPS provider languish the way it has. I have some theories around that and I hope that someday I can talk with the product team to see what changes can be made.

However, it should be noted that if you’re just getting started with Powershell, the SQLPS provider is still the best place to start. If you’ve read my other posts, you know by now there has been an effort to make the provider an intuitive path for building automation around SQL Server. Don’t let the hurdles stop you,. The provider will let you get far enough on its own and help you develop patterns that you can later improve and enhance.

Please feel free to leave any comments below on your experience with the provider and other questions you may have regarding it.

#Powershell and SQL Server: Using the SQLPS Provider

In the previous post, I gave an overview of what the SQLPS provider is and how it works. Now I want to pull back the curtains a bit and demonstrate how you can navigate the provider and use it effectively for managing your SQL Server instances. For those new to Powershell, this can be an effective way to start using the language without a lot of “overhead” for learning syntax and methods.

Being Direct

Focusing on the concept that providers allow us to browse parts of the Windows stack as directory structure, let’s start by just reviewing what “directories” are available with SQLPS:

SQLPS_use_1

Right away you can see that there’s a lot of familiarity here, as we can see many components of SQL Server that we’re used to seeing. For the time being, let’s go straight into the SQL Database Engine and look around by browsing down into the SQL\LOCALHOST\DEFAULT path:

SQLPS_use_2Pay attention to the structure of the directory paths:

SQLPS_use_3

This pattern is used throughout the provider, offering a consistent structure for our objects. The next thing to notice is that the list of items under our instance is pretty standard and looks very much like what we would find under the object browser in SQL Server Management Studio. The provider is merely an abstraction for all the usual parts of SQL Server that we’re used to seeing.

Objects and Details

The most basic thing we can use the SQLPS provider for is getting lists of our SQL Server objects. Just like getting a directory listing of our files, we can list out our databases with a simple command:

SQLPS_use_4

Note the use of the -force flag. If you leave the -force flag off, the provider will only return user databases. Including this flag will display all databases, including the system databases.

What should also be noted is that there are many more fields here available to us, which we can see using Get-Member. As DBAs, a common question is when our databases were last backed up. Within the SMO, each database has the .LastBackupDate property that shows the last full backup, which we can easily include in our directory call:

SQLPS_use_5

Getting Things Done

While listing objects (and you can list logins, agent jobs, and other parts of your instance in much the same way) is effective, what else can we do? The key to the next step is recalling that objects within the provider are all SMO database objects.  All of these objects will have attendant properties and methods. We can leverage the properties to accomplish some pretty standard tasks.

One thing I tend to do with my databases is set the owner to ‘sa’. This common task is easy to do in T-SQL and I certainly don’t want to discourage that option, but it’s also an easy task to manage in Powershell by using the .SetOwner() method:

cd SQLSERVER:\SQL\LOCALHOST\DEFAULT\databases
$dbs = dir

foreach($db in $dbs){
$db.SetOwner('sa')
}

#List the directory contents again and look at the owner
dir

With these few lines, I can quickly change the owner of all my databases. How cool is that? Now, one note about permissions. Any actions you execute through the provider will use your current security context. Typically, DBAs will have enough permissions to perform these tasks, but if the account you connect to does not have rights for a task, it will fail.

And so much more

There are so many more examples of what we could use the provider for. Simply using directory lookups can provide a lot of flexibility, but there’s more we can do leveraging the methods and properties of the Provider objects. From this point, it can get very advanced and complex. Focus on the fact that SQLPS provider is a starting point, a place where can quickly get in and manage SQL Server with Powershell.

Next up is some of the warts of the SQLPS provider. A lot of folks who have been using the provider have run in to some challenges. In a lot of ways, how the SQLPS provider works is a little clumsy. This doesn’t mean you shouldn’t use it, but I do want to cover some of the frustrations so that you are aware of them and they don’t prevent you from effectively using this aspect of Powershell.

#Powershell and SQL Server: The SQLPS Provider

One of the key entry points for using Powershell and SQL Server is the SQLPS provider. If you’ve been reading my blog for any length of time, you’ve seen me make use of the provider for one task or another. It’s an incredibly useful tool and can help you manage some basic tasks in SQL Server without a lot of additional coding on your part.

The struggle that I see is there’s a lot of confusion about what the provider is and how it works. There are also challenges and gotchas around what the SQLPS provider does that frustrate both new and long time users of Powershell. I hope to provide some clarity over the next few posts as I review the basics of the SQLPS provider, how I’ve used it, and how to work around some of these challenges.

What are providers?

The idea of providers is a foundational concept in Powershell. They are fully documented over on MSDN, or directly in Powershell by using ‘Get-Help about_Providers’. Let me give you a starting point, though: the general idea is that providers extend different parts of the stack as file system paths in your shell. They give users an intuitive method to browse components like the registry, environment variables, and SQL Server as if they were directory structures.

You can start by using ‘Get-PSDrive’ from your favorite Powershell host. You’ll see something like this:

SQLPS_Intro_1

Note that I’ve called out the important bits here. You can consider the Name column the drive letter for each provider. The different types of providers are listed on the right. Understand that the drives we are used to seeing (C:\, E:\, etc.) are FileSystem providers and essentially equivalent to other providers, like environment variables. The trick is that the behavior of each provider is different once you start working within them, but accessing them works the same.

Using Providers

To use a different provider is just a matter of running some familiar commands. You can switch to a different provider by using “cd” and see what’s in the provider by using “dir” (which are aliases for Set-Location and Get-ChildItem). All pretty easy, right? Try this, for example:

cd Env:\
dir
Get-Content PATH

Already you can see how handy this is, as it gives us a much easier way to view the PATH variable than that tiny little GUI box under Environment Variables.

Let’s talk specifically about the provider for SQL Server. The provider is not part of Powershell by default and you have to load it. Doing this is straightforward, you just need to import the SQLPS module that is installed whenever you installed the SQL Server 2012+ client tools.

Import-Module SQLPS
#If you want to see what’s in the module, use this...
Get-Command -Module SQLPS

When you execute this command, you’ll get a warning about cmdlet names. You can safely ignore this, the provider has loaded and I’ll cover this message in a later post. A gotcha here is that if your client tools are previous to SQL 2012, you’ll need to load a snap-in. This is an obsolete method, so I strongly recommend you upgrade your client tools to SQL 2012 or better.

The Provider Foundation

Before we get into actually using the provider, we should review what makes the provider tick. Remember that everything in Powershell is a .Net object. Everything. With this in mind, we can look at the building blocks that create the SQL Server provider by using the trusty Get-Member cmdlet:

cd SQLSERVER:\SQL\localhost\DEFAULT\databases
dir | Get-Member

Don’t focus on the directory we are drilling into, we’ll cover that in the next post. You are going to get a sizeable output, but you should focus on the first part:

SQLPS_Intro_2

Notice that the typename is a Microsoft.SqlServer.Management.Smo.Database object. This shows us that the SQLPS provider is built on that long standing SQL Server Management Objects .Net library.

I call this out because if you browse the interwebz for examples of using Powershell and SQL Server, you’ll see a mix of code. Some folks will use the provider structure, others will instantiate .Net SMO objects. What you should understand is that these approaches use the same fundamental building blocks. The difference is that if you use the provider, you have some additional abstractions that SQLPS provides you (which means less code), whereas creating the SMO objects forgo them (translating to more code, but more control).

Moving Along

Providers give you a lot of flexibility within your shell experience. The intuitive nature of them allow for an easy entry into using Powershell, whether you have a coding background or not. This folds quite well into the initial intent of Powershell, which is to provide a useful scripting experience for administrators who do not have development experience.
In my next post, I will cover specifics for using the SQL Server Powershell provider. We will review the fundamentals and how these can be leveraged for common administrative tasks. If you have specific questions about the provider and how it can be used, I encourage you to leave these questions in the comments section so that I can answer them in a later post. If you prefer, you can also email your questions to ‘mike at this blog domain’.