Art of the DBA Rotating Header Image

March, 2016:

Azure SQL Databases with #Powershell: Components

As with any project, before we can start, we need to know what we have to work with. Last post, we went over loading the Azure RM module and getting connected to our Azure account. Before I go over how you create the Azure SQL databases, I’d like to talk first about exactly what we will create first. It’s the old adage: measure twice, cut once.

The very first thing to create is an Azure Resource Group, as we are going to create our Azure SQL Database using the Azure Resource Manager deployment model. There’s nothing really fancy about this, just that it is a container that can house multiple resources. This resource group can house any Azure resource, not just our databases. Creating one using Powershell is simple, we just need to know what to call it and which Azure region to create it in:

New-AzureRmResourceGroup -Name MSFAzureSQL -Location ‘West US’

Once we have our resource group, we can start deploying our Azure SQL database components.

Parallels

From a logical standpoint, working with Azure SQL databases is not very different from setting up a SQL Server instance and database in your environment. There are 3 main components we will need to deploy:

  • A server
  • A database
  • A firewall (server or database)

3-20-2016 7-27-15 PM

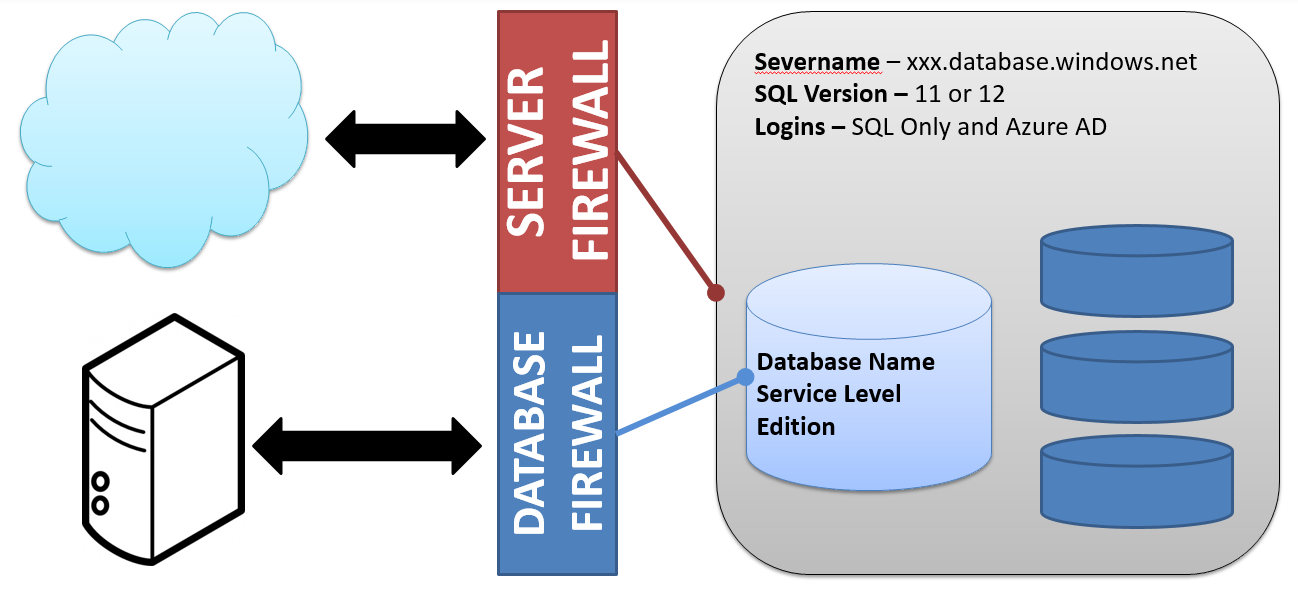
Starting with the server, there are only a few things we need to know. The first is a server name so we can identify and connect to it. After that, we need to know what version of Azure SQL databases we want. There are two options here, 11 and 12. Yes, those are fairly abstract numbers, though version 12 is currently what is being updated and has many of the features that will be included in SQL 2016. Finally we need to create an administrative login, the equivalent of the sa login found in all SQL Servers. This all boils down to just two lines of Powershell:

$cred = Get-Credential
New-AzureRmSqlServer -ResourceGroupName MSFAzureSQL -Location ‘West US’ -ServerName msfazuresql -SqlAdministratorCredentials $cred -ServerVersion '12.0'

Running this, in my opinion, beats all the clicking and selecting you have to do in the portal.

Next up, we need to create our database. As with creating a server, we need a name for the database. We also need the resource group and server name we are creating the database in. We will then need to declare a service level objective. While there is a performance aspect to this selection, it more rests on what sort of connection load you will have, what kind of features you need, and what sort of disaster recovery support you require. The nice thing about selecting a service level is their easy to change once you have your database. Finally, we need to select an edition (again, relates to features). To deploy, our command looks like this:

New-AzureRmSqlDatabase -ResourceGroupName MSFAzureSQL -ServerName msfazuresql -Edition Standard -DatabaseName msfsqldb -RequestedServiceObjectiveName 'S0'

Security and Access

The final component to create is a firewall. By default, your Azure SQL Database has its access blocked to anything outside of it. Yes, this includes your access via management studio. To open this access, we need to create firewall rules that allow specific IP addresses to connect. There are two types of firewall rules we can use, server and database. These are what you would guess. The server rule allows access from that address to any database in your server, where the database rule only works for that database.

For our purposes, the server rule will work just fine. Creating a database rule is not really different, it just applies to a different scope. To create a rule, we need the resource group name, server name, rule name, and an IP address range. For this, we will use a trick I picked up from John Milner(@JFRMilner) to get our external IP and create a firewall rule for it:

$localIP = (Invoke-WebRequest ifconfig.me/ip).Content.trim()
New-AzureRmSqlServerFirewallRule -ResourceGroupName MSFAzureSQL -ServerName msfazuresql -FirewallRuleName 'msffirewall' -StartIpAddress $localIP -EndIpAddress $localIP

Now, there is also a special firewall rule we can use. This one is handy because it will make your database accessible to all Azure services. This saves you the headache of creating separate rules for websites, PowerBI, or any other service you want to use. Just call the firewall rule cmdlet with -AllowAllAzureIPs:

New-AzureRmSqlServerFirewallRule -ResourceGroupName MSFAzureSQL -ServerName msfazuresql -AllowAllAzureIPs

Fully Functional

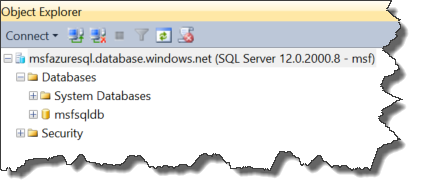
With that, we now have a functioning Azure SQL database. To connect to it, you just need to use the servername along with database.windows.net as your connection string, along with the admin login you created. Put it into management studio and you are good to go:

3-21-2016 5-04-05 PM

Oh, you want the full script?

New-AzureRmResourceGroup -Name MSFAzureSQL -Location ‘West US’

$cred = Get-Credential
New-AzureRmSqlServer -ResourceGroupName MSFAzureSQL -Location ‘West US’ -ServerName msfazuresql -SqlAdministratorCredentials $cred -ServerVersion '12.0'

New-AzureRmSqlDatabase -ResourceGroupName MSFAzureSQL -ServerName msfazuresql -Edition Standard -DatabaseName msfsqldb -RequestedServiceObjectiveName 'S0'

$localIP = (Invoke-WebRequest ifconfig.me/ip).Content.trim()
New-AzureRmSqlServerFirewallRule -ResourceGroupName MSFAzureSQL -ServerName msfazuresql -FirewallRuleName 'msffirewall' -StartIpAddress $localIP -EndIpAddress $localIP
New-AzureRmSqlServerFirewallRule -ResourceGroupName MSFAzureSQL -ServerName msfazuresql -AllowAllAzureIPs

As you can see, deploying an Azure SQL database is a pretty simple process, it is just a matter of knowing what you need.  Next up, we will go over how you can manage and alter your Azure SQL Database. After all, the cloud promises us flexibility and using Powershell makes it easy.

Azure SQL Databases with #Powershell: Getting Started

I’m now a month into my new gig at UpSearch and loving it. The most interesting thing about moving from being a corporate world to being a consultant is the variety of work that I get to do. As tech folks, part of the reason we work in this field is because of all the things we get to learn.

One new area for me has been Azure SQL Databases. Sure, I’ve known about them for a while now, but it was never something that was needed by my corporate masters. Now, with several different clients to work for, it did not take long for Azure’s platform-as-a-service database offering to be a good fit for a project. Since this is me we are talking about here, I made a point of learning how to create and manage these databases in Powershell. I’d like to share some of those lessons here.

The Tools

Before we get started, we need the right cmdlets for working with Azure. With Windows Management Framework 5.0, it is actually really easy to install and get started with Azure and Powershell. The full process is documented up on Microsoft’s site. It takes about 30 minutes to get everything installed and configured.

If you have worked with the Azure cmdlets before, you might be surprised to see that the instructions references two different modules, Azure and AzureRM. Actually, if you do a lookup on any modules you will see a lot more:

Get-Module -ListAvailable  Azure* | Select-Object ModuleType,Version,Name

3-12-2016 11-48-54 AM

What is this all about? It took me a bit of digging, but what it boils down to is that Microsoft made a fundamental change to how things are managed within Azure. You will now find documentation on these two different deployment models: Classic Deployments and Resource Manager Deployments. These two different set of Powershell cmdlets reflect these different models, as anything for Classic Deployments are handled by cmdlets in the Azure and Azure.Storage modules. All the Resource Manager Deployment stuff is handled by the AzureRM* modules.

Choose Your Path

The reason I call this out is to address one major hangup with working with Azure: the documentation. Because Azure is changed so quickly, official documentation and other write ups (like this one) quickly go out of date. When I was looking for information on how to do this, I kept finding blog after blog that covered Classic Deployments. Since I am just starting with this, there is no reason for me to go down the Classic Deployments path. While these are still viable and perfectly valid, it makes more sense to me to focus on using Azure the way Microsoft intends it to be used.

To get started, we will first connect to our Azure RM account. I will be using my MSDN account. From my Powershell window, I’ll run the following commands:

Import-Module AzureRM
Login-AzureRMAccount

I am then greeted by a GUI login window, where I enter my credentials.

3-12-2016 12-35-48 PM

Hey, wait? A GUI? With Powershell? Yeah, this surprised me as well, because to me GUIs are an aberration when it comes to Powershell. You can not really automate them and that throws a wrench into the whole works. This is probably my biggest gripe about using these cmdlets. The nice thing is that once you login your session is maintained and you can make use of a session profile.

Thanks out to Adam Bertram(@adbertram) for helping me with this, but you have the ability to save off a profile file that will save a lot of this info for use by other Powershell sessions. This gives us the ability to connect and run commands without the need for this GUI nonsense. Accomplishing this is just a matter of using the right cmdlet:

Save-AzureRmProfile -Path C:\Users\Mike\mfalprofile.apf
Select-AzureRmProfile -Path C:\Users\Mike\mfalprofile.apf 

Note, the name of the file is pretty meaningless. I used the apf extension because of my own personal taste, but you can do whatever you want. The point is to have the file. Once you have this file, you can load it up in future/different Powershell sessions and avoid the login GUI completely. The real hurdle here is that, regardless of how you go about this, you need to login graphically at least once to get credentials.

First Steps

With our connection established, we can now start creating SQL databases. Before we do, however, we need to talk more about what we are going to create. While the beauty of working with public cloud providers such as Azure is it is really easy to spin up resources, it does not negate the importance of understanding how and what we are deploying to. It is just as important to “measure twice, cut once” when it comes to the cloud. My next post will focus on the different components that make up Azure SQL databases, deployment considerations, and how we end up creating SQL databases in the cloud.

Dynamic CSV Imports with #Powershell

A common task for data folks is loading comma separated values files into databases. It can be tedious, having to figure out column layouts, data formats, and sorting bad data. This sort of Extract, Transform, and Load (ETL) task is something we would do in SSIS or a similar loading tool, but those tools require us to review the data and have a good idea of what the staging table will look like. Most of the time with CSVs, we just need a quick dump of the file into a database table so we can work with it using T-SQL, which means that I don’t want to spend a lot of time figuring out what a stage table is going to look like.

I know SQL Server Management Studio will try and help you out with the Import Data task. I have used this pretty frequently myself. However, like any other GUI tool out there, you can not automate it. It builds a one time SSIS package (which you can save) and executes it, but if it does not save much time if I have to load multiple CSV files with differing formats.

We all know my weapon of choice is Powershell. I am sure there are other approaches to this problem and my ETL/BI pals are probably reading this post in dismay (if they are reading it at all!). However, I’m pretty comfortable with the patterns in Powershell to script this process, letting me quickly load multiple CSV files without having to do a lot of work.

All Around the Table

The challenge is getting the staging table in place. We need a process that can read the CSV header and build a CREATE TABLE statement for us. Once we have that, the load is actually pretty easy. Assuming the CSV has a header row, I then use this bit of Powershell code to figure out the different columns I’m going to load into:

$source = <Path to your source file>
$Header = (Get-Content $source | Select-Object -First 1).Split(',')

Two lines of Powershell and now I have a collection of all my column names as a string array. This is where the fun begins. Now, I can not assume that the column headers will play nice as SQL column names, so I need to do a little hygiene work. I will loop through the collection and strip out any non-alphanumeric characters:

$CleanHeader = @()
foreach($h in $Header){
$CleanValue = $h -Replace '[^a-zA-Z0-9_]',''
$CleanHeader += $CleanValue
}

I could use ForEach-Object here to simplify the code, but I expand it out in a foreach loop because I might add some other logic to the header name clean up. I want to keep it simple for this example. The result is a new collection that has names I can use to create a staging table.

Next up, I will take this new collection and build out a SQL statement. This is a matter of looping through the CleanHeader collection and using those values. Since we can’t really tell what the format will be, each table column will be VARCHAR(255).

$StagingTableName = ‘CSVFileLoad’
$sql = @("IF EXISTS (SELECT 1 FROM sys.tables WHERE name = '$StagingTableName') DROP TABLE [$StagingTableName];")
$sql += ("CREATE TABLE [$StagingTableName]($($CleanHeader[0]) VARCHAR(255)")
$CleanHeader[1..$CleanHeader.Length] | ForEach-Object {$sql += ",$_ VARCHAR(255)"}
$sql += ");"

The SQL format is a typical pattern:

  1. If the table name already exists, drop it (we’re doing a drop and replace of the data).
  2. Grab the very first column name in the collection and use it to start the CREATE TABLE.
  3. Loop through the remaining column names, putting a comma in front of each column.
  4. Close the CREATE TABLE statement with a parentheses and semicolon.

This block of code is the key, allowing me to create any table structure to import my data with.  Once I have it, I just execute it using Invoke-SqlCmd as I would any other T-SQL statement, and my staging table is now in place.

Stick the Landing

Once the staging table is in place, the load is actually fairly simple. You have lots of options, but the easiest one for my money is to build a BCP call and execute that. BCP is a simple utility that has been around for a while, mostly because it is effective. The build is not difficult:

$cmd = "bcp '$Database.dbo.[$StagingTableName]' in '$Source' -S'$SQLServerName' -F2 -T -c -t','"
Invoke-Expression $cmd

For those unfamiliar with the BCP syntax, all I do is declare the destination table, the key word ‘in’ to declare that I am loading data from a file to a SQL Server table, and then the SQL Server name. The remaining parameters set the following load options:

  • -F2: Start the load with the second row, skipping the header
  • -T: Use windows authentication to connect
  • -c: The input file is character data
  • -t’,’: The column terminator is a comma

This is how I do it, but there are plenty of other options. Allen White(@SqlRunr) has written about using the .Net methods to perform a Bulk Load. You could also use the BULK INSERT command run from an Invoke-SqlCmd call. There are probably a dozen ways to skin this particular cat. The choice is up to you.

Now For Your Parting Gift

As with many of these patterns that I blog about, I have a function I have written around it. This one is Import-CsvToSqlTable. This function has some additional pieces that are best discussed by reviewing the parameters:

  • InstanceName – SQL Server Instance you are going to load to.
  • Database – Database name you are going to load to.
  • SourceFile – Source file to load
  • SqlDataType – Data type the staging table columns will be created as. Defaults as VARCHAR(255).
  • StagingTableName – Table name you will create and load into.
  • Append – If declared, the staging table will not be dropped if it already exists.

The function wraps up all the different pieces of what we talked about above. With it wrapped in a function, we now can call it for a simple data load. For this load, I am using a file from https://catalog.data.gov/ for New York City demographics:

3-5-2016 11-37-15 AM

Nothing fancy and the output shows the instance, database, table, and count of rows in that table. If we look in SQL Server, we will see the table created with VARCHAR(255) columns as expected:

3-5-2016 11-39-19 AM

We can do more, though. Let’s say we know that the file contains numbers in all the columns. It might make more sense to load them into a FLOAT or a NUMERIC datatype. We’ll declare that now. I’m also going to declare the -Verbose so I can see the detail of how the function is processing the import:

3-5-2016 11-42-53 AM

3-5-2016 11-48-58 AM

With the right parameters, not only do we have control over what we create, but we can see how it’s created and loaded into SQL Server. This can help with troubleshooting in case we try and load the wrong data type or there is some other error for the load.

This function can be useful for quick and dirty data loads, importing CSVs that we don’t want to waste a lot of time figuring out. I wrote it for this express purpose, because I did not want to get tied up clicking on buttons in the Import Data Wizard. However, I definitely do not recommend this as a full on replacement for ongoing ETL processes and standardized data loads. For any ongoing process where you know the format of your data files, there are much better options and approaches. As with any task, it is important that you use the right tool for the job, but it never hurts to understand your options.

Getting Database File Info with #Powershell

As database administrators, we are often obsessed with free space. Whether it’s on disk or in our database files, we know that if that precious resource runs out, everything we manage can come to a crashing halt. There are also the other hidden impacts, like if things slow down while files grow and possible downtime to additional storage to support the needs of our databases. This is all part of what a former manager of mine called “DBA 101” and staying on top of it is one of our higher priorities.

Fortunately, there’s plenty of tools for us to manage these metrics. It comes down a lot to personal choice. Usually this can be managed via some monitoring suite, but there are times we need a handy tool to answer questions quickly. For disks, I have a function I borrowed from the web and put into my profile called Get-FreeSpace. Using it, I can quickly answer questions about how much free space is available on any of my servers.

The Database Challenge

Databases are a little more difficult. Sure, we can use a variety of queries to gather this information and there are ways to get it. We could always use SSMS to look at a database’s properties. Personally, I like to use Glenn Berry’s(@GlennAlanBerry) DMV scripts. The problem is that it’s difficult to get a concise report across all of our databases with this. Sure, we can create scripts that execute the query against each database, looping through them all, but that’s a hassle. I want something simpler.

Once I hit these limits using T-SQL, I did some investigation to see if Powershell offered any better alternatives. It’s one of my learning tools for Powershell: take a T-SQL task I’m familiar with and redo it in Powershell to see if it is easier and/or better.

To do this, I dove into the SMO object model. This gets a little /Net-y, but the good news is there’s lots of properties we can use to get the information we are looking for. If we look at both the DataFile and LogFile classes, there are properties readily available for us. Both classes have UsedSpace and Size properties (both measured in KB), from which we can derive both available space and percentage used. All it takes is wrapping some collection and formatting logic around these objects and we’re good to go. You can see my full function up on GitHub.

Reporting on Database Free Space

I’ve done a couple new things with this function. The biggest is to build it for the pipeline. This is a significant step for me, because it makes the function more flexible. I always talk about how Powershell supports multi-server execution, so I try to build that into my functions when I can. this is no different. I also made the output a generic PSObject instead of a formatted table. This is key because it lets the user manage it as they need to, which is a database design concept that can be carried over to Powershell quite easily.

So let’s use it. Running it for a single instance is easy enough:

Get-FreeDBSpace -InstanceName ‘SHION’ | Format-Table

2-27-2016 1-23-35 PM

I use the Format-Table to give me this clean table style output, as the generic output is a list that can be hard to read. What’s cool here is that, with a single Powershell command, I can quickly report out all the necessary database file size info. It gets better, of course. Because I designed the function to take a pipeline, I can run it for multiple instances with ease:

$Instances = @(‘SHION’,’SHION\ALBEDO’)
$Instances | Get-FreeDBSpace | Format-Table

2-27-2016 1-33-48 PM

How cool is that? As an administrator, this can be invaluable when I’m evaluating an environment or instance. Still, this is a lot of information to parse. Let’s leverage the pipeline again and filter down the report to show all the files have less than 10 percent free (greater than 90% used):

$Instances | Get-FreeDBSpace | Where-Object {$_.PercUsed -gt 90} | Format-Table

2-27-2016 1-38-18 PM

How cool is that? Now we’ve got an easy report showing all our databases that could be tight on space. But wait, there’s more! We’re going to use the pipeline one last time, this time to output an HTML report showing us the information we just displayed to the screen:

$Instances | Get-FreeDBSpace | Where-Object {$_.PercUsed -gt 90} | ConvertTo-HTML | Out-File .\FreeDBSpace.htm

2-27-2016 1-44-27 PM

Easing Our Burdens

As you can see, there’s a lot of potential to how we can use this. The key to building any Powershell tool is making it as flexible and repeatable as possible. The building blocks are there, it is just a matter of how we assemble them.

You’ll often hear how you should use the right tool for the job. I love T-SQL and use it for many tasks, but this is a great example of how Powershell can complement T-SQL and give administrators a more robust way to manage their environments. Using this function, we can easily evaluate a new environment or manage our existing one. Our time is precious and tools like these can help us best use that valuable resource.