Art of the DBA Rotating Header Image

SQL Server

What’s CHECKDB doing in my database restore?

Recently I was doing some work with a friend around some database restores. It was pretty routine stuff. However, after one restore my friend came across something in the SQL Error Log that caught him by surprise. As part of the restore, there was a CHECKDB message for the restored database:

My friend’s first reaction was “why is SQL Server doing a DBCC CHECKDB as part of the restore?” He was concerned, because CHECKDB is a pretty hefty operation and this could really impact the restore time if he had to wait on a CHECKDB to complete. But the other confusing thing was that the date for the CHECKDB didn’t match up with the restore timing.

A Clean Start

Now I was pretty sure that the SQL restore didn’t actually run a CHECKDB, but I needed an explanation for this message. I figured I’d start with good old AdventureWorks2014 to test through the process. Also, since I needed to get in the guts of the restore, I broke out a few undocumented trace flags:

DBCC TRACEON(3014);
DBCC TRACEON(3604);
DBCC TRACEON(3605);

Trace flag 3014 is the important on, as it provides the details on what actually happens during a database restore. Once I turned these flags on, I ran an initial restore of the AdventureWorks2014 database to the name of AW2014_BASE and reviewed the output from TF 3014. I focused on everything from when the database was brought online to the completion of the restore.

Notice that no where in this output do we see evidence of a CHECKDB command. So far, so good, right?

Checking our CHECKDB

My suspicion at this point is that the CHECKDB message found in a database restore was actually unrelated to the restore itself. The next step was to actually run a DBCC CHECKDB against my test database (and capture the time the DBCC was run).

With this completed, it was time to do another backup and restore with my trace flags enabled to see what I got.

Lo and behold, our CHECKDB message is back. But what’s going on? Why did it appear here but not in the first restore? The key (as you might have already guessed) is to look at the datetime for the CHECKDB in the error log: 2018-03-31 09:17:16. This matches the time we actually ran DBCC prior to our backup. In fact, if we review the message output from the restore (and not the error log messages) for the same restore span, you’ll see there are no actual CHECKDB messages within the restore.

Mystery Solved

The answer here is pretty simple. When you restore a database, SQL Server is trying to help you by telling you the last time the database had a CHECKDB run against it. That’s actually why the message says “his is an informational message only; no user action is required.” However, for many folks not familiar with the process can be confused and jump to the conclusion that SQL Server is doing more than it should be. The key to clearing up these misconceptions is to use our tools to lift up the hood and see what’s going on internally. Once you look at these details, it’s pretty clear to see what’s happening and become better informed on how SQL Server works.

The 2018 SQL Backup Survey

Last year I joined on to Rubrik to help them sell their SQL Server database product. It’s been a fun challenge and definitely interesting working in the vendor space instead of having to field 3AM calls because something broke. This means that I talk to a lot of people about SQL backups and restores, especially about the challenges that your average data professional runs into. However, I based a lot of this conversation off of my anecdotal experience as a DBA. Being a data person, it felt a little awkward talking about these things in the absence of data.

This leads me to last week. In order to have some data, I decided to run an informal backup survey targeted at the SQL community. The results floored me: 344 of you decided to take my short survey. This really helps me understand some of the trends out there and now I want to share those results with you.

Before I get started, I want to first thank each and every person who responded from the bottom of my heart. This data is the result of your participation. Secondly, I want to underscore the “informal” nature of this. There’s a lot of holes that can probably be poked in the process, but I think the data is still useful and can give people insight into the trends.

I’ve posted raw data along with a few tools out on GitHub, where you are welcome to download and play with it. The tools include:

  • Two SQL scripts that create and process the data into a simple data warehouse schema.
  • An SSIS package (created by the SQL import wizard) that loads the raw data into the staging table
  • A PowerBI report that has a couple basic charts built off of the data.
  • A SQL 2016 SP1 backup of the database where I processed the .csv.

Note, my data warehousing/PowerBI skill set is nowhere as strong as others. I built something that was familiar to me and let me get at the data. I’m sure someone can build something better. Which is why I’ve made it public.

The Environment

As far as parsing out the data, let’s look at the questions and how people responded. The first questions were around how many SQL Servers(instances) and databases most people manage:

I think what’s interesting here is that the vast majority of folks out there manage a LOT of servers (36% have 100+ servers). Contrast this to a more balanced distribution across the database counts. This becomes even more interesting when contrasted against the data volumes:

The majority of shops out there manage less than 25TB of total data, with most of these databases clocking in at 5TB or less. While 5TB is still a lot of data, this does mean that (when comparing this to the numbers above) most of the respondents manage “wide” environments, with more databases that are smaller in size. This becomes even more interesting when looking at the size of DBA teams:

As you can see, the VAST majority (80%+) of companies employ teams of 5 DBAs or less. This means that in these wider environments, DBAs are responsible for a lot of objects. To me, this means that we have a lot of touchpoints to manage from a data protection standpoint.

SQL Use

Other interesting tidbits filter in with the questions on how SQL is used. Starting with just the versions of SQL in use, it’s not really surprising that Microsoft’s mainstream supported versions are in use out there:

I was a little surprised at the SQL 2000/2005 number, but not shocked. I know how hard it is to phase out some of those legacy platforms.

Nothing really surprising when it comes to feature use either:

I did hope to see compression higher because of the performance impacts it has, but the rest of these values file in line with my expectations.

When it comes the High Availability/Disaster Recovery options, we also shouldn’t be too surprised:

Availability Groups have been a strong offering from Microsoft and something they’ve marketed hard. This has resulted in solid adoption, but it’s only a little higher than Failover Cluster instances. I’m also not surprised by the Log Shipping use, because let’s be honest. It just works.

The final piece of data around backup tooling is of significant importance to me:

Almost 35% of you use some sort of community scripts, over 15% more than the next entry. This is significant because it means that most shops out there are relying on code that the SQL community provides for free. Think about that in context of other software platforms. Most are going to rely on purchased tools, but so many of us are comfortable with these community scripts that we entrust our company’s most important asset to them.

I was a little surprised at how high Enterprise Platform usage was, considering how many DBAs take a dim view of them. I think what also surprised me was that Vendor Software (Idera, Red Gate, etc.) was so low. Overall, we can definitely see where DBAs find value for running and managing their backups.

The Pain

The last question was more of a free form entry around what’s bugging people when managing backups. I’ll let folks browse it on their own, but here’s what I found interesting:

  • ~21% of the responses referenced concerns about having enough space for their backups.
  • Several respondents were frustrated by needing to build out reporting/management solutions.
  • There were many concerns about having access to backups or being able to restore them in an emergency (mostly due to lack of space to either store enough backups or test them).

Wrapping It All Up

There’s probably a lot of different possible conclusions that can be leapt to from this data, certainly outside the ones I made. I’m certainly not claiming this survey as anything definitive, merely some interesting observations made from a healthy community response. Hopefully you also find the data interesting and I hope it sheds some light on to what’s happening out there in the wide world of SQL Server.

Before I go, a couple shout outs:

  • Meagan Longoria (@mmarie) for telling me how and why my data visualizations sucked. Seriously, though, don’t hold what you find in the PowerBI report against her. :)
  • Chris Lumnah (@clumnah) for helping me refine the survey questions.
  • All the folks who shared the survey link, helping me get to 344 responses.
  • The 344 of you who DID respond, helping make this survey into something worthwhile

Reporting on SQL Agent Jobs with #Powershell

SQL Agent jobs are a fundamental tool for managing our databases. Whether we are running regular backups, executing maintenance tasks, or performing a scheduled ETL process, being able to manage and run scheduled tasks is key to keeping our workload manageable. Of course, as our environment grows, keeping track of these jobs becomes harder and harder.

We can manage this growth by leveraging facets of Powershell. One aspect I continually advocate is Powershell’s ability to execute tasks easily across multiple servers. This means that our tools can easily adapt to the our growth. Additionally, since Powershell is a framework that supports different approaches, administrators can use a method most comfortable to them to accomplish their work.

Let’s take the case of reporting on failed jobs. Job failures usually mean that an administrator needs to troubleshoot an error, resolve it, and run the job again. Now, some jobs are critical and require immediate attention to fix. For this, the Agent provides error alerts and reporting that can execute at the time of failure. However, if it’s not as critical and can wait for someone to review it, we can build a reporting process that can be reviewed. I’d like to cover three techniques we can use in Powershell to accomplish this reporting and how you can leverage them yourself.

T-SQL and Powershell

The first technique is to simply combine a T-SQL query with some Powershell to execute across multiple instances and collect the results. Let’s start with the SQL query (borrowed from SQLMatters.com):

;WITH CTE_MostRecentJobRun AS
(
-- For each job get the most recent run (this will be the one where Rnk=1)
  SELECT job_id
    ,run_status
    ,run_date
    ,run_time
    ,RANK() OVER (PARTITION BY job_id ORDER BY run_date DESC,run_time DESC) AS Rnk
  FROM sysjobhistory
  WHERE step_id=0
)
SELECT
  @@SERVERNAME as Instance
  ,name AS [JobName]
  ,CONVERT(VARCHAR,DATEADD(S,(run_time/10000)*60*60 /* hours */
     +((run_time - (run_time/10000) * 10000)/100) * 60 /* mins */
     +(run_time - (run_time/100) * 100) /* secs */
  ,CONVERT(DATETIME,RTRIM(run_date),113)),100) AS [TimeRun]
FROM CTE_MostRecentJobRun MRJR
  JOIN sysjobs SJ ON MRJR.job_id=sj.job_id
WHERE Rnk=1
  AND run_status=0
  AND [enabled] = 1
ORDER BY name

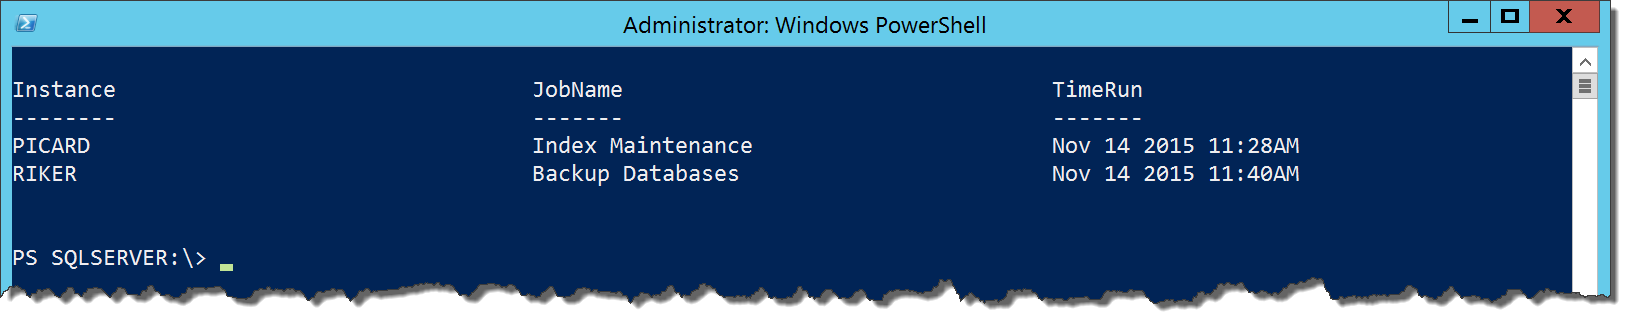
Running this within SQL Server Management Studio is easy enough and the query is exactly what we would expect. We want to run this against multiple servers. Now with a few lines of Powershell, we can create a report across all of our instances:

#I've already put the query into the $sql string variable.
#Not displayed here to save space
$servers = @('PICARD','RIKER','SPOCK','KIRK')
$servers | ForEach-Object {Invoke-Sqlcmd -ServerInstance $_ -Database msdb -Query $sql}

11-14-2015 11-47-36 AM

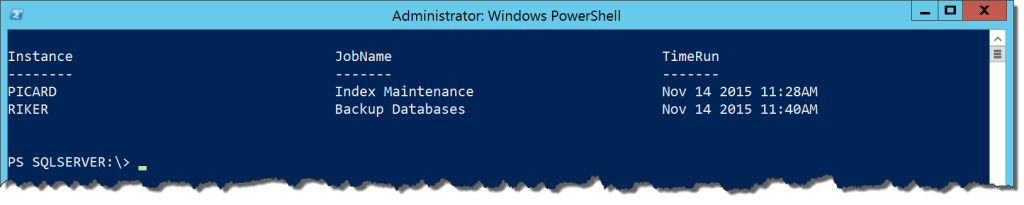
Pretty simple and it is flexible enough that all we have to do is add servers to our named list and we’re off to the races. If you want to make it even more dynamic, you could always leverage Central Management Server to populate your server list.

The SMO

This is effective, but I struggle a little with the SQL query. It’s good, but suffers from the structure of the jobs tables in MSDB. We have to account for that and it makes the SQL query a little convoluted. It would be helpful if we could reference a simple data set like the Job Activity Monitor in SSMS.

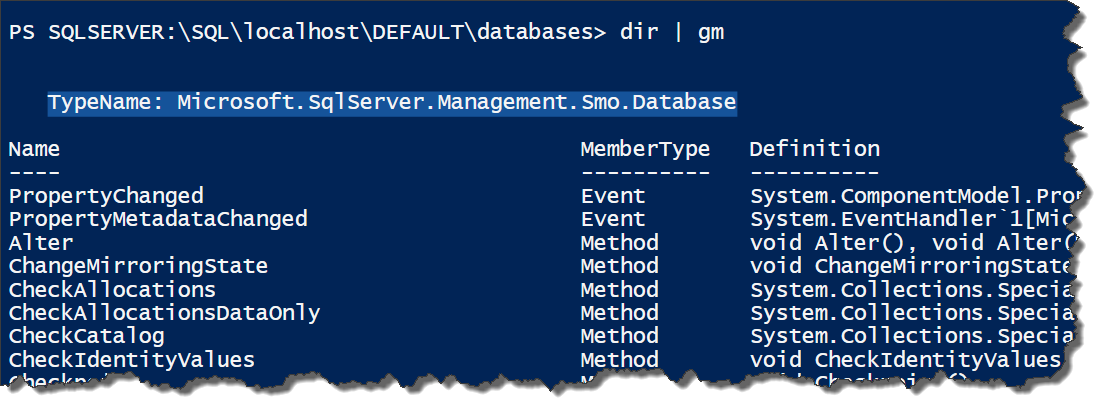
Of course, this is a leading question on my part. There is a way to do this and it is by leveraging the SQL Server Management Objects (SMO). This .Net library is the API interface for working with SQL Server and is what SSMS is built on. Because it is a .Net library, we can also access it through Powershell.

What we want from the SMO are the Smo.Agent.JobServer and Smo.Agent.Job classes. These represent the SQL Server Agent jobs and allow us to interact with everything within it. Using this and some handy Select-Object calls, we can accomplish what we want without the long T-SQL query:

[System.Reflection.Assembly]::LoadWithPartialName('Microsoft.SqlServer.Smo') | Out-Null

$servers = @('PICARD','RIKER','SPOCK','KIRK')
$servers | ForEach-Object {(New-Object Microsoft.SqlServer.Management.Smo.Server $_).JobServer.Jobs |
    Where-Object {$_.LastRunOutcome -ne 'Succeeded'} |
    Select-Object @{Name='Server';Expression={$_.Parent.Name}},Name,LastRunDate
}

11-14-2015 12-19-32 PM

We’ve accomplished the same task, but now without the complicated SQL query. Granted, this method is predicated on understanding the SMO object model, but this can be figured out using Get-Member and the MSDN pages that describe the methods and properties. Because everything in Powershell is an object, we can do so much more with the information contained within.
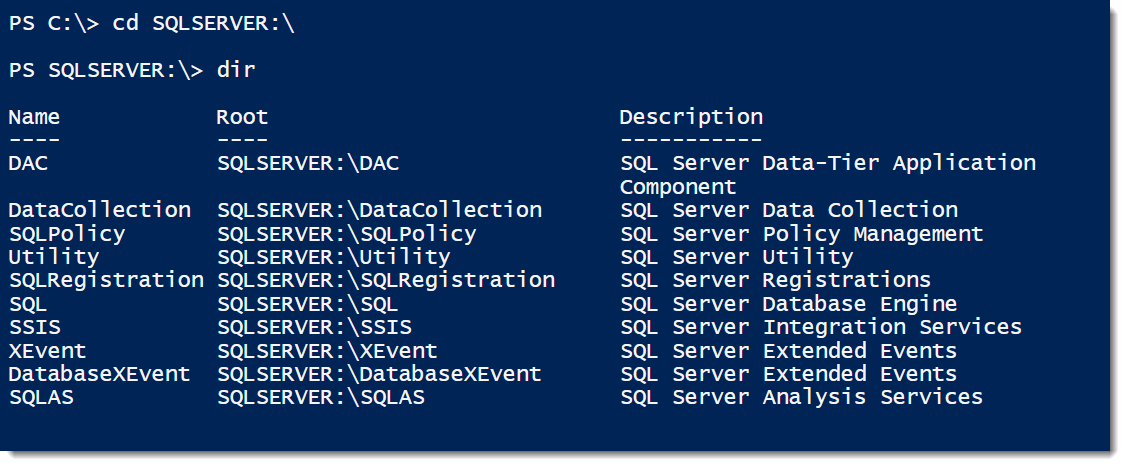
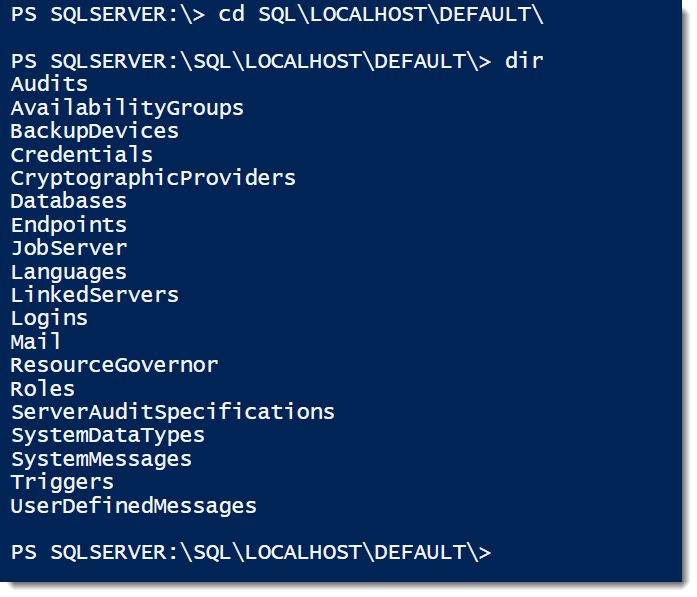
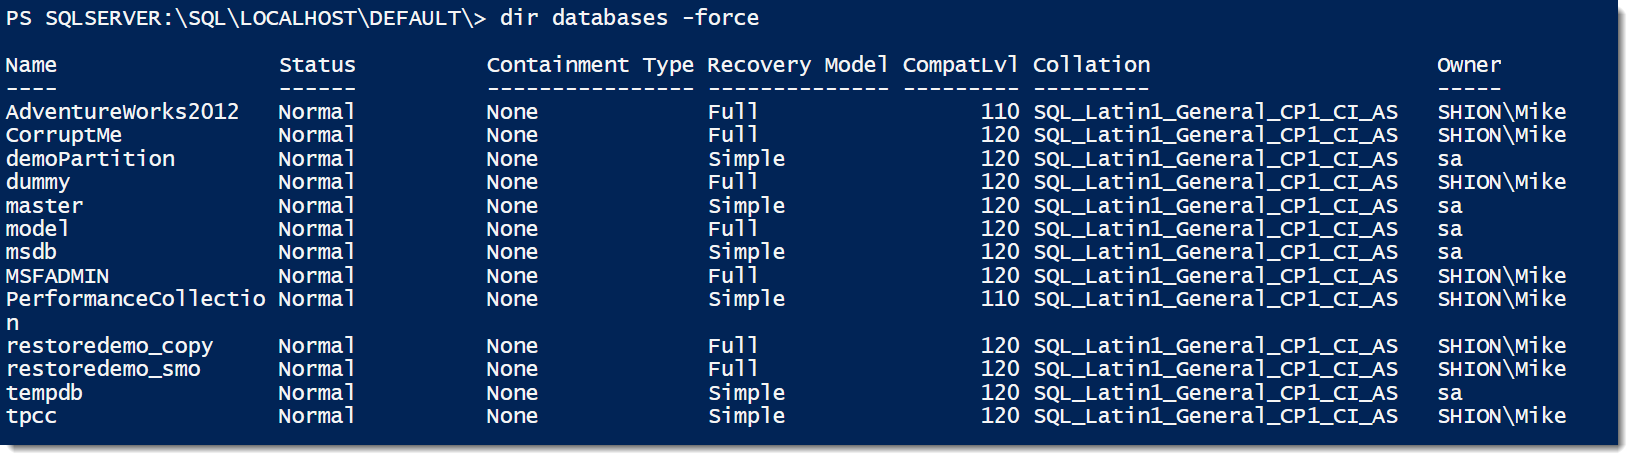
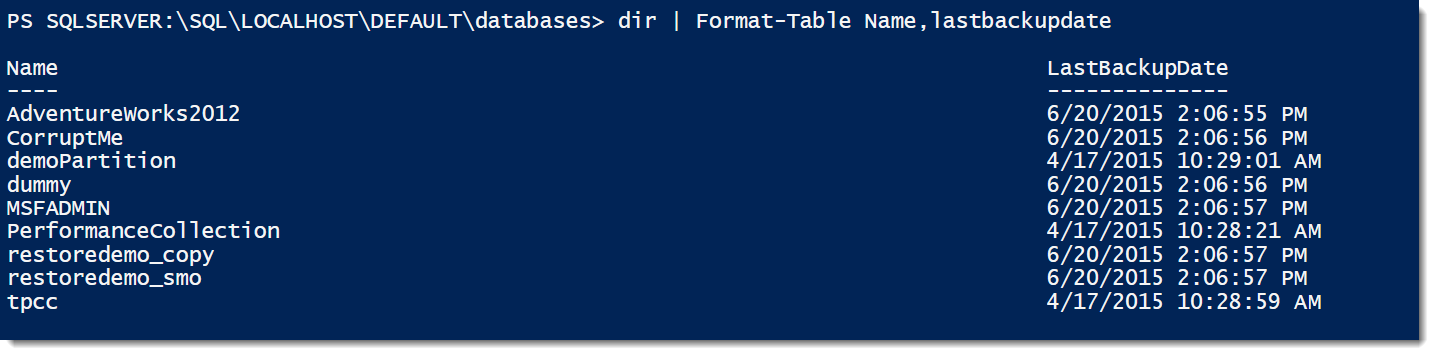
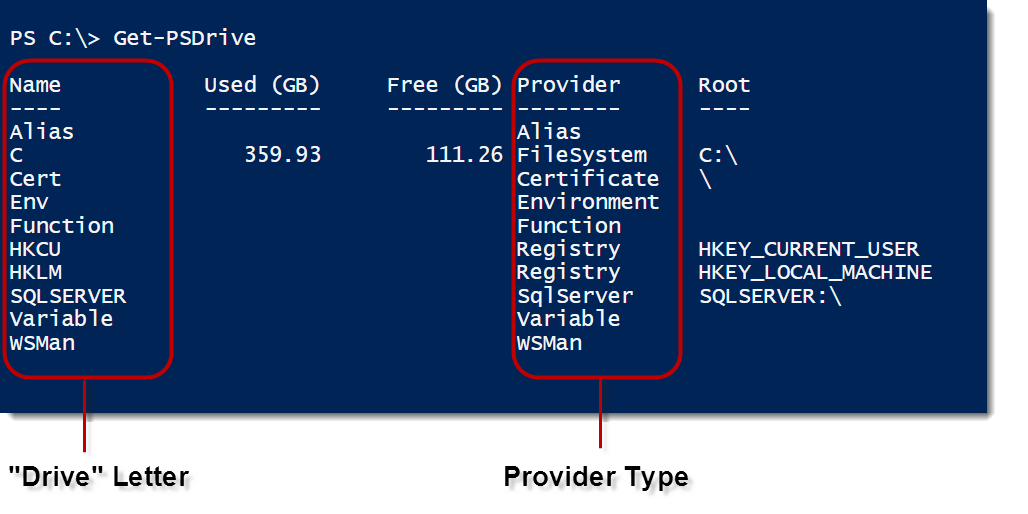
The Provider

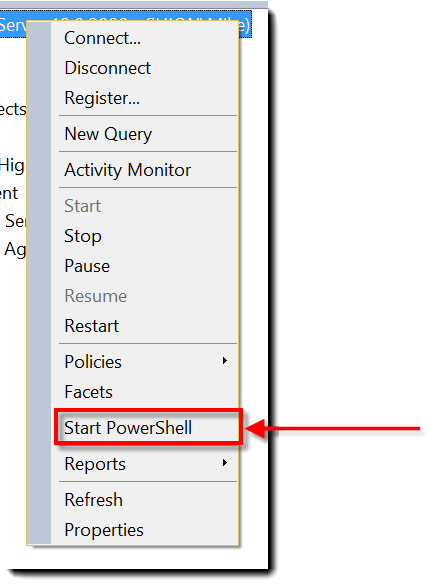
The third method is actually the same as using the SMO. The SQL Server provider is an additional layer of abstraction that lets us browse SQL Server components as if they were a file system. It uses the SMO to do its work, so it will be handled in a similar way and give us the same results as the pure SMO. However, we can skip some of the .Net instantiation techniques in favor of a simple directory lookup:

$servers = @('PICARD','RIKER','SPOCK','KIRK')
$servers | ForEach-Object {Get-ChildItem "SQLSERVER:\SQL\$_\DEFAULT\JobServer\Jobs\" |
    Where-Object {$_.LastRunOutcome -ne 'Succeeded'} |
    Select-Object @{Name='Server';Expression={$_.Parent.Name}},Name,LastRunDate
}

The output is exactly the same as the SMO, which makes sense because this method works in the same manner. However, because all the necessary libraries and objects are loaded when we load the provider (Import-Module SQLPS), we can skip the object instantiation. It removes another layer of complexity.

Wrapping Up

These three methods all give you the same amount of information, it’s up to you to decide which approach works best for your environment. For DBAs who want to work mostly with T-SQL and are still getting used to Powershell, the first option makes a lot of sense. For system administrators who have had SQL Server thrust upon them, the third option might work better as it doesn’t require any T-SQL knowledge. It’s all a matter of what is comfortable. However you want to work with your data, Powershell gives you the tools to get the information in a way that makes sense for you.

#Powershell and SQL Server: SQLPS Challenges and Hurdles

Over the last two posts, I’ve covered what the SQLPS provider is and how you can get started with it. Now it’s time for other side of the story. If you’ve started working with the provider or done some reading on the web, various hurdles have probably popped up. These hurdles can frustrate and discourage you, so let’s discuss them before that happens.

Slower than Molasses in January

The initial complaint you’ll usually see with the provider is that it’s slow. Mind numbingly slow. So slow that it breaks tab completion in the ISE. Unfortunately, due to the way the provider was implemented using the SMO, we don’t have a lot of options

What can we do? Unfortunately, there are no magic workarounds to implement. This limitation is why you will see a lot of Powershell/SQL development either use the SMO directly or implement .Net code that avoids this completely. The challenge here is that these approaches can be too advanced for administrators who are not used to code development. My recommendation is to be patient with it. The provider is your entry point and is your starting point. As you get more comfortable with Powershell, you will find SMO and other .Net methods will perform better for you. Begin with understanding the language.

What You Least Expect

Another challenge with the provider is that sometimes it will behave in a fashion that doesn’t quite make sense. As with the speed, we’re tied to how the SQL Server team at Microsoft implemented the provider. It is, after all, an API and this means we can only use the it as it was written. What I struggle with is that there there are elements of the provider that weren’t thought all the way through and occasionally they catch me by surprise.

One example of this is an interesting piece of behavior I discovered recently with a several online colleagues (Paul Timmerman, Chris Sommer, Derik Hammer, and Johan Bijnens). Basically, we found that there was no real way to refresh a Central Management Server listing within an existing Powershell session. Once a CMS registry was populated in your provider session, you were stuck with it. If you made changes to your CMS in SSMS, you wouldn’t see those changes propagated until you opened a new Powershell session.

While frustrating, it’s not a show stopper. The challenge, however, is that there are other little land mines like this in the provider and they pop up when you least expect it. This particular issue is not really a problem because you can always save a script and re-open your host. However, it should behave a little more consistently and at least give the user the opportunity to execute a manual refresh of the cached object. I’m hoping that the SQL Server team will be able to address this in future versions of SQL Server.

The Mini-Shell

SQLPS_warts_1Speaking of things that behave not as you would expect, I want to cover the notorious mini-shell. If you have ever right clicked in Management Studio Object Explorer, you’ve probably seen a Start Powershell option.

The intent of this option is to open up a command window with the SQL provider already loaded. This shell also duplicates what SQL Server does if you ever run a Powershell script within a SQL Server Agent job step. What catches people by surprise is how it behaves. In SQL Server 2012 or prior, the host machine will load using Powershell version 1.0 or 2.0, no matter what version you have installed on the host machine. This can be annoying because modules won’t be automatically loaded and some cmdlets aren’t available to you. This was fixed in SQL 2014, so whatever version is installed on the host machine will be used.

While this can present a hurdle for developing scripts to be used in the SQL Agent, it will not block you completely. You can always double check this by starting the Powershell task in Management Studio and interrogating the $PSVersionTable system variable. Beyond that, I haven’t had much reason to use the mini-shell for any Powershell tasks and prefer to work in the ISE or the standard Powershell command window host.

A Fixer-Upper

The SQLPS provider is klunky. It suffers from a little neglect by the SQL Server team and some slapdash coding to implement it. In light of some of the Powershell tools provided for Windows Server, Exchange, and Active Directory, it’s pretty frustrating to see the SQLPS provider languish the way it has. I have some theories around that and I hope that someday I can talk with the product team to see what changes can be made.

However, it should be noted that if you’re just getting started with Powershell, the SQLPS provider is still the best place to start. If you’ve read my other posts, you know by now there has been an effort to make the provider an intuitive path for building automation around SQL Server. Don’t let the hurdles stop you,. The provider will let you get far enough on its own and help you develop patterns that you can later improve and enhance.

Please feel free to leave any comments below on your experience with the provider and other questions you may have regarding it.

#Powershell and SQL Server: Using the SQLPS Provider

In the previous post, I gave an overview of what the SQLPS provider is and how it works. Now I want to pull back the curtains a bit and demonstrate how you can navigate the provider and use it effectively for managing your SQL Server instances. For those new to Powershell, this can be an effective way to start using the language without a lot of “overhead” for learning syntax and methods.

Being Direct

Focusing on the concept that providers allow us to browse parts of the Windows stack as directory structure, let’s start by just reviewing what “directories” are available with SQLPS:

SQLPS_use_1

Right away you can see that there’s a lot of familiarity here, as we can see many components of SQL Server that we’re used to seeing. For the time being, let’s go straight into the SQL Database Engine and look around by browsing down into the SQL\LOCALHOST\DEFAULT path:

SQLPS_use_2Pay attention to the structure of the directory paths:

SQLPS_use_3

This pattern is used throughout the provider, offering a consistent structure for our objects. The next thing to notice is that the list of items under our instance is pretty standard and looks very much like what we would find under the object browser in SQL Server Management Studio. The provider is merely an abstraction for all the usual parts of SQL Server that we’re used to seeing.

Objects and Details

The most basic thing we can use the SQLPS provider for is getting lists of our SQL Server objects. Just like getting a directory listing of our files, we can list out our databases with a simple command:

SQLPS_use_4

Note the use of the -force flag. If you leave the -force flag off, the provider will only return user databases. Including this flag will display all databases, including the system databases.

What should also be noted is that there are many more fields here available to us, which we can see using Get-Member. As DBAs, a common question is when our databases were last backed up. Within the SMO, each database has the .LastBackupDate property that shows the last full backup, which we can easily include in our directory call:

SQLPS_use_5

Getting Things Done

While listing objects (and you can list logins, agent jobs, and other parts of your instance in much the same way) is effective, what else can we do? The key to the next step is recalling that objects within the provider are all SMO database objects.  All of these objects will have attendant properties and methods. We can leverage the properties to accomplish some pretty standard tasks.

One thing I tend to do with my databases is set the owner to ‘sa’. This common task is easy to do in T-SQL and I certainly don’t want to discourage that option, but it’s also an easy task to manage in Powershell by using the .SetOwner() method:

cd SQLSERVER:\SQL\LOCALHOST\DEFAULT\databases
$dbs = dir

foreach($db in $dbs){
$db.SetOwner('sa')
}

#List the directory contents again and look at the owner
dir

With these few lines, I can quickly change the owner of all my databases. How cool is that? Now, one note about permissions. Any actions you execute through the provider will use your current security context. Typically, DBAs will have enough permissions to perform these tasks, but if the account you connect to does not have rights for a task, it will fail.

And so much more

There are so many more examples of what we could use the provider for. Simply using directory lookups can provide a lot of flexibility, but there’s more we can do leveraging the methods and properties of the Provider objects. From this point, it can get very advanced and complex. Focus on the fact that SQLPS provider is a starting point, a place where can quickly get in and manage SQL Server with Powershell.

Next up is some of the warts of the SQLPS provider. A lot of folks who have been using the provider have run in to some challenges. In a lot of ways, how the SQLPS provider works is a little clumsy. This doesn’t mean you shouldn’t use it, but I do want to cover some of the frustrations so that you are aware of them and they don’t prevent you from effectively using this aspect of Powershell.

#Powershell and SQL Server: The SQLPS Provider

One of the key entry points for using Powershell and SQL Server is the SQLPS provider. If you’ve been reading my blog for any length of time, you’ve seen me make use of the provider for one task or another. It’s an incredibly useful tool and can help you manage some basic tasks in SQL Server without a lot of additional coding on your part.

The struggle that I see is there’s a lot of confusion about what the provider is and how it works. There are also challenges and gotchas around what the SQLPS provider does that frustrate both new and long time users of Powershell. I hope to provide some clarity over the next few posts as I review the basics of the SQLPS provider, how I’ve used it, and how to work around some of these challenges.

What are providers?

The idea of providers is a foundational concept in Powershell. They are fully documented over on MSDN, or directly in Powershell by using ‘Get-Help about_Providers’. Let me give you a starting point, though: the general idea is that providers extend different parts of the stack as file system paths in your shell. They give users an intuitive method to browse components like the registry, environment variables, and SQL Server as if they were directory structures.

You can start by using ‘Get-PSDrive’ from your favorite Powershell host. You’ll see something like this:

SQLPS_Intro_1

Note that I’ve called out the important bits here. You can consider the Name column the drive letter for each provider. The different types of providers are listed on the right. Understand that the drives we are used to seeing (C:\, E:\, etc.) are FileSystem providers and essentially equivalent to other providers, like environment variables. The trick is that the behavior of each provider is different once you start working within them, but accessing them works the same.

Using Providers

To use a different provider is just a matter of running some familiar commands. You can switch to a different provider by using “cd” and see what’s in the provider by using “dir” (which are aliases for Set-Location and Get-ChildItem). All pretty easy, right? Try this, for example:

cd Env:\
dir
Get-Content PATH

Already you can see how handy this is, as it gives us a much easier way to view the PATH variable than that tiny little GUI box under Environment Variables.

Let’s talk specifically about the provider for SQL Server. The provider is not part of Powershell by default and you have to load it. Doing this is straightforward, you just need to import the SQLPS module that is installed whenever you installed the SQL Server 2012+ client tools.

Import-Module SQLPS
#If you want to see what’s in the module, use this...
Get-Command -Module SQLPS

When you execute this command, you’ll get a warning about cmdlet names. You can safely ignore this, the provider has loaded and I’ll cover this message in a later post. A gotcha here is that if your client tools are previous to SQL 2012, you’ll need to load a snap-in. This is an obsolete method, so I strongly recommend you upgrade your client tools to SQL 2012 or better.

The Provider Foundation

Before we get into actually using the provider, we should review what makes the provider tick. Remember that everything in Powershell is a .Net object. Everything. With this in mind, we can look at the building blocks that create the SQL Server provider by using the trusty Get-Member cmdlet:

cd SQLSERVER:\SQL\localhost\DEFAULT\databases
dir | Get-Member

Don’t focus on the directory we are drilling into, we’ll cover that in the next post. You are going to get a sizeable output, but you should focus on the first part:

SQLPS_Intro_2

Notice that the typename is a Microsoft.SqlServer.Management.Smo.Database object. This shows us that the SQLPS provider is built on that long standing SQL Server Management Objects .Net library.

I call this out because if you browse the interwebz for examples of using Powershell and SQL Server, you’ll see a mix of code. Some folks will use the provider structure, others will instantiate .Net SMO objects. What you should understand is that these approaches use the same fundamental building blocks. The difference is that if you use the provider, you have some additional abstractions that SQLPS provides you (which means less code), whereas creating the SMO objects forgo them (translating to more code, but more control).

Moving Along

Providers give you a lot of flexibility within your shell experience. The intuitive nature of them allow for an easy entry into using Powershell, whether you have a coding background or not. This folds quite well into the initial intent of Powershell, which is to provide a useful scripting experience for administrators who do not have development experience.
In my next post, I will cover specifics for using the SQL Server Powershell provider. We will review the fundamentals and how these can be leveraged for common administrative tasks. If you have specific questions about the provider and how it can be used, I encourage you to leave these questions in the comments section so that I can answer them in a later post. If you prefer, you can also email your questions to ‘mike at this blog domain’.

#Powershell and Automating SQL Server Builds-Part 3

Hopefully you’ve seen over the last two posts some basic techniques for automating and codifying your SQL Server builds.  There’s just two more items I want to cover here, questions you’re probably asking yourself already.

The build script

Let’s start with reviewing the whole build script to this point. While I wouldn’t recommend running this in production yourself, the finalized version looks something like this:

Run this from the install binary location
[Reflection.Assembly]::LoadWithPartialName(“System.Web”)
$SAPassword = [System.Web.Security.Membership]::GeneratePassword(16,4)
.\setup.exe /CONFIGURATIONFILE=<config file location> /SAPASSWORD=$SAPassword /IACCEPTSQLSERVERLICENSETERMS

#Configure the OS
New-Item -ItemType Directory G:\MSSQL\Data
New-Item -ItemType Directory H:\MSSQL\Logs
New-Item -ItemType Directory I:\MSSQL\TempDB

#Configure Instant File Initialization
$svcaccount = 'SDF\sqlsvc'
secedit /export /areas USER_RIGHTS /cfg C:\templocalsec.cfg
$privline = Get-Content C:\templocalsec.cfg | Select-String 'SeManageVolumePrivilege'
(Get-Content C:\templocalsec.cfg).Replace($privline,"$privline,$svcaccount") | Out-File C:\newlocalsec.cfg
secedit /configure /db secedit.sdb /cfg C:\newlocalsec.cfg

#Open the firewall for 1433
New-NetFirewallRule -DisplayName "Allow SQL Server" -Direction Inbound –LocalPort 1433 -Protocol TCP -Action Allow

#Set Server configurations
$smosrv = new-object ('Microsoft.SqlServer.Management.Smo.Server') localhost
$smosrv.Configuration.MaxServerMemory.ConfigValue = 4000
$smosrv.Configuration.MinServerMemory.ConfigValue = 2000
$smosrv.Configuration.MaxDegreeOfParallelism.ConfigValue = 4
$smosrv.Configuration.OptimizeAdhocWorkloads.ConfigValue = 1
$smosrv.DefaultFile = 'G:\MSSQL\Data'
$smosrv.DefaultLog = 'H:\MSSQL\Logs'
$smosrv.Alter()

#disable sa
$smosrv.Logins['sa'].Disable()

Next Steps

After this, we should consider deploying maintenance jobs, restoring databases, or building out things like availability groups. While I don’t cover these here, keep in mind these tasks can be scripted out as well.  I encourage you to consider how you could do this.  For example, if you leverage either Ola Hallengren’s scripts or the new Minion Reindex from the Midnight DBAs(@MidnightDBA), you have another piece you can automate. The key is that you have a repeatable process.

At Xero we have all our maintenance jobs as part of our administrative database deployment. This is handled through SQL Server Data Tools and .dacpacs. We achieve consistency and deployment speed by managing that solution and deploying the administrative database project. By maintaining the database in source control we manage our tool set, keeping it standardized.  When we add or update it, we can apply the changes out to our environment. This also means when we build a new server, we have a standardized way to install our admin tools with a minimum of muss and fuss.

The Point

Automation is more about consistency than speed, but speed is a nice side benefit. By assembling these components into a single script, we have a repeatable build process for any SQL Server in our environment. Our instances will be built the same way, every time, so long as we aren’t changing our script. The bonus is, since it’s all scripted, there’s no fumbling with wizards, dialog boxes, and making sure we type in the right values, so it all just happens. And in a matter of minutes. At Xero, I can take a server from nothing to ready for databases in about 20 minutes using these techniques.

Now, we could go pretty crazy with how we build our automation script. In fact, there’s some pretty cool tools out there that will help you with this. I’ll let you do that on your own. Just make sure that, before you do, you know all the steps you have to build your SQL Server. It’s fine and dandy to be able to script out things, but without a plan or process to automate first, most of the scripts you could write won’t do you much good because you can’t use them again.

P.S. HUGE thanks out to Melody Zacharias(@SQLMelody) for helping me with this series of posts.

#Powershell and Automating SQL Server Builds-Part 2

When last we left our heroes, we were discussing how best to go about building SQL Servers quickly and consistently using Powershell.  The thing is, we hadn’t quite gotten to the Powershell part yet and only really covered the build process plus installing SQL Server.  Let’s change that and move on to the next steps.

Configure the OS

It’s time to flex Powershell. Because Powershell works directly with the OS, it makes it really easy to perform tasks that SQL Server isn’t so good at. Let’s start with creating three directories for our database files:

New-Item -ItemType Directory G:\MSSQL\Data
New-Item -ItemType Directory H:\MSSQL\Logs
New-Item -ItemType Directory I:\MSSQL\TempDB

This assumes that our sysadmins have built the box with those LUNs. There are, of course, ways to script that out as well, but we’ll skip over that for the sake of brevity.

Enabling Instant File Initialization is a little tricky, because editing the local security policy is not something Powershell can do directly. Insert a harumph here. Anyway, we can do some tricks using the secedit tool. This technique, borrowed from Kyle Neier(@Kyle_Neier), basically dumps out the local security policy to a text file, updates it, then re-imports it to the local security policy. Kyle provides  a full function to use, but you can boil it down to the following script:

$svcaccount = 'SDF\sqlsvc'
secedit /export /areas USER_RIGHTS /cfg C:\templocalsec.cfg
$privline = Get-Content C:\templocalsec.cfg | Select-String 'SeManageVolumePrivilege'
(Get-Content C:\templocalsec.cfg).Replace($privline,"$privline,$svcaccount") | Out-File C:\newlocalsec.cfg
secedit /configure /db secedit.sdb /cfg C:\newlocalsec.cfg

As a quick aside, you might want to consider working with your sysadmins to actually set this permission in your domain Group Policy. Means you’ll get it without having to configure it yourself.

Finally, we want to make sure we open the firewall for port 1433:

New-NetFirewallRule -DisplayName "Allow SQL Server" -Direction Inbound –LocalPort 1433 -Protocol TCP -Action Allow

Configuring SQL Server

Now with the OS configured, it’s time to configure our SQL Server. For this, we’re going to leverage our friend and pal, the .Net SMO. As with many things in the SMO, the beauty of it is that we get a consistent API to interface with our SQL Server. For our purposes, we want to look at the Configurations collection of the Microsoft.SqlServer.Management.Smo.Server object. In here we can find everything you’d find in the sys.configurations view through T-SQL. Now let’s configure our max and min memory, max degree of parallelsim, and optimize for ad hoc queries.

$smosrv = new-object ('Microsoft.SqlServer.Management.Smo.Server') localhost
$smosrv.Configuration.MaxServerMemory.ConfigValue = 4000
$smosrv.Configuration.MinServerMemory.ConfigValue = 2000
$smosrv.Configuration.MaxDegreeOfParallelism.ConfigValue = 4
$smosrv.Configuration.OptimizeAdhocWorkloads.ConfigValue = 1
$smosrv.Alter()

Simple enough, right? You can get pretty fancy and add all sorts of logic to calculate these values, giving you a flexible setup script.

You could just as easily write these as a T-SQL script for a series of sp_configure executions to set your values. I’ve done it and know plenty of people who do. There are two reasons I’m moving away from this. The first is that some of my configurations, such the default database directories, need some specialized techniques (usually involving xp_regedit or something similar) to implement in T-SQL. I don’t like that approach because the extended stored procedures are usually unsupported and can have lots of issues. Powershell is much more graceful and (the second reason), using it across the board gives me a common interface for my configuration management.

In fact, let’s look at the default database directory settings. As stated, if you want to do this programatically in T-SQL, you are going to need to use xp_regedit to update the registry keys. Using the SMO is much, much easier:

$smosrv.DefaultFile = 'G:\MSSQL\Data'
$smosrv.DefaultLog = 'H:\MSSQL\Logs'
$smosrv.Alter()

Piece of cake, right? One last thing to do now, and that is disable the sa account:

$smosrv.Logins['sa'].Disable()

And we’re done!

To be concluded…

This builds the core of our server, but there’s a couple more odds and ends to discuss.  We’ll wrap up tomorrow with a few things, like how to handle maintenance jobs and other administrative tools.  We’ll also talk a little bit about the “why” of all of this.  Stay tuned for the thrilling conclusion!

(Well, I think it’s thrilling.)

#Powershell and Automating SQL Server Builds

Last week, my friend John Morehouse(@SQLrUs) and I had a bit of twitter banter about breaking and fixing things. Of course, my joke is usually “I have a script for that”, to which John replied:

Amusingly enough, I kind of do. It’s not quite the way you would think, though. Lately I’ve had a different attitude about “fixing” things in my environments, because sometimes it takes waaaaaaay more time to try and repair stuff than to just build it from scratch. Especially if you are scripting out your processes and automating your builds. This is what I would say to John;  if he walked in to my data center and abused my poor server with a wooden implement, I’d simply build a new one.

Before we get much further here, let’s talk about the fine print. Everything I’m going to talk about doesn’t get around backups, DBCC checks, or other processes we need to address as DBAs. We’re not talking about the data here, simply the server that hosts it all. It’s still vital that you do your due diligence to protect your data.

Building SQL Servers

So let’s talk about building our SQL Servers. Firstly, you should always have a defined build process for your environments even if you haven’t had a chance to automate or script it. Checklists and runbooks are the starting points for consistency in any IT shop and if you don’t have them, make them.

For our purposes, let’s assume the following build process. This is pretty basic and there’s lots of possible elements we could have, but I want to start simple. Here’s what we’re going to do:

  1. Install SQL Server
  2. Configure the OS
    1. Directory structures
    2. Instant File Initialization
    3. Open the firewall for SQL Server
  3. Configure SQL Server
    1. Configure max and min server memory, our maxdop setting, and optimize for adhoc queries
    2. Set default database directories
    3. Disable the sa account

I’m not going to give you a comprehensive script at this time, but instead show you how so you can use the same tricks in your environment. The reason for this is that everyone builds their servers a little differently, but if you define and script your process, you can  have your servers built and configured in 15-20 minutes.

Install SQL Server

This step is actually the easiest and has been around for a while, but I want to add a few twists to it. I always install SQL Server using a configuration.ini file. By using this approach, you can install your SQL Servers the same way, every time. You’ll find plenty of articles on the Googles on how to do this, so I won’t dive into it, but I want to address the matter of passwords.

The problem with using the .ini file is most folks (and this includes me) will put the passwords in plaintext in the file. This has numerous bad security implications. Depending on how accessible this file is, you could be giving away your service account and sa passwords and not even know it.

One step I take to manage this is I no longer include my sa password in the file, but instead randomly generate it when I install SQL Server. I went down this path because my friend Argenis Fernandez(@DBArgenis) got me thinking about how the sa account really gets used. The fact of the matter is that I rarely, if ever, log in to the server as sa. In my opinion, no one should even be using that account. This is why I will disable the account on my servers. I’m going to forgo the debate about whether this is a good idea or not (plenty of opinions on either side), but instead just work on the assumption that I need to provide some password to the account for the install. I still want a strong password, though, so I use the following code in Powershell to create my password and pass it as a command line switch. Feel free to read more up on the System.Web.Security.Membership GeneratePassword method for the details on how this works:

[Reflection.Assembly]::LoadWithPartialName(“System.Web”)
$SAPassword = [System.Web.Security.Membership]::GeneratePassword(16,4)
.\setup.exe /CONFIGURATIONFILE=<config file location> /SAPASSWORD=$SAPassword /IACCEPTSQLSERVERLICENSETERMS

This gets my install complete and, honestly, is the longest part of the process. There are ways to cheat around that, but I’ll save that for another post.

To Be Continued…

When I first started writing this, I figured it would be a quick post. Suddenly I found I was at 5 pages and going. So we’re going to break it up to make it a little more manageable.  Tune in tomorrow when we cover configuring the OS and SQL Server itself.

Growing Log Files Responsibly

One of the commonly referenced blogs out there is Kimberly Tripp’s(@KimberlyLTrippseminal post on Virtual Log Files.  If you haven’t read it yet, I highly recommend it.  It provides a good description of one of those quirks with your log files and how you should manage it.

Of course, while folks are familiar with this, it’s often not a practice that gets followed.  Why?  Because it’s hard to manage.  Usually it’s just easier to set the autogrowth settings and let the log find its own size.  This is where I hope I can help you out.

Just like anything we do, if we need to execute it more than once it should be script.  As such, I figured I’d share a T-SQL script I’ve put together for growing my log files out in 8GB chunks.  I’ve used this quite a bit when managing my own systems for when I either need to expand a log file or I need to resize it after an accidental blowout.

--Set variables
declare @dbname sysname = 'test'
,@limit int = 32000
,@filename sysname
,@currsize int
,@growth int
,@v_sql nvarchar(1000)

--Get initial settings
select @currsize = convert(int,floor(size/128.0))
,@filename = name
,@growth = 8000
from sys.master_files
where database_id = db_id(@dbname) and file_id = 2

--Grow file
while @currsize < @limit
begin
  select @growth = CASE WHEN @limit - @currsize < 8000 THEN @limit - @currsize ELSE 8000 END
  select @currsize += @growth
  select @v_sql = N'alter database '+@dbname+' modify file (name='+@filename+',size='+convert(nvarchar(10),@currsize)+'MB);'
  exec sp_executesql @v_sql
end

This is a fairly handy script and pretty easy to follow.  I set the database name and limit, then let the loop keep adding 8000 MB chunks until I get to the size I want.  No strange black voodoo magic, right?  That part is next.

Hopefully everyone reading this blog knows that I’m a big fan of Powershell.  If not, well…I’m a big fan of Powershell.  So I gave myself a little challenge to re-write that T-SQL script as a Powershell function to see how it would work.  Here’s the end result:

#load assemblies
[System.Reflection.Assembly]::LoadWithPartialName('Microsoft.SqlServer.SMO') | out-null
$ErrorActionPreference = 'Inquire'

function Expand-SqlLogFile{
  param(
  [string]$InstanceName = 'localhost',
  [parameter(Mandatory=$true)][string] $DatabaseName,
  [parameter(Mandatory=$true)][int] $LogSizeMB)

#Convert MB to KB (SMO works in KB)
[int]$LogFileSize = $LogSizeMB*1024

#Set base information
$srv = New-Object -TypeName Microsoft.SqlServer.Management.Smo.Server $InstanceName
$logfile = $srv.Databases[$DatabaseName].LogFiles[0]
$CurrSize = $logfile.Size

#grow file
while($CurrSize -lt $LogFileSize){
  if(($LogFileSize - $CurrSize) -lt 8192000){$CurrSize = $LogFileSize}
  else{$CurrSize += 8192000}
  logfile.size = $CurrSize
  $logfile.Alter()
  }
}
#Call the function
Expand-SqlLogFile -DatabaseName 'test' -LogSizeMB 35000

You’ll note that it’s about the same number of lines, does more or less the same thing.  For those of you familiar with the SMO, you’ll also know that at behind the scenes all it’s doing is running T-SQL.  So why write it this way?

First, it’s an interesting challenge just to help understand Powershell and how to write it.  It’s these kind of challenges that help me learn and expand my knowledge.  The second, though, is to explore the differences between the methods.  We know in the IT field, you can solve a problem in any number of ways.  While I love Powershell, I wouldn’t use it everywhere.  The only way to know where to draw the line, though, is to experiment and solve the same problem in different ways.