Art of the DBA Rotating Header Image

Server Core

Getting Tooled

This week Tom LaRock(@sqlrockstar) tweeted a question, followed by a full on blog post and survey, asking folks if they installed client tools on their servers.  My answer was pretty blunt:


This got wrapped up in a larger discussion about whether or not installing client tools is appropriate, with some strong (and not necessarily wrong) opinions on either side.  I confess I didn’t get involved, mostly because I find it hard to have a serious discussion in 140 character snippets.  So now I’ll blog about it! 

I’m the kind of DBA that is a “jerk”.  I say no a lot and prefer, in production, not to take any more action than absolutely necessary until it’s proven that the action will do no harm.  I don’t get off on it nor do I enjoy giving people the hand.  I’m just…..careful.  We’ve all been burned and it’s my responsibility to make sure that we’re protecting the company’s assets, both data and the systems that data lives on. 

The problem with client tools is they can create avenues for danger.  For example, if I install SQL Server Management Studio and the Sysinternals tools, I’ve created a way for a local administrator on that server to log in to my SQL Server as an administrator, even if it wasn’t my intention to grant him that access.  This can be extremely useful (such as a situation where you do lose your SQL admin logins), but there’s inherent risk there.  Other tools can create similar risk, so my view is to try and reduce this risk by minimizing client tool installs. 

Another problem with client tool installs is that client tools take resources away from SQL Server (or other processes that the server is hosting up).  I know, I know…we live in an age where RAM and CPU are plentiful, but I still get protective of my stuff.  These are MY toys and, since I’m a jerk, I hate sharing.  By restricting client tool installs, I proactively prevent this sort of sharing and keep folks out of my sandbox. 

Thirdly, by putting client tools on to server, I provide a crutch for those who feel they have to do all their work directly on the server.  This is a bad practice, even if you have resources.  You’re not just taking stuff away from SQL, things you could also seriously damage something without even intending to.  Accidentally shut down the box?  Easy.  Delete or corrupt critical files?  Piece of cake.  I often think of working on the server as playin around in the middle of a minefield and why put a tool I need in the middle of that minefield?  If the tool isn’t installed, there’s no reason to log in to a server, so it doesn’t even become an issue.

This is one of many reasons I’m so high on Server 2012 Core.  By the very lack of its GUI, a lot of people will shy away from tools.  And the tools are there, but let’s be honest with each other here:  Most of us Windows folks love our dialog boxes and ‘Ok’ buttons, our drop ‘n drag paired with right clicking.  Command line interfaces are an anathema and we will avoid them as a preference.

 I get it, though.  There are plenty of valid reasons why you would install those tools.  It can speed up troubleshooting and there are certain things that can only be done from the machine itself.  Plus, if your box is secure, you can reduce the risk of having those tools out there.  I would argue that, even with the box secure, minimizing your client tool installs will reduce your risk even further.

I challenge folks to really, REALLY ask themselves: Do you really need use those client tools on the server?  In most cases, you probably don’t.  And if you don’t need to use them on the server, then why are you installing them in the first place?
I need more power!

Man, sometimes blogging is hard. I meant to get this out earlier in the week, but better late than never, right?

When I was out at SQL Rally a couple weeks ago, I went to Argenis Fernandez(b|t) and Robert Smith’s(b|t) pre-con for SQL Server best practices. It was a good session, with lots of interesting discussion on ways to configure your environments for SQL. One gotcha we talked about was SQL 2008’s annoying power plans and how they get set to Balanced by default. Now, I get what Microsoft is trying to do with these plans, but defaulting to Balanced on servers? Really? Let’s use some common sense.

Anyway, before I get on a rant (don’t worry, I’ve got a couple of those in store for later blog posts), the question that popped into my mind when we started talking about this was how to do it on Server Core. Changing the plans on your standard Windows installs is easy, you just browse into Power Plans (click your start and type “power plans” in the search box). What about when we have no GUI? Do we panic? Of course not, because we have the command line!

Some quick Googling provided me with two items. One is powercfg, a command line utility that Microsoft has provided to allow us to edit these plans. It’s handy, but a little confusing, especially because the power plans use GUIDs for management and that adds a whole new level of trickiness. So, the second Google nugget to appear was this handy script from Aaron Saikovski, where he wraps powercfg in some Powershell to give us more graceful management. Here it is with some editing/tweaking from me for use:

function Set-PowerPlan(
    [ValidateSet("High performance", "Balanced", "Power Saver")] [string]$PreferredPlan)
{
	$currplan = powercfg -getactivescheme
	Write-Host "Current plan is $currplan.substring($currplan.Indexof('{')) [$(Get-Date)]"

    Write-Host "Setting Powerplan to $PreferredPlan"
    $guid = (Get-WmiObject -Class win32_powerplan -Namespace root\cimv2\power -Filter "ElementName='$PreferredPlan'").InstanceID.tostring()
    $regex = [regex]"{(.*?)}$"
    $newpowerVal = $regex.Match($guid).groups[1].value

    #Set the powerplan
    powercfg -S  $newpowerVal

	$currplan = powercfg -getactivescheme
	Write-Host "Current plan is $currplan.substring($currplan.Indexof('{')) [$(Get-Date)]"
}

#set Preferred powerplan
Set-PowerPlan $args[0]

Save the script and call it with whatever plan you want as the argument, or put it in your profile and call it as a function. Technically, you can use this to set the power plan to any of the default options, but my main use of it is to set the plan to High Performance for my Core servers.

UPDATE: Kendall Van Dyke (b|t) provides a handy way to update the plan using the WMI. I’ve not used it much, but I’ll definitely play around with it. In general, I think you could go either way for managing your powersettings.

Get-WmiObject -Class win32_powerplan -Namespace root\cimv2\power | ? { $_.ElementName -ieq 'high performance' } | % { $_.Activate() }

FILESTREAM on Server Core

A couple weeks ago, I did a post for T-SQL Tuesday on the Filetable, a cool new SQL 2012 feature. One thing I glossed over a little bit was enabling FILESTREAM for your SQL Server, where I just linked the MSDN article walking you through configuring the service using the Configuration Manager.  This is great as long as you have the GUI to use. However, I’ve said previously that I’m trying to do all my work (demos and blog posts) using SQL 2012 on Server core, which means no GUI. This makes it a leeeeeeeeeeeeeetle trickier and requires some more advanced techniques.

We need to flex our Powershell muscles for this. For me, this still means hitting the Google search to find the command syntax I need, though I understand it a little better. I found this excerpt from Wrox’s Microsoft SQL Server 2008 Administration with Windows PowerShell on Google Books.  The example shows, quite clearly, how to use Powershell to hit the WMI and the appropriate methods to enable FILESTREAM with the right perms and names.

I took the example there and reworked it slightly, mostly to change the namespace so that it will use the correct SQL 2012 interface.  It’s not much, when you get right down to it.  The core purpose is to create the WMI object and then use the EnableFilestream method (which may be hard to do if you don’t know the appropriate namespace to use):

instance="MSSQLSERVER"
$wmi=Get-WmiObject -namespace "root\Microsoft\SqlServer\ComputerManagement11" -class FILESTREAMSettings | where {$_.InstanceName -eq $instance}
$wmi.EnableFILESTREAM(3,$instance)

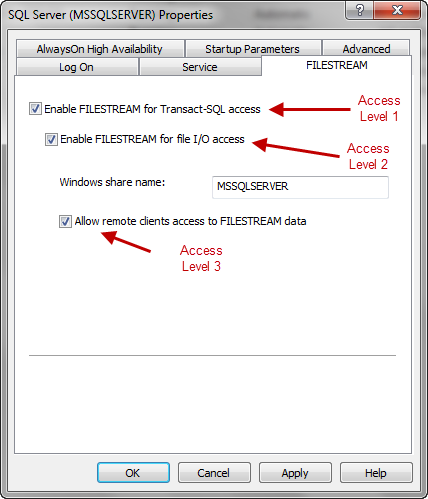
There are two parameters to the EnableFILESTREAM method. The first is access level, with 4 possible values that relate to how much access is granted to the filesystem. The easiest way to understand it is to relate the values to the settings in the GUI:

(Access level 0 is where no boxes are checked, essentially disabling FILESTREAM)

The second parameter is simply the share name, so in this example we would create\\<SERVER NAME>\MSSQLSERVER for our FILESTREAM objects.  Now, note that you still have to run the SQL to configure the SQL Server side of things (see my previous post).  This step just replaces activating the service properties from the Configuration Manager.

The other alternative to this method is to use the remote management tools to connect to the instance and alter the service settings through the GUI. I like this way better, though, because I have more control over it and I don’t need any additional connections or tools.

Edit:  I forgot to mention that this will require you to restart the SQL Service to apply (thanks Hayden Hancock for pointing this out in the comments).  Since we’re Powershelling it:

Get-Service $instance = “MSSQLSERVER” | Restart-Service

Thursday Bonus Series – Core Mechanics, Part Three

So here we are. After installing Server Core and configuring it, we’re ready to install SQL 2012. Fortunately, this is the easy part. We only have two steps and both are things that have been common actions for many years now.

The first step is to install the .Net 4.0 libraries. SQL Server requires these and they’re currently not part of the Windows configuration/setup. We’ll need to head out to MSDN and download the standalone .Net 4.0 installer for Server Core. You’ll need to do this on a separate machine since you won’t have access to a web browser on your core machine itself, but it’s not a large file(~50 MB). Once you have it, copy it over to your core machine and run the executable. The install should take 5-10 minutes and then you’re ready for SQL Server.

Step two is something I’ve done a lot of and strive to make a habit in most of my SQL Server environments: an unattended install. For those of you unfamiliar, this is simply the practice of installing SQL Server from the command line using a configuration file. This is actually how SQL Server is typically installed, you’re just building your configuration file as you click through the GUI. Read up on it on MSDN.

For my install, I’m just going to use the sample configuration.ini file found on MSDN, with only a couple adjustments for my environment and a couple additional flags. I won’t go through the whole file, but here are a couple key options that are used:

  • QUIET=TRUE – You *must* have this set, as any other option requires GUI elements of the install and your install action will fail. Like I said earlier, Server Core hears ya’, Server Core don’t care. We’re flying without visuals here, folks.
  • IAcceptSQLServerLicenseTerms=TRUE – Typical license agreement acceptance, but since we don’t have a GUI with a checkbox, we need to indicate our acceptance in our configuration file.
  • TCPENABLED=1 – By default, SQL Server won’t enable TCP communication. So instead of going into the configuration tools after the fact, we’re going to enable it in our setup with this flag.
  • SECURITYMODE=SQL – I rarely see servers that are Windows authentication only, but SQL Server uses that mode by default. We need to use this option in order to set mixed mode authentication. This also means we MUST use the SAPWD option to declare our SA password.

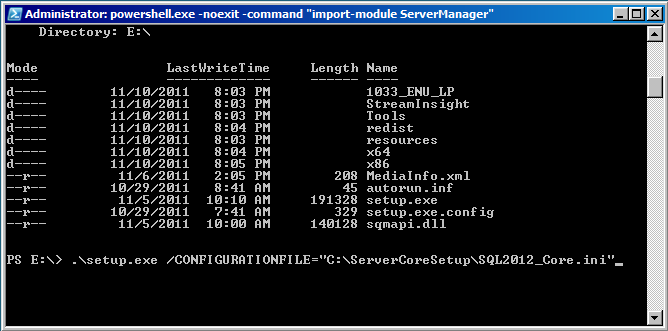
Once we have this, it’s a simple matter of running setup.exe and declaring the configuration file. With my VM, I’ve mounted the SQL 2012 RC0 image to my E:. From here, it’s one line and off we go. 

Now we just wait for SQL to install, which should take 5-10 minutes depending on your system. Once it’s complete, then we can fire up SQL Server Management Studio and connect to our brand new instance.

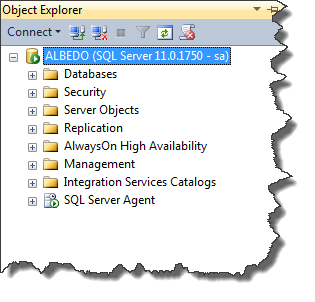
After this, it’s just SQL Server folks. Everything we’re used to doing, whether it’s using T-SQL or the Object Explorer, we’ve done before. It’s just now we’re doing it on a box that has a smaller OS footprint, leaving us with a happier place for our SQL Instance to live.

With our install complete, I want to leave you with a couple extra tips. Keep in mind that while the server itself has no GUI, we can still use MMC snap-ins to connect to the server remotely and manage it. This way, if you need to change firewall rules, add users, or any other management task, you can still use the tools your familiar with. Also, by forcing remote administration, you’re adding an additional level of security to your systems.

While AlwaysOn and many of the business intelligence features are being highly touted, I’m pretty excited about this bit of functionality in SQL 2012’s feature set. There’s a lot of power here for automation, security, and performance (all things I love), so I’m going to be pushing this where ever I can. Hopefully you can benefit from it as well.


Thursday Bonus Series – Core Mechanics, Part 2

Previously on Art of the DBA, I walked you through a basic install and setup of Windows 2008 Server Core. Now that we have our server setup with an OS, a name, and an IP, it’s time to prep it so we can install SQL 2012. Let’s get started, shall we?

Left-Right-Left-Right-A-B-Select-Start

Before we get too far, I have a cheat I confess to. A lot of these commands I am going to run are saved in scripts to spare myself from typing commands. As I’ve mentioned previously, I’m lazy and the beauty of automation is having scripts. So the first thing I’ll do is open up the firewall so I can copy my scripts down:

netsh firewall set service fileandprint enable

This command enables file and print sharing. Now, normally this will be off (and I tend to turn it off when I’m done), but for the initial setup I want to be able to get at the machines local drives and put my scripts there.

The second thing to do is to activate Windows. Just because we’re using Server Core doesn’t mean Microsoft doesn’t care about us registering the OS, even if they make it harder. Go ahead and run:

SLMgr.vbs -ipk <<Serial Key>>
SLMgr.vbs –ato

The first command will load your serial key into the machine, the second command will communicate with Microsoft to validate your key and activate your machine.

Great, with all that out of the way, let’s get to the fun stuff.

Configuring your Console

Full disclosure, I’m still pretty new to Powershell. Oh, I’m no stranger to scripting (VB scripts as well as Korn/Bash are in my repertoire) and, as we’ve discussed, I love the command line. But I’m still getting used to the syntax and all the different calls. This means that I want to make sure Powershell is loaded and set as my default shell for my Server Core installation. To do this, I’ll run the following script:

REM Install base packages
REM install .Net
start /w ocsetup NetFx2-ServerCore

REM Install powershell and modules
start /w ocsetup MicrosoftWindowsPowerShell
start /w ocsetup ServerManager-PSH-Cmdlets

The comments explain what’s going on, but let’s touch on a couple of things. First is ocsetup, which is a command line utility to install Windows components. What I am using it here for is to first install my basic .Net libraries, then Powershell and Powershell’s ServerManager commandlets. Once that’s all installed, I restart the machine and then fire up powershell itself (by typing ‘powershell’ and the command prompt) so I can wrap up the rest of the configuration.

Finishing touches

With powershell running, we can start on our final steps. First, I will set my script execution policy so I can run scripts (and save myself some effort):

set-executionpoilicy remotesigned

For more on what this means, here’s a link. With this in place, I can now execute my final steps, using the following script:

#Run from Powershell, configure powershell
import-module ServerManager
enable-psremoting

#configure powershell as default shell
set-itemproperty "HKLM:\Software\Microsoft\Windows NT\CurrentVersion\WinLogon" shell 'powershell.exe -noexit -command "import-module ServerManager"'

This script will go ahead and import the ServerManager commandlets for the current session (commandlets are not loaded automatically). This makes our life easier for setup. The next command then allows for remote powershell script execution. While I don’t use it for this job, it’s nice to have. Finally, I make a registry key change so that when I log on in the future, it will use Powershell as my default shell.

Finally, we configure our Windows features and firewall:

#Install x64 components
Get-WindowsFeature WoW64-NetFx*,WoW64-Powershell | Add-WindowsFeature

#update firewall
netsh advfirewall set currentprofile settings remotemanagement enable
netsh advfirewall firewall add rule name="SQL Server(1433)" dir=in action=allow protocol=TCP localport=1433

With this, I add all the necessary .Net and Powershell libraries I’ll want for future use. Then I enable the remote management settings in the firewall, along with opening up port 1433 for SQL Server.

And with that, we’re ready to actually install SQL 2012, which I will cover in the next post! Stay tuned!

Thursday Bonus Series: Core Mechanics Part One

I’m not sure how many folks out there have heard of Server Core yet. The quick and dirty is that it’s a version of Windows Server that has most of the GUI elements stripped out. No, Microsoft didn’t develop this version for technological masochists (like me), but wanted to provide administrators with a Server installation that was leaner, meaner, and more secure. By taking out the graphical portions, you get some nice benefits for your environment, including a smaller footprint for your install, tighter security, and reduced security patching (look at how many of those updates fix bugs with IE).

Up until SQL 2012, SQL Server was too dependent on the graphical libraries in Windows to run on Server Core. Now with the next version, we get the support to install SQL Server to Core, something I’m pretty excited about it. I went ahead and created a VM installation of Core with SQL 2012 and then provide some blog posts to walk you through the process so that hopefully you can do the same in your lab environment.

First things first

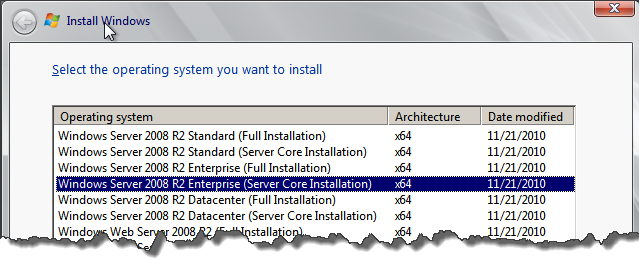
Before we do anything, we must (of course) get Core installed on a VM. For information on setting up a blank VM, check out my virtualization posts. Then just fire up the machine with your OS install and make the usual selections. Well, usual until you get to the install version:

I’ve gone ahead and selected the 2008 R2 Enterprise version, Server Core installation. There’s also corresponding Core installations for the other versions, so go with what works for you. Once you click ‘Next’ here, the install will happily churn along (go progress bar, go) until it’s ready for you to enter an administrator password. Once that’s set, you’ll boot into the OS and see…

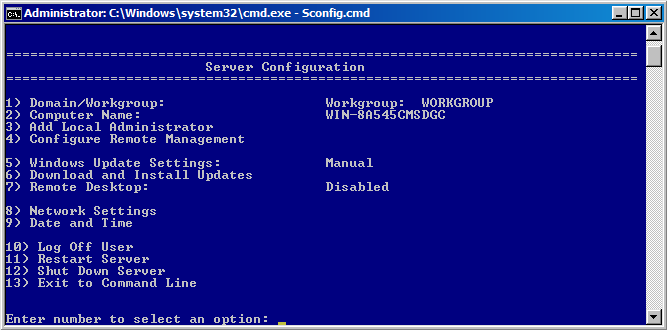
BAM! Command line! “But wait!” you say, “There’s so much to do before I’m ready for this!” Server Core hears ya’, Server Core don’t care. Fear not, though, because with Server Core, we get a utility that allows us to do some of the basic configuration of your machine. Just type ‘SConfig.cmd’ at the prompt and you’ll see:

Ah, much more comfortable, right? The utility is easy to use, just select and option and respond to the prompts. Using this utility, I’ll do the following:

  • Change my computer name to ‘ALBEDO’
  • Update Windows with all current patches
  • Go into Network Settings and set my IP as 192.168.56.102 (Static)
  • Confirm that my date and time settings are correct.
  • Create a local admin account – ‘mfal’ (Because only bad people use the default Administrator)

This is just the start, of course. We still have several things to do to prep our machine for SQL 2012. In the next post, I’ll cover the basic OS setup, including setting up Powershell as our default shell, enabling the firewall to support SQL Server, and making sure we have the correct Windows features installed.