Art of the DBA Rotating Header Image

automation

Defending Invoke-SqlCmd

Twitter. It can be annoying, it can be frivolous, but you’d be surprised at how many times it gives me a blog topic. This time around, I was having a back and forth with some folks about Invoke-SqlCmd. I had recommended someone try using it, which was followed by a lot of people griping about the cmdlet while suggesting other community tools or scripts should be used.

While I understand where a lot of these folks come from, I wanted to share a little, in a longer form, about why I use and recommend Invoke-SqlCmd. I think it still gets a bad rap from the PowerShell power users for some of its…quirks. I want to stand up for this handy little cmdlet, which I think is likely the most useful part of the SqlServer PowerShell module.

The .NET Root

When we start talking about Invoke-SqlCmd, what are we trying to do? At the core, PowerShell scripters need something to execute SQL commands within the context of a .ps1 script. I often speak of how PowerShell is a framework where you can tie different parts of the Windows stack together, so this ability to run SQL is needed.

One of the strongest elements of PowerShell is that it is built on .NET, which means we can always use .NET code and objects. In the case of SQL, we can use traditional ADO .NET code to execute SQL against a SQL Server instance:

$Datatable = New-Object System.Data.DataTable    
$Connection = New-Object System.Data.SQLClient.SQLConnection

$Connection.ConnectionString = "server=localhost;database=AdventureWorks2012;trusted_connection=true;"
$Connection.Open()
$Command = New-Object System.Data.SQLClient.SQLCommand
$Command.Connection = $Connection
$Command.CommandText = 'select top 10 BusinessEntityID,PersonType,FirstName,LastName from person.Person'

$DataAdapter = new-object System.Data.SqlClient.SqlDataAdapter $Command
$Dataset = new-object System.Data.Dataset
$DataAdapter.Fill($Dataset)
$Connection.Close()
$Dataset.Tables[0]

As you can see, this is pretty verbose.  We have to create a connection object and set its command string, then open the connection, execute the SQL, populate the data set, close the connection, then finally return the data set. No matter how you slice it, this is a lot of code for a simple SELECT statement.

SMOing it up

To avoid this verbosity, most programmers wouldn’t rely on the raw .NET unless they absolutely needed to. Instead, they would use existing libraries (or write their own if they had to). This is where the SQL Server Management Objects (SMO) come into play. I’ll skip the long boring explanation of what SMO is and just focus on the fact that we can use these existing libraries to simplify our call:

$smosrv = New-Object Microsoft.SqlServer.Management.Smo.Server
$query = 'select top 10 BusinessEntityID,PersonType,FirstName,LastName from person.Person'
$results = $smosrv.Databases['AdventureWorks2012'].ExecuteWithResults($query)
$results.Tables[0]

The SMO lets us reduce twelve lines of code (ignoring whitespace) to four for our SELECT output. This is the power of using existing libraries. We don’t have to reinvent the wheel for our work,which means we can focus more of our effort on everything around the SQL statement.

But what if we could make it even easier?

Keep It Simple, Sir (or Ma’am)

Three lines of code isn’t that much. The problem is that our code is a little less intuitive. Let’s keep in mind that most PowerShell scripters are not .NET programmers. Understanding dot notation isn’t necessarily difficult, but if it doesn’t come naturally to you there’s a learning curve that you have to climb.

This is where Invoke-SqlCmd starts to make sense. First off, it wraps up all the functionality of the above .NET code so we can use it with the cmdlet call. Also, it follows the founding concepts of the PowerShell language, where the syntax is verbose enough to understand what you’re passing as arguments. Let’s look at our simple SELECT now using Invoke-SqlCmd:

Invoke-Sqlcmd -ServerInstance localhost -Database 'AdventureWorks2012' `
    -Query 'select top 10 BusinessEntityID,PersonType,FirstName,LastName from person.Person'

If we break this down, you can see we have a clear set of syntax for calling the cmdlet. We specify an instance, a database, and a query. The output is an array of data rows, though it could be a datatable if you’re using the most current version. Most scripters are not going to need much more than that. It’s a straightforward solution to a simple problem.

So why not?

Why do people gripe so much about Invoke-SqlCmd then? Well, to understand this is to understand the history of SQLPS. For a long while, the SQL Server module for PowerShell was klunky and buggy. There were a lot of challenges with loading it and using it, such that many scripters decided to throw it out and write their own functions. In many cases, PowerShell folks would skip Invoke-SqlCmd not because it was bad, but because it came packaged with the rest of SQLPS and they wanted to avoid the entire module.

Now that the SQL Tools team has been reworking the module as SqlServer, this has become less of a concern. The module is less of a burden to load and the other components do not get in the way. There are also improvements and updates to the code to make it work better and serve more needs.

There are other reasons as well, but it usually boils down to the use case. Invoke-SqlCmd is great, but it can’t do everything. My anecdotal evidence is that the cmdlet will handle upwards of 90% of what I need it for, but there will still be edge cases. For these edge cases, we always have the more code intensive options available to us. This is why PowerShell is so great, there’s always another way, whether it’s writing more detailed code or using a community function.

To touch on this last point, this is where I also bump up against folks. There are some fantastic community functions out there. Seriously, check out DBATools if you haven’t yet. These tools enhance and expand your PowerShell experience and I make heavy use of these tools. They also have better alternatives that address the quirks of the core SqlServer module.

The rub is that you can’t always rely on community tools being available to you. Sometimes a corporate environment won’t let you install those tools or scripts. It might be that you go into a gig and they haven’t even heard of these tools. I can tell you that as consultant, I have to be very considerate of my client’s environments before I start bringing in outside code. However, because Invoke-SqlCmd is part of Microsoft’s tool set, I can rely on it being there. There are less steps and hurdles to making use of it.

Making Sense Of It All

There are a lot of reasons for using this little cmdlet. There are also reasons not to use it, depending on your situation or use case. My goal here is to not let the baby get thrown out with the proverbial bathwater. Invoke-SqlCmd is one of my favorite cmdlets in my toolbox and (most of the time) it does exactly what I need it to. Whether I’m writing scripts or working adhoc on a server, I usually don’t need a lot of fluff, just a way to execute a SQL query and sometimes get something back.

I hope you enjoyed my little love letter to Invoke-SqlCmd. I understand if it doesn’t suite your needs, but maybe you should give it another look? Or, if you’re a PowerShell newbie, you can see why using it can make your life a little easier. Wherever you go next after this blog post, I hope it is with a clearer view of how Invoke-SqlCmd can fit into your own PowerShell habits.

Using #PowerShell to Restore to a New Location

Now that I’ve gotten some of my thought pieces out of my brain, I wanted to get back to some more technical posts, starting with some simpler techniques for people trying to figure out how to use SQL Server and PowerShell together. I know that a lot of database pros are starting to understand the importance of the language, but still struggle with some practical examples of how to get started. One of my goals with this blog is to bridge that gap.

When restoring a backup, it can be tedious to restore to a new location and have to figure out your MOVE statements. If you only have one data file and one log file, it’s probably not a big deal, but it’s still annoying. Usually, the steps for me are:

  1. Figure out my new data and log paths.
  2. Run a RESTORE FILELISTONLY against the backup file to get the files.
  3. Write out my RESTORE WITH MOVE commands using the new paths.
  4. Execute

None of this is difficult, but we can still make it easier. We have an established process, so putting some PowerShell scripting around it can automate our restore to make the script building faster and more consistent.

Our weapon of choice will be Restore-SqlDatabase. This workhorse cmdlet has been part of the both the old SQLPS and the new SqlServer modules. The functionality hasn’t really changed, meaning that what we go over here should work for you regardless of what module you use. I always recommend using the most recent version of the code, but don’t worry if you can’t.

The cmdlet is straightforward in its use. Fundamentally, all we need to declare is an instance, database name, and backup file. However, if we don’t declare anything else, the cmdlet will try and restore the database files to their original locations. Keep in mind this is no different than how a normal RESTORE DATABASE command works.

This is where we make our lives easier with PowerShell. First off, to move files using Restore-SqlDatabase, we need to create a collection of RelocateFile objects. Don’t let the .Net-ness of this freak you out. All we’re doing is creating something that has the logical file name and the new physical file name. In other words, it’s just an abstraction of the MOVE statement in RESTORE DATABASE.

Let’s look at some code. I’ve got a script, but I think the best way to approach it is to break it up and talk about each section individually, just to make sure we’re all on the same page. To get started, we should declare a few things: the new file locations, output of a script file, database name for the restore, backup file, and then an array we can store our RelocateFile objects in.

#Set Variables
$NewDataPath = 'C:\DBFiles\Data'
$NewLogPath = 'C:\DBFiles\Log'
$OutputFile = '.\restore.sql'
$dbname = 'AdvWorks2014'
$BackupFile = 'C:\DBFiles\AdventureWorks2014.bak'
$relocate = @()

Next up is a simple RESTORE FILELISTONLY to get our file list. This needs to be done with Invoke-SqlCmd because there’s no support in Restore-SqlDatabase (or any other cmdlet) for the file list option.

#Get a list of database files in the backup
$dbfiles = Invoke-Sqlcmd -ServerInstance localhost -Database tempdb -Query "RESTORE FILELISTONLY FROM DISK='$BackupFile';"

Now comes the “magic”. Our RESTORE FILELISTONLY call gives us a collection for all our files, but it’s all the old locations. We will look through this collection, do some string replacement, and create our RelocateFile objects. I want to call out the use of Split-Path -Leaf, a handy cmdlet that will separate out the different parts of a file path. By using -Leaf, the cmdlet give you only the actual file name. We can just append that value to the end of our new path (using Join-Path) and use that for creating the RelocateFile object for each file.

#Loop through filelist files, replace old paths with new paths
foreach($dbfile in $dbfiles){
  $DbFileName = $dbfile.PhysicalName | Split-Path -Leaf
  if($dbfile.Type -eq 'L'){
    $newfile = Join-Path -Path $NewLogPath -ChildPath $DbFileName
  } else {
    $newfile = Join-Path -Path $NewDataPath -ChildPath $DbFileName
  }
  $relocate += New-Object Microsoft.SqlServer.Management.Smo.RelocateFile ($dbfile.LogicalName,$newfile)
}

Creating the RelocateFile objects is the heavy lifting. After this, it’s just a matter of calling Restore-SqlDatabase with the right arguments. Note that I’m using the -Script argument and piping this to Out-File. We’re using PowerShell to create a SQL script, which is a pattern I like. As handy as these tools are, they don’t always get everything, so I will use scripts to create scripts and then edit the final output with whatever else I need.

#Create Restore script
Restore-SqlDatabase -ServerInstance localhost `
-Database $dbname `
-RelocateFile $relocate `
-BackupFile "$BackupFile" `
-RestoreAction Database `
-Script | Out-File $OutputFile

By saving and reusing this script, I have saved myself a lot of man hours for restores. The strength here isn’t in any mystery code or magic functionality. It is simply a matter of leveraging a framework to automate an existing process.

I’ve actually taken this script and created a more formalized function with it. The core is there, but in keeping with the tooling spirit, I’ve added some additional code that validates file system paths. You can find it on my GitHub repository and you’re welcome to download and make use of it yourself.

Highways and Railroads

Stop me if you’ve heard this one….

“We don’t have time for process, it just slows us down.”

In the buzz of today’s world, you’ve probably had this thrown at you at least once. Process has supposedly become an anathema to productivity. Everyone from developers up to CTOs seem to think that you need to get rid of process in order to turn out timely software.

Well, they’re wrong.

I understand the reasons behind it. As someone who’s had to fill out change request forms to alter a server’s MAXDOP setting, process can be tedious and troublesome. It can be a shackle that mires work in the swamp of forms and sign offs. When you’re living in a world of “get sh*t done”, process can be a thorn in everyone’s side.

There’s another side of the coin, though. Process, done right, will ensure that work is done the same way every time. It can provide protection against costly mistakes, unexpected outages, and other business pains that puts everyone under the gun. Also, if you build your process right, it won’t be a bottleneck to your work but a guide rail to keep you on the right track.

Driving vs. Riding

The analogy I like to use with folks when I explain the need for process is by comparing highways and railroads. Think about how you drive for a moment. When you’re on the highway, with a bunch of other people trying to get to the same place, you can only go so fast. You’re going to be limited to how many other cars are around you, so more traffic means slower speeds. Of course, then you get that one person who starts trying to move faster than is safe in traffic, usually causing an accident.

This is the lack of process at play. Different teams or developers have their own car and are trying to get to the release. However, everyone else is doing the same and your highway only has so much bandwidth. Sure, we have a road, so some path is defined, but there’s nothing to govern your interactions with the other cars other than general momentum and the number of resources you have to make the deploy work. You could make the road wider by getting more resources, but that’s not scalable.

Contrast this with a railroad track. It’s straight, narrow, and trains can fly along this because all the roadblocks are out of the way. You can link multiple cars together on a train to get everyone to the same place at the same time, which is a lot faster than using the highway. Even if the train moves a little slower than a car, it will still get there ahead because there isn’t anything blocking the track. You also get there safer because there isn’t any competing traffic to get in the way and risk an accident.

Building railroads is the goal of implementing process. You want to build something that is direct and well defined. What we lose in freedom pays off in speed. We’re building bullet trains that can deliver rapid deployments through consistent, repeatable action. This is achieved by  removing blocks, reducing stops, and streamlining the process we use to get things done. Process should not be a throttle, but a track, giving us a clear method of getting things done faster.

I’ve Been Working On The Railroad

How do we go about building this Nirvana? It takes cooperation between both development and operations teams to build this right, as both are invested in the outcome. Developers want to deliver new code to market faster and operations wants that code to be safe, stable, and not put the business at risk. Both sides must come together to collaborate on building the process. And make no mistake, this will be a building effort. There is no black voodoo magic in making this happen.

The first step is actually to write everything down. I always preach that the most basic form of automation is a check list. You can’t automate a process if you don’t know what it is. Start with a plan that everyone puts together for how software should be released and use that as your road map.

“We can’t take the time to stop doing everything just to put this together!!!” Yeah, I’ve heard that one too. No one is asking you to stop working just to switch to a new process. All I’m suggesting is, if you’ve got your highway, start building your railroad next to it. People will still be driving on the road.

You also might have people concerned about getting it right the first time. Let’s be honest here, you may not. Treat this plan like you would any other piece of work you have and develop it iteratively. Start somewhere and, as you build things out, fix the problems you discover. Your release process is just another piece of software, with features and bugs. No reason not to treat it in the same way.

Once you’ve got your plan, start following it. It might be inconvenient, but this is the sort of thing that takes discipline. It may seem tedious, but this is the start of a diet or exercise plan. It will be tough, but over time it will get easier and you’ll get better at it.

As you follow your plan, you will be able to introduce tooling and automation to speed up parts of your railroad track. Unit tests, automated builds, source control, incremental changes…these are all pieces of the process. Improve your process one piece at a time, making each new change so it can be evaluated and verified before moving on to the next step.

Build your process with the goal of removing traffic jams and slow downs. You want to lay down track to give guidance and consistency. You will find that you and those around you will achieve that mythical space of being faster, more reliable, and ultimately more agile with your software development. In short, you’ll run like you’re on rails.

All Aboard

Building this sort of process is at the heart of DevOps. DevOps isn’t a tool or a magic method, it is a deliberate culture of cooperation and discipline. The only way you will build your railroad is if you bring together development teams and operations engineers and work together to relieve your shared pain. That is the selling point: both sides share many of the same challenges, so it should a no-brainer to come together and solve those issues.

If you’re looking for a real world example, check out Farm Credit Services of America. This article articulates, in a very real way, how one company moved into a DevOps culture and built their own railroad. While there’s a lot of information in the article, at the core it is about how development and operations collaborated to achieve something together.

I’ve seen similar work in other companies. It is usually painful growth, but the results far exceed the gains. What is important is to not lose sight of the need for process. Getting rid of process, if anything, will hinder you just as much as following some archaic method merely because it is rote. Build your process with the goal of removing bottlenecks and establishing guide rails. You will find that you and those around you will achieve that mythical space of being faster, more reliable, and ultimately more agile with your software development.

(I want to thank Rie Irish(@IrishSQL) for proof reading and contributing to this blog article.)

Dynamic CSV Imports with #Powershell

A common task for data folks is loading comma separated values files into databases. It can be tedious, having to figure out column layouts, data formats, and sorting bad data. This sort of Extract, Transform, and Load (ETL) task is something we would do in SSIS or a similar loading tool, but those tools require us to review the data and have a good idea of what the staging table will look like. Most of the time with CSVs, we just need a quick dump of the file into a database table so we can work with it using T-SQL, which means that I don’t want to spend a lot of time figuring out what a stage table is going to look like.

I know SQL Server Management Studio will try and help you out with the Import Data task. I have used this pretty frequently myself. However, like any other GUI tool out there, you can not automate it. It builds a one time SSIS package (which you can save) and executes it, but if it does not save much time if I have to load multiple CSV files with differing formats.

We all know my weapon of choice is Powershell. I am sure there are other approaches to this problem and my ETL/BI pals are probably reading this post in dismay (if they are reading it at all!). However, I’m pretty comfortable with the patterns in Powershell to script this process, letting me quickly load multiple CSV files without having to do a lot of work.

All Around the Table

The challenge is getting the staging table in place. We need a process that can read the CSV header and build a CREATE TABLE statement for us. Once we have that, the load is actually pretty easy. Assuming the CSV has a header row, I then use this bit of Powershell code to figure out the different columns I’m going to load into:

$source = <Path to your source file>
$Header = (Get-Content $source | Select-Object -First 1).Split(',')

Two lines of Powershell and now I have a collection of all my column names as a string array. This is where the fun begins. Now, I can not assume that the column headers will play nice as SQL column names, so I need to do a little hygiene work. I will loop through the collection and strip out any non-alphanumeric characters:

$CleanHeader = @()
foreach($h in $Header){
$CleanValue = $h -Replace '[^a-zA-Z0-9_]',''
$CleanHeader += $CleanValue
}

I could use ForEach-Object here to simplify the code, but I expand it out in a foreach loop because I might add some other logic to the header name clean up. I want to keep it simple for this example. The result is a new collection that has names I can use to create a staging table.

Next up, I will take this new collection and build out a SQL statement. This is a matter of looping through the CleanHeader collection and using those values. Since we can’t really tell what the format will be, each table column will be VARCHAR(255).

$StagingTableName = ‘CSVFileLoad’
$sql = @("IF EXISTS (SELECT 1 FROM sys.tables WHERE name = '$StagingTableName') DROP TABLE [$StagingTableName];")
$sql += ("CREATE TABLE [$StagingTableName]($($CleanHeader[0]) VARCHAR(255)")
$CleanHeader[1..$CleanHeader.Length] | ForEach-Object {$sql += ",$_ VARCHAR(255)"}
$sql += ");"

The SQL format is a typical pattern:

  1. If the table name already exists, drop it (we’re doing a drop and replace of the data).
  2. Grab the very first column name in the collection and use it to start the CREATE TABLE.
  3. Loop through the remaining column names, putting a comma in front of each column.
  4. Close the CREATE TABLE statement with a parentheses and semicolon.

This block of code is the key, allowing me to create any table structure to import my data with.  Once I have it, I just execute it using Invoke-SqlCmd as I would any other T-SQL statement, and my staging table is now in place.

Stick the Landing

Once the staging table is in place, the load is actually fairly simple. You have lots of options, but the easiest one for my money is to build a BCP call and execute that. BCP is a simple utility that has been around for a while, mostly because it is effective. The build is not difficult:

$cmd = "bcp '$Database.dbo.[$StagingTableName]' in '$Source' -S'$SQLServerName' -F2 -T -c -t','"
Invoke-Expression $cmd

For those unfamiliar with the BCP syntax, all I do is declare the destination table, the key word ‘in’ to declare that I am loading data from a file to a SQL Server table, and then the SQL Server name. The remaining parameters set the following load options:

  • -F2: Start the load with the second row, skipping the header
  • -T: Use windows authentication to connect
  • -c: The input file is character data
  • -t’,’: The column terminator is a comma

This is how I do it, but there are plenty of other options. Allen White(@SqlRunr) has written about using the .Net methods to perform a Bulk Load. You could also use the BULK INSERT command run from an Invoke-SqlCmd call. There are probably a dozen ways to skin this particular cat. The choice is up to you.

Now For Your Parting Gift

As with many of these patterns that I blog about, I have a function I have written around it. This one is Import-CsvToSqlTable. This function has some additional pieces that are best discussed by reviewing the parameters:

  • InstanceName – SQL Server Instance you are going to load to.
  • Database – Database name you are going to load to.
  • SourceFile – Source file to load
  • SqlDataType – Data type the staging table columns will be created as. Defaults as VARCHAR(255).
  • StagingTableName – Table name you will create and load into.
  • Append – If declared, the staging table will not be dropped if it already exists.

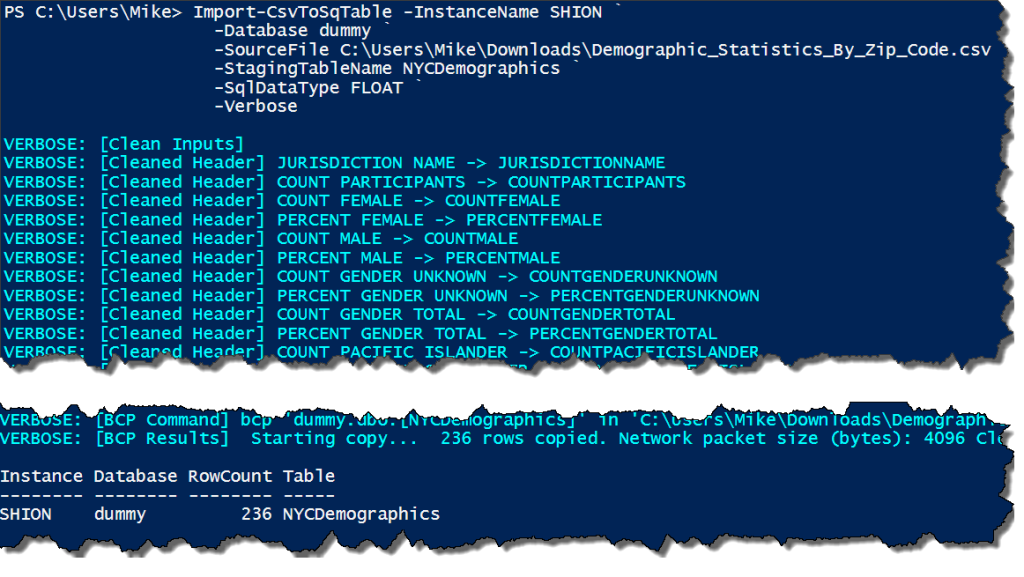
The function wraps up all the different pieces of what we talked about above. With it wrapped in a function, we now can call it for a simple data load. For this load, I am using a file from https://catalog.data.gov/ for New York City demographics:

3-5-2016 11-37-15 AM

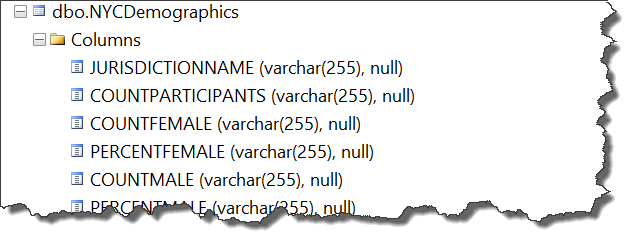
Nothing fancy and the output shows the instance, database, table, and count of rows in that table. If we look in SQL Server, we will see the table created with VARCHAR(255) columns as expected:

3-5-2016 11-39-19 AM

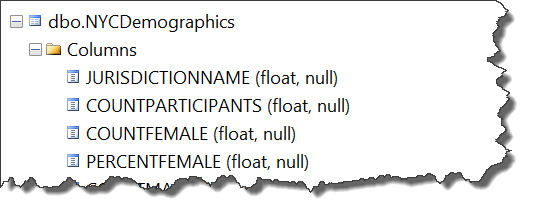
We can do more, though. Let’s say we know that the file contains numbers in all the columns. It might make more sense to load them into a FLOAT or a NUMERIC datatype. We’ll declare that now. I’m also going to declare the -Verbose so I can see the detail of how the function is processing the import:

3-5-2016 11-42-53 AM

3-5-2016 11-48-58 AM

With the right parameters, not only do we have control over what we create, but we can see how it’s created and loaded into SQL Server. This can help with troubleshooting in case we try and load the wrong data type or there is some other error for the load.

This function can be useful for quick and dirty data loads, importing CSVs that we don’t want to waste a lot of time figuring out. I wrote it for this express purpose, because I did not want to get tied up clicking on buttons in the Import Data Wizard. However, I definitely do not recommend this as a full on replacement for ongoing ETL processes and standardized data loads. For any ongoing process where you know the format of your data files, there are much better options and approaches. As with any task, it is important that you use the right tool for the job, but it never hurts to understand your options.

Set-SqlStartupParameters #Powershell Function

Here on the heels of my last two blog posts about the Smo.ManagedComputer class, I wanted to wrap up with a function I put together to help with managing startup parameters. It is the result of the work I did to figure out how to move the master db along with the inspiration I got from Shawn Melton’s(@wsmelton) blog post on the matter.

Looking back at the previous blog post, changing the the startup parameters through the SMO is pretty easy with the ManagedComputer class. In some ways, it is too easy. As Shawn calls out, you could easily overwrite the full string and remove the startup locations for your master database (and breaking your instance). This is where tool building can be such an aid, because by wrapping the change code in a function, we can build some safety mechanisms to protect us (or others) from doing harm when trying to make this sort of change. The function I wrote is not terribly long, but I’ll spare you the whole thing by letting you view it on GitHub. We’ll use our time better by going over how I constructed it while focusing on some of my tool building principles. 

The first is trying to build around multi-instance execution. You will note that my parameter block uses a string array called Instances ($Instances):

function Set-SQLStartupParameters{
  [cmdletbinding(SupportsShouldProcess=$true)]
  param([string[]] $Instance
       ,[string[]] $StartupParameters
)

This array will drive a foreach loop inside the function, allowing me to apply the same block of code to each instance name. There are a lot of situations when I am applying changes across multiple SQL instances and I want to keep the call simple.

The second parameter is also a string array, which is a collection of the startup parameters I want to apply. While the property in the SMO is a semi-colon delimited string and will ultimately be set that way, I find that using a string array makes the collection of parameters much more manageable and readable. It is important that any tool you create is not a struggle to use.

Next up, as we walk through the function, you will see some Write-Verbose statements:

Write-Verbose "Old Parameters for $i :"
Write-Verbose $wmisvc.StartupParameters

It is easy to write a script that can execute a bunch of things, but when it starts throwing out red error text you could have a debugging nightmare. By adding these statements, I can add logging information to the output so I can see things like the old startup parameters and the string that will be added to the service for the new parameters.

The final item to call out is the meat of the function. As it has been emphasized, altering these startup parameters can be very dangerous and could possibly break the instance if we leave out the -d, -e, or -l parameters or set them improperly. I wrote this function to capture the existing values of these parameters and, if they are not being changed, keep them.

$oldparams = $wmisvc.StartupParameters -split ';'
$newparams = @()
foreach($param in $StartupParameters){
  if($param.Substring(0,2) -match '-d|-e|-l'){
    $SystemPaths = $true
    $newparams += $param
    $oldparams = $oldparams | Where-Object {$_.Substring(0,2) -ne $param.Substring(0,2)}
  }
  else{
    $newparams += $param
  }
}

$newparams += $oldparams | Where-Object {$_.Substring(0,2) -match '-d|-e|-l'}

While not the most graceful approach, the logic is as follows. Start with the old parameter block and check each new parameter. If any of the sensitive parameters are specified, remove it from the old parameter set and use the new one. Once we have gone through the new ones, pull any remaining sensitive parameters from the old set and insert them into the new. This way we should always keep a value for the sensitive parameters.

The non-sensitive parameters are a different manner. They will not be retained, but instead overwritten. This means if you want to retain an existing trace flag, you will need to include it in your new parameter set when you call the function.

Now, what this does NOT do is insure these sensitive parameters are valid. This is up to the user to make sure that the files and paths are valid. I added a warning to the function that if these values are changed, the user needs to validate them, but the rest is on the person executing the call. This function will also not restart the service to apply the changes. Because we need to be sensitive about when our SQL Server services restart, I wanted to leave that in the control of the user.

Let’s look at some examples and see how this function works. If we want to add the trace flag to suppress successful backup messages, it’s just a simple line of code:

Set-SQLStartupParameters -Instance PICARD -StartupParameters '-T3226' -Verbose -WhatIf

12-12-2015 11-23-05 AM

By specifying the -Verbose switch, all the included verbose messages I built into the function will display. Using -Whatif then gives us a chance to see what is going to happen before we actually apply it. This becomes useful both for debugging and checking that what we are doing is really what we want to do.

If we remove the -WhatIf, the change will actually be applied:

Set-SQLStartupParameters -Instance PICARD -StartupParameters '-T3226' -Verbose

12-12-2015 11-27-43 AM

This gives us all the same information, but now actually applies the change. The function is written to warn us that, while the startup parameters have been changed, we still need to restart the instance.

What about moving our master database? Let’s use last week’s example and relocate the master database as part of a set:

#Set the params as a string array
$params = @('-dC:\DBFiles\MSSQLSERVER\master.mdf',
'-eC:\DBFiles\MSSQLSERVER\ERRORLOG',
'-lC:\MSSQLSERVER\mastlog.ldf')

Set-SQLStartupParameters -Instance PICARD -StartupParameters $params -Verbose

12-12-2015 11-34-23 AM

Because of how the function is built, it displays the additional warning that we have changed the sensitive parameters. While the function can not save us from everything, it will try and provide as much information as it can to help.

I have tried to share with you some of the things I think about when building my own functions. However, I also want to call out the importance of getting other opinions. While I wrote the code, I got a LOT of help from Shawn Melton in the way of code review. He was kind enough to look over my function and suggest a few things (like the -WhatIf flag). Building code is a team effort and having a supportive community is a great way to help you create your own tools.


Moving your Master Database with #Powershell

A common best practice that many administrators do not typically apply is moving your system databases out of the default location on the C: drive. This is recommended because this way your system databases will not affect or be impacted by whatever work the OS is doing. It is a way to reduce contention and protect your SQL installation from something going awry with the OS. And while moving databases like model, msdb, and tempdb are fairly straightforward, moving master can be a real challenge.

The reason for this difference is because of how SQL Server stores the location of those database files. For model, msdb, and tempdb, these locations are stored as with regular user databases: in master. This means we can relocate them in the usual way. Master is a trickier beast because SQL Server must have knowledge of its location before it starts. How it does this via the instances startup parameters. The parameters of -d and -l specify the instance’s data and log files (respectively) for the master database. This means, if we want to move our master database files, we need to change these startup parameters.

CAUTION: Changing these values can break your instance and prevent it from starting.

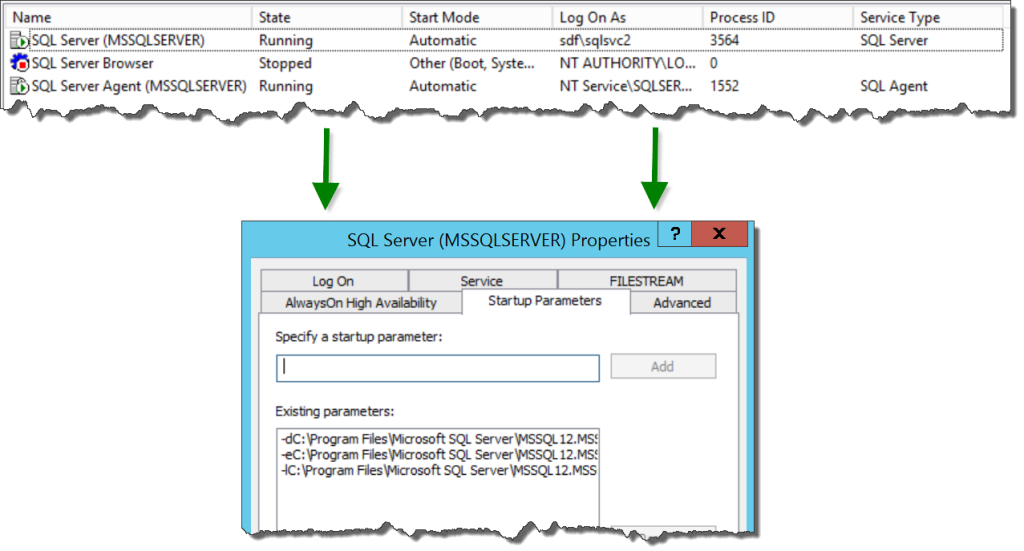
Normally, to change these values, we would use the Microsoft Management Console (mmc) for SQL Server:12-5-2015 12-07-30 PM

As with many GUI based operations, this is pretty much impossible to automate and opens the door to inconsistencies and errors. You definitely could not include this into a scripted SQL Server build process. What do we do?

My answer, unsurprisingly, is Powershell. The trick is how. If you do a Google search, you will find a lot of articles on changing registry keys. This is messy and I definitely do not feel comfortable with that approach. Fortunately there is a better way.

Last week I blogged about how you can use Smo.ManagedComputer class to update service accounts for your SQL Services. My friend Shawn Melton(@wsmelton) decided to explore the class a little more and discovered how you can change your startup parameters using this class. Shawn’s examples are focused around adding common trace flags to your instance, which is a typical practice. However, let us look at using this to move master.

We will get started by first showing the current startup parameters of our instance:

[System.Reflection.Assembly]::LoadWithPartialName('Microsoft.SqlServer.SqlWmiManagement')| Out-Null
$smowmi = New-Object Microsoft.SqlServer.Management.Smo.Wmi.ManagedComputer PICARD
($smowmi.Services | Where-Object {$_.Name -like 'MSSQL*'}).StartupParameters
'--------------------------------'
($smowmi.Services | Where-Object {$_.Name -like 'MSSQL*'}).StartupParameters -split ';'

12-5-2015 12-35-07 PM

The startup parameters are stored in the object as a single string, with each parameter separated by a semicolon. This is why, to make it easier to read, I pass the output to a -split parameter so we can see them in a string array.

To change this is simply a matter of changing the StartupParameter property of the service and apply it as Shawn describes in his post. We should be careful, because if we screw this up the SQL instance will NOT start. With that out of the way, let’s first script out changing the location of master:

#Set the params as a string array
$params = @('-dC:\DBFiles\MSSQLSERVER\master.mdf',
'-eC:\DBFiles\MSSQLSERVER\ERRORLOG',
'-lC:\MSSQLSERVER\mastlog.ldf')

#Get the Service
[System.Reflection.Assembly]::LoadWithPartialName('Microsoft.SqlServer.SqlWmiManagement')| Out-Null
$smowmi = New-Object Microsoft.SqlServer.Management.Smo.Wmi.ManagedComputer PICARD
$sqlsvc = $smowmi.Services | Where-Object {$_.Name -like 'MSSQL*'}

#Change the startup parameters
$sqlsvc.StartupParameters = $params -join ';'
$sqlsvc.Alter()

Just as if we had changed this in our management console, the changes will not take effect until we restart the service. In addition to restarting the service, we also need to relocate the master files to the new location, which can not be done while the instance is running. The next part of the script will go ahead and to these tasks for us:

#Stop SQL Service, move files, start SQL
$sqlsvc.Stop()
Invoke-Command -ComputerName PICARD -ScriptBlock{Move-Item 'C:\Program Files\Microsoft SQL Server\MSSQL12.MSSQLSERVER\MSSQL\DATA\master.mdf' 'C:\DBFiles\MSSQLSERVER\master.mdf'}
Invoke-Command -ComputerName PICARD -ScriptBlock{Move-Item 'C:\Program Files\Microsoft SQL Server\MSSQL12.MSSQLSERVER\MSSQL\DATA\mastlog.ldf' 'C:\DBFiles\MSSQLSERVER\mastlog.ldf'}
$sqlsvc.Start()

I want to call out that I use the Invoke-Command in here because I am running this script remotely, but the Move-Item cmdlets need to execute using local paths. Also note that while I changed the location of the SQL error logs, I do not have to move them. This is because a new error log is created every time SQL Server starts, so we just need to make sure the path name is correct.

Once this script is complete, we now have a SQL Service running with the master database in an entirely different location. This process can easily be added to a build script to further automate our SQL builds and help us adhere to best practices. Combining this with the SMO and its WMI classes help make the change easier and protect us (somewhat) from accidental damage. Hopefully this helps you in understanding and building better automation for your own environments.

Desired SQL Configuration with #Powershell – Part 2

Last week, as part of T-SQL Tuesday 68, I introduced you to two Powershell functions for validating and setting your SQL Server configurations. While useful, they depend on some sort of configuration source, which begs the question: How do we get this source? This post covers the third function that will help you create your configuration source, using an existing server’s values and allowing you to use them directly or modify them as you see fit.

Get-SQLConfiguration

The concept of Get-SQLConfiguration is simple: Get the sys.configuration values of a SQL Server instance and export them as a hash table that can be used by the other functions. The additional criterion to consider is that Test-SQLConfiguration and Set-SQLConfiguration both use the SMO properties to do this, so our configuration source must also use these names. The result is a function that uses the SMO to perform its export:

function Get-SQLConfiguration{
param([string]$InstanceName='localhost'
  ,[string[]] $Filter
  )

$smosrv = new-object ('Microsoft.SqlServer.Management.Smo.Server') $InstanceName
$output = @()
if($Filter){
  $configs = $smosrv.Configuration | Get-Member -MemberType Properties | Where-Object {$Filter.Contains($_.Name)}
}
else{
  $configs = $smosrv.Configuration | Get-Member -MemberType Properties | Where-Object {$_.Name -ne 'Properties'}
}

foreach($config in $configs){
  $output += New-Object PSObject -Property ([Ordered]@{'Name'=$config.Name;
  'DesiredValue'=$smosrv.Configuration.$($config.Name).RunValue})
}

return $output

}

The function itself is not complex, but I did want to add one other feature to it. A simple export might be overwhelming, considering the number of configuration properties within SQL Server. Most of these will actually be left at their defaults. To aid us, I also added a Filter parameter that accepts an array of SMO configuration property names and will only export those properties.

There are a couple patterns to use this function. The simplest is to just run it for one server and use the output to check another:

$configurations=Get-SQLConfiguration -InstanceName PICARD
Test-SQLConfiguration -InstanceName RIKER -Configs $configurations

This call will essentially compare and find the differences between the two instances. If we wanted to get more specific, we could use our Filter parameter to only compare one or two configurations:

$configurations=Get-SQLConfiguration -InstanceName PICARD -Filter @('FillFactor')
Test-SQLConfiguration -InstanceName RIKER -Configs $configurations

It is also possible to store and manage these configurations by using the Get-SQLConfiguration function. Because we’re working with hash tables, we have a variety of storage options. The easiest to get started is to use the built in Export-CSV function and save our configurations as a delimited file (I like pipe, but commas will do):

Get-SQLConfiguration -InstanceName PICARD | Export-Csv -Path .\PicardConfig.cfg -NoTypeInformation

With the text file that is generated, we can go in and edit our configs, removing what we want and editing values we need to update. The result can then be stored in source control for tracking and audit purposes. We could even go as far as to load the configurations into a database table and call them from a central administrative server. There are a lot of possibilities.

The Code

While I’ve published the functions in these two blog posts, there’s an easier way to get ahold of them. These are part of my SQLConfiguration module published on GitHub, which you can download and use (along with my other SQL configuration functions). Please keep in mind this module and the code contained within should still be considered a work in progress and the functions are provided as is. The usual disclaimers apply, so be careful using it and test it thoroughly before making regular use of it. Of course, if you do find any issues, I would love to know about them so I can review and update my code.

There are many additional items that can be added to this. The largest that comes to mind is dynamic configuration values, as these functions consider your configs to be static. Items like minimum memory, maximum memory, and maximum degree of parallelism depend on the hardware configuration and there are various ways to calculate these values. There are also configurations not stored in this part of SQL Server, such as default database directories and SQL Server agent settings. These functions have plenty of room for enhancement. They’re a good start, however, to giving you additional tools to manage your environment, helping to make your SQL Server deployments more consistent and reliable.

#TSQL2SDAY 68: Desired SQL Server Configuration with #Powershell

Welcome to another month of T-SQL Tuesday, started by Adam Machanic(@adammachanic) and hosted this month by Andy Yun(@SqlBek). The topic for this month’s blog party is “Just say ‘NO’ to defaults!”, a call on what we have learned and how we manage SQL Server defaults in our environments. While you will probably find lots of posts out there on what you should or should not set your SQL Server configurations to, I wanted to share with you a post on some tools that can help you manage these configurations.

Management Overhead

Many database professionals, SQL Server or otherwise, learn very quickly that you don’t want to stick with your default settings. The database vendors usually try and set some general values that can apply to most situations, but these typically don’t last long in any enterprise. You probably have a set of configurations you change from the defaults whenever you install a new SQL Server instance.

The struggle, whether you have 5 SQL Servers or 500, is keeping these settings consistent. Sure, you can script out your changes (and should), but how do you manage the changes over time? What if someone changes a setting, how do you enforce your configurations? Or maybe someone else sets up an instance and doesn’t apply your scripts? It becomes an ugly problem to manage.

Since I’m a Powershell fan, I’m also a fan of Desired State Configuration. While the technology is still new on the scene, it’s quickly turning into an effective way to manage your server builds. When thinking about Andy’s topic and the problem of managing changes to your instance defaults, my ‘eureka’ moment was that the DSC model could easily be applied to managing these configurations. The result was three Powershell functions that provide tools you can use to control the settings in your environment.

Test-SQLConfiguration

The first function I wrote was to evaluate the configurations on an instance. To do this, I started with the assumption that I’d have a hash table of Config(name) and DesiredValue(value) pairs. Each pair would be the SMO Configuration Class property and the desired value I wanted to check. Then I would simply loop through each one and, if it did not match, I would add that to an output array. The function would then return a collection of configurations that did not match my desired state.

function Test-SQLConfiguration{
  param([string]$InstanceName='localhost'
    ,[Parameter(Mandatory=$true)][PSObject] $Configs
  )
  $smosrv = new-object ('Microsoft.SqlServer.Management.Smo.Server') $InstanceName
  $output = @()

  foreach($config in $configs){
    if($config.DesiredValue -ne $smosrv.Configuration.$($config.Name).RunValue){
      $output += New-Object PSObject -Property (@{'Configuration'=$config.Name;
                   'DesiredValue'=$config.DesiredValue;
                   'CurrentValue'=$smosrv.Configuration.$($config.Name).RunValue})
    }
  }
  return $output
}

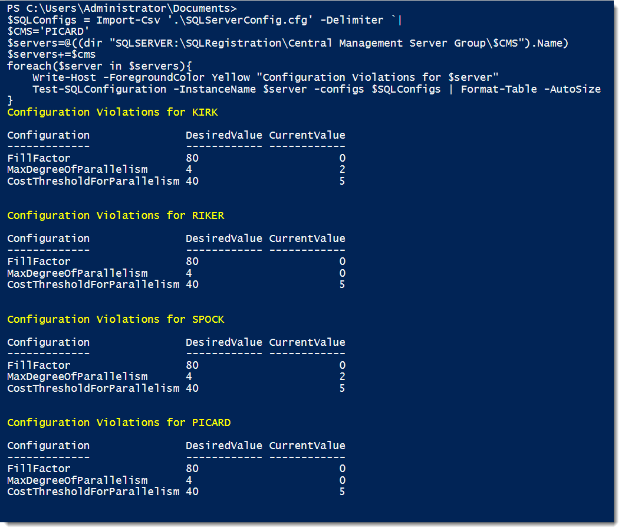
To test this, I put together a very simple pipe-delimited file of configurations I wanted to check. These configuration names had to match the SMO property names (which aren’t difficult to acquire) and the resulting file and output looks like this:

SQLServerConfig.cfg
 Name|DesiredValue
 FillFactor|80
 MaxDegreeOfParallelism|4
 CostThresholdForParallelism|40
 XPCmdShellEnabled|0

SQLConfigure_1

This function provides a quick view of which SQL Server configurations don’t match my desired values. What’s cool is now I can then take this function and easily run it across my entire enterprise.

SQLConfigure_2
With this function, I’ve removed the burden of validating my SQL Server instance configurations. Since the output is an object, there’s many flexible options for reporting and collecting the information. Writing this to a text file is a snap or uploading it to a database table for ongoing auditing.

Set-SQLConfiguration

The next step, after we’ve checked configurations, is to correct the violations. This next function works much like Test-SQLConfiguration and takes the same two parameters as Test-SQLConfiguration. The difference is that the function will now alter the value and then reconfigure the instance to apply the change.

function Set-SQLConfiguration{
  param([string]$InstanceName='localhost'
    ,[Parameter(Mandatory=$true)][PSObject] $Configs
  )
  $smosrv = new-object ('Microsoft.SqlServer.Management.Smo.Server') $InstanceName
  $output = @()

  foreach($config in $configs){
    if($config.DesiredValue -ne $smosrv.Configuration.$($config.Name).RunValue){
        $row = New-Object PSObject -Property (@{'Configuration'=$config.Name;
               'DesiredValue'=$config.DesiredValue;
               'CurrentValue'=$smosrv.Configuration.$($config.Name).RunValue})
        $smosrv.Configuration.$($config.Name).ConfigValue = $Config.DesiredValue
        $smosrv.Configuration.Alter()
        $row | Add-Member -MemberType NoteProperty -Name 'ConfiguredValue' -Value $smosrv.Configuration.$($config.Name).RunValue
        $output += $row
        if($smosrv.Configuration.$($config.Name).IsDynamic -eq $false){$reboot=$true}
    }
  }

  if($reboot){Write-Warning 'Altered configurations contain some that are not dynamic. Instance restart is required to apply.'}

  return $output
}

SQLConfigure_3

Because the function is built to accept a hash table of configurations, we can use the same pipe-delimited file (or any delimited file) to update the instance. Note the warning with the output. Because not all configurations are dynamic, the function will alert you if a non-dynamic configuration was changed. If you change a non-dynamic configuration, you will need to restart the SQL Service to complete the change.

Wrap Up

The last challenge is building out the configurations to check against. The third function I wrote will handle that, but I felt like covering that functionality would make this blog post to long. Next week I will cover the Get-SQLConfiguration function, additional techniques for extending these functions, and then tell you where you can get the code. Please note that this code is in a work-in-progress state, so use with caution. However, this also means that if you have any suggestions, I’d love to hear them so I can turn this into a functional tool that the community can use.

Thanks again to Andy for a great T-SQL Tuesday topic. Keep your eye on his invite blog post and the #TSQL2SDAY hashtag on Twitter for other great contributions.

The Cult of Automation

Last week, while perusing through the usual interesting links from Twitter, I came across an article from Kendra Little (@Kendra_Little) titled “Not Everything Should be Automated”. It’s brief post where Kendra talks about why she has stopped automating some of her tasks. The title is attention grabbing (well, it grabbed MY attention), but there’s a core debate hidden in here that I want to take sides on.

If You Liked It, You Should Have Wrote a Script For Itbrodoyouevenscript

I often hear “you can’t automate everything”. As a card carrying member of the Cult of Automation (caps mine), I usually respond with “why not?” Many of my daily tasks can and should be automated. When doing these tasks manually, I am exposing the work to risk from skipping something, flubbing a syntax, or some other human error. The cost of these errors is compounded by the fact that it often takes a person longer to execute a process manually then if it were automated. This all adds up and can heavily impact your the value you bring to your employer.

This is, after all, why GUIs were created. By providing that interface, we aid users with a method to execute tasks that can have mistake protection built in as well as providing a speedy way to complete the work. This is the conversation I end up having with folks who want to use the SQL Server Management Studio GUI to create databases, that they can do it faster than having to type out that tedious CREATE DATABASE statement. The benefits are less errors and faster time to completion.

Automating a process isn’t really that different, because you’re wrapping up an action in a script so it executes the same way every time. The goals are the same: reduce errors and increase speed. It’s just now, instead of providing a GUI for interaction, we’re scripting out all the actions and getting the heck out of the way. The result is repeatable, consistent action.

Why wouldn’t you automate then? To me, it seems a no brainer to script something out if you do it more than once. When you do that, you reduce your errors while increasing the speed of execution. This is the message of my Cult and one I would hope more people subscribe to.

How do you get to Senior DBA? Practice, Practice, Practice

Let’s go back to Kendra’s post, though. Her message is that she forces herself to type out commands instead of scripting or snippeting them because she wants to make sure she knows and understands those commands. It’s a matter of mastering the syntax. If you automate a task or put it behind some sort of interface, you can quickly lose touch on how to write it. You might forget the options or the exact syntax, which means your skills can get rusty.

As a musician, I know and understand the value of practice. When preparing for a concert, I often rehearse a section of music dozens of times in order to commit it to muscle memory. This means when it’s time to perform, my brain doesn’t get crossed up trying to remember what the notes were and I can focus on making music. Code practice is no different, because when it gets to crunch time, you shouldn’t be flailing with how to do a point in time restore because you can’t remember how a command is written.

This all sounds fine in theory, but let’s talk use case. Restore testing is a perfect example, because it’s something that will commonly be automated. I’ve written my own scripts to aid this and will often set up a regular job to select a database, restore it to a target server, run a DBCC check, and catalog a report of the process for later review. To manually test all my databases is way too long and if I were doing that, I couldn’t work on any of the cool projects. This makes automation a perfect and necessary solution.

However, I still do regular manual point in time restores. This is because I need the practice. I won’t do all my databases and I won’t do it every day (usually once a month), but I still do it. It keeps my skills fresh. It applies for other tasks as well. I have many automated processes, but I will occasionally bypass the automation so I can get my reps.

This takes us back to the GUI discussion. Many of the tasks in SQL Server we could do graphically through SSMS, but more experienced DBAs eschew that to typing the script. We’ve all used the learning tool of scripting out an SSMS action. To script is to understand, at the core, what is happening in SQL Server and gives us better knowledge of how to manage it. I remind many DBAs I’ve talked to that pretty much everything in SQL Server is a T-SQL command of some sort, so it behooves you to understand the relationship between the action and the syntax.

The Bone of Contention

Now we get to my issue with Kendra’s post. I don’t disagree with any of her statements, but I disagree with the tone of the post as set by the title. We’re not arguing against automation here, but instead championing practice. You still should try and automate as many tasks as possible. Just don’t lose sight of the skills you need to build that automation. It’s very difficult to write a script if you don’t know and understand the actions you need to script. Worse yet, if someone hands you a script and you run it without understanding how it works, you could be doing lasting damage to your environment.

Practice makes perfect, and perfect makes automation. You should build and practice your skills, understanding what makes the platform tick. Once you do that, you can script it. Once you script it, you can start practicing your next automation trick. Just don’t lose sight of the skills that got you this far.

Your #Powershell Profile

Keeping with the theme of my last blog post, let’s talk a little more about Powershell basics. More specifically, let’s talk about the basics of reusing your Powershell scripts. Most DBAs have their library of scripts that they take with them from job to job, helping them be more effective at their job. Whether it’s SQL, Powershell, or some other language, experienced data professionals always make sure to retain their work for when they’ll need it again.

Enter the profile. This is actually a concept that’s been around for a long, long while in the *nix world. The concept is simple: There is a script that runs every time you start up a session in your shell, configuring your environment. Many times in *nix, this will configure system variables like PATH or HOME, but you can also use it to load custom functions and aliases within your shell.

The Microsoft team borrowed this concept when constructing the Powershell language. We have access to a profile (well, 4 of them) that help us configure and customize our own environments. Similar *nix, it’s a .ps1 script that runs every time you open a new session. This allows you a lot of flexibility for reuse of your code.

Getting Started

As linked above, there are 4 different types of profiles you can use. We won’t focus on these different profiles, but instead stay with the basic profile: the one that applies to the current user and the current host (in these examples, the ISE). To view your profile, open it up in your text editor of choice by referencing the $profile system variable:

ise $profile

If you don’t currently have a profile, you’ll probably get an error about the file not existing. To fix this, create the file:

New-Item -ItemType File -Path $profile -Force

Vioala! You now have a completely empty profile, which is what you will see when you try and open it again.

So Now What?

I can hear the internal dialog now:

“Woo hoo! A profile!”

“Ummm…yeah. That’s great. But what do we do with it?”

“…….”

“That’s what I was thinking, too.

I don’t want to leave you hanging, so let’s start making use of it. The first order of business with the profile is to use it for customizing your environment. Since I am a SQL DBA, I like  to load up the SQLPS module and the SMO objects. This means any time I’m in Powershell, I’ve got the SQL Server cmdlets and objects ready to go.

Next up, I have a function I wrote a while back for reporting on the available disk space on a server. It’s very handy and I use it almost every day. The code is not original, but I wrapped it in a function to save myself a LOT of typing. Usually, you’d package such a function in a module.  I ended putting it in my profile because it was easy. I also add to an alias to save myself even more typing.

This means I end up with a profile that looks a lot like this:

#load SMO library
[System.Reflection.Assembly]::LoadWithPartialName('Microsoft.SqlServer.SMO') | out-null

#Load SQLPS Module
Import-Module SQLPS -DisableNameChecking

#Set Aliases
New-Alias -Name gfs -Value Get-FreeSpace

function Get-FreeSpace{
<#
.SYNOPSIS
Uses WMI to get capacity and freespace for all disks/mounts on a host.

.DESCRIPTION
Uses WMI Win32_Volume to query logical disks and provide drive size and usage for all
logical disks and mountpoints.  If no parameter is given, localhost is used.  Otherwise
the host name should be passed.

Mike Fal (http://www.mikefal.net) 2012-10-10

.PARAMETER
host - Name of machine information is being queried from, defaults to localhost

.EXAMPLE
Get-FreeSpace "CCX-SQL-PRD-01"
#>

param([string] $hostname = ($env:COMPUTERNAME))
gwmi win32_volume -computername $hostname  | where {$_.drivetype -eq 3} | Sort-Object name `
| ft name,@{l="Size(GB)";e={($_.capacity/1gb).ToString("F2")}},@{l="Free Space(GB)";e={($_.freespace/1gb).ToString("F2")}},@{l="% Free";e={(($_.Freespace/$_.Capacity)*100).ToString("F2")}}

}

Now if I had just added this to my profile and wanted to load it into the current session, I’d just have to execute it, like so:

. $profile

This loads the profile, running it as if it were any other .ps1 script (because it is).

The Power of the Profile

Using this, I have a customized Powershell environment ready to go any time I start. It lets me use Powershell the way I want to, allowing me to extend my shell with my own custom code or pre-packaged modules that I need access to. I’ve talked several times before about building Powershell tools, but at some point we all need a toolbox. By leveraging the profile, you can start building your own custom Powershell toolbox that you can rely on.

Want to know more? You can learn about Powershell profiles right from the shell itself: Get-Help about_profiles. How cool is that?