Art of the DBA Rotating Header Image

backups

What’s CHECKDB doing in my database restore?

Recently I was doing some work with a friend around some database restores. It was pretty routine stuff. However, after one restore my friend came across something in the SQL Error Log that caught him by surprise. As part of the restore, there was a CHECKDB message for the restored database:

My friend’s first reaction was “why is SQL Server doing a DBCC CHECKDB as part of the restore?” He was concerned, because CHECKDB is a pretty hefty operation and this could really impact the restore time if he had to wait on a CHECKDB to complete. But the other confusing thing was that the date for the CHECKDB didn’t match up with the restore timing.

A Clean Start

Now I was pretty sure that the SQL restore didn’t actually run a CHECKDB, but I needed an explanation for this message. I figured I’d start with good old AdventureWorks2014 to test through the process. Also, since I needed to get in the guts of the restore, I broke out a few undocumented trace flags:

DBCC TRACEON(3014);
DBCC TRACEON(3604);
DBCC TRACEON(3605);

Trace flag 3014 is the important on, as it provides the details on what actually happens during a database restore. Once I turned these flags on, I ran an initial restore of the AdventureWorks2014 database to the name of AW2014_BASE and reviewed the output from TF 3014. I focused on everything from when the database was brought online to the completion of the restore.

Notice that no where in this output do we see evidence of a CHECKDB command. So far, so good, right?

Checking our CHECKDB

My suspicion at this point is that the CHECKDB message found in a database restore was actually unrelated to the restore itself. The next step was to actually run a DBCC CHECKDB against my test database (and capture the time the DBCC was run).

With this completed, it was time to do another backup and restore with my trace flags enabled to see what I got.

Lo and behold, our CHECKDB message is back. But what’s going on? Why did it appear here but not in the first restore? The key (as you might have already guessed) is to look at the datetime for the CHECKDB in the error log: 2018-03-31 09:17:16. This matches the time we actually ran DBCC prior to our backup. In fact, if we review the message output from the restore (and not the error log messages) for the same restore span, you’ll see there are no actual CHECKDB messages within the restore.

Mystery Solved

The answer here is pretty simple. When you restore a database, SQL Server is trying to help you by telling you the last time the database had a CHECKDB run against it. That’s actually why the message says “his is an informational message only; no user action is required.” However, for many folks not familiar with the process can be confused and jump to the conclusion that SQL Server is doing more than it should be. The key to clearing up these misconceptions is to use our tools to lift up the hood and see what’s going on internally. Once you look at these details, it’s pretty clear to see what’s happening and become better informed on how SQL Server works.

The 2018 SQL Backup Survey

Last year I joined on to Rubrik to help them sell their SQL Server database product. It’s been a fun challenge and definitely interesting working in the vendor space instead of having to field 3AM calls because something broke. This means that I talk to a lot of people about SQL backups and restores, especially about the challenges that your average data professional runs into. However, I based a lot of this conversation off of my anecdotal experience as a DBA. Being a data person, it felt a little awkward talking about these things in the absence of data.

This leads me to last week. In order to have some data, I decided to run an informal backup survey targeted at the SQL community. The results floored me: 344 of you decided to take my short survey. This really helps me understand some of the trends out there and now I want to share those results with you.

Before I get started, I want to first thank each and every person who responded from the bottom of my heart. This data is the result of your participation. Secondly, I want to underscore the “informal” nature of this. There’s a lot of holes that can probably be poked in the process, but I think the data is still useful and can give people insight into the trends.

I’ve posted raw data along with a few tools out on GitHub, where you are welcome to download and play with it. The tools include:

  • Two SQL scripts that create and process the data into a simple data warehouse schema.
  • An SSIS package (created by the SQL import wizard) that loads the raw data into the staging table
  • A PowerBI report that has a couple basic charts built off of the data.
  • A SQL 2016 SP1 backup of the database where I processed the .csv.

Note, my data warehousing/PowerBI skill set is nowhere as strong as others. I built something that was familiar to me and let me get at the data. I’m sure someone can build something better. Which is why I’ve made it public.

The Environment

As far as parsing out the data, let’s look at the questions and how people responded. The first questions were around how many SQL Servers(instances) and databases most people manage:

I think what’s interesting here is that the vast majority of folks out there manage a LOT of servers (36% have 100+ servers). Contrast this to a more balanced distribution across the database counts. This becomes even more interesting when contrasted against the data volumes:

The majority of shops out there manage less than 25TB of total data, with most of these databases clocking in at 5TB or less. While 5TB is still a lot of data, this does mean that (when comparing this to the numbers above) most of the respondents manage “wide” environments, with more databases that are smaller in size. This becomes even more interesting when looking at the size of DBA teams:

As you can see, the VAST majority (80%+) of companies employ teams of 5 DBAs or less. This means that in these wider environments, DBAs are responsible for a lot of objects. To me, this means that we have a lot of touchpoints to manage from a data protection standpoint.

SQL Use

Other interesting tidbits filter in with the questions on how SQL is used. Starting with just the versions of SQL in use, it’s not really surprising that Microsoft’s mainstream supported versions are in use out there:

I was a little surprised at the SQL 2000/2005 number, but not shocked. I know how hard it is to phase out some of those legacy platforms.

Nothing really surprising when it comes to feature use either:

I did hope to see compression higher because of the performance impacts it has, but the rest of these values file in line with my expectations.

When it comes the High Availability/Disaster Recovery options, we also shouldn’t be too surprised:

Availability Groups have been a strong offering from Microsoft and something they’ve marketed hard. This has resulted in solid adoption, but it’s only a little higher than Failover Cluster instances. I’m also not surprised by the Log Shipping use, because let’s be honest. It just works.

The final piece of data around backup tooling is of significant importance to me:

Almost 35% of you use some sort of community scripts, over 15% more than the next entry. This is significant because it means that most shops out there are relying on code that the SQL community provides for free. Think about that in context of other software platforms. Most are going to rely on purchased tools, but so many of us are comfortable with these community scripts that we entrust our company’s most important asset to them.

I was a little surprised at how high Enterprise Platform usage was, considering how many DBAs take a dim view of them. I think what also surprised me was that Vendor Software (Idera, Red Gate, etc.) was so low. Overall, we can definitely see where DBAs find value for running and managing their backups.

The Pain

The last question was more of a free form entry around what’s bugging people when managing backups. I’ll let folks browse it on their own, but here’s what I found interesting:

  • ~21% of the responses referenced concerns about having enough space for their backups.
  • Several respondents were frustrated by needing to build out reporting/management solutions.
  • There were many concerns about having access to backups or being able to restore them in an emergency (mostly due to lack of space to either store enough backups or test them).

Wrapping It All Up

There’s probably a lot of different possible conclusions that can be leapt to from this data, certainly outside the ones I made. I’m certainly not claiming this survey as anything definitive, merely some interesting observations made from a healthy community response. Hopefully you also find the data interesting and I hope it sheds some light on to what’s happening out there in the wide world of SQL Server.

Before I go, a couple shout outs:

  • Meagan Longoria (@mmarie) for telling me how and why my data visualizations sucked. Seriously, though, don’t hold what you find in the PowerBI report against her. :)
  • Chris Lumnah (@clumnah) for helping me refine the survey questions.
  • All the folks who shared the survey link, helping me get to 344 responses.
  • The 344 of you who DID respond, helping make this survey into something worthwhile

Using #PowerShell to Restore to a New Location

Now that I’ve gotten some of my thought pieces out of my brain, I wanted to get back to some more technical posts, starting with some simpler techniques for people trying to figure out how to use SQL Server and PowerShell together. I know that a lot of database pros are starting to understand the importance of the language, but still struggle with some practical examples of how to get started. One of my goals with this blog is to bridge that gap.

When restoring a backup, it can be tedious to restore to a new location and have to figure out your MOVE statements. If you only have one data file and one log file, it’s probably not a big deal, but it’s still annoying. Usually, the steps for me are:

  1. Figure out my new data and log paths.
  2. Run a RESTORE FILELISTONLY against the backup file to get the files.
  3. Write out my RESTORE WITH MOVE commands using the new paths.
  4. Execute

None of this is difficult, but we can still make it easier. We have an established process, so putting some PowerShell scripting around it can automate our restore to make the script building faster and more consistent.

Our weapon of choice will be Restore-SqlDatabase. This workhorse cmdlet has been part of the both the old SQLPS and the new SqlServer modules. The functionality hasn’t really changed, meaning that what we go over here should work for you regardless of what module you use. I always recommend using the most recent version of the code, but don’t worry if you can’t.

The cmdlet is straightforward in its use. Fundamentally, all we need to declare is an instance, database name, and backup file. However, if we don’t declare anything else, the cmdlet will try and restore the database files to their original locations. Keep in mind this is no different than how a normal RESTORE DATABASE command works.

This is where we make our lives easier with PowerShell. First off, to move files using Restore-SqlDatabase, we need to create a collection of RelocateFile objects. Don’t let the .Net-ness of this freak you out. All we’re doing is creating something that has the logical file name and the new physical file name. In other words, it’s just an abstraction of the MOVE statement in RESTORE DATABASE.

Let’s look at some code. I’ve got a script, but I think the best way to approach it is to break it up and talk about each section individually, just to make sure we’re all on the same page. To get started, we should declare a few things: the new file locations, output of a script file, database name for the restore, backup file, and then an array we can store our RelocateFile objects in.

#Set Variables
$NewDataPath = 'C:\DBFiles\Data'
$NewLogPath = 'C:\DBFiles\Log'
$OutputFile = '.\restore.sql'
$dbname = 'AdvWorks2014'
$BackupFile = 'C:\DBFiles\AdventureWorks2014.bak'
$relocate = @()

Next up is a simple RESTORE FILELISTONLY to get our file list. This needs to be done with Invoke-SqlCmd because there’s no support in Restore-SqlDatabase (or any other cmdlet) for the file list option.

#Get a list of database files in the backup
$dbfiles = Invoke-Sqlcmd -ServerInstance localhost -Database tempdb -Query "RESTORE FILELISTONLY FROM DISK='$BackupFile';"

Now comes the “magic”. Our RESTORE FILELISTONLY call gives us a collection for all our files, but it’s all the old locations. We will look through this collection, do some string replacement, and create our RelocateFile objects. I want to call out the use of Split-Path -Leaf, a handy cmdlet that will separate out the different parts of a file path. By using -Leaf, the cmdlet give you only the actual file name. We can just append that value to the end of our new path (using Join-Path) and use that for creating the RelocateFile object for each file.

#Loop through filelist files, replace old paths with new paths
foreach($dbfile in $dbfiles){
  $DbFileName = $dbfile.PhysicalName | Split-Path -Leaf
  if($dbfile.Type -eq 'L'){
    $newfile = Join-Path -Path $NewLogPath -ChildPath $DbFileName
  } else {
    $newfile = Join-Path -Path $NewDataPath -ChildPath $DbFileName
  }
  $relocate += New-Object Microsoft.SqlServer.Management.Smo.RelocateFile ($dbfile.LogicalName,$newfile)
}

Creating the RelocateFile objects is the heavy lifting. After this, it’s just a matter of calling Restore-SqlDatabase with the right arguments. Note that I’m using the -Script argument and piping this to Out-File. We’re using PowerShell to create a SQL script, which is a pattern I like. As handy as these tools are, they don’t always get everything, so I will use scripts to create scripts and then edit the final output with whatever else I need.

#Create Restore script
Restore-SqlDatabase -ServerInstance localhost `
-Database $dbname `
-RelocateFile $relocate `
-BackupFile "$BackupFile" `
-RestoreAction Database `
-Script | Out-File $OutputFile

By saving and reusing this script, I have saved myself a lot of man hours for restores. The strength here isn’t in any mystery code or magic functionality. It is simply a matter of leveraging a framework to automate an existing process.

I’ve actually taken this script and created a more formalized function with it. The core is there, but in keeping with the tooling spirit, I’ve added some additional code that validates file system paths. You can find it on my GitHub repository and you’re welcome to download and make use of it yourself.

Azure SQL Databases with #Powershell: Exporting and Importing

Previously we went over how Azure handles regular backups of your Azure SQL Databases. It is such a huge weight off an administrator’s shoulders when we only have to worry about restoring a database if something goes wrong. While many DBAs might struggle with letting go of the need to control and manage their backups, I think most of us will embrace the freedom from the tedium and worry of keeping an eye on this part of our disaster recovery.

There still is a need to take a backup of some sort. Over my career, while I have used backups for protecting my data, I have also used them for other tasks. Sometimes it is to snapshot the data at a point in time, such as before a code release or a major change. Other times a backup can serve as a great template for creating a new application database, especially if you have a federated database model. Whatever your use case, there are times we would need to snapshot a database so we can restore from it.

Exports

One approach would be to just mark down the time you want to use as your backup and restore from there, but this approach could be difficult to control and be tricky to automate. Azure offers us a better option: exporting the Azure SQL database in question to blob storage. We can restore (or, more precisely, import) this export to a new database.

To run an export is a simple call to the Start-AzureSqlDatabaseExport cmdlet. Just like the restore cmdlet, it will start the process in the Azure environment, running in the background while we do other work. To run an export, we need the following information:

  • Azure SQL database to export
  • The administrative login for the server hosting your Azure SQL Database (which we will define as a SQL Server storage context)
  • The storage container information

The only mildly frustrating thing with the export we need to use cmdlets from both the Azure module and the AzureRM module (assuming your storage blob is deployed using the resource manager model). Because of this, make sure you run Add-AzureAccount and Login-AzureRMAccount before you get started.

We first need to create a connection context for our Azure SQL Database instance, using a credential for our admin login and the server name/

$cred = Get-Credential
$sqlctxt = New-AzureSqlDatabaseServerContext -ServerName msfazuresql -Credential $cred

Once we have established our SQL connection context, we will then need to set our storage context using a combination of AzureRM and Azure cmdlets.

$key = (Get-AzureRmStorageAccountKey -ResourceGroupName Test -StorageAccountName msftest).Key1
$stctxt = New-AzureStorageContext -StorageAccountName msftest -StorageAccountKey $key

Now we can then start the export. Notice, we need a name for the export, used in the BlobName parameter.

$exp = Start-AzureSqlDatabaseExport -SqlConnectionContext $sqlctxt -StorageContext $stctxt -StorageContainerName sqlexports -DatabaseName awdb -BlobName awdb_export

Since this only starts the export, we need a way to check on the status. We can check using Get-AzureSqlDatabaseImportExportStatus. Oddly enough, the status cmdlet requires the username and password to be passed separately and does not take a credential object.

Get-AzureSqlDatabaseImportExportStatus -RequestId $exp.RequestGuid -ServerName msfsqldb -Username $cred.UserName -Password $cred.GetNetworkCredential().Password

And then there is our blob.

2016-05-14_11-23-48

There are two gotchas to keep in mind with both the export and the status. The first is you can not overwrite an existing blob, so make sure your blob name is unique (or get rid of the old one). Also, you can not check on the status of an export that has finished. If you get an error, chances are your export has completed.

Imports

Once we have our export, we now have a “backup file” we can create new databases from. All we need to do is run an import of our blob. Just as for our export, we need some information for our import, which we will (unsurprisingly) run with Start-AzureSqlDatabaseImport.

  • The storage container and blob that we will import from
  • A destination server and credentials for the server
  • The name for our database

Now, since we are creating a new Azure SQL Database with the import, the process needs to define a service objective. By default, it will import the database at standard 0 (S0), but you can defined a higher or lower edition if you want. To simplify things, we will go with the defaults and use the contexts from above, so all we really need to do to kick off the import is:

Start-AzureSqlDatabaseImport -SqlConnectionContext $sqlctxt -StorageContext $stctxt -StorageContainerName sqlexports -DatabaseName awdb_imp -BlobName awdb_export

Which, when completed, gives us a new Azure SQL Database created from our export blob:

2016-05-14_11-56-01

The Secret Sauce

What makes this black voodoo magic work? Is this some proprietary technique Microsoft has snuck in on us? Surprisingly, this is a bit of technology that have existed for sometime now as part of SQL Server Data Tools called BACPACs. A BACPAC is essentially a logical backup of a database, storing the schema and data as SQL statements.

This differs from a typical SQL Server backup, which stores your database pages directly in a binary format. Because of this, native backups are smaller and can be made/restored faster. However, they are more rigid, as you can only restore a native backup in specific scenarios. A logical backup, since it is a series of SQL statements, can be more flexible.

I don’t know why Microsoft went with BACPACs over some native format, but because they did,we can also migrate a database from on-premise SQL Server to Azure SQL database. This is a follow up to a common question I get: “How can I copy my database up to Azure SQL Database?” I want to look at this in my next post. Tune in next week, where we will create a BACPAC with regular SQL Server database and migrate it up to Azure SQL Database. 

Azure SQL Databases and #Powershell: Database Restores

logoAzureSqlA database administrator’s first priority is to ensure their datais protected in the event of a disaster. Typical scenarios range from someone forgetting a WHERE clause to completely losing the data center that houses our servers. We are charged with thinking through all the possible scenarios and making sure we can support our company’s Recovery Time and Recovery Point Objectives (RTO and RPO). This sort of responsibility is a lot why being DBA is a tough job.

Owning our servers gives us a lot of control of how our disaster recovery is constructed, but also a lot of responsibility. This can be a real challenge. We already know that cloud services, like Azure SQL Database, take that responsibility away by managing the infrastructure behind the scenes. These services also provide much of the disaster recovery protection, which is much more comprehensive and (in most cases) cost effective. In this post, we will review these options and how they can be managed using Powershell.

A Big investment

The most fundamental form of disaster recovery is database backups and restores. Typically setting up backups is a lot of work. DBAs need to make sure there’s enough storage available for backups, create schedules that accommodate business operations and support RTOs and RPOs, and implement jobs that execute backups according to those schedules. On top of that, there is all the work that has to be done when backups fail and making sure disk capacity is always large enough. There is a huge investment that must be made, but it is a necessary one, as losing a database can spell death for a company.

This is one of the HUGE strengths of Azure SQL Database. Since it a service offering, Microsoft has already built out the backup infrastructure for you. All that stuff we talked about in the previous paragraph? If you use Azure SQL Database, you do not have to do any of it. At all.

What DBAs still need to manage is being able to restore databases if something happens. This is where Powershell comes into play. While we can definitely perform these actions using the portal, it involves a lot of clicking and navigation. I would much rather run a single command to run my restore.

Executing a Restore

Before we get started, we need to first load up the classic Azure module. While our work so far has been done with the AzureRM module, there are many Azure SQL Databases tasks that can only be managed using the Azure module and database restores are one of them. Unfortunately, it also means we have to login to our Azure account a second time, as authentication is managed separately between the modules. Using Add-AzureAccount is just like Login-AzureRMAccount and will bring up a graphical dialog for you to sign in with.

Import-Module Azure
Add-AzureAccount

2016-05-07_12-25-46

To restore a database, first we just need three things to start: the server where the original database came from, the name of the database we want to restore, and a name to restore the database as. When you restore an Azure SQL Database, you have to create a database that does not already exist, so there is no WITH REPLACE option. Starting the restore is then just a matter of calling the right cmdlet:

Start-AzureSqlDatabaseRestore -SourceServerName msfazuresql -SourceDatabaseName msfsqldb -TargetDatabaseName msfsqldb-restore

2016-05-07_12-37-34

This only initiates the database restore operation and we have to wait for it to complete. To check on the status, we can use another Powershell cmdlet to display that information.

Get-AzureSqlDatabaseOperation -ServerName msfazuresql -DatabaseName msfsqldb-restore | Sort-Object LastModifyTime -Descending | Select-Object -First 1

2016-05-07_12-57-24

All the pipeline calls are there to filter out additional operations and only show the most recent, as the cmdlet returns all restore operations that have ever happened for that server and database. It is difficult to predict how long a restore will take, as this is all handled behind the scenes. I have not tested restore times, but my test databases usually take a few minutes to restore.

There are other options we can declare, depending on how we want to manage our restore, including:

  • Point in time within a minute of when we want to recover.
  • An optional destination server that we want to restore the database
  • A dropped database as our source

One other gotcha to be aware of, albeit a minor one, is that you can not perform a restore of an Azure SQL Database until 15 minutes after the creation of the database. This should not be a concern for most, but it can get in the way of rapidly spinning up databases for demo purposes (ask me how I know!).

Other Scenarios

Simple database restores is the entry point for most recovery scenarios. There are other options for disaster recovery as well as managing copies of your database. There are other options within the platform to support these scenarios. In the next post, I want to dive into a couple cmdlets that we can use to copy our Azure SQL Database as well as make a “backup file” to Azure blob storage that can be used to store a copy of our database in a particular state.

Dynamically Extracting .dacpacs With #Powershell

As DBAs, backing up our databases isn’t quite enough.  We also want to back up our schemas for additional protection.  And while we could go through some complex scripting to actual write out all those schema objects, Microsoft has given us a handy tool with SQL Server Data Tools and Visual Studio to capture these schemas.

I’m talking about sqlpackage.  I hadn’t used this before I got to my current job, but it really is a snap.  Using sqlpackage (in conjunction with managing your database through a Visual Studio project), you can easily deploy or script out database code changes.  You can also extract your schema with a few simple commands, like so:

sqlpackage.exe /action:extract /targetservername:localhost /targetdatabasename:dummy /targetfile:someawesome.dacpac

So this is great and all, but when you’ve got dozens or even hundreds of databases, you need a quick and efficient way to run this command.  Since this is a command line operation, Powershell becomes the natural way to do this.  Here’s a simple script that will allow you to extract all the user database schemas from a server:

#extract all your database schemas as dacpacs
$server = 'PICARD'

$dbs = Invoke-Sqlcmd -ServerInstance $server -Database tempdb -Query 'SELECT name FROM sys.databases WHERE database_id >4'

foreach($db in $dbs.name){
$cmd = "& 'C:\Program Files (x86)\Microsoft SQL Server\120\DAC\bin\sqlpackage.exe' /action:Extract /targetfile:'C:\dacpacs\$db.dacpac' /SourceServerName:$server /SourceDatabaseName:$db"

Invoke-Expression $cmd
}

Let’s look at two things in play here.  The first is the use of the ‘&’, which is the call operator.  This takes a string expression you create and then executes it.  In this case, we build out the expression with that operator.  Then we use item number two, Invoke-Expression, to run the expression we built.  The rest is pretty simple.

This is a quick and dirty version of it, but we could get a lot fancier.  In fact, Gianluca Sartori(@spaghettidba) has a very nice blog post where he provides a function to do this.  My own function (which looks pretty similar) goes a little something like this:

function Export-SQLDacPacs{
    param([string[]] $Instances = 'localhost',
          [string] $outputdirectory=([Environment]::GetFolderPath("MyDocuments"))
)

#get the sqlpackage executable
$sqlpackage = (get-childitem C:\ -Recurse | Where-Object {$_.name -eq 'sqlpackage.exe'} |Sort-Object LastWriteTime | Select-Object -First 1).FullName

#declare a select query for databases
$dbsql = @"
SELECT name FROM sys.databases
where database_id >4 and state_desc = 'ONLINE'
"@

#loop through each instance
foreach($instance in $Instances){
    #set processing variables
    $dbs = Invoke-Sqlcmd -ServerInstance $instance -Database tempdb -Query $dbsql
    $datestring =  (Get-Date -Format 'yyyyMMddHHmm')
    $iname = $instance.Replace('\','_')

    #extract each db
    foreach($db in $dbs.name){
        $outfile = Join-Path $outputdirectory -ChildPath "$iname-$db-$datestring.dacpac"
        $cmd = "& '$sqlpackage' /action:Extract /targetfile:'$outfile' /SourceServerName:$instance /SourceDatabaseName:$db"
        Invoke-Expression $cmd
        }
    }
}

Export-SQLDacPacs -instances 'PICARD' 

What’s cool is with this is a function, we can now extend it and do some really cool things.  Remember that CMS lookup we used last week?  Let’s use it here:

$CMS=’PICARD’
$servers=@((dir "SQLSERVER:\SQLRegistration\Central Management Server Group\$CMS").Name)

$servers+=$cms
Export-SQLDacPAcs -Instances $servers

And now I have a script to extract all my user database schemas from all the instances in my enterprise.  How cool is that?  Now I can put this into an agent job or a Windows scheduled task and have a regular schema extract, giving me an extra layer of protection for my systems.

Making SQL Backups better with #Powershell

SQL Server backups are a key part of any database administrator’s job and one of the first items that will get automated in an environment. In my career, I have seen a number of different approaches to this task, usually a combination of T-SQL and SQL Agent Jobs. When using these, you usually have two different approaches. The first is to create a single script to dynamically identify your databases and back them up serially. The second is to create multiple agent jobs, one for each database, that can execute in parallel, but must be created as static jobs.

Either approach presents us with some hurdles. The first enables us to dynamically handle adding databases to the server, but the backups must be executed serially. Serial backups can extend maintenance windows by not making efficient use of our resources. The second gives us the ability to run our backups in parallel, but leaves us with multiple jobs that are static and must be managed as new databases are added. Neither of these options are really ideal.

What if there was a third way?

Enter Powershell Jobs. While I usually don’t advocate database backups using Powershell (because they can be handled quite well with native T-SQL), I have come across a handy technique using Powershell Jobs and T-SQL to allow me to dynamically create backup statements and execute them in parallel. This allows me to find that intersection between minimal management and increased efficiency for my database backup management.

So what are Powershell Jobs?  They are a mechanism within Powershell for creating background jobs that can execute independent of the session that initiates them. Using this functionality, we can start multiple executions of any Powershell command in parallel, allowing them to run while other tasks execute. To find out more, you can read the documentation by running Get-Help about_Jobs or look them up on MSDN.

Start-Job is the key to this technique. To implement, I first use T-SQL code to get my databases for backup, much like I would when using pure T-SQL. Using this T-SQL, I will create an array of databases to be backed up and use that array to build a script block. This script block will contain a call to Invoke-SqlCmd for each backup statement, which can then be used with Start-Job to execute each backup job.

$dbs = Invoke-Sqlcmd -ServerInstance localhost -Database tempdb -Query "SELECT name FROM sys.databases WHERE database_id > 4"
$datestring =  (Get-Date -Format 'yyyyMMddHHmm')

foreach($db in $dbs.name){
    $dir = "C:\Backups\$db"
    if(!(Test-Path $dir)){New-Item -ItemType Directory -path $dir}
    
    $filename = "$db-$datestring.bak"
    $backup=Join-Path -Path $dir -ChildPath $filename
    $sql = "BACKUP DATABASE $db TO DISK = N'$backup'"
    $cmd = "Invoke-Sqlcmd -ServerInstance localhost -Database tempdb -Query `"$sql`" -QueryTimeout 6000;"
    $cmd += "Get-ChildItem $dir\*.bak| Where {`$_.LastWriteTime -lt (Get-Date).AddMinutes(-10)}|Remove-Item;"
    [scriptblock]$cmdblock = [ScriptBlock]::Create($cmd)
    Start-Job $cmdblock
}

In addition to using Powershell to create jobs, we also get some bonus features. For example, I can use Test-Path to validate my backup directories exist (and create them if they don’t).

(!(Test-Path $dir)){New-Item -ItemType Directory -path $dir}

Backup paths are big deal for SQL Server, because if that path doesn’t exist, we get an ugly backup error.  When using a T-SQL script for backups, administrators still need some additional step to create the backup directories. This is a task that is much easier using Powershell.
We can also leverage Powershell for deleting old backups by adding the following line:

$cmd += "Get-ChildItem $dir\*.bak| Where {`$_.LastWriteTime -lt (Get-Date).AddMinutes(-10)}|Remove-Item;"

Deleting files is something SQL Server is also particularly bad at. I’ve had a lot of sleepless nights that were the result of old backup files not being cleaned up. By leveraging this one line in the script block, the job will delete any full backups older than 10 minutes. We could change this window or be more elegant as our needs require, but the end result is that we only keep the most recent backup file.

What’s nice is that the script can be easily extended for log backups without a lot of retrofitting. I make four changes for this. The first is to filter our database query to ignore any databases in SIMPLE mode, as they can’t have their log files backed up.

$dbs = Invoke-Sqlcmd -ServerInstance localhost -Database tempdb -Query "SELECT name FROM sys.databases WHERE database_id > 4 AND recovery_model_desc != 'SIMPLE'"

The second is change the backup command from BACKUP DATABASE to BACKUP LOG.

$sql = "BACKUP LOG $db TO DISK = N'$backup'"

Next, I change the backup file extension from .bak to .trn, because I prefer to distinguish my backup file types in this manner.

$filename = "$db-$datestring.trn"

Finally I change the retention period for the delete step to 2 days, so I can keep transaction logs on disk in the event I need them for recovery.

$cmd += "Get-ChildItem $dir\*.trn| Where {`$_.LastWriteTime -lt (Get-Date).AddDays(-2)}|Remove-Item;"

The end result is this script, which works much like our full backup script:

The end result is this script, which works much like our full backup script:

$dbs = Invoke-Sqlcmd -ServerInstance localhost -Database tempdb -Query "SELECT name FROM sys.databases WHERE database_id > 4 AND recovery_model_desc != 'SIMPLE'"
$datestring =  (Get-Date -Format 'yyyyMMddHHmm')

foreach($db in $dbs.name){
    $dir = "C:\Backups\$db"
    if(!(Test-Path $dir)){New-Item -ItemType Directory -path $dir}
    
    $filename = "$db-$datestring.trn"
    $backup=Join-Path -Path $dir -ChildPath $filename
    $sql = "BACKUP LOG $db TO DISK = N'$backup'"
    $cmd = "Invoke-Sqlcmd -ServerInstance localhost -Database tempdb -Query `"$sql`" -QueryTimeout 6000;"
    $cmd += "Get-ChildItem $dir\*.trn| Where {`$_.LastWriteTime -lt (Get-Date).AddDays(-2)}|Remove-Item;"
    [scriptblock]$cmdblock = [ScriptBlock]::Create($cmd)
    Start-Job $cmdblock
}

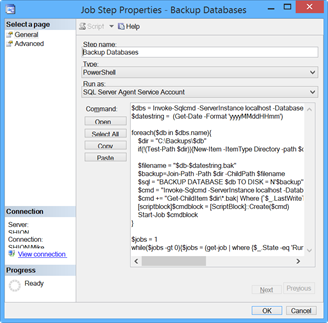
So how do we use this in SQL Server? We can stick with the previous pattern of using SQL Server Agent Jobs. Since SQL Server 2008, Agent Jobs have supported a Powershell step. To implement that step, we would create our same backup job in the Agent as before, but now instead of creating a T-SQL step we can create a Powershell step and insert our script, like so:

MSF_AddJobStep_PoSHBackups

There is one additional piece of code we have to add to make it work, however. The way Agent Jobs operate is that once the script completes and our background jobs are initiated, the Agent Job step stops and closes our parent session. When this happens, the remote jobs we just kicked off get canceled and our backups don’t happen. We need to add a logic check to keep the Agent Job running until the background jobs are no longer running. This is simple and only requires the following code to accomplish our task:

$jobs = 1
while($jobs -gt 0){$jobs = (get-job | where {$_.State -eq 'Running'} | Measure-Object).Count}

With this in place, we can now schedule and run our backup task as we would have before, except now we have a more dynamic and more efficient Powershell script to do it with. We can also do the same with our log backup script as well.

Overall these are very basic scripts and could be enhanced, but the core functionality is what you should focus on. The emphasis is on making the best use of our tools and resources in the most efficient way possible. This approach is also nice for SQL Server administrators as the script is primarily a wrapper for T-SQL backup commands that we all know and love. For those SQL Server folks who are still getting their feet wet with Powershell, this is a very intuitive way to start using the syntax and get some quick bang-for-your-buck.


RestoreAutomation #Powershell Module

When you become involved with the SQL community, you see a lot of great tools contributed to make life easier for the rest of us.  The function of these tools range greatly, from helping to analyze your system state, collect data about your enterprise, or performing regular maintenance.  I’ve used many of these tools over the years and can’t imagine being a DBA without them.  Well, now it’s time to give back.

A little over two years ago, I posted a Powershell script for building database restores.  It has been very handy and I’ve used it a lot over the years.  However, it always felt like it could use some polish.  I began work a few months ago to add that polish and was able to debut this output at SQL Saturday Sacramento a few weeks ago.  Now I want to share that same output with you here on my blog.

RestoreAutomation.psm1

I’ve compiled the previous Powershell script into a module, making it easily transportable and allowing DBAs to use it more effectively as a tool.  No messing with script files, all you need to do to use it is download the module file and then import it into your Powershell session.  The file is now available on my new GitHub repository and can be accessed via the following links:

https://github.com/MikeFal/PowerShell/blob/master/RestoreAutomation.psm1
https://raw.githubusercontent.com/MikeFal/PowerShell/master/RestoreAutomation.psm1 (raw version)

To install the module, follow these steps:

  1. Open one of your default Powershell module locations ($env:PSModulePath).  I recommend your user specific one.
  2. Create a folder named RestoreAutomation in that locatoin
  3. Place the RestoreAutomation.psm1 file in the new folder.

Full Microsoft install instructions can be found here.

To load the module once you’ve installed it, just open a Powershell session and enter Import-Module RestoreAutomation.  After that, you can see the available functions by using Get-Command -Module RestoreAutomation, which will provide the following list:

CommandType     Name                ModuleName
-----------     ----                ----------
Function        Get-DBCCCheckDB     RestoreAutomation
Function        Get-Header          RestoreAutomation
Function        Get-RestoreObject   RestoreAutomation
Function        New-Restore         RestoreAutomation
Function        Sync-DBUsers        RestoreAutomation

Using the module

While five functions are listed, two of them are internal and used by the core restore process to generate the necessary code.  I’ll cover the primary three functions here, but I have made full use of Powershell’s comment based help, so you can use Get-Help on these functions at any time to get information on how to use them.

New-Restore
This is the core functionality that was created from my initial script.  When you run this function, it will create a .sql script in your Documents folder to restore the associated files.  The function takes a directory path and then search that directory path for all backup files within it, ordering them appropriately (latest full, then latest differential, then the right sequence of transaction logs).

You’ll see that the function has a lot of parameters.  The only two required are:

  • dir – The directory where the necessary backup files live
  • server – A SQL Server instance where the script generation commands will be run (but not necessarily restored to)

I will not cover the optional parameters in detail here, but review Get-Help New-Restore -full for a full listing of the parameters and what they do.

The function makes the following assumptions:

  • All the backup files in the directory belong to one database only.
  • Backup file types are defined by extension (.bak for full, .dff for differential, and .trn for transaction log).
  • No striped backup files, meaning a database backup will be contained on only one file.
  • No backup sets, meaning a backup file only contains a single database backup.

To use the function, simply get a directory of backup files and run a command similar to:

New-Restore -dir “X:\backups\db” -server “localhost”

Then, look in your Documents folder for a restore_db.sql file.  This will be your database restore script.

If you want to test drive it yourself using a dummy database, I’ve provided a full demo script and files for download.

Sync-DBUsers
This function I added to help me with database migrations.  Often, I’ll migrate a database via backup and restore.  Afterwards I always need to clean up the orphan logins.  This function is a wrapper for SQL queries that I use to do this, providing me an easy to use interface for managing the process.

The function accepts only two parameters:

  • server – The SQL instance that the database resides on
  • database – Database that contains users you wish to correct

To run the function, just call your server and database name:

Sync-DBUsers -server “localhost” -database “restoredemo”

The function will then find all orphaned users and correct them.  Any orphans it can not find corresponding logins for, it will return as an output list for review and correction.

Get-DBCCCheckDB
When building out my automated restore process, I always wanted to do a DBCC CHECKDB on the restored database to validate everything was ok.  So I wrote this function in order to give me a manageable interface for the process.  The function will then run a DBCC CHECKDB with PHYSICAL_ONLY on my target database and return the results.

The function has three parameters:

  • server – The SQL instance that the database resides on
  • database – Database that you want to check
  • Full – Switch parameter.  If used, the function will execute a full DBCC CHECKDB.  If omitted, it will only perform a check with PHYSICAL_ONLY

To use the function, call the server and database name:

Get-DBCCCheckDB -server “localhost” -database “restoredemo”

The output will be a data table of the check results.

Only the beginning

Hopefully this module can help you as much as it has helped me.  The point is to use this as a tool to facilitate other tasks.  Many of these tasks I will provide examples of over the next month or so, to demonstrate how you can leverage this in your own environment.

I already have a list of enhancements that I plan to add.  I expect that as folks out there review it and play with it, I’ll get more.  Please do not hesitate to post suggestions and comments to the GitHub repository.  The idea, as with many of these other tools, is to build a reliable offering that other DBAs can use in their day to day jobs to make things easier and allow them to work on more important tasks and projects.

TIL: Broken Log Chains

Something that always bites me in the butt from time to time is restoring a database in full recovery model and forgetting to do a full right away.  Then I find out shortly when my log backups start failing and spamming me with error messages.  I’m fairly certain this has happened to you, as well.  It’s an easy thing to forget, especially when you’re dealing with non-critical databases.

Humans are typically bad at remembering things.  That’s why we make task lists, have calendar reminders, document processes, and script for automation.  We either have to remind ourselves to do something or (my preference) build something that’s smart enough to correct our oversight.  So when I found a way to do this with broken log chains, I was pretty happy.

The key was a new dynamic management view (DMV) I discovered.  Most people who know me know I love the DMVs and all the information they can provide.  My new discovery is the sys.database_recovery_status view, which provides recovery info for all the databases.  The key field is the last_log_backup_lsn field, which will be NULL if the log chain has somehow been broken.

What’s cool about this is now we have a programmatic way we can use to validate if a full backup needs to be performed.  By adding a quick check to a log backup script, we can make sure we never have a broken log chain.  A quick and dirty way would be:

if (select last_log_backup_lsn from sys.database_recovery_status where database_id = db_id(‘foo’)) is NULL
begin
    backup database [foo] to disk=<<path to full backup>>
end

backup log [foo] to disk=<<path to log backup>>

This is obviously the most simple approach you can use, but the pattern is the important piece.  By combining this with your standard backup scripts (please tell me you have standard backup scripts), you can always ensure that you never get an error because you forgot a full backup.

Because your script will remember for you.


Some Backup Info

So I’ve been pretty bad about blogging lately.  I don’t buy in much to excuses and so I have none to offer.  Just got away from me (something I’ll talk about shortly when I review my 2012 goals).  Anyway, let’s talk about something a little more useful to you, the reader.

A couple weeks ago, I gave a short presentation on MSDB’s BackupSet.  It was a fun little presentation and gave me a chance to share with the Boulder SQL user group one of my favorite tables.  Why one of my favorites?  Simply because there’s so much useful information packed in there, particularly when it comes to the critical job of monitoring your backups.  If you haven’t looked at it, I highly recommend that you check it out.

While developing the presentation, I put together a handy query that I wanted to share.  It’s very useful for not only showing you when your latest backups were, but also the size and location of those backups:

select
  bs.database_name
  ,bs.backup_finish_date
  ,bs.backup_size/1024.0/1024.0 [backup_size_mb]
  ,bs.compressed_backup_size/1024.0/1024.0 [compressed_size_mb]
  ,datediff(ss,backup_start_date,backup_finish_date) [backup_time]
  ,((bs.backup_size/1024.0/1024.0)/(datediff(ss,backup_start_date,backup_finish_date)+1)) [mb_per_second]
  ,1.0-(bs.compressed_backup_size*1.0/bs.backup_size) [compression_ratio]
  ,bm.physical_device_name
from
  msdb.dbo.backupset bs
  join msdb.dbo.backupmediafamily bm on (bs.media_set_id = bm.media_set_id)
  join (select database_name
          ,max(backup_finish_date) last_backup
        from msdb.dbo.backupset
        where type = 'D'
        group by database_name) lb on (bs.database_name = lb.database_name and bs.backup_finish_date = lb.last_backup)
where type = 'D'