Art of the DBA Rotating Header Image

October, 2015:

A Month of SQLPS: Databases and Availability Groups

The final piece of the Availability Group puzzle is managing databases in them. Managing is typically adding and removing databases, but we also can start and stop the replication of data to other nodes.  These can all be handled via T-SQL and cmdlets contained within the SQLPS module.

There are four cmdlets in the module for database management in Availability Groups:

Get-Command -Module SQLPS *SqlAvailabilityDatabase

SQLPS-20-1

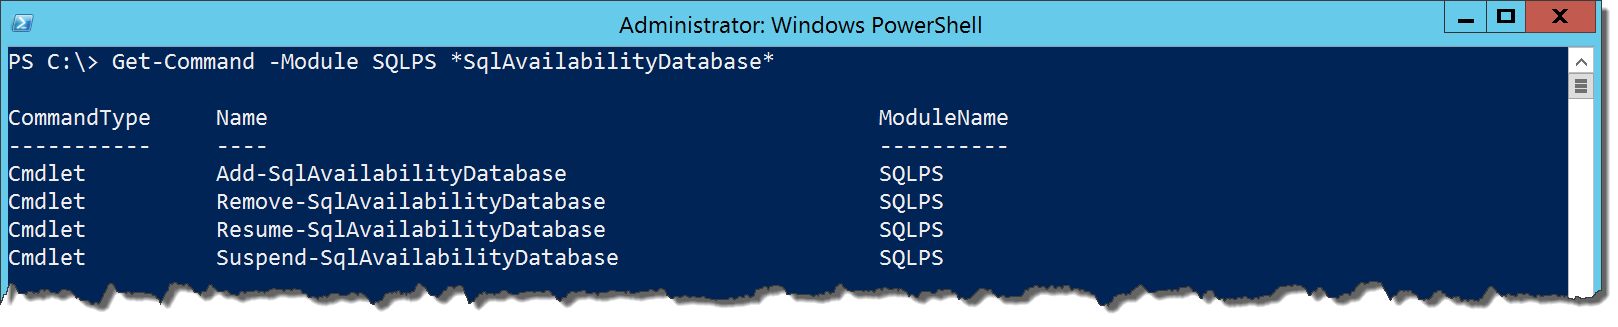
These are easily identifiable based on their names. Since adding and removing a database from an AG is the most common set of tasks, we’ll first look at Add-SqlAvailabilityDatabase. Typical of the other SQLPS cmdlets for AGs, it will take the path or Smo.AvailabilityGroup object for the node where you are adding the database. It will also take the database name. Simple enough, right? What’s interesting is how the behavior of the cmdlet differs depending on where you execute it.

Let’s see what happens if we use the cmdlet for a database on the primary node. Whenever we add a database, we always have to add it to the primary node first. In order to demonstrate the differences, I’ll run the example with the -Script switch so we can see the T-SQL it will execute:

Add-SqlAvailabilityDatabase -Path SQLSERVER:\SQL\KIRK\DEFAULT\AvailabilityGroups\ENTERPRISE -Database AdventureWorks2012 -Script

SQLPS-20-2

This output is exactly what we would expect if we followed the Microsoft documentation on adding a database to an AG. This further reinforces that cmdlets are simply wrappers for T-SQL. Now what if we ran this same command on a secondary node:

Add-SqlAvailabilityDatabase -Path SQLSERVER:\SQL\SPOCK\DEFAULT\AvailabilityGroups\ENTERPRISE -Database AdventureWorks2012 -Script

SQLPS-20-3

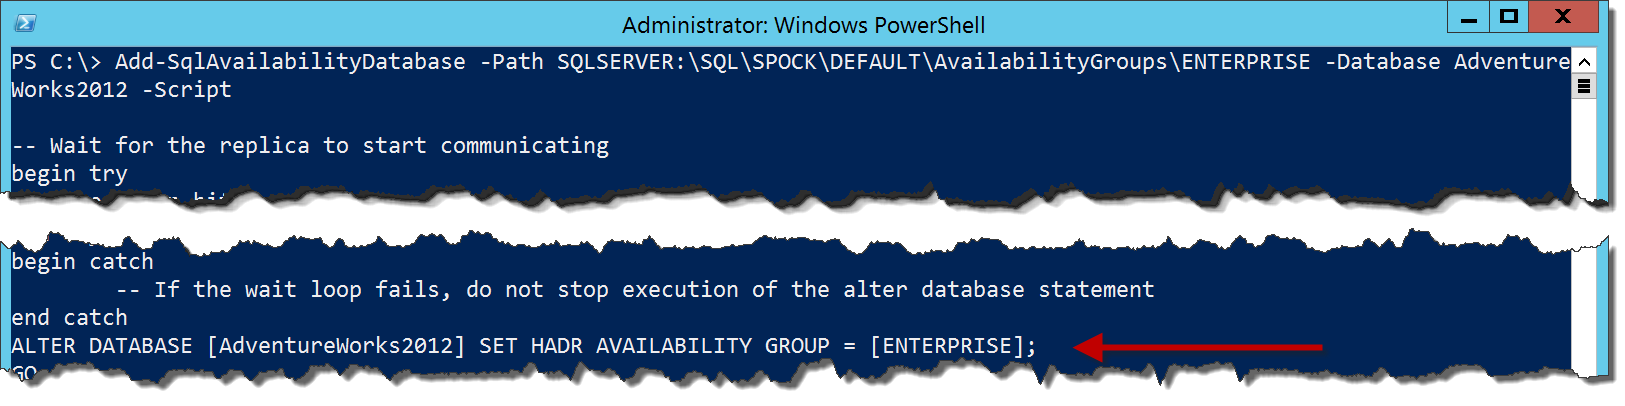
There is a lot more here, but I’ve cut out a lot of the extra stuff and called out the important bit, which is an ALTER DATABASE command instead of the ALTER AVAILABILITY GROUP call we need to make on the primary node. The cut out material is T-SQL that validates that there is an AG for the secondary node to join, then runs the T-SQL for joining a secondary.

This is one of the handier bits of code within the SQLPS module. It is a little annoying to remember that there are two different pieces of T-SQL syntax for adding a database to an AG. The SQLPS cmdlets account for that by wrapping up the logic in a single call and sorting out the correct command for you.

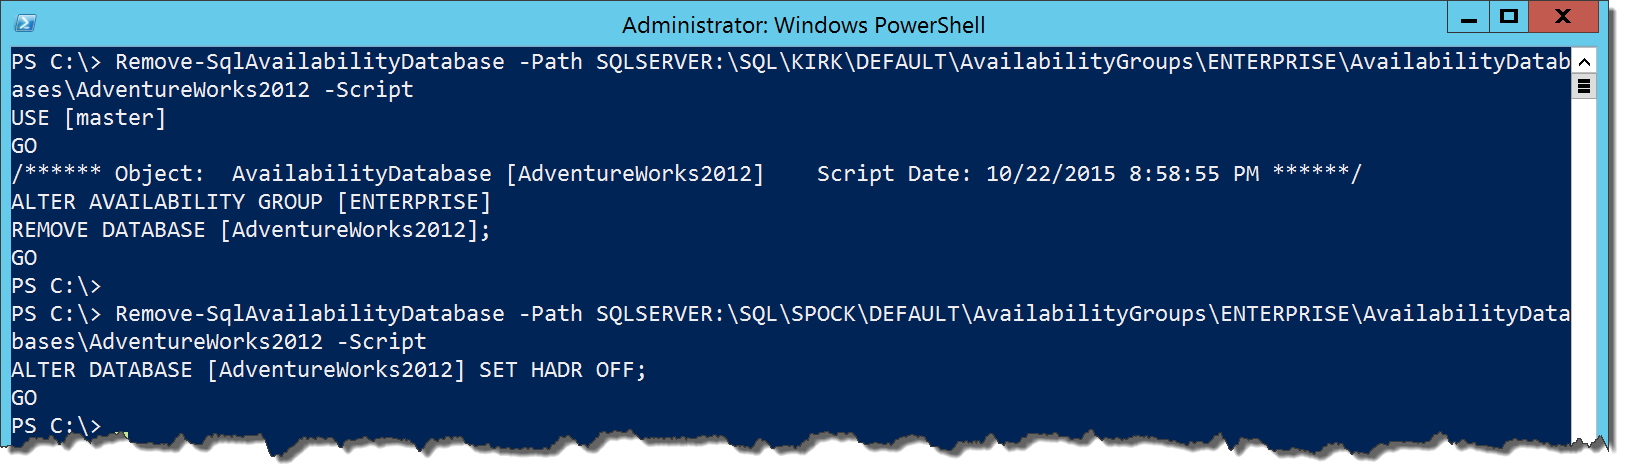
The Remove-SqlAvailabilityDatabase cmdlet works in a similar fashion. The main difference is that our reference is now to a Smo.AvailabilityDatabase object, found in AvailabilityDatabases under your AG in the provider. Yes, I hear ya’, how many different object paths do we need to keep track of? Anyway, the cmdlet will take a different action depending on which node it executes on:

Remove-SqlAvailabilityDatabase -Path SQLSERVER:\SQL\KIRK\DEFAULT\AvailabilityGroups\ENTERPRISE\AvailabilityDatabases\AdventureWorks2012 -Script

Remove-SqlAvailabilityDatabase -Path SQLSERVER:\SQL\SPOCK\DEFAULT\AvailabilityGroups\ENTERPRISE\AvailabilityDatabases\AdventureWorks2012 -Script

SQLPS-20-4

The final two cmdlets will control data replication. We can suspend data replication in an availability database when necessary using the Suspend-SqlAvailabilityDatabase and Resume-SqlAvailabilityDatabase cmdlets. They serve as wrappers for ALTER DATABASE [] SET HADR SUSPEND/RESUME and follow the same restrictions. You call them with the availability database path or using the Smo.AvailabilityDatabase object for the database you want to alter:

Suspend-SqlAvailabilityDatabase -Path SQLSERVER:\SQL\KIRK\DEFAULT\AvailabilityGroups\ENTERPRISE\AvailabilityDatabases\AdventureWorks2012

Resume-SqlAvailabilityDatabase -Path SQLSERVER:\SQL\KIRK\DEFAULT\AvailabilityGroups\ENTERPRISE\AvailabilityDatabases\AdventureWorks2012

This wraps up the AG cmdlets for the SQLPS module. As you can see, there is quite a bit of functionality here and pretty solid. I have some issues with the use of paths and lack of Get- commands, but overall there is good support here for automating the creation of Availability Groups. So much that they are a major part of my presentation at the 2015 SQL PASS Summit next week. If you’re there and would like to know more, check it out on Thursday (10/29) at 3:30PM.

Speaking of Summit, since I will be there this series will go on hold for a week. When I get back, we’ll wrap up with the handful of remaining cmdlets. Thanks for reading and we’ll see you back here on November 2.

A Month of SQLPS: AG Listeners

In order to properly communicate with an Availability Group, we need an AG Listener. Straight from the Microsoft documentation, a listener is a Virtual Network Name that represents the AG, allowing applications to connect to it instead of directly to the SQL instance. The listener will handle routing to the appropriate replica within the AG and allow for connections to be consistent regardless of failovers and node changes.

To create a listener, we need a unique name within the domain and an IP address for each subnet the AG lives in. Creating it in your SQL Server Management Studio is just a matter of entering the information when creating a new listener. The GUI is under the Availability Group Management section, where you can add a new listener. Now, there’s a bit of a gotcha with creating the listener. It doesn’t really create SQL Server objects, but instead cluster resources. This means that while can create it in SSMS, after it is created we have to manage it through the Failover Cluster Manager.

Anyway, we’re here to talk about how to manage this using the SQLPS cmdlets, right? There are three cmdlets for listeners:

Get-Command -Module SQLPS *SqlAvailabilityGroupListener*

SQLPS-19-1

We’ll look at New-SqlAvailabilityGroupListener first, used to create a new listener. For this cmdlet we’ll need either the provider path for the Availability Group or the Smo.AvailabilityGroup object. Additionally, we also need the name, IP address, and TCP port for the listener. The name is easy enough, it can be any unique name, but we have options for the IP address: declare the address to be acquired via DHCP or give it a static IP address combined with a subnet mask. Personally, I prefer static IP addresses for my listeners and I tend to name my AG listener after the AG itself:

New-SqlAvailabilityGroupListener -Name 'ENTERPRISE' -staticIP 192.168.10.101/255.255.255.0 -Port 1433 -Path 'SQLSERVER:\Sql\KIRK\DEFAULT\AvailabilityGroups\ENTERPRISE'

If you look at the help file for this cmdlet, you’ll notice the -StaticIP argument will take an array. This is becausewe could have multiple IP addresses for the listener if the AG spans multiple subnets. Note, you can still only have one IP address per subnet, so keep this in mind as you provision your listener.

After the listener is created, we can view the listener in a few places. First is in SSMS under Availability Groups. The second is within the Failover Cluster Manager, as the cmdlet creates cluster resources. Finally, we could look at it using the provider:

SQLPS-19-2

Set-SqlAvailabilityGroupListener will only allow you to do one thing: Change the port the listener uses. You can not change addresses, only add and remove them. You also can not change the listener name, only remove it and create a completely new listener. To use this cmdlet, you’ll need the provider path or Smo.AvailabilityGroup object for the AG, specifically on the primary node.

Set-SqlAvailabilityGroupListener -Path SQLSERVER:\SQL\KIRK\DEFAULT\AvailabilityGroups\ENTERPRISE -Port 1433

Add-SqlAvailabilityGroupListenerStaticIp allows us to add additional static IP addresses to the listener. This cmdlet will also create cluster resources for these addresses, just like New-SqlAvailabilityGroupListener, and must be unique per subnet for the listener.

If you need to remove any of these objects, you’ll probably want to do it through the Failover Cluster Manager or the Failover Cluster cmdlets. You can use Remove-Item if you reference the provider path of the listener and this will drop the entire object. However, managing the IP addresses of the listener itself can only be done by managing the individual cluster resources.

Using these cmdlets will give us a functioning Availability Group and allow us to connect to it using the AG name. With this complete, there is one more step to make an AG 100% functional: install a database into the AG and enable it for synchronization. In the last post for this week, we will cover the cmdlets for enabling and managing databases within an AG.

A Month of SQLPS: Availability Group cmdlets

In the previous post, we covered how to create and manipulate Availability Group replicas. Assembling these replicas are necessary for building and using SQL Server’s AlwaysOn technology for high availability. Now it is on to the cmdlets in the SQLPS module that actually create the Availability Groups themselves. As always, we’ll start with looking at the cmdlets in the module:

Get-Command -Module SQLPS *SqlAvailabilityGroup

SQLPS-18-1

We talked about Join-SqlAvailabilityGroup in relation to the cmdlets for managing replicas. This cmdlet is important because while we can create replicas, they still need to be joined to the Availability Group. Calling this cmdlet is simply a matter of passing the provider path or the Smo.Server object that represents the node, then the Availability Group name:

Join-SqlAvailabilityGroup -Path SQLSERVER:\SQL\KIRK\DEFAULT -Name ENTERPRISE

This is necessary once the Availability Group is created, but what about actually creating it in the first place? For that we have the New-SqlAvailabilityGroup cmdlet. To use this, we need a couple things: the name of the Availability Group, the path or SMO.Server object for the primary node, and a collection of replicas.

New-SqlAvailabilityGroup -Name ENTERPRISE -Path SQLSERVER:\SQL\KIRK\DEFAULT -AvailabilityReplica $replicas

Again, even if we create this with the cmdlet, we still have to join the replicas. Make sure you keep that gotcha in mind. Otherwise, this is all we need to get a basic Availability Group up and running. Doesn’t seem hard, does it? Really, the bulk of the work is done by creating the replica objects.

If we want to change any settings for the Availability Group, we would use SqlSet-AvailabilityGroup. This is for changing settings like backup preference, failure condition levels, and the AG health check timeout. Now that an AG exists, the cmdlet requires the Smo.AvailabilityGroup object or the provider path for that AG:

Set-SqlAvailabilityGroup -Path SQLSERVER:\SQL\KIRK\DEFAULT\AvailabilityGroups\ENTERPRISE -AutomatedBackupPreference Secondary

Calling Remove-SqlAvailabilityGroup will destroy the AG with no extra action required:

Remove-SqlAvailabilityGroup -Path SQLSERVER:\SQL\KIRK\DEFAULT\AvailabilityGroups\ENTERPRISE

This is all pretty useful, but the strength of Availability Groups is fast failover to another node. Normally, to accomplish this you would connect to the node using SQL Server Management Studio and running the appropriate ALTER AVAILABILITY GROUP command. The Switch-SqlAvailabilityGroup cmdlet saves us a little bit of extra effort by avoiding the step of logging into the SQL Server. We can just call the cmdlet and specify the AG path within the node we want to fail to:

Switch-SqlAvailabilityGroup -Path SQLSERVER:\SQL\SPOCK\DEFAULT\AvailabilityGroups\ENTERPRISE

It’s important to note the difference in the path. Just as we want to run the SQL from the target node for the failover, we need to use the provider path for that target node.

We know the Test-SqlAvailabilityReplica will evaluate some Policy Based Management checks, and so will Test-SqlAvailabilityGroup. We can pass the usual arguments and get back a PowerShell.Hadr.AvailabilityGroupHealthState object with a HealthState property.

By covering these cmdlets, we know have a good foundation for how to get started with Availability Groups and Powershell. There are two other steps we need to complete our fully functioning AG: creating a listener and deploying a database. The next few posts will go over those cmdlets in detail, so you can understand the best way to automate the creation and management of this great piece of SQL Server technology.

A Month of SQLPS: Managing Availability Group Replicas

Now that we understand how to prepare our machines for an Availability Group, we can go about the business of creating an Availability Group. This can be fairly involved, but the SQLPS cmdlets can make this a more manageable process. To start the process, we need to look at the components that make up an Availability Group, the replica nodes. Let’s look at the available cmdlets for managing replicas:

Get-Command -Module SQLPS *AvailabilityReplica*

SQLPS-17-1

Starting with New-SqlAvailabilityReplica, how we use this cmdlet depends on whether or not we are creating a new Availability Group or adding a replica to a group that already exists. For an existing AG, we need to reference it using either its provider path or its related Smo.AvailabilityGroup object:

New-SqlAvailabilityReplica -Path 'SQLSERVER:\SQL\KIRK\DEFAULT\AvailabilityGroups\ENTERPRISE' -Name SPOCK -EndpointUrl 'TCP://SPOCK:5022' -AvailabilityMode SynchronousCommit -FailoverMode Automatic

Note the path we use, not to be confused with the path of the SQL Server instance. This path should be within the context of the primary node for the AG. Running this command will create the replica.

If we are creating a brand new AG, the process is slightly different. This is because we don’t have an existing AG to reference, we need to create our replicas in memory so they can be referenced later. We need to make use of the -AsTemplate switch, which creates the replica object in memory. We also need to specify what version of SQL replica we’re creating, by using the -Version argument, specifying 11 or 12 for 2012 or 2014 respectively:

$replicas = @()
$replicas += New-SqlAvailabilityReplica -Name SPOCK -EndpointUrl 'TCP://SPOCK:5022' -AvailabilityMode SynchronousCommit -FailoverMode Automatic -AsTemplate -Version 12

Note, with this command we’re adding the output of the cmdlet to a collection. This is our reference for when the new AG is created.

There is one other step required, for both scenarios, to make a replica fully part of the AG: we need to join it using Join-SqlAvailabilityGroup. To do this, run the cmdlet and specify either the provider path for the instance or its Smo.Server object. This completes your replica creation.

In the above examples, we specified the failover, endpoint URL, and availability options. To change these within Powershell, we can use the Set-SqlAvailabilityReplica cmdlet. The trick to this cmdlet is if we want to reference the replica, we need a different provider path to the object:

Set-SqlAvailabilityReplica -Path 'SQLSERVER:\SQL\KIRK\DEFAULT\AvailabilityGroups\Enterprise\AvailabilityReplicas\SPOCK' -FailoverMode Manual

To check on the state of the replica, we can use Test-SqlAvailabilityReplica, which will evaluate the AG Policy Based Management policies and return a special object, PowerShell.Hadr.AvailabilityReplicaHealthState (you can examine this with Get-Member on the Test-SqlAvailabilityReplica output):

Test-SqlAvailabilityReplica -Path 'SQLSERVER:\SQL\KIRK\DEFAULT\AvailabilityGroups\Enterprise\AvailabilityReplicas\SPOCK'

SQLPS-17-2

Finally, you can use Remove-SqlAvailabilityReplica by using the same path to the replica:

Remove-SqlAvailabilityReplica -Path 'SQLSERVER:\SQL\KIRK\DEFAULT\AvailabilityGroups\Enterprise\AvailabilityReplicas\SPOCK'

All of these cmdlets are wrappers for T-SQL, which means they all accept -Script to output the T-SQL instead of actually executing the command. Again, it’s the same output as if you had done the action in SSMS and used the script button to examine your output. This is a useful check if you’re learning how to use the module cmdlets to validate that what you’re trying to do is actually what is specified.

There’s a lot involved here to manage your replicas, from all the different cmdlet options to the different provider paths needed to execute the functions properly. A request I would make of the SQLPS team at Microsoft is to provide a series of Get- cmdlets that will accept the name strings and return the appropriate SMO objects, since these cmdlets will accept an -InputObject of the appropriate type. Next up, we’ll cover the actual Availability Group cmdlets, using these functions to create and manage our SQL Availability Groups from the Powershell command line.

A Month of SQLPS: AlwaysOn Support

When SQL Server 2012 rolled out, the big feature for the release was Availability Groups. This new technology to support high availability in SQL Server is pretty impressive and has become a cornerstone for database operations in many shops. When it was introduced, the SQL team added more than twenty new cmdlets for Availability Groups in SQLPS. For those keeping score at home, this is about half of the available cmdlets in the module. Microsoft has documented them fairly well online, making them some of the more useful cmdlets available in the SQLPS module.

While the full details of Availability Groups are outside the scope of this series, we will cover many details of Availability Group management and creation as we review the different cmdlets in the module. The first of these have to do with the SQL Server service and enabling AlwaysOn for that service. Normally, we would open up the properties of the service in the Configuration Manager, check off the box for the functionality, and restart the service:

SQLPS-16-1

That’s a lot of clicking, isn’t it? Fortunately, Powershell gives us an easier way. Let’s do a quick lookup of of all the cmdlets containing SqlAlwaysOn:

Get-Command -Module SQLPS *SqlAwaysOn

Running this returns two cmdlets, one for enabling the feature, the other for disabling. Pretty handy, eh? Now, instead of having to open up all sorts of Windows, we can run Enable-SqlAlwaysOn to enable the feature:

Enable-SqlAlwaysOn -ServerInstance KIRK -Force

The cmdlet will accept the instance name, the provider path, or a Smo.Server object to identify the service it needs to alter. By default, running the command will force a service restart, but you can postpone that by using the -NoServiceRestart switch. Disable-SqlAlwaysOn works in the same way, just disabling the feature instead of turning it on.

Before we can create an Availability Group, there’s one other piece of prep that needs to be done within SQL Server. In order for databases to replicate their data to replicas, it needs an endpoint. Normally, we would create this via T-SQL, but fortunately there are cmdlets within SQLPS that make creating these easier:

Get-Command -Module SQLPS *HADREndpoint

Setting up the endpoint is a simple two step process. First we create it using the New-SqlHADREndpoint cmdlet, which creates the endpoint with all the options we want use. Once we have the endpoint created, we need to start it, using the Set-SqlHADREndpoint to alter its state. Fortunately, we can combine these two steps into one using the pipeline:

New-SqlHadrEndpoint HADR_Endpoint -Port 5022 -Path SQLSERVER:\SQL\KIRK\DEFAULT | Set-SqlHadrEndpoint -State ‘Started’

Note, this only creates the endpoint and makes it available. We still have to map the Availability Group to the endpoint, which we will do when we create it.

One difference with the endpoint commands from some of the other cmdlets is that they don’t accept ServerInstance as an argument. We can only pass the provider path or an Smo.Server object. This is where having a cmdlet for retrieving the instance as an SMO object would be handy, but we’ll have to settle for either creating the Smo.Server object ourselves or using the provider path.

With this, we’ll have an instance ready for creating an Availability Group. I’ve skipped over cluster creation, as that is handled by cmdlets from the FailoverCluster Powershell module. Hint, it’s pretty easy. Next up, we’ll go over the cmdlets and steps for building our Availability Group.


A Month of SQLPS: Azure Managed Backups

SQL 2014 introduced some new features to expand capabilities into Azure. One of these features is Azure Managed Backup. There is some SQLPS support provided for this new feature, grouped under the SqlSmartAdmin cmdlets:

SQLPS-15-1

These cmdlets give us some limited control over managed backups, allowing us to set up and configure the managed backup settings. I’m going to save that for another post, but for the detailed instructions you can follow the blog post linked above or the Microsoft documentation.

Once we have the managed backups setup, we can retrieve the smart admin object using Get-SqlSmartAdmin. While it accepts the usual parameters, I prefer to use the -ServerInstance argument for simplicity reasons. As with other cmdlets, we’ll call it and pass the output to Get-Member to see what the underlying type is:

Get-SqlSmartAdmin -ServerInstance PICARD | Get-Member

SQLPS-15-2

The object is another member of the SMO library, the Smo.SmartAdmin class. There’s not much to say about this class. It contains a lot of properties you would expect, such as BackupEnabled, EncryptionType, and StorageUrl. It should be noted that this class only contains the instance level settings, so you can’t use it to show what individual databases you’ve set up for managed backups.

Set-SqlSmartAdmin will allow us to update those instance level settings. The documentation for this cmdlet lies a little, as it says you can pass the provider path as one of the arguments. I’ve tried this and couldn’t get it to work, but did find that we could use Get-SqlSmartAdmin and the pipeline to get this to work:

Get-SqlSmartAdmin -ServerInstance PICARD | Set-SqlSmartAdmin -BackupRetentionPeriodInDays 10

SQLPS-15-3

In addition to managing our instance level settings, we can also validate that the managed backups are working correctly. SQL 2014 included two new Policy Based Management policies: SmartAdminSystemHealthPolicy and SmartAdminUserActionsHealthPolicy. These two policies will validate that your managed backup processes are working correctly. Test-SqlSmartAdmin will essentially evaluate these policies and report if there’s a failure:

Get-SqlSmartAdmin -ServerInstance PICARD | Test-SqlSmartAdmin

SQLPS-15-4

Managed backups are a cool concept and can be of great value for DBAs. The Azure Managed Backup system not only takes care of your backups for you without a lot of intervention, but also stores them offsite in the cloud, giving you additional insurance for a disaster recovery scenario. These SQLPS cmdlets feel like a good start for managing this functionality, but it feels incomplete.

I’ll confess I’m not as strong on using Azure with SQL Server, so I would have to further investigate this in combination with the Azure Powershell support. Once I finish this series, I plan to return to these and explore them a little more in detail. I think there is a lot of appeal with managed backups and being able to script them out in Powershell can be a huge boon to automating work in smaller shops.

A Month of SQLPS: Firewalls and Networking

All IT professionals have to deal with firewalls in some capacity or another. Protecting communication with servers is a fundamental component of any security plan. By default, whenever we install SQL Server we will need to do two things to allow us to talk to our SQL Servers: enable communication (usually TCP) and create a firewall rule allowing inbound traffic. Performing these steps are so standard that it only makes sense to automate them.

Enabling TCP communication is usually something handled within the SQL setup. It is one of the command line options, so this means we can include it in a config.ini and consistently enable it as part of our setup. Firewall rules are an OS operation, though, and are not part of the SQL Server setup. There have been command line options for a long while courtesy of netsh, but since Powershell 3 we’ve also had New-NetFirewallRule to execute this task:

New-NetFirewallRule -DisplayName "Allow SQL Server" -Direction Inbound –LocalPort 1433 -Protocol TCP -Action Allow

SQLPS-14-1

Respectively, these cmdlets will create and remove a firewall rule for SQL Server. The help file shows only a handful of parameters to use. It also states a dependency on our friend, the Cloud Adapter Service. So let’s see how it works.

The command is easy enough to run:

Add-SqlFirewallRule -ServerInstance PICARD -Credential $cred

All we need to make this happen is an instance name and credential that has enough rights on the host machine to create a firewall rule. We could use an SMO Server object or a provider path to the instance. With any of these options, what we get is a firewall rule to the SQL Server application for that named instance:

SQLPS-14-2

This is actually an extremely convenient way to allow firewall access for our instance. Because it allows access specifically for the application executable, it helps minimize port management. However, that’s about all the control you get. The rule will always be for all your profiles, meaning you are opening access to anyone who can reach the machine. This kind of blanket security change could easily expose your data in a way you were not planning on.

Removing a firewall rule does not work quite as expected. Running Remove-SqlFirewallRule will not remove your firewall rule, only disable it. This is not such hassle, but nice to be aware of. If you add it back, the rule just gets re-enabled and there are not any naming conflicts.

There’s one other cmdlet to look at relating to firewalls and that’s the Set-SqlNetworkConfiguration cmdlet. It is used to change the IP address port that instance is listening on. The parameters are similar to any other cmdlet using the Cloud Adapter Service, where you will need the instance name and a credential with permissions to alter the service:

Set-SqlNetworkConfiguration -ServerInstance PICARD -Protocol TCP -Port 13000 -ForceServiceRestart -Credential $cred

SQLPS-14-3

It’s a handy way to change your IP port. However, doing this has no impact on the firewall rule created by Add-SqlFirewallRule, as that firewall maps to the application executable for the instance.

Overall, these cmdlets can be useful, but I am not sure I would recommend them. The lack of fine grained control over how the rule gets created is a big concern for me. Add to this the dependency on the Cloud Adapter Service, which opens up another vector to accessing the server. We’re trading ease for control and the benefits do not outweigh the drawbacks. Since we already have a full set of Network Security cmdlets that allow us to manage firewall rules, I would not use the SQLPS module cmdlets.

A Month of SQLPS: Managing Credentials

Security is an important aspect of SQL Server management. It’s important to control permissions within the instance and only allow the minimal level of rights to our users. This is the principle of least privilege, a fundamental concept for computer security. SQL Server provides a variety of tools to manage these permissions within the instance, but what if SQL Server has to interact with either the operating system or another application? For this, we have credentials, a way to manage authentication to other resources.

The next series of cmdlets to review from SQLPS are the ones used to manage these credentials. We’ll go through the usual process and use Get-Command to list the options:

Get-Command -Module SQLPS *SqlCredential

The result is four cmdlets for creating, retrieving, altering, and removing a credential. We’ll start by using New-Credential to create one for a windows domain login:

$pw = Read-Host 'Enter the password' -AsSecureString
New-SqlCredential -Path 'SQLSERVER:\SQL\PICARD\Default\' -Name SQLTest_Windows -Identity 'SDF\SQLTest' -Secret $pw

This command will create the credential in the PICARD instance. Unlike some of the other cmdlets, though, the -SqlCredential cmdlets do not support a -ServerInstance parameter. The way to specify the instance is to use the provider path to the instance. It also, unfortunately, doesn’t accept a Powershell credential object to create the SQL credential. It will accept a secure string for the password, meaning that the password will be encrypted as the cmdlet processes it.

Now that we’ve created our credential, let’s crack it open with Get-Member and see what kind of object we’re working with:

Get-SqlCredential -Path 'SQLSERVER:\SQL\PICARD\Default\' -Name SQLTest_Windows | Get-Member

SQLPS-13-1

It’s an Smo.Credential object, which matches with the other object types found within the provider.

The Set-SqlCredential gives us the capability to update the identity or the password for an existing credential. This means if something changes externally with credential information, we can update the credential to reflect that. Remove-SqlCredential rounds out the functionality by giving us a cmdlet to remove a credential using Powershell. These two cmdlets will also support the -Script switch, allowing you to output the resulting T-SQL for these calls.

Why would you use these? The functionality they provide does not really offer any real savings over doing the same work in T-SQL. Conversely, it is about the same amount of code. If you use Powershell for deploying these objects, the secure string functionality can be helpful to keep your credentials encrypted. The choice between T-SQL and Powershell is a matter of having different options to create your credentials, letting you choose the appropriate tool for your deployment.

A Month of SQL PS: Backups and Restores

Backups and restores are a key task for any database administrator. Our primary job is safeguarding the data and backups provide us with a redundant, point-in-time state of our data that we can use to recover from in the event of a Bad Thing(tm). Not taking backups is a great way to make sure your resume is up to date.

It’s no surprise that the SQLPS module has two cmdlets specifically designed for these functions, respectively named Backup-SqlDatabase and Restore-SqlDatabase. Go ahead and take a moment to look at the help files for these using Get-Help. The first thing you should see is there’s quite a bit of documentation for these two cmdlets. They have some of the most thorough help files for any of the SQLPS cmdlets.

Backing up a database with Backup-SqlDatabase is easy, much like it would be if we were to use BACKUP DATABASE in T-SQL:

Backup-SqlDatabase -ServerInstance PICARD -Database AdventureWorks2012 -BackupFile 'C:\Backups\AW2012_cmdlettest.bak’

If you run this, you’ll note that you get a nice little progress bar for the backup action. Not to much else to worry about here, because it’s straightforward in how it operates. This cmdlet does run T-SQL behind the scenes, meaning we can use the -Script argument generate the T-SQL statement the cmdlet will run when it backs up our database:

SQLPS-12-1

Looks suspiciously like what you would get if you scripted out a backup action in SQL Server Management Studio, doesn’t it? We’re going back to the concept that the SQLPS components all use the SMO, meaning they work the same way as other tools that use the components, like SSMS. This becomes handy if you want to use the cmdlets to shortcut creating scripts for your backups.

Most of the other arguments for this cmdlet are simply additional options for the T-SQL BACKUP command. This means we can have the same level of customization of our backups as we would if we were writing straight T-SQL. I’ll let you explore those on your own and consider which options make sense and how to use them.

So why would we use this, if all it’s doing is duplicating T-SQL? Mostly because it becomes easier to integrate with Powershell in this manner, allowing us to use Powershell for what it’s good at it. One pattern I like to advocate around this is using Powershell to create backup directories as part of my backup process, then backup the database, then again use Powershell to remove old backups. Consider this script:


$dbs = dir SQLSERVER:\SQL\localhost\DEFAULT\databases | Where-Object {$_.status -eq 'Normal'}

foreach ($db in $dbs.name){
 $backuppath = "C:\DBBackups\$db"
 if(!(Test-Path $backuppath )){New-Item -ItemType Directory -Path $backuppath}
    $backupfile = Join-Path -Path $backuppath -ChildPath "$db-$(Get-Date -Format 'yyyyMMddhhmm').bak"
    Backup-SqlDatabase -ServerInstance LocalHost -Database $db -BackupFile $backupfile -Initialize 
    dir $backuppath | Where-Object {$_.FullName -ne $backupfile} | Remove-Item
}


This will dynamically backup all the user databases on the local instance with a unique name in its own directory. The script also uses Powershell to handle the file system tasks of creating the folder if it does not exist and cleaning up any backups outside of the one we just created. We have a simple, dynamic backup script all with a fairly minimal amount of coding.

The counterpart to this is the Restore-SqlDatabase. After all, our backups are not all that useful if we can’t restore them. The cmdlet is very similar to Backup-SqlDatabase with its arguments, where most of them are direct translations of the T-SQL RESTORE command options. One gotcha to call out is how relocating database files is handled.

Moving database files with a restore is a pretty common operation. The way the cmdlet handles it makes sense if you remember that everything is working through the SMO. What we need for moving files is a collection of RelocateFile objects, which the cmdlet will then use to establish the restore:

$MoveFiles = @()
$MoveFiles += New-Object Microsoft.SqlServer.Management.Smo.RelocateFile ('AdventureWorks2012_Data','C:\DBFiles\data\AdventureWorks2012New_Data.mdf')
$MoveFiles += New-Object Microsoft.SqlServer.Management.Smo.RelocateFile ('AdventureWorks2012_Log','C:\DBFiles\log\AdventureWorks2012New_Log.ldf')

Restore-SqlDatabase -ServerInstance PICARD -Database AdventureWorks2012New -RelocateFile $MoveFiles -BackupFile 'C:\DBBackups\AdventureWorks2012\AdventureWorks2012-201510101251.bak

As with our Backup-SqlDatabase cmdlet, we can see the T-SQL that would execute this by using the -Script argument.

Again, this cmdlet is useful by including within a larger script. I like using it for quick and dirty script generation for point in time restores:

$LastFull= Get-ChildItem 'C:\Backups\AdventureWorks2012\*.bak' | Sort-Object LastWriteTime -Descending | Select-Object -First 1
$logs = Get-ChildItem 'C:\Backups\AdventureWorks2012\*.trn' | Where-Object {$_.LastWriteTime -gt $LastFull.LastWriteTime} | Sort-Object LastWriteTime

$MoveFiles = @()
$MoveFiles += New-Object Microsoft.SqlServer.Management.Smo.RelocateFile ('AdventureWorks2012_Data','C:\DBFiles\data\AdventureWorks2012New_Data.mdf')
$MoveFiles += New-Object Microsoft.SqlServer.Management.Smo.RelocateFile ('AdventureWorks2012_Log','C:\DBFiles\log\AdventureWorks2012New_Log.ldf')

$db = 'AdventureWork2012New'
Restore-SqlDatabase -ServerInstance 'PICARD' -Database $db -RelocateFile $MoveFiles -BackupFile $LastFull.FullName -RestoreAction Database -NoRecovery -Script | Out-File 'C:\Temp\Restore.sql'
foreach($log in $logs){
    if($log -eq $logs[$logs.Length -1]){
        Restore-SqlDatabase -ServerInstance 'PICARD' -Database $db -BackupFile $log.FullName -RestoreAction Log -Script | Out-File 'C:\Temp\Restore.sql'
    }
    else{
        Restore-SqlDatabase -ServerInstance 'PICARD' -Database $db -BackupFile $log.FullName -RestoreAction Log -NoRecovery -Script | Out-File 'C:\Temp\Restore.sql'
    }
}

While it seems like a lot of code, it follows an understandable pattern. The first to Get-ChildItem calls collect our most recent full backup and any log backups that have occurred after that. Next up is to build our RelocateFile collection. Then we just run the Restore-SqlDatabase cmdlet with the -Script argument for each file, piping the output to a file. The result is a full restore script with all of our transaction log files sorted for us. This kind of script saves me a lot of time when I have to execute database restores and I can avoid wading through a lot of transaction log backups.

For my money, the Backup- and Restore-SqlDatabase cmdlets are two of the more useful functions from the module. They make it easy to combine my SQL Server work with the file system tasks that needed to happen as well. They also make it simpler because they reduce the amount of code I need to write to within Powershell, reducing the overall complexity of the work. While much of this could be done using straight T-SQL, leveraging the right parts of Powershell makes for robust and reliable processes.

A Month of SQLPS: SqlDatabase cmdlets

In the last post we covered the cmdlets that are used to acquire, start, and stop SQL Instances. Naturally, the next area to talk about are cmdlets designed for SQL databases. Let’s see what we have using Get-Command again:

Get-Command -Module SQLPS *SqlDatabase

SQLPS-11-1

Three cmdlets are available, each one easily understandable from their names. We’ll start by looking at Get-SqlDatabase’s help file (using Get-Help Get-SqlDatabase -ShowWindow). Fortunately, this is one of the better documented cmdlets, though I’m still disappointed that the help information doesn’t show the output object type.

I know I sound like a broken record, but it is so vital to remember that everything in Powershell is an object. This means that knowing what our output objects are is key to being able to use our cmdlets. What we need to do now is use Get-Member to investigate the output of the cmdlet:

Get-SqlDatabase -ServerInstance PICARD -Name AdventureWorks2012 | Get-Member

SQLPS-11-2

Our output is an Smo.Database object, with all of those methods and properties. As we previously covered, this is the same object that the provider gives you. This means the Get-SqlDatabase cmdlet is functionally equivalent to:

Get-Item SQLSERVER:\SQL\PICARD\DEFAULT\Databases\AdventureWorks2012

This means we have a couple different paths to the same result, so whichever technique is used is a matter of preference. Interestingly enough, the Get-SqlDatabase cmdlet takes a -Path argument, but only works for the instance. We can not use the -Path to define the database, which seems weird to me. Anyway, this command will use the path and result in the same output:

Get-SqlDatabase -Name AdventureWorks2012 -Path SQLSERVER:\SQL\PICARD\DEFAULT

Another little gotcha with this cmdlet has is there’s a -Script switch argument for the cmdlet. Typically, when you see the -Script argument, this is a way for the cmdlet to call the .Script() method and produce a T-SQL script for the action. The thing is, Get-SqlDatabase is not actually performing a T-SQL action, just acquiring a SMO object. If you use the -Script argument, nothing will get returned because of this.

One significant difference between getting the option via the cmdlet versus the path and Get-Item is that Get-SqlDatabase will take a PSCredential object for -Credential. This means we can use alternate authentication for getting our objects. While we know we can do this using the provider, this can save us a step.

There’s a lot of variations here and we would use this cmdlet in any situation where we wanted to get the database object. What I do want to call out is the disconnection between Get-SqlDatabase and Get-SqlInstance. The fact that Get-SqlInstance returned a different type of object than the Smo.Server class when everything else with the provider works using SMO objects makes it a little weird. At least Get-SqlDatabase maintains that consistency with the SMO, giving us a handy way to manage and manipulate database objects for our scripts.