Art of the DBA Rotating Header Image

SQL 2012

I need more power!

Man, sometimes blogging is hard. I meant to get this out earlier in the week, but better late than never, right?

When I was out at SQL Rally a couple weeks ago, I went to Argenis Fernandez(b|t) and Robert Smith’s(b|t) pre-con for SQL Server best practices. It was a good session, with lots of interesting discussion on ways to configure your environments for SQL. One gotcha we talked about was SQL 2008’s annoying power plans and how they get set to Balanced by default. Now, I get what Microsoft is trying to do with these plans, but defaulting to Balanced on servers? Really? Let’s use some common sense.

Anyway, before I get on a rant (don’t worry, I’ve got a couple of those in store for later blog posts), the question that popped into my mind when we started talking about this was how to do it on Server Core. Changing the plans on your standard Windows installs is easy, you just browse into Power Plans (click your start and type “power plans” in the search box). What about when we have no GUI? Do we panic? Of course not, because we have the command line!

Some quick Googling provided me with two items. One is powercfg, a command line utility that Microsoft has provided to allow us to edit these plans. It’s handy, but a little confusing, especially because the power plans use GUIDs for management and that adds a whole new level of trickiness. So, the second Google nugget to appear was this handy script from Aaron Saikovski, where he wraps powercfg in some Powershell to give us more graceful management. Here it is with some editing/tweaking from me for use:

function Set-PowerPlan(
    [ValidateSet("High performance", "Balanced", "Power Saver")] [string]$PreferredPlan)
{
	$currplan = powercfg -getactivescheme
	Write-Host "Current plan is $currplan.substring($currplan.Indexof('{')) [$(Get-Date)]"

    Write-Host "Setting Powerplan to $PreferredPlan"
    $guid = (Get-WmiObject -Class win32_powerplan -Namespace root\cimv2\power -Filter "ElementName='$PreferredPlan'").InstanceID.tostring()
    $regex = [regex]"{(.*?)}$"
    $newpowerVal = $regex.Match($guid).groups[1].value

    #Set the powerplan
    powercfg -S  $newpowerVal

	$currplan = powercfg -getactivescheme
	Write-Host "Current plan is $currplan.substring($currplan.Indexof('{')) [$(Get-Date)]"
}

#set Preferred powerplan
Set-PowerPlan $args[0]

Save the script and call it with whatever plan you want as the argument, or put it in your profile and call it as a function. Technically, you can use this to set the power plan to any of the default options, but my main use of it is to set the plan to High Performance for my Core servers.

UPDATE: Kendall Van Dyke (b|t) provides a handy way to update the plan using the WMI. I’ve not used it much, but I’ll definitely play around with it. In general, I think you could go either way for managing your powersettings.

Get-WmiObject -Class win32_powerplan -Namespace root\cimv2\power | ? { $_.ElementName -ieq 'high performance' } | % { $_.Activate() }
FILESTREAM on Server Core

A couple weeks ago, I did a post for T-SQL Tuesday on the Filetable, a cool new SQL 2012 feature. One thing I glossed over a little bit was enabling FILESTREAM for your SQL Server, where I just linked the MSDN article walking you through configuring the service using the Configuration Manager.  This is great as long as you have the GUI to use. However, I’ve said previously that I’m trying to do all my work (demos and blog posts) using SQL 2012 on Server core, which means no GUI. This makes it a leeeeeeeeeeeeeetle trickier and requires some more advanced techniques.

We need to flex our Powershell muscles for this. For me, this still means hitting the Google search to find the command syntax I need, though I understand it a little better. I found this excerpt from Wrox’s Microsoft SQL Server 2008 Administration with Windows PowerShell on Google Books.  The example shows, quite clearly, how to use Powershell to hit the WMI and the appropriate methods to enable FILESTREAM with the right perms and names.

I took the example there and reworked it slightly, mostly to change the namespace so that it will use the correct SQL 2012 interface.  It’s not much, when you get right down to it.  The core purpose is to create the WMI object and then use the EnableFilestream method (which may be hard to do if you don’t know the appropriate namespace to use):

instance="MSSQLSERVER"
$wmi=Get-WmiObject -namespace "root\Microsoft\SqlServer\ComputerManagement11" -class FILESTREAMSettings | where {$_.InstanceName -eq $instance}
$wmi.EnableFILESTREAM(3,$instance)

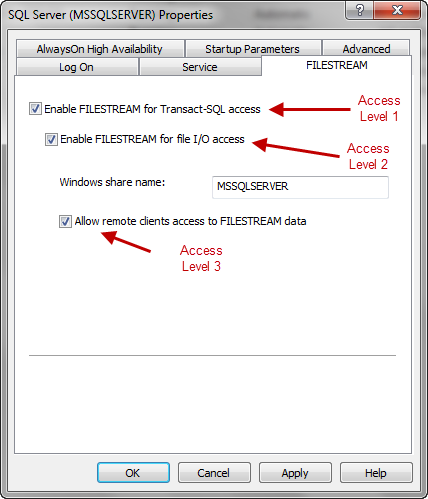
There are two parameters to the EnableFILESTREAM method. The first is access level, with 4 possible values that relate to how much access is granted to the filesystem. The easiest way to understand it is to relate the values to the settings in the GUI:

(Access level 0 is where no boxes are checked, essentially disabling FILESTREAM)

The second parameter is simply the share name, so in this example we would create\\<SERVER NAME>\MSSQLSERVER for our FILESTREAM objects.  Now, note that you still have to run the SQL to configure the SQL Server side of things (see my previous post).  This step just replaces activating the service properties from the Configuration Manager.

The other alternative to this method is to use the remote management tools to connect to the instance and alter the service settings through the GUI. I like this way better, though, because I have more control over it and I don’t need any additional connections or tools.

Edit:  I forgot to mention that this will require you to restart the SQL Service to apply (thanks Hayden Hancock for pointing this out in the comments).  Since we’re Powershelling it:

Get-Service $instance = “MSSQLSERVER” | Restart-Service

T-SQL Tuesday #29 2012 Party: Dancing on the FileTable (#tsql2sday)

For this month’s edition of T-SQL Tuesday, Nigel Sammy(b|t) asks us to talk a bit about a feature of SQL 2012 that we’re excited about. Now, while my most favoritist SQL 2012 feature is the ability to install on Server Core, I’ve already written about that and I want to talk about something that hasn’t gotten quite so much publicity. Enter the File Table, new functionality that exposes more of the Windows file system to SQL Server. With it, we get some additional tools for file handling that before we had to do with other applications and workarounds like xp_cmdshell.

A File Table is a special type of table in SQL 2012. It’s got a fixed set of columns and points at a directory managed by SQL’s FILESTREAM technology. If you do a SELECT from the File Table, you’ll get a listing of all the files within that directory. What’s cool is that “inserting” rows into this table is as copying files into the directory. Once a file is in there, we can use use SQL to do other operations, like copying files between two different File Tables, or cleaning up old files based on the file dates or archive flags.

Setting up a File Table doesn’t take much, but since it uses FILESTREAM it can be a little tricky. The first thing you need to do is actually enable FILESTREAM for your SQL Server instance. To do so, just follow the steps from MSDN. For the purposes of this, I’m going to set up my share name as my instance name, SQL2012. This means that to get to my FILESTREAM objects and my File Tables, I’m going to be using the UNC path of \\SHION\SQL2012 for my laptop.

Now that we’ve got FILESTREAM going, we can go ahead and create our File Table. The first step is to set our database options to allow non-transactional access and a default virtual directory for the FILESTREAM.

--Set database specific options for FILESTREAM
ALTER DATABASE demoFileStream
SET FILESTREAM (non_transacted_access=FULL,directory_name=N'FSDemo')

Next, we need to add a FILESTREAM filegroup to the database, which defines the physical directory where our file tables will exist. Note, this directory will be a physical directory, but SQL Server must create it so it cannot already exist.

--Filegroup for the filestream
ALTER DATABASE demoFileStream
ADD FILEGROUP fgFileStream CONTAINS FILESTREAM

--Directory for the filestream filegroup
ALTER DATABASE demoFileStream
ADD FILE (NAME=flFileStream,FILENAME=N'C:\FileStream')
TO FILEGROUP fgFileStream

Finally, we can now create our file table with a simple CREATE TABLE statement. Note, we won’t declare any columns as those are pre-defined for the file table structure.

CREATE TABLE FT_Test
AS FILETABLE

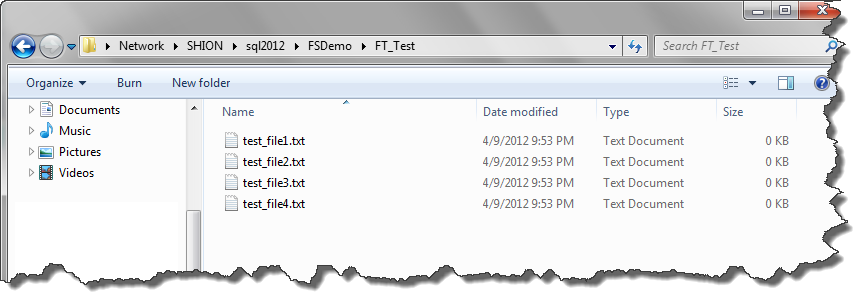
And we’re done! We can now browse to the following UNC filepath: \\SHION\sql2012\FSDemo\FT_Test. This directory is the physical location of our file table. For now, I’ll put a couple test files in there.

At this point, we’ll just run a simple select and, bam! There’s a listing of our files.

SELECT
  name,
  file_type,
  creation_time,
  last_write_time
FROM FT_TEST


Voila! A happy little file table, ready for our use. I’ll be honest, there’s some limited use here and having file tables doesn’t solve a lot of problems. It’s very useful, though, for certain use cases and can be a very powerful tool in your tool kit. If you’re trying to think of situations where you need it, consider times where you need to work with files on the file system:

  • Managing backup files: If you’re like me, you write your backups to a unique filename for each backup. This means I usually need some other tool to clean up my old files. With File Tables, I can manage that clean up completely within SQL.
  • Restores: If you’ve got a lot of transaction logs to restore and you want an easy way to parse through files to find the ones you need, you can now do that using File Tables.
  • Basic ETL: If you need a simple ETL solution, File Tables can give you some additional leverage so you can keep your entire solution within SQL.

Thanks again to Nigel Sammy for hosting this month’s T-SQL Tuesday. There’s so much new with SQL 2012, it’s good for Nigel to give the community a chance to share some of the new features that are now out. Enjoy the rest of T-SQL Tuesday #29!