Art of the DBA Rotating Header Image

administration

Highways and Railroads

Stop me if you’ve heard this one….

“We don’t have time for process, it just slows us down.”

In the buzz of today’s world, you’ve probably had this thrown at you at least once. Process has supposedly become an anathema to productivity. Everyone from developers up to CTOs seem to think that you need to get rid of process in order to turn out timely software.

Well, they’re wrong.

I understand the reasons behind it. As someone who’s had to fill out change request forms to alter a server’s MAXDOP setting, process can be tedious and troublesome. It can be a shackle that mires work in the swamp of forms and sign offs. When you’re living in a world of “get sh*t done”, process can be a thorn in everyone’s side.

There’s another side of the coin, though. Process, done right, will ensure that work is done the same way every time. It can provide protection against costly mistakes, unexpected outages, and other business pains that puts everyone under the gun. Also, if you build your process right, it won’t be a bottleneck to your work but a guide rail to keep you on the right track.

Driving vs. Riding

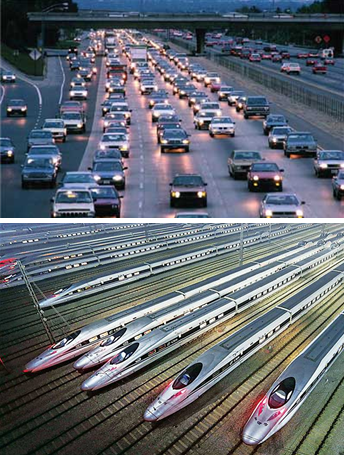
The analogy I like to use with folks when I explain the need for process is by comparing highways and railroads. Think about how you drive for a moment. When you’re on the highway, with a bunch of other people trying to get to the same place, you can only go so fast. You’re going to be limited to how many other cars are around you, so more traffic means slower speeds. Of course, then you get that one person who starts trying to move faster than is safe in traffic, usually causing an accident.

This is the lack of process at play. Different teams or developers have their own car and are trying to get to the release. However, everyone else is doing the same and your highway only has so much bandwidth. Sure, we have a road, so some path is defined, but there’s nothing to govern your interactions with the other cars other than general momentum and the number of resources you have to make the deploy work. You could make the road wider by getting more resources, but that’s not scalable.

Contrast this with a railroad track. It’s straight, narrow, and trains can fly along this because all the roadblocks are out of the way. You can link multiple cars together on a train to get everyone to the same place at the same time, which is a lot faster than using the highway. Even if the train moves a little slower than a car, it will still get there ahead because there isn’t anything blocking the track. You also get there safer because there isn’t any competing traffic to get in the way and risk an accident.

Building railroads is the goal of implementing process. You want to build something that is direct and well defined. What we lose in freedom pays off in speed. We’re building bullet trains that can deliver rapid deployments through consistent, repeatable action. This is achieved by  removing blocks, reducing stops, and streamlining the process we use to get things done. Process should not be a throttle, but a track, giving us a clear method of getting things done faster.

I’ve Been Working On The Railroad

How do we go about building this Nirvana? It takes cooperation between both development and operations teams to build this right, as both are invested in the outcome. Developers want to deliver new code to market faster and operations wants that code to be safe, stable, and not put the business at risk. Both sides must come together to collaborate on building the process. And make no mistake, this will be a building effort. There is no black voodoo magic in making this happen.

The first step is actually to write everything down. I always preach that the most basic form of automation is a check list. You can’t automate a process if you don’t know what it is. Start with a plan that everyone puts together for how software should be released and use that as your road map.

“We can’t take the time to stop doing everything just to put this together!!!” Yeah, I’ve heard that one too. No one is asking you to stop working just to switch to a new process. All I’m suggesting is, if you’ve got your highway, start building your railroad next to it. People will still be driving on the road.

You also might have people concerned about getting it right the first time. Let’s be honest here, you may not. Treat this plan like you would any other piece of work you have and develop it iteratively. Start somewhere and, as you build things out, fix the problems you discover. Your release process is just another piece of software, with features and bugs. No reason not to treat it in the same way.

Once you’ve got your plan, start following it. It might be inconvenient, but this is the sort of thing that takes discipline. It may seem tedious, but this is the start of a diet or exercise plan. It will be tough, but over time it will get easier and you’ll get better at it.

As you follow your plan, you will be able to introduce tooling and automation to speed up parts of your railroad track. Unit tests, automated builds, source control, incremental changes…these are all pieces of the process. Improve your process one piece at a time, making each new change so it can be evaluated and verified before moving on to the next step.

Build your process with the goal of removing traffic jams and slow downs. You want to lay down track to give guidance and consistency. You will find that you and those around you will achieve that mythical space of being faster, more reliable, and ultimately more agile with your software development. In short, you’ll run like you’re on rails.

All Aboard

Building this sort of process is at the heart of DevOps. DevOps isn’t a tool or a magic method, it is a deliberate culture of cooperation and discipline. The only way you will build your railroad is if you bring together development teams and operations engineers and work together to relieve your shared pain. That is the selling point: both sides share many of the same challenges, so it should a no-brainer to come together and solve those issues.

If you’re looking for a real world example, check out Farm Credit Services of America. This article articulates, in a very real way, how one company moved into a DevOps culture and built their own railroad. While there’s a lot of information in the article, at the core it is about how development and operations collaborated to achieve something together.

I’ve seen similar work in other companies. It is usually painful growth, but the results far exceed the gains. What is important is to not lose sight of the need for process. Getting rid of process, if anything, will hinder you just as much as following some archaic method merely because it is rote. Build your process with the goal of removing bottlenecks and establishing guide rails. You will find that you and those around you will achieve that mythical space of being faster, more reliable, and ultimately more agile with your software development.

(I want to thank Rie Irish(@IrishSQL) for proof reading and contributing to this blog article.)

We Are All Developers Now

Last year, I had a pretty intense conversation with a friend of mine at a SQL Saturday. It was one of those that started with the typical “grumble grumble grumble damn devs” statement. There was a time I would have echoed that with a hearty “harrumph harrumph”, but as I’ve progressed through my career, I’ve come to realize that the line between developers and DBAs has softened and blurred, particularly in the age of DevOps. What followed was a back and forth about the habits of DBAs and developers and lead me to a phrase I’ve added to my lexicon: “We’re all developers now”

I know, I know. What about the long standing division between righteous Operations folks (DBAs, sysadmins, network engineers, and their ilk) versus the .Net, Java, Node, and other heathens of the Developer world. These “barbarians” assail the fortresses of Operations with hastily written code that is not properly tested. This causes sleepless nights filled with pages  that a weary admin must respond to and resolve. Why would anyone in their right mind associate with these irresponsible practices?

Borrowing From Your Neighbor

The first step to answering this question is to step back and actually look at what happens in the developer world and compare it to what we do in administration. It’s a common practice to borrow code and practices from our peers in the SQL world, so why not do the same with those who develop other types of code? Especially those who develop code for a living (hint: consider the recursiveness of this statement).

As an administrator, I created all sorts of administrative scripts. Obviously I’ve got a reputation for PowerShell, but I also have T-SQL scripts that I use as well. For a while I would hack these together as any other good DBA and store them on a USB/Dropbox/Google Drive/OneDrive. It was functional, but I only ever had the current state of those scripts and didn’t always know why I changed things. I could put in a header, but this was tedious and manual, an anathema to how I work.

Enter my time at Xero. I hadn’t really used source control before and the teams there used it heavily. I got a rapid introduction to GitHub from Kent Chenery(@kentchenery) and Hannah Gray(@lerevedetoiles). It didn’t take long for me to realize the benefits of source control, not just for databases, but for my own personal scripts. Now I maintain my own personal GitHub repo and not only have a central location where my code is stored, but it can be shared with others who can contribute and collaborate.

Code, Rinse, Repeat

After adopting source control, I began to look at other developer practices and habits. While one can debate the pros and cons of Agile development, one of the concepts I like is iterative development. As with other work we do, iterative development isn’t rocket science, but it took me a while to adopt it because of a natural fear admins have: production paranoia (aka “what will this break”).

Admins of all stripes are in constant fear of breaking production, and for good reason. We want every change to be right and as close to perfect as possible. However, most folks who develop iteratively realize that perfect is a road block. It is hard to anticipate all the factors. When you develop iteratively, you ship what you can and fix/fail fast once you deploy it.

I’ve adopted this approach for my own script/process development. Whether I’m publishing a script or deploying a server, I focus on delivering a product. I test aggressively, but I’m prepared for the event that something will fail. I focus on the feedback loop to test, evaluate, remediate, and deploy. As an aside, this feedback loop is often where application developers will fail, because they are often driving towards the next set of improvements or features. It’s incumbent on both sides of the fence to adopt and enforce the feedback loop.

It’s All Just Ones and Zeroes

I could go on about habits I’ve adopted, but the real question is “why are developer practices important to administrators?” As we move into a realm of automation and scripting (as any good admin will), we are doing more and more code development. Sure, we can click through GUIs to setup SQL Server or run a backup, but the more experienced folks out there will have scripts to accomplish these tasks. Network and system admins are deploying infrastructure to the cloud using CloudDeploy or ARM templates. We live in an age where almost everything can be codified.

This codification means it is imperative that we focus on good habits for managing our code. It might be that we’re writing T-SQL code for SQL maintenance. Perhaps we’re writing shell scripts to execute code deploys or build a continuous integration pipeline. Suddenly we’re developers of a different stripe.

So what do you do about it? You probably haven’t implemented some of these habits and, likely, you might be a little mystified on how to get started. I suggest you start where I started: Go to a developer and talk to them. Maybe chat with a couple. Go to a local developer user group and see what they’re talking about. This is about learning, so find a mentor who can help you learn this topic.

And who knows? Maybe you can teach them a few things about your world while you’re at it.

Azure SQL Databases with #Powershell: Managing your Databases

I meant to write this post a month ago, but then life happened. This is a continuation of my short series on Azure SQL Database and how you can manage it with Powershell. If you want, you can go back and read the previous two posts: Getting started and creating your database.

Administrative Access

Now I’d like to show you how to connect to the database, but since it’s been so long since I’ve looked at this demo, I’ve forgotten my administrative password! While it would be simple to blow away the Azure SQL server and database, there are many situations where this is not possible. Fortunately we have an easy way to reset the administrative password using the cmdlets.

$pw = ConvertTo-SecureString -AsPlainText -Force '********'
Set-AzureRmSqlServer -ResourceGroupName MSFAzureSQL -ServerName msfazuresql -SqlAdministratorPassword $pw

Walking through this, we just need to create a secure string for our password and then use the Set-AzureRmSqlServer cmdlet and pass the secure string to -SqlAdministratorPassword argument. Easy as that and we don’t even need to know what the previous password was. With this in mind, I also want to call out that you can only change the password and not the admin login name. While this is not such a big deal, be aware that once you have an admin login name, you are stuck with it.

Connecting and Querying

Armed with our reset password, now we can query the database. The easiest way for you to do this is to connect to your database with SQL Server Management studio:2016-04-30_10-20-41

Remember that your server name will be what you named it followed by “.database.windows.net”. You must have SQL Server Authentication selected, and then just enter your login and password. SSMS will then connect up to your Azure SQL Database and the rest is very much like managing your on premises databases.

What about using Powershell? Again, not all that different. Let’s run a basic query to get some information about our database using Invoke-SqlCmd:

$sql = @"
SELECT
DATABASEPROPERTYEX ( 'msfsqldb' , 'Edition' ) as Edition
,DATABASEPROPERTYEX ( 'msfsqldb' , 'ServiceObjective' ) as ServiceTier
,DATABASEPROPERTYEX ( 'msfsqldb' , 'Version' ) as Version
,convert(bigint,DATABASEPROPERTYEX ( 'msfsqldb' , 'MaxSizeInBytes' ))/1024/1024/1024 as MaxSizeGB

GO
"@

Invoke-Sqlcmd -ServerInstance msfazuresql.database.windows.net -Database msfsqldb -Username msf -Password '*********' -Query $sql

2016-04-30_10-39-00

As you can see, working with Azure SQL Database after it has been created and configured is not much different than your typical SQL Server installation. There is a lot of writing out there on features and use of Azure SQL Database, so I will skip that here. The best place to start is Grant Fritchey(@GFritchey) and his Azure blog posts.

Remaining Flexible

The last item I want to cover here is managing your database size. One of the promises of the cloud and Azure is the flexibility to change your resources as your needs demand and not be stuck on whatever hardware you purchased when you first built your data center. There are a couple items you should consider when first creating your Azure SQL Database, but the great thing is that you are not tied into many of those options permanently.

There are several service tiers available to you, with a mix between standard and premium offerings. Obviously, each service tier has a different price point, so how do you know what is the right choice for your database? What complicates this is you have a mystery metric for performance: Database Transaction Units. Ostensibly this is the number of transactions per second your database should be able to provide, but there’s more to it than that. My general recommendation is you should base your choice on features you need and user connections you expect. If you find, after that, you have a performance bottleneck, you can adapt upwards incrementally.

How do you make this change? It is just one line of Powershell:

Set-AzureRmSqlDatabase -ResourceGroupName MSFAzureSQL -ServerName msfazuresql -DatabaseName msfsqldb -RequestedServiceObjectiveName 'S1' 

Then it is off to the races. The actual operation is not instantaneous and Azure needs some time to allocate the resources and adjust the settings on its side. The great news here is this does not interfere with the operation of your database at all and it will be available while the resizing happens. Existing connections will be maintained and even queries that are running will continue to run. The end result will simply be:

2016-05-01_18-18-03

Ease of Use

As you can see, we can manage the access and scale of Azure SQL Database with a few straightforward commands. While these changes can also be managed through the web portal, I find the Powershell approach to not only be simpler, as we can skip all the browsing through blade windows and troublesome clicks. While these actions are not really ones we would automate, using the cmdlets can also ensure that our actions can be more precise and consistent.

In my next post, I want to cover a topic near and dear to the hearts of DBAs everywhere: database restores. While backups for Azure SQL Database are managed for us, we need the ability to restore our data to a point and time of our choosing. Fortunately this is fairly easy to accomplish with Powershell. Stay tuned and I promise you will not have to wait another month for me to demonstrate this.

Getting Database File Info with #Powershell

As database administrators, we are often obsessed with free space. Whether it’s on disk or in our database files, we know that if that precious resource runs out, everything we manage can come to a crashing halt. There are also the other hidden impacts, like if things slow down while files grow and possible downtime to additional storage to support the needs of our databases. This is all part of what a former manager of mine called “DBA 101” and staying on top of it is one of our higher priorities.

Fortunately, there’s plenty of tools for us to manage these metrics. It comes down a lot to personal choice. Usually this can be managed via some monitoring suite, but there are times we need a handy tool to answer questions quickly. For disks, I have a function I borrowed from the web and put into my profile called Get-FreeSpace. Using it, I can quickly answer questions about how much free space is available on any of my servers.

The Database Challenge

Databases are a little more difficult. Sure, we can use a variety of queries to gather this information and there are ways to get it. We could always use SSMS to look at a database’s properties. Personally, I like to use Glenn Berry’s(@GlennAlanBerry) DMV scripts. The problem is that it’s difficult to get a concise report across all of our databases with this. Sure, we can create scripts that execute the query against each database, looping through them all, but that’s a hassle. I want something simpler.

Once I hit these limits using T-SQL, I did some investigation to see if Powershell offered any better alternatives. It’s one of my learning tools for Powershell: take a T-SQL task I’m familiar with and redo it in Powershell to see if it is easier and/or better.

To do this, I dove into the SMO object model. This gets a little /Net-y, but the good news is there’s lots of properties we can use to get the information we are looking for. If we look at both the DataFile and LogFile classes, there are properties readily available for us. Both classes have UsedSpace and Size properties (both measured in KB), from which we can derive both available space and percentage used. All it takes is wrapping some collection and formatting logic around these objects and we’re good to go. You can see my full function up on GitHub.

Reporting on Database Free Space

I’ve done a couple new things with this function. The biggest is to build it for the pipeline. This is a significant step for me, because it makes the function more flexible. I always talk about how Powershell supports multi-server execution, so I try to build that into my functions when I can. this is no different. I also made the output a generic PSObject instead of a formatted table. This is key because it lets the user manage it as they need to, which is a database design concept that can be carried over to Powershell quite easily.

So let’s use it. Running it for a single instance is easy enough:

Get-FreeDBSpace -InstanceName ‘SHION’ | Format-Table

2-27-2016 1-23-35 PM

I use the Format-Table to give me this clean table style output, as the generic output is a list that can be hard to read. What’s cool here is that, with a single Powershell command, I can quickly report out all the necessary database file size info. It gets better, of course. Because I designed the function to take a pipeline, I can run it for multiple instances with ease:

$Instances = @(‘SHION’,’SHION\ALBEDO’)
$Instances | Get-FreeDBSpace | Format-Table

2-27-2016 1-33-48 PM

How cool is that? As an administrator, this can be invaluable when I’m evaluating an environment or instance. Still, this is a lot of information to parse. Let’s leverage the pipeline again and filter down the report to show all the files have less than 10 percent free (greater than 90% used):

$Instances | Get-FreeDBSpace | Where-Object {$_.PercUsed -gt 90} | Format-Table

2-27-2016 1-38-18 PM

How cool is that? Now we’ve got an easy report showing all our databases that could be tight on space. But wait, there’s more! We’re going to use the pipeline one last time, this time to output an HTML report showing us the information we just displayed to the screen:

$Instances | Get-FreeDBSpace | Where-Object {$_.PercUsed -gt 90} | ConvertTo-HTML | Out-File .\FreeDBSpace.htm

2-27-2016 1-44-27 PM

Easing Our Burdens

As you can see, there’s a lot of potential to how we can use this. The key to building any Powershell tool is making it as flexible and repeatable as possible. The building blocks are there, it is just a matter of how we assemble them.

You’ll often hear how you should use the right tool for the job. I love T-SQL and use it for many tasks, but this is a great example of how Powershell can complement T-SQL and give administrators a more robust way to manage their environments. Using this function, we can easily evaluate a new environment or manage our existing one. Our time is precious and tools like these can help us best use that valuable resource.

Set-SqlStartupParameters #Powershell Function

Here on the heels of my last two blog posts about the Smo.ManagedComputer class, I wanted to wrap up with a function I put together to help with managing startup parameters. It is the result of the work I did to figure out how to move the master db along with the inspiration I got from Shawn Melton’s(@wsmelton) blog post on the matter.

Looking back at the previous blog post, changing the the startup parameters through the SMO is pretty easy with the ManagedComputer class. In some ways, it is too easy. As Shawn calls out, you could easily overwrite the full string and remove the startup locations for your master database (and breaking your instance). This is where tool building can be such an aid, because by wrapping the change code in a function, we can build some safety mechanisms to protect us (or others) from doing harm when trying to make this sort of change. The function I wrote is not terribly long, but I’ll spare you the whole thing by letting you view it on GitHub. We’ll use our time better by going over how I constructed it while focusing on some of my tool building principles. 

The first is trying to build around multi-instance execution. You will note that my parameter block uses a string array called Instances ($Instances):

function Set-SQLStartupParameters{
  [cmdletbinding(SupportsShouldProcess=$true)]
  param([string[]] $Instance
       ,[string[]] $StartupParameters
)

This array will drive a foreach loop inside the function, allowing me to apply the same block of code to each instance name. There are a lot of situations when I am applying changes across multiple SQL instances and I want to keep the call simple.

The second parameter is also a string array, which is a collection of the startup parameters I want to apply. While the property in the SMO is a semi-colon delimited string and will ultimately be set that way, I find that using a string array makes the collection of parameters much more manageable and readable. It is important that any tool you create is not a struggle to use.

Next up, as we walk through the function, you will see some Write-Verbose statements:

Write-Verbose "Old Parameters for $i :"
Write-Verbose $wmisvc.StartupParameters

It is easy to write a script that can execute a bunch of things, but when it starts throwing out red error text you could have a debugging nightmare. By adding these statements, I can add logging information to the output so I can see things like the old startup parameters and the string that will be added to the service for the new parameters.

The final item to call out is the meat of the function. As it has been emphasized, altering these startup parameters can be very dangerous and could possibly break the instance if we leave out the -d, -e, or -l parameters or set them improperly. I wrote this function to capture the existing values of these parameters and, if they are not being changed, keep them.

$oldparams = $wmisvc.StartupParameters -split ';'
$newparams = @()
foreach($param in $StartupParameters){
  if($param.Substring(0,2) -match '-d|-e|-l'){
    $SystemPaths = $true
    $newparams += $param
    $oldparams = $oldparams | Where-Object {$_.Substring(0,2) -ne $param.Substring(0,2)}
  }
  else{
    $newparams += $param
  }
}

$newparams += $oldparams | Where-Object {$_.Substring(0,2) -match '-d|-e|-l'}

While not the most graceful approach, the logic is as follows. Start with the old parameter block and check each new parameter. If any of the sensitive parameters are specified, remove it from the old parameter set and use the new one. Once we have gone through the new ones, pull any remaining sensitive parameters from the old set and insert them into the new. This way we should always keep a value for the sensitive parameters.

The non-sensitive parameters are a different manner. They will not be retained, but instead overwritten. This means if you want to retain an existing trace flag, you will need to include it in your new parameter set when you call the function.

Now, what this does NOT do is insure these sensitive parameters are valid. This is up to the user to make sure that the files and paths are valid. I added a warning to the function that if these values are changed, the user needs to validate them, but the rest is on the person executing the call. This function will also not restart the service to apply the changes. Because we need to be sensitive about when our SQL Server services restart, I wanted to leave that in the control of the user.

Let’s look at some examples and see how this function works. If we want to add the trace flag to suppress successful backup messages, it’s just a simple line of code:

Set-SQLStartupParameters -Instance PICARD -StartupParameters '-T3226' -Verbose -WhatIf

12-12-2015 11-23-05 AM

By specifying the -Verbose switch, all the included verbose messages I built into the function will display. Using -Whatif then gives us a chance to see what is going to happen before we actually apply it. This becomes useful both for debugging and checking that what we are doing is really what we want to do.

If we remove the -WhatIf, the change will actually be applied:

Set-SQLStartupParameters -Instance PICARD -StartupParameters '-T3226' -Verbose

12-12-2015 11-27-43 AM

This gives us all the same information, but now actually applies the change. The function is written to warn us that, while the startup parameters have been changed, we still need to restart the instance.

What about moving our master database? Let’s use last week’s example and relocate the master database as part of a set:

#Set the params as a string array
$params = @('-dC:\DBFiles\MSSQLSERVER\master.mdf',
'-eC:\DBFiles\MSSQLSERVER\ERRORLOG',
'-lC:\MSSQLSERVER\mastlog.ldf')

Set-SQLStartupParameters -Instance PICARD -StartupParameters $params -Verbose

12-12-2015 11-34-23 AM

Because of how the function is built, it displays the additional warning that we have changed the sensitive parameters. While the function can not save us from everything, it will try and provide as much information as it can to help.

I have tried to share with you some of the things I think about when building my own functions. However, I also want to call out the importance of getting other opinions. While I wrote the code, I got a LOT of help from Shawn Melton in the way of code review. He was kind enough to look over my function and suggest a few things (like the -WhatIf flag). Building code is a team effort and having a supportive community is a great way to help you create your own tools.


Managing SQL Server Services with #Powershell

14711793077_7088d420cf_zManaging service accounts is one of those tedious jobs that tend to annoy me. Changing the passwords of these accounts regularly is a good security practice, but takes a lot of time and can be difficult to manage. In other words, a perfect task to automate with Powershell.

There are two ways to handle this task, both through the Windows Management Instrumentation(WMI). The first way uses the base WMI interface, which can be used to manage all Windows services. Using it is a little convoluted, but gets the job done:

$svc = Get-WmiObject -Class Win32_Service -ComputerName PICARD -Filter 'Name = "MSSQLSERVER"'
$svc.Change($Null,$Null,$Null,$Null,$Null,$Null,'sdf\sqlsvc2','P@$$w0rd',$Null,$Null,$Null)

This call is easy to decipher. Using the .Change() method of the service class, we can update the service account name and/or password (as well as other properties of the service). You probably noticed the number of arguments the .Change() method takes, which makes it cumbersome to use. The other gotcha is that the service still needs to be restarted in order for these changes to take affect. Depending on your need, these gotchas can be good or bad, but can be handled depending on how you code around it.

If you’ve managed services through the GUI, using this method probably makes you think of how you manage accounts through the services MMC console. However, most SQL Server folks will use the SQL Server Configuration console instead. These two methods are subtly different, where using the SQL Server Configuration console will handle some additional tasks (such as restarting the service) as part of its interface. If we want to manage our SQL Services in the same fashion, we can leverage a part of the SMO, the Wmi.ManagedComputer Wmi.Service classes.

To handle our services, we need an extra step or two, but it’s a little cleaner to write:

[System.Reflection.Assembly]::LoadWithPartialName('Microsoft.SqlServer.SqlWmiManagement')| Out-Null
$smowmi = New-Object Microsoft.SqlServer.Management.Smo.Wmi.ManagedComputer PICARD
$wmisvc = $smowmi.Services | Where-Object {$_.Name -eq $ServiceName}
$wmisvc.SetServiceAccount('sdf\sqlsvc2','P@$$w0rd')

We first need to load the SqlWmiManagement assembly, just like loading the SMO libraries if we were using that functionality(note: this library is loaded if you load the SQLPS module). Then we need to instantiate the Managed computer object and retrieve the specific service we want to alter. The final step is to just change the service account.

This works about the same as the base WMI approach, though we’re altering the service by using the same functionality as the SQL Server Configuration Manager. This means that once we change the service account, it will force a service restart. This is good and bad. The good is that it will apply the change immediately and you will know right away if the account change is valid. The bad is that you can not delay the service restart, so if you use this method you want to be sure it is a good time to restart your SQL Service.

I have built a function around using the second method that makes handling this process a little easier. Also, because I’m not a fan of passing passwords in plain text, I built the function to take a PSCredential object to keep my account information secure. In order to spare you the wall of text, you can view the full function on my GitHub repository.

The function can be loaded through a variety of methods, but once it is loaded calling it is simply a matter of creating the credential for the service account and calling the function:

$cred = Get-Credential 'Enter Service Account'
Set-SqlServiceAccount -Instance PICARD -ServiceAccount $cred -Service SqlServer

Creating functions allows us to abstract some of the messy bits and make our lives a little easier. In this case, my function handles the following:

  • Decoding the credential in a way to keep the account information secure.
  • Managing the service names based on the instance name (passed in the standard HOST\INSTANCE name format).
  • Restarting the SQL Server Agent service if it is not running after up restart the SQL Server service.
  • Accept a list of instances and process all of them.

This simplifies the changing of account information and gives us many opportunities for automating large scale password changes. For example, if you use a single service account for all your instances, changing it is a snap:

$servers = @('PICARD','RIKER','KIRK','SPOCK')

$cred = Get-Credential 'Enter Service Account'
Set-SqlServiceAccount -Instance $servers -ServiceAccount $cred -Service SqlServer

This simple pattern and function will not only make managing our security policy easier, but also more consistent. Using a simple list of servers from a text file, a database table, or even our Central Management Server and combining it with this function means we ensure that we are applying these changes to every server in the list. This is how we can build for automation, focusing on making simple tasks like this repeatable and consistent.

Quick hat tips out to the following folks:

Reporting on SQL Agent Jobs with #Powershell

SQL Agent jobs are a fundamental tool for managing our databases. Whether we are running regular backups, executing maintenance tasks, or performing a scheduled ETL process, being able to manage and run scheduled tasks is key to keeping our workload manageable. Of course, as our environment grows, keeping track of these jobs becomes harder and harder.

We can manage this growth by leveraging facets of Powershell. One aspect I continually advocate is Powershell’s ability to execute tasks easily across multiple servers. This means that our tools can easily adapt to the our growth. Additionally, since Powershell is a framework that supports different approaches, administrators can use a method most comfortable to them to accomplish their work.

Let’s take the case of reporting on failed jobs. Job failures usually mean that an administrator needs to troubleshoot an error, resolve it, and run the job again. Now, some jobs are critical and require immediate attention to fix. For this, the Agent provides error alerts and reporting that can execute at the time of failure. However, if it’s not as critical and can wait for someone to review it, we can build a reporting process that can be reviewed. I’d like to cover three techniques we can use in Powershell to accomplish this reporting and how you can leverage them yourself.

T-SQL and Powershell

The first technique is to simply combine a T-SQL query with some Powershell to execute across multiple instances and collect the results. Let’s start with the SQL query (borrowed from SQLMatters.com):

;WITH CTE_MostRecentJobRun AS
(
-- For each job get the most recent run (this will be the one where Rnk=1)
  SELECT job_id
    ,run_status
    ,run_date
    ,run_time
    ,RANK() OVER (PARTITION BY job_id ORDER BY run_date DESC,run_time DESC) AS Rnk
  FROM sysjobhistory
  WHERE step_id=0
)
SELECT
  @@SERVERNAME as Instance
  ,name AS [JobName]
  ,CONVERT(VARCHAR,DATEADD(S,(run_time/10000)*60*60 /* hours */
     +((run_time - (run_time/10000) * 10000)/100) * 60 /* mins */
     +(run_time - (run_time/100) * 100) /* secs */
  ,CONVERT(DATETIME,RTRIM(run_date),113)),100) AS [TimeRun]
FROM CTE_MostRecentJobRun MRJR
  JOIN sysjobs SJ ON MRJR.job_id=sj.job_id
WHERE Rnk=1
  AND run_status=0
  AND [enabled] = 1
ORDER BY name

Running this within SQL Server Management Studio is easy enough and the query is exactly what we would expect. We want to run this against multiple servers. Now with a few lines of Powershell, we can create a report across all of our instances:

#I've already put the query into the $sql string variable.
#Not displayed here to save space
$servers = @('PICARD','RIKER','SPOCK','KIRK')
$servers | ForEach-Object {Invoke-Sqlcmd -ServerInstance $_ -Database msdb -Query $sql}

11-14-2015 11-47-36 AM

Pretty simple and it is flexible enough that all we have to do is add servers to our named list and we’re off to the races. If you want to make it even more dynamic, you could always leverage Central Management Server to populate your server list.

The SMO

This is effective, but I struggle a little with the SQL query. It’s good, but suffers from the structure of the jobs tables in MSDB. We have to account for that and it makes the SQL query a little convoluted. It would be helpful if we could reference a simple data set like the Job Activity Monitor in SSMS.

Of course, this is a leading question on my part. There is a way to do this and it is by leveraging the SQL Server Management Objects (SMO). This .Net library is the API interface for working with SQL Server and is what SSMS is built on. Because it is a .Net library, we can also access it through Powershell.

What we want from the SMO are the Smo.Agent.JobServer and Smo.Agent.Job classes. These represent the SQL Server Agent jobs and allow us to interact with everything within it. Using this and some handy Select-Object calls, we can accomplish what we want without the long T-SQL query:

[System.Reflection.Assembly]::LoadWithPartialName('Microsoft.SqlServer.Smo') | Out-Null

$servers = @('PICARD','RIKER','SPOCK','KIRK')
$servers | ForEach-Object {(New-Object Microsoft.SqlServer.Management.Smo.Server $_).JobServer.Jobs |
    Where-Object {$_.LastRunOutcome -ne 'Succeeded'} |
    Select-Object @{Name='Server';Expression={$_.Parent.Name}},Name,LastRunDate
}

11-14-2015 12-19-32 PM

We’ve accomplished the same task, but now without the complicated SQL query. Granted, this method is predicated on understanding the SMO object model, but this can be figured out using Get-Member and the MSDN pages that describe the methods and properties. Because everything in Powershell is an object, we can do so much more with the information contained within.

The Provider

The third method is actually the same as using the SMO. The SQL Server provider is an additional layer of abstraction that lets us browse SQL Server components as if they were a file system. It uses the SMO to do its work, so it will be handled in a similar way and give us the same results as the pure SMO. However, we can skip some of the .Net instantiation techniques in favor of a simple directory lookup:

$servers = @('PICARD','RIKER','SPOCK','KIRK')
$servers | ForEach-Object {Get-ChildItem "SQLSERVER:\SQL\$_\DEFAULT\JobServer\Jobs\" |
    Where-Object {$_.LastRunOutcome -ne 'Succeeded'} |
    Select-Object @{Name='Server';Expression={$_.Parent.Name}},Name,LastRunDate
}

The output is exactly the same as the SMO, which makes sense because this method works in the same manner. However, because all the necessary libraries and objects are loaded when we load the provider (Import-Module SQLPS), we can skip the object instantiation. It removes another layer of complexity.

Wrapping Up

These three methods all give you the same amount of information, it’s up to you to decide which approach works best for your environment. For DBAs who want to work mostly with T-SQL and are still getting used to Powershell, the first option makes a lot of sense. For system administrators who have had SQL Server thrust upon them, the third option might work better as it doesn’t require any T-SQL knowledge. It’s all a matter of what is comfortable. However you want to work with your data, Powershell gives you the tools to get the information in a way that makes sense for you.

Desired SQL Configuration with #Powershell – Part 2

Last week, as part of T-SQL Tuesday 68, I introduced you to two Powershell functions for validating and setting your SQL Server configurations. While useful, they depend on some sort of configuration source, which begs the question: How do we get this source? This post covers the third function that will help you create your configuration source, using an existing server’s values and allowing you to use them directly or modify them as you see fit.

Get-SQLConfiguration

The concept of Get-SQLConfiguration is simple: Get the sys.configuration values of a SQL Server instance and export them as a hash table that can be used by the other functions. The additional criterion to consider is that Test-SQLConfiguration and Set-SQLConfiguration both use the SMO properties to do this, so our configuration source must also use these names. The result is a function that uses the SMO to perform its export:

function Get-SQLConfiguration{
param([string]$InstanceName='localhost'
  ,[string[]] $Filter
  )

$smosrv = new-object ('Microsoft.SqlServer.Management.Smo.Server') $InstanceName
$output = @()
if($Filter){
  $configs = $smosrv.Configuration | Get-Member -MemberType Properties | Where-Object {$Filter.Contains($_.Name)}
}
else{
  $configs = $smosrv.Configuration | Get-Member -MemberType Properties | Where-Object {$_.Name -ne 'Properties'}
}

foreach($config in $configs){
  $output += New-Object PSObject -Property ([Ordered]@{'Name'=$config.Name;
  'DesiredValue'=$smosrv.Configuration.$($config.Name).RunValue})
}

return $output

}

The function itself is not complex, but I did want to add one other feature to it. A simple export might be overwhelming, considering the number of configuration properties within SQL Server. Most of these will actually be left at their defaults. To aid us, I also added a Filter parameter that accepts an array of SMO configuration property names and will only export those properties.

There are a couple patterns to use this function. The simplest is to just run it for one server and use the output to check another:

$configurations=Get-SQLConfiguration -InstanceName PICARD
Test-SQLConfiguration -InstanceName RIKER -Configs $configurations

This call will essentially compare and find the differences between the two instances. If we wanted to get more specific, we could use our Filter parameter to only compare one or two configurations:

$configurations=Get-SQLConfiguration -InstanceName PICARD -Filter @('FillFactor')
Test-SQLConfiguration -InstanceName RIKER -Configs $configurations

It is also possible to store and manage these configurations by using the Get-SQLConfiguration function. Because we’re working with hash tables, we have a variety of storage options. The easiest to get started is to use the built in Export-CSV function and save our configurations as a delimited file (I like pipe, but commas will do):

Get-SQLConfiguration -InstanceName PICARD | Export-Csv -Path .\PicardConfig.cfg -NoTypeInformation

With the text file that is generated, we can go in and edit our configs, removing what we want and editing values we need to update. The result can then be stored in source control for tracking and audit purposes. We could even go as far as to load the configurations into a database table and call them from a central administrative server. There are a lot of possibilities.

The Code

While I’ve published the functions in these two blog posts, there’s an easier way to get ahold of them. These are part of my SQLConfiguration module published on GitHub, which you can download and use (along with my other SQL configuration functions). Please keep in mind this module and the code contained within should still be considered a work in progress and the functions are provided as is. The usual disclaimers apply, so be careful using it and test it thoroughly before making regular use of it. Of course, if you do find any issues, I would love to know about them so I can review and update my code.

There are many additional items that can be added to this. The largest that comes to mind is dynamic configuration values, as these functions consider your configs to be static. Items like minimum memory, maximum memory, and maximum degree of parallelism depend on the hardware configuration and there are various ways to calculate these values. There are also configurations not stored in this part of SQL Server, such as default database directories and SQL Server agent settings. These functions have plenty of room for enhancement. They’re a good start, however, to giving you additional tools to manage your environment, helping to make your SQL Server deployments more consistent and reliable.

Availability Groups, Agent Jobs, and #Powershell

My current gig has me working a lot with Availability Groups. I love the options they give me with their ability to failover fast and replicate my data to other servers. It is a lot of peace of mind for high availability and data protection. The price of all this comes from a much more complex system to manage and the extra considerations needed to have a properly deployed Availability Group.

One such consideration is your SQL Agent Jobs. It is pretty well documented that your server level objects must be replicated or created outside of the actual Availability Group process. It’s not difficult, but must be thought about and addressed when setting up a server. If you source control your management jobs, then it should be a simple matter of executing a script to create these jobs on a new server. There are cases, though, where either jobs get out of sync or are created outside of the source control process. When this happens, administrators need to copy these jobs to the other servers.

The common way to accomplish this is to simply script out the job in Managment Studio, then run the script on the other nodes. While effective, this is also manual and prone to error, such as forgetting a server.

By automating this process, we can ensure consistency.  You can use Powershell to leverage the SMO and the .Script() method to basically duplicate your Management Studio action.  However, by using this and incorporating it into a script, we can ensure our consistency.  The following function is a pretty basic use of this that allows you to copy a single job from a source server to any number of targets:

function Copy-SQLAgentJob{
  param([string]$Source
  ,[string[]]$Targets
  ,[string]$JobName)

#Load assemblies
[System.Reflection.Assembly]::LoadWithPartialName('Microsoft.SqlServer.SMO') | out-null

$smosource = New-Object Microsoft.SqlServer.Management.Smo.Server $Source
$JobScript = $smosource.JobServer.Jobs[$JobName].Script()

foreach($Target in $Targets){
 $smotarget = New-Object Microsoft.SqlServer.Management.Smo.Server $Target
 if($smotarget.JobServer.Jobs.Name -notcontains $JobName){
   $smotarget.Databases['msdb'].ExecuteNonQuery($JobScript)
    }
  }
}

All this function does is find the source job, script it out, and then run that job creation script against all the other targets. Simple enough. One thing to call out is I’ve specifically written this function to stay completely within the SMO. Normally, I would use Invoke-SqlCmd to execute the SQL script, but I thought it simpler to use the SMO .ExecuteNonQuery() method (which runs a SQL batch and does not expect a return).

Now let’s implement this for a hypothetical Availability Group to copy from one node to all the others:

$PrimaryNode = 'PICARD'
$nodes = (Get-ClusterNode -Cluster (Get-Cluster $PrimaryNode).Name | Where-Object {$_.Name -ne $PrimaryNode}).name
Copy-SQLAgentJob -Source $PrimaryNode -Targets $nodes -JobName 'Backup Databases - Powershell'

Of course, we could also use this in a much simpler fashion, such as deploying a new job across all of our servers. Remember the Central Management Server trick I’ve implemented in the past? We can fold that in here for an easy deployment once we’ve created the job on a single server in our environment.

$CMS=’PICARD’
$servers=@((dir "SQLSERVER:\SQLRegistration\Central Management Server Group\$CMS").Name)
$servers+=$cms

Copy-SQLAgentJob -Source $CMS -Targets $Servers -JobName 'Backup Databases - Powershell'

As always, the lesson learned here is to leverage our tools to make more our work more repeatable and consistent. While everything we have done here can be done in other methods, I prefer this because it minimizes the interaction needed to accomplish the task. The more any of us have to touch a process to get work done, the greater our risk of error. You’ve heard it before: consistency through automation, this time for SQL Agent jobs.


Building Availability Groups with #Powershell

A couple weeks ago, I went over automating your SQL Server builds. That’s the kind of process that will benefit many SQL Server administrators. But why stop there?  I say that the more we can automate, the better.  So now let’s talk about automating another aspect of building SQL Servers: availability groups.

Availability groups were the killer feature in SQL 2012 and saw more enhancements with SQL 2014. In my opinion, this is a key feature that allows SQL Server to step into the horizontally scalable world. The problem is that it is not an easy feature to set up or configure. Availability groups have a lot of pitfalls and gotchas to navigate. This is where automation comes in as our ally to build a consistent, repeatable process to deal with these hurdles. Remember, automation is primarily about consistency and we can achieve that by scripting out as much of our build process as possible.

As before, let’s talk about the process we’re going to automate:

  1. Build a Windows failover cluster consisting of two nodes.
    1. The two nodes will already have SQL Server installed.
    2. We will add a file share witness into the cluster (because an even number of quorum votes is bad).
    3. The cluster will be simple, so we will skip things like heartbeat networks and other more advanced configurations.
  2. Build an availability group across both nodes of the cluster.
    1. Availability group will use standard endpoints
    2. Both nodes will be configured for synchronous commit and automatic failover
    3. Create a listener with a static IP address.

Building the Cluster

To ease the scripting process, Microsoft provides several cmdlets in the Failover Cluster module.  Using these, we can create our cluster.

Import-Module FailoverClusters

New-Cluster -Name 'NC1701' -StaticAddress '192.168.10.100' -NoStorage -Node @('PICARD','RIKER')| Set-ClusterQuorum -FileShareWitness '\\hikarudc\qwitness'

As you can see, the cluster creation is pretty easy. Keep in mind this is an extremely simple cluster with none of the usual items we include in production. While you can use this process for your production environment, make sure you work with a clustering expert to define all the additional configurations you will need to build in to make your cluster stable. I also want to call out that I created the fileshare for the witness outside of this script as well.

Before we proceed, I want to validate the cluster.  As with everything else we will use Powershell:

Test-Cluster -Name ‘NC1701’

Firewall Ports

An easy thing to overlook is the firewall ports for availability group communication. I know, I forget it all the time! We need to open up 1433 for SQL Server and listener communication and port 5022 for the availability group endpoints.  Some quick Powershell resolves this for us:

Invoke-Command -ComputerName RIKER -ScriptBlock {New-NetFirewallRule -DisplayName 'SQL Server' -LocalPort 1433 -Direction Inbound -Protocol TCP}
Invoke-Command -ComputerName PICARD -ScriptBlock {New-NetFirewallRule -DisplayName 'SQL Server' -LocalPort 1433 -Direction Inbound -Protocol TCP}

Invoke-Command -ComputerName RIKER -ScriptBlock {New-NetFirewallRule -DisplayName 'AG Endpoint' -LocalPort 5022 -Direction Inbound -Protocol TCP}
Invoke-Command -ComputerName PICARD -ScriptBlock {New-NetFirewallRule -DisplayName 'AG Endpoint' -LocalPort 5022 -Direction Inbound -Protocol TCP}

Building the Availability Group

Microsoft provides some cmdlets for building availability groups in the SQLPS module. The process is fairly straightforward, since we’re only declaring two synchronous nodes with automatic failover. If we were to have additional nodes, we would need to put in additional logic for determining which nodes would perform which roles.

Import-Module SQLPS -DisableNameCheckin
$AGName = 'ENTERPRISE'
$PrimaryNode = 'PICARD'
$IP = '192.168.10.101/255.255.255.0'
$replicas = @()

$cname = (Get-Cluster -name $PrimaryNode).name
$nodes = (get-clusternode -Cluster $cname).name

$sqlperms = @"
use [master];
GRANT ALTER ANY AVAILABILITY GROUP TO [NT AUTHORITY\SYSTEM];
GRANT CONNECT SQL TO [NT AUTHORITY\SYSTEM];
GRANT VIEW SERVER STATE TO [NT AUTHORITY\SYSTEM];
"@

foreach($node in $nodes){
    Enable-SqlAlwaysOn -Path "SQLSERVER:\SQL\$node\DEFAULT" -Force
    Invoke-Sqlcmd -ServerInstance $node -Database master -Query $sqlperms
    $replicas += New-SqlAvailabilityReplica -Name $node -EndpointUrl "TCP://$($node):5022" -AvailabilityMode 'SynchronousCommit' -FailoverMode 'Automatic' -AsTemplate -Version 12
}

New-SqlAvailabilityGroup -Name $AGName -Path "SQLSERVER:\SQL\$PrimaryNode\DEFAULT" -AvailabilityReplica $replicas

$nodes | Where-Object {$_ -ne $PrimaryNode} | ForEach-Object {Join-SqlAvailabilityGroup -path "SQLSERVER:\SQL\$_\DEFAULT" -Name $AGName}

New-SqlAvailabilityGroupListener -Name $AGName -staticIP $IP -Port 1433 -Path "SQLSERVER:\Sql\$PrimaryNode\DEFAULT\AvailabilityGroups\$AGName"

There are a couple cmdlets we’re using to make this all work:

  • Enable-SQLAlwaysOn enables Always On with the SQL Server service. This must be done before we can create our AGs.
  • New-SqlAvailabilityReplica creates a SMO object that represents our node for the availability group. We signify that we are creating SMO objects by using the -AsTemplate switch. Without that switch, the cmdlet would try creating the actual replica, which we can’t do since the availability group doesn’t actually exist at this point.
  • New-SqlAvailabilityGroup requires two items: the primary node the availability group will be created on (declared as a SQL provider path) and the collection of replica nodes.  Running the cmdlet will create the availability group and join the replicas to it.
  • Join-SqlAvailabilityGroup is used to join the replicas to the availability group. Weirdly enough, when you create the availability group, it won’t join the other replicas, so we have to take an additional step to join the non-primary nodes.

You’ll note we wrap the replica process in a foreach loop built on the Get-ClusterNode output. I use this approach so that, no matter how many nodes my cluster contains, I can add them all without explicit calls to the node names. The loop will add the SMO objects to a collection that will eventually represent all the nodes for the availability group (in this case, only two).

A gotcha to call out is the SQL Statement I execute on each node. When working on this, I kept encountering error 41131. It surprises me, because I believe these permissions should be granted when you enable Always On for the service. However, most of the time this does not happen, so I’ve included the SQL Statement to guarantee that my permissions are correct for creating the availability group

Once we’ve created the availability group, we need to create the listener. To do this, we need the listener name, the port we will use, the static IP that will be assigned to the listener name, and the availability group (declared as the provider path). To ease the implementation, I use the availability group name as the listener name and port 1433. This actually takes the longest of the steps, because the cmdlet has to validate the IP isn’t already in use, but as long as the address is available your listener will be created and your availability group built.

 At this point, you should have a functional availability group and can add databases to it.

Another approach

The interesting thing about these cmdlets is they all work using the SMO and related objects. That means that if you want a more controlled approach where you get down and dirty with the code, you can go that route. Thomas Stringer(@sqllife) has a great post on this method and I actually was going down that route originally.

The question I had to ask myself was if it was worth re-inventing the wheel for my availability group builds. I’m not a big fan of how the SQLPS cmdlets rely on the SQL Server provider. Additionally, if you build your script using Thomas’ method, your script will work anywhere you have .Net and doesn’t rely on you installing the SQL Server client tools to get SQLPS. However, using the SMO/.Net method means I have to do a lot more work to get my script running, where the SQLPS cmdlets have taken care of most of that work for me.

Which approach should you use? That’s for you to decide, but I encourage you to look at both methods and evaluate which approach works better for you. When all was said and done, I went with the SQLPS cmdlets because it meant I didn’t have to spend a lot of time writing additional code.

Just as with our SQL Server build process, we’re building consistency and repeatability into our environment. The added benefit is, using this script, I can create my availability group in about a minute. While I may not be creating availability groups often, my script ensures that when I do create them I can maintain my build standards and keep my systems aligned.