Art of the DBA Rotating Header Image

SQLPS

Using #PowerShell to Restore to a New Location

Now that I’ve gotten some of my thought pieces out of my brain, I wanted to get back to some more technical posts, starting with some simpler techniques for people trying to figure out how to use SQL Server and PowerShell together. I know that a lot of database pros are starting to understand the importance of the language, but still struggle with some practical examples of how to get started. One of my goals with this blog is to bridge that gap.

When restoring a backup, it can be tedious to restore to a new location and have to figure out your MOVE statements. If you only have one data file and one log file, it’s probably not a big deal, but it’s still annoying. Usually, the steps for me are:

  1. Figure out my new data and log paths.
  2. Run a RESTORE FILELISTONLY against the backup file to get the files.
  3. Write out my RESTORE WITH MOVE commands using the new paths.
  4. Execute

None of this is difficult, but we can still make it easier. We have an established process, so putting some PowerShell scripting around it can automate our restore to make the script building faster and more consistent.

Our weapon of choice will be Restore-SqlDatabase. This workhorse cmdlet has been part of the both the old SQLPS and the new SqlServer modules. The functionality hasn’t really changed, meaning that what we go over here should work for you regardless of what module you use. I always recommend using the most recent version of the code, but don’t worry if you can’t.

The cmdlet is straightforward in its use. Fundamentally, all we need to declare is an instance, database name, and backup file. However, if we don’t declare anything else, the cmdlet will try and restore the database files to their original locations. Keep in mind this is no different than how a normal RESTORE DATABASE command works.

This is where we make our lives easier with PowerShell. First off, to move files using Restore-SqlDatabase, we need to create a collection of RelocateFile objects. Don’t let the .Net-ness of this freak you out. All we’re doing is creating something that has the logical file name and the new physical file name. In other words, it’s just an abstraction of the MOVE statement in RESTORE DATABASE.

Let’s look at some code. I’ve got a script, but I think the best way to approach it is to break it up and talk about each section individually, just to make sure we’re all on the same page. To get started, we should declare a few things: the new file locations, output of a script file, database name for the restore, backup file, and then an array we can store our RelocateFile objects in.

#Set Variables
$NewDataPath = 'C:\DBFiles\Data'
$NewLogPath = 'C:\DBFiles\Log'
$OutputFile = '.\restore.sql'
$dbname = 'AdvWorks2014'
$BackupFile = 'C:\DBFiles\AdventureWorks2014.bak'
$relocate = @()

Next up is a simple RESTORE FILELISTONLY to get our file list. This needs to be done with Invoke-SqlCmd because there’s no support in Restore-SqlDatabase (or any other cmdlet) for the file list option.

#Get a list of database files in the backup
$dbfiles = Invoke-Sqlcmd -ServerInstance localhost -Database tempdb -Query "RESTORE FILELISTONLY FROM DISK='$BackupFile';"

Now comes the “magic”. Our RESTORE FILELISTONLY call gives us a collection for all our files, but it’s all the old locations. We will look through this collection, do some string replacement, and create our RelocateFile objects. I want to call out the use of Split-Path -Leaf, a handy cmdlet that will separate out the different parts of a file path. By using -Leaf, the cmdlet give you only the actual file name. We can just append that value to the end of our new path (using Join-Path) and use that for creating the RelocateFile object for each file.

#Loop through filelist files, replace old paths with new paths
foreach($dbfile in $dbfiles){
  $DbFileName = $dbfile.PhysicalName | Split-Path -Leaf
  if($dbfile.Type -eq 'L'){
    $newfile = Join-Path -Path $NewLogPath -ChildPath $DbFileName
  } else {
    $newfile = Join-Path -Path $NewDataPath -ChildPath $DbFileName
  }
  $relocate += New-Object Microsoft.SqlServer.Management.Smo.RelocateFile ($dbfile.LogicalName,$newfile)
}

Creating the RelocateFile objects is the heavy lifting. After this, it’s just a matter of calling Restore-SqlDatabase with the right arguments. Note that I’m using the -Script argument and piping this to Out-File. We’re using PowerShell to create a SQL script, which is a pattern I like. As handy as these tools are, they don’t always get everything, so I will use scripts to create scripts and then edit the final output with whatever else I need.

#Create Restore script
Restore-SqlDatabase -ServerInstance localhost `
-Database $dbname `
-RelocateFile $relocate `
-BackupFile "$BackupFile" `
-RestoreAction Database `
-Script | Out-File $OutputFile

By saving and reusing this script, I have saved myself a lot of man hours for restores. The strength here isn’t in any mystery code or magic functionality. It is simply a matter of leveraging a framework to automate an existing process.

I’ve actually taken this script and created a more formalized function with it. The core is there, but in keeping with the tooling spirit, I’ve added some additional code that validates file system paths. You can find it on my GitHub repository and you’re welcome to download and make use of it yourself.

Stuck in SQLPS

maxresdefaultA month and a half ago, with a lot of fanfare and maybe a little confetti, the SQL Server Tools Team released an update to SQL Server Management Studio that massively updated the SQL Server Powershell experience. As I blogged, this is a big deal and long overdue. I am extremely happy that this is finally getting some attention in Redmond.

However, once the dust settled and I had a chance to dig into things, I discovered that not all was rainbows and candy. The truth of the matter is that SQLPS is not so easily replaced. We are still going to be burdened with using the old module for at least the short term. This means at least being comfortable with the foibles of the old module.

Bundled With SSMS

The first real issue with the new SqlServer Powershell module is that is part of the SQL Server Management Studio install. I’ve long lamented the fact that you can’t install Powershell components separately. This means you’re limited to installing this only in locations where you can install SSMS 2016. Microsoft probably thinks you should be installing SSMS2016 EVERYWHERE, but even if you run on the bleeding edge this is a problem if you’re using Windows Server Core (no GUI, no SSMS).2016-08-11_14-41-38

I have not figured out any workaround to this. It’s possible to copy the module folder from a good install to somewhere else, but I’m nervous about that since something could be missed. This means that, until we can install this separately, users are stuck running SQLPS on servers without management studio. Yes, this means SQL 2016 without SSMS as well.

Not Recognized by SQL Agent

The second issue is that even if you do install SSMS 2016, SQL Agent won’t recognize and give you access to the new module if you use a PowerShell job step. When you create a PowerShell job step, the script in that job step runs within a specific context. It’s hidden from you, but whenever that script runs the first thing that happens is SQL Server launches sqlps.exe.

3285_72b386224056bf940cd5b01341f65e9dSqlps.exe is a “mini-shell”, which configures a few things to support SQL Server and PowerShell together. The important piece here is that the executable is hard coded to use the SQLPS module. Now, sqlps.exe is deprecated and going away, but only in a future SQL Server release. This means if you’re using anything previous to this release (having no idea when the release will happen), you are going to be forced to use the SQLPS module if you are creating a Powershell script job step.

How can you get around this? This is a trick that’s been around for a while. I try to avoid it since it adds additional layers to running PowerShell in an agent job, but it does work. What you do is create a CmdExec agent job and call the Powershell executable to run your task. This approach gives you a LOT more control on how PowerShell is working in your environment, but takes some extra work. Hat tip:Derik Hammer (@sqlhammer)

Stuck In The Past

pastLike I said before, I’m excited and happy the SQL Server Tools Team is improving the PowerShell experience for SQL Server. It has been a long time coming and I hope it continues. This is why it makes the above items SO frustrating, because while all these updates are being made, most of the user base won’t be able to use them. In a world where SQL Server installations still run on 2000 and 2005, it can take a long while to upgrade your core installation to take advantage of these improvements.

Normally, I’d be ok with this. I know that when I use an earlier version of SQL Server, I don’t get the shiny new toys. With SQLPS, though, it’s different. For all these years the experience has been klunky and problematic. While some of this klunky-ness finally got fixed back in March, most of us are still stuck with the workarounds because we do not have a way to install the updates.

What can you do about it? I’m glad you asked. Currently there are two Connect items that address these directly:

You can also make your voice heard on the community Trello board. As users, we’re at the mercy of Microsoft for updating this stuff and making it available to us. The goal is to raise awareness of these issues and let the development teams know how important they are. I will definitely give Microsoft credit for being more responsive to user feedback.


Out With The SQLPS, In With The SqlServer

This month, the SQL Server tools team released an updated version of the SQL Server PowerShell module. It is a huge leap forward for using PowerShell and SQL Server together, with the tools team making a serious commitment to correcting the sins of the past. While we still have a long way to go, this is a promising path. At this time next year, I’m certain the PowerShell/SQL Server experience will be in the best place it has ever been.

Before I share my thoughts, let me give you some relevant links. You know, in case you missed something.

Not Playing Nice

Now for my turn! First off, I want to call out that with the July 2016 update we have a new module. SqlServer replaces SQLPS, which means that all the old functionality in the old module exists in the new one (along with some nice little fixes). What I discovered is that this also means you can’t use both modules at the same time. I ran into this because my profile automatically loaded SQLPS for me. When I went to import SqlServer, I got some unpleasant red text:

2016-07-09_12-39-26

Basically, it’s a typing conflict with the SMO. Now, there’s no real reason why you should be running both modules side by side, but be aware that if you have anything that automatically loads SQLPS, you’re going to have problems. Fortunately there’s an easy way to fix this without having to restart your session:

Remove-Module SQLPS
Import-Module SqlServer

However, there’s another monkey wrench, especially for those of us using PowerShell scripts in SQL Agent jobs. Even with the release of SQL 2016 (which was just before these changes were made), SQL Agent still runs sqlps.exe and loads the SQLPS module. To check this, I made a simple agent job that executes:

Get-Module | Out-File C:\Temp\AgentPSModules.txt

The resulting output shows us the issue plain as day:

2016-07-09_12-50-13

There are ways around this, of course. The key here is awareness and I’m sure that we’ll see the SQL tools team get an update to this when possible.

Invoke-SqlCmd: Now with more flexibility!

Enough of the bad news, let’s talk about some of the improvements. As I mentioned earlier, Laerte Junior blogged about some of the updates to Invoke-SqlCmd. These changes really help make the cmdlet more useful for managing and working with outputs. However, I want to look at one specific addition more closely: connection strings!

I’ve always found the biggest limitation of Invoke-SqlCmd was that I couldn’t specify connection string parameters. This was a significant issue when working with multi-subnet Availability Groups, because I couldn’t specify MultiSubnetFailover=True, a key connection string parameter. Now I can, along with a host of other options.

Using it is pretty simple. Just declare a connection string as you would with any other application and pass it to the -ConnectionString parameter:

$ConnectionString = 'Server=localhost;Database=tpcc;Trusted_Connection=true'
$sql = 'SELECT name,physical_name FROM sys.database_files'
Invoke-Sqlcmd -ConnectionString $ConnectionString -Query $sql

2016-07-09_13-05-37

This new parameter opens up a whole new range of possibilities. I love that Microsoft is providing multiple paths to work with their tools. This means that if you’re a .NET guy who is more comfortable with connection strings, you don’t have to constantly keep looking up all the different flags and parameters of Invoke-SqlCmd. Also, if you have a situation which can not be addressed by those standard flags, you can always use the standard .NET connection string parameters and get the job.

(And yeah, I’m excited about this because it was my Connect item. :D )

Providing for the Provider

The last thing I want to touch on are a couple updates to the SQL Server provider. Now, the provider definitely has a bad name out there, but it can be a very useful tool for exploring and gathering SQL Server objects you want to work with. Since it is based on the SMO, it makes SQL Server object manipulation easier by giving you more options to collect your objects.

An important facet of the provider is that it behaves like a file system. How many of us have deleted files from the command line? Have you also used a PowerShell one-liner to delete old files, like backups? If you have, you might be familiar with two parameters: -WhatIf and -Confirm. These two switch parameters are extremely helpful because they can keep you from cutting yourself with that sharp PowerShell knife.

With the July 2016 update, the SQL Server provider now supports the use of these two switches. While using them may not be a common situation, it’s good to know that they are there. After all, it could be handy if you wanted to clean up some items from the command line, like maybe a junk database. Now you can both check what you’re going to do before you do it, along with getting a confirmation question when you go for the actual delete:

2016-07-09_13-21-52

While this may not seem like a big deal, it’s another example of how the SQL tools team is trying to get the SQL Server PowerShell module up to the standards of other PowerShell implementations. For all of us who struggle daily with technical debt, I’m sure you can understand how significant this is.

Early Days

I know the SQL Server PowerShell module still has a bad reputation with a lot of folks out there. Honestly, it’s well deserved. The SQL Server Tools team is out to fix that and everything we’ve seen over the last 3-4 months shows that commitment. A lot of this has to do with the effort put forth by the SQL Server community and the ongoing Trello board where the community is working with the tools team to suggest and prioritize changes. Want to help? Join us by contributing changes and voting up the current suggestions. Microsoft wants to make this your product and this is how we can help.

A Month of SQLPS: The Thrilling Conclusion

17097596540_f1280b65f7 (1)Here we are, 45 cmdlets and a provider later. When I started this series, I did it for two reasons. The first was the general lack of documentation for the cmdlets and a hope that I could bridge that gap for the community. The second was that I realized I didn’t understand much of the functionality that was there myself and writing on it would help me build that knowledge. I can definitely say that now, at the end of it all, I’ve had my eyes opened to what we can and can’t do.

The Good

I have to say, I’m pretty pleased with most of the cmdlets available to us.  The cmdlets for managing Availability Groups are great and I make daily use of them. I would like to see some Get- cmdlets for some of those instead of using the path, but in a pinch I can use Get-Item within the provider context to accomplish the same thing. The other alternative is to create SMO server objects and reference the appropriate properties to create the necessary objects.

As I blogged about awhile back, I do like Invoke-SqlCmd and the ability to get query results as datarow objects. This is a handy way to work with data within a Powershell script. I also like the backup and restore cmdlets for abstracting away some of the SQL work into Powershell. I know I can run any of these using T-SQL, but the abstraction makes things easier for me when writing automation.

I also really like the provider. I know it’s clunky, but once you’re past the gotchas, there is a lot of great things you can collect using it. To boot, the collection is fairly simple. Using the provider is a fairly simple and effective way to collect server wide inventories.

The Bad

Some of the functions just seem unnecessary. It strikes me that some cmdlets, like Convert-UrnToPath and Encode/Decode-SqlName were developed for some specific use cases and have limited real world use. This is not surprising, as we have seen cases in the past where Microsoft decided internally that something was useful, but real world adoption did not happen. These only annoy in the way that they are clutter and add confusion.

Of course, the real problem is the initial experience of the provider. So many DBAs get discouraged by the timeouts and strange behavior of the provider that they ask if Powershell is even worth it. The usual path for them is to go back to what they know and code things in T-SQL which, while cumbersome and inelegant for many tasks, just work. The struggle is to get DBAs over that initial hump with Powershell so that they can get on with figuring out what to use the tool for.

The Meh

As we’ve seen, the SQLPS module has some head scratchers. I’m still not 100% clear on why the team needed to leverage the Cloud Adapter Service when creating some of these functions. Tasks like adding a firewall rule, enabling authentication modes, and restarting services already have valid ways to be managed through Powershell, so these cmdlets are really not necessary. Again, we’re left to deal with clutter in the module.

What’s Next

I’ve gotten a lot of feedback in person on this series and it sounds like a lot of people out there have really benefited from my posts. This is great. If you’ve missed the series or maybe a post or two within it, the full list is easy to find.

What I would like to do is to take some time over the next few months and compile this information into an e-book, along with some patterns for use. I also intend to build a presentation for next year that is a deep dive into both the provider and the module. I really do like the SQLPS module and the provider, as it can be extremely powerful if used correctly. I hope that, now that you’ve read this series, the wheels are turning in your brain about where and how you can implement SQL Server and Powershell automation in your environment.

A Month of SQLPS: Forget-Me-Nots

You’ve probably gotten the impression over this series that it was a little ad hoc. It’s true, because this was as much about exploring the module as documenting it. I figured the best approach was just to dive in and start writing about the ones that could be fit together. This worked out, but over the series I did sections on cmdlets and missed a couple. I’m going to cover them now.

The first is New-SqlBackupEncryptionOption, which I should have covered when I talked about the backup and restore cmdlets. This cmdlet is for supporting the encrpyted backup features of SQL 2014 and allows you to generate an Smo.BackupEncryptionOptions object that can be used by either the Backup-SqlDatabase or Set-SqlSmartAdmin cmdlets. You use it to define a certificate or key and encryption algorithm so that your backup file will be encrypted:

$encryption = New-SqlBackupEncryptionOption -Algorithm Aes256 -EncryptorType ServerCertificate -EncryptorName AzureManagedBackup
Backup-SqlDatabase -ServerInstance PICARD -Database AdventureWorks2012 -EncryptionOption $encryption -BackupFile C:\Backups\AW_Encrypted.bak

Restoring the database does not require you to declare an encryption option, you just need the appropriate certificate or asymmetric key to be available. This makes encrypting backups for SQL2014 pretty simple. The only real challenge is how you manage your keys.

The other cmdlet I skipped over was Test-SqlDatabaseReplicaState, which should have been included when I talked about databases in Availability Groups. This cmdlet will use Policy Based Management to evaluate all the databases in an Availability Group replica set to determine their health. As with the other AG cmdlets, it is a little cumbersome to use because it relies on the provider paths. And, of course, it has its own path to reference: AvailabilityGroups\<AGNAME>\DatabaseReplicaStates.

$replicastates = Get-ChildItem SQLSERVER:\SQL\KIRK\DEFAULT\AvailabilityGroups\ENTERPRISE\DatabaseReplicaStates
$replicastates | Test-SqlDatabaseReplicaState

SQLPS-23-1

We get a handy little report of the policy evaluations that is a collection of PowerShell.Hadr.DatabaseReplicaHealthState objects. This could be used to drive alerts or remediations of replicas that become unhealthy within the AG.

That does it! That’s all the current cmdlets in the SQLPS module, at least as of SQL Server 2014. With the impending release of 2016, I’m sure we’ll get some new ones. As of the this post, I haven’t yet looked at SQL Server 2016 CTP 3, so I’m not sure what to expect. Watch for that in a future post. Tomorrow I’ll give you a quick wrap up of the series.

A Month of SQLPS: Odds and Ends

The last few cmdlets to cover don’t fit in any nice buckets. I’ll just address each one on its own to keep it simple. One I won’t cover is Invoke-SqlCmd, because I already did that a couple of months ago. I will say that I use Invoke-SqlCmd a LOT and recommend that you look into using it for your own scripts.

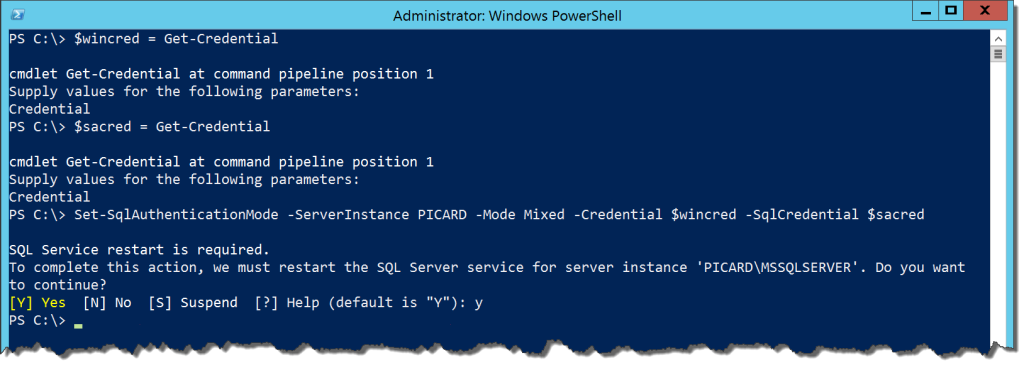
What’s left? Well, one cmdlet is Set-SqlAuthenticationMode. As the name implies, it allows us to change the authentication mode of our instance. The cmdlet requires to the Cloud Adapter Service to function and a Windows Administrator credential for the target machine. When called, you can specify one of two modes: Integrated and Mixed. Normal and Unknown will show up as accepted values by Intellisense, but if you try and use them the cmdlet will fail.

If we try to set Mixed, the cmdlet will require a SQL credential that contains the password for ‘sa’. When run, this cmdlet will force a service restart (as normal for changing an authentication mode). It will ask you to confirm a restart, which you can avoid using the -Force flag.

SQLPS-22-1

Is it useful? It’s really nice and handy to have a cmdlet that will wrap up the checking for credentials and manipulating the service, but needing that Cloud Adapter Service is frustrating. It’s another layer of functionality that I need to provide, one that does not offer me a whole lot of value outside of this one call. Especially when we already have a good way to do it using the SMO (hat tip Allen White(@SQLRunr)).

Next up is a cmdlet useful to those who leverage Policy Based Management, Invoke-PolicyEvaluation. Interestingly enough, Microsoft actually has this cmdlet documented, so this is helpful. Running it seems fairly simple: Get a policy (either from an XML declaration or a SQL Server object), then call the cmdlet with that and a target server:

SQLPS-22-2

Neat, right? A nice little report that my policy evaluation failed. Just one problem: I don’t know WHAT failed. As of writing this, I’ve been trying to figure out how to display the results in a readable format to the Powershell window. You can get the detailed results by using the -OutputXML flag to generate an XML string (not an XML doc object, unfortunately) which will contain the detail, but this isn’t all that helpful.

One nice little piece of fucntionality is the -AdHocPolicyEvaluationMode parameter. By default it is set to Check, which means it simply reports on whether or not the policy passed evaluation. However, we can pass Configure and then the cmdlet will attempt to correct the violations. I’m still testing with this, but this could be handy for cleaning up your environment using PBM.

The final cmdlet is Convert-UrnToPath. This cmdlet is built to assist Universal Resource Names that the SMO uses to name and organize SQL Server objects. Full disclosure: I’ve never used these. Fortunately, the URN for an object can be found as a property of the related SMO object:

SQLPS-22-3

The cmdlet will convert one of these URN paths to its appropriate SQL Server provider path:

SQLPS-22-4

This can be useful for those who work a lot with URNs, but I honestly have not had a need up until this point. The only real use case I can think of with it is if I want to get a provider path from an SMO object I’ve created.

That about wraps it up! There are two cmdlets that I should have covered in earlier posts that I will touch on tomorrow, then we’ll wrap up with one last post with some thoughts I have on the SQLPS module now that I’ve had a chance to explore it through this blog post series. Thanks for following this and feel free to let me know of any feedback you have via mike [at] [this domain] or the comments and I will try to cover them in my wrap up post.

A Month of SQLPS: Encoding and Decoding

Welcome back and thanks for waiting. There are just a couple cmdlets left to cover in this series, so I expect we’ll wrap up later this week. The next two are odd ones for a couple of reasons. The functions to cover are for SqlNames:

Get-Command -Module SQLPS *SqlName

SQLPS-21-1

What do these cmdlets even do? The help files describe the Encode-SqlName as a function for converting special characters in SQL Server names to characters that can be read by the Powershell provider. The reason this is necessary is because SQL Server objects will support characters in their names that are reserved within Powershell, specifically: : \:./%<>*?[]|

Using the cmdlets is simple enough. For the Encode-SqlName cmdlet, all we need to do is pass the name with those characters and the output will be something we can use within a provider path. The Decode-SqlName will reverse this process, taking the provider path value and convert it back to its SQL Server object name:

SQLPS-21-2

Do we even need these cmdlets? I really don’t think so. Firstly, I would strongly advise against using any of these reserved characters in a SQL Server object name. There are too many issues and problems that can arise, beyond this one, when these are used. Secondly, we already have ways of handling special characters in path names:

  • Wrapping the the full name in single or double quotes
  • Escaping the characters with the Powershell escape character: ` (the backtick/backquote)

SQLPS-21-3

The additional hiccup is that these are the two cmdlets that throw the warning when the SQLPS module is loaded. Encode and Decode are not approved Powershell verbs, which means the you will be warned that those cmdlets will be harder to discover because they don’t fit the language standard. While this is the case, the module still gets loaded and will operate just fine.

I’ve mentioned cmdlets that I like and use. I can’t say that I have ever used these cmdlets and don’t know what I would recommend them for. Honestly, I’d like to see the Microsoft team deprecate these and simply recommend the current methods for handling special characters in names.

A Month of SQLPS: Databases and Availability Groups

The final piece of the Availability Group puzzle is managing databases in them. Managing is typically adding and removing databases, but we also can start and stop the replication of data to other nodes.  These can all be handled via T-SQL and cmdlets contained within the SQLPS module.

There are four cmdlets in the module for database management in Availability Groups:

Get-Command -Module SQLPS *SqlAvailabilityDatabase

SQLPS-20-1

These are easily identifiable based on their names. Since adding and removing a database from an AG is the most common set of tasks, we’ll first look at Add-SqlAvailabilityDatabase. Typical of the other SQLPS cmdlets for AGs, it will take the path or Smo.AvailabilityGroup object for the node where you are adding the database. It will also take the database name. Simple enough, right? What’s interesting is how the behavior of the cmdlet differs depending on where you execute it.

Let’s see what happens if we use the cmdlet for a database on the primary node. Whenever we add a database, we always have to add it to the primary node first. In order to demonstrate the differences, I’ll run the example with the -Script switch so we can see the T-SQL it will execute:

Add-SqlAvailabilityDatabase -Path SQLSERVER:\SQL\KIRK\DEFAULT\AvailabilityGroups\ENTERPRISE -Database AdventureWorks2012 -Script

SQLPS-20-2

This output is exactly what we would expect if we followed the Microsoft documentation on adding a database to an AG. This further reinforces that cmdlets are simply wrappers for T-SQL. Now what if we ran this same command on a secondary node:

Add-SqlAvailabilityDatabase -Path SQLSERVER:\SQL\SPOCK\DEFAULT\AvailabilityGroups\ENTERPRISE -Database AdventureWorks2012 -Script

SQLPS-20-3

There is a lot more here, but I’ve cut out a lot of the extra stuff and called out the important bit, which is an ALTER DATABASE command instead of the ALTER AVAILABILITY GROUP call we need to make on the primary node. The cut out material is T-SQL that validates that there is an AG for the secondary node to join, then runs the T-SQL for joining a secondary.

This is one of the handier bits of code within the SQLPS module. It is a little annoying to remember that there are two different pieces of T-SQL syntax for adding a database to an AG. The SQLPS cmdlets account for that by wrapping up the logic in a single call and sorting out the correct command for you.

The Remove-SqlAvailabilityDatabase cmdlet works in a similar fashion. The main difference is that our reference is now to a Smo.AvailabilityDatabase object, found in AvailabilityDatabases under your AG in the provider. Yes, I hear ya’, how many different object paths do we need to keep track of? Anyway, the cmdlet will take a different action depending on which node it executes on:

Remove-SqlAvailabilityDatabase -Path SQLSERVER:\SQL\KIRK\DEFAULT\AvailabilityGroups\ENTERPRISE\AvailabilityDatabases\AdventureWorks2012 -Script

Remove-SqlAvailabilityDatabase -Path SQLSERVER:\SQL\SPOCK\DEFAULT\AvailabilityGroups\ENTERPRISE\AvailabilityDatabases\AdventureWorks2012 -Script

SQLPS-20-4

The final two cmdlets will control data replication. We can suspend data replication in an availability database when necessary using the Suspend-SqlAvailabilityDatabase and Resume-SqlAvailabilityDatabase cmdlets. They serve as wrappers for ALTER DATABASE [] SET HADR SUSPEND/RESUME and follow the same restrictions. You call them with the availability database path or using the Smo.AvailabilityDatabase object for the database you want to alter:

Suspend-SqlAvailabilityDatabase -Path SQLSERVER:\SQL\KIRK\DEFAULT\AvailabilityGroups\ENTERPRISE\AvailabilityDatabases\AdventureWorks2012

Resume-SqlAvailabilityDatabase -Path SQLSERVER:\SQL\KIRK\DEFAULT\AvailabilityGroups\ENTERPRISE\AvailabilityDatabases\AdventureWorks2012

This wraps up the AG cmdlets for the SQLPS module. As you can see, there is quite a bit of functionality here and pretty solid. I have some issues with the use of paths and lack of Get- commands, but overall there is good support here for automating the creation of Availability Groups. So much that they are a major part of my presentation at the 2015 SQL PASS Summit next week. If you’re there and would like to know more, check it out on Thursday (10/29) at 3:30PM.

Speaking of Summit, since I will be there this series will go on hold for a week. When I get back, we’ll wrap up with the handful of remaining cmdlets. Thanks for reading and we’ll see you back here on November 2.

A Month of SQLPS: AG Listeners

In order to properly communicate with an Availability Group, we need an AG Listener. Straight from the Microsoft documentation, a listener is a Virtual Network Name that represents the AG, allowing applications to connect to it instead of directly to the SQL instance. The listener will handle routing to the appropriate replica within the AG and allow for connections to be consistent regardless of failovers and node changes.

To create a listener, we need a unique name within the domain and an IP address for each subnet the AG lives in. Creating it in your SQL Server Management Studio is just a matter of entering the information when creating a new listener. The GUI is under the Availability Group Management section, where you can add a new listener. Now, there’s a bit of a gotcha with creating the listener. It doesn’t really create SQL Server objects, but instead cluster resources. This means that while can create it in SSMS, after it is created we have to manage it through the Failover Cluster Manager.

Anyway, we’re here to talk about how to manage this using the SQLPS cmdlets, right? There are three cmdlets for listeners:

Get-Command -Module SQLPS *SqlAvailabilityGroupListener*

SQLPS-19-1

We’ll look at New-SqlAvailabilityGroupListener first, used to create a new listener. For this cmdlet we’ll need either the provider path for the Availability Group or the Smo.AvailabilityGroup object. Additionally, we also need the name, IP address, and TCP port for the listener. The name is easy enough, it can be any unique name, but we have options for the IP address: declare the address to be acquired via DHCP or give it a static IP address combined with a subnet mask. Personally, I prefer static IP addresses for my listeners and I tend to name my AG listener after the AG itself:

New-SqlAvailabilityGroupListener -Name 'ENTERPRISE' -staticIP 192.168.10.101/255.255.255.0 -Port 1433 -Path 'SQLSERVER:\Sql\KIRK\DEFAULT\AvailabilityGroups\ENTERPRISE'

If you look at the help file for this cmdlet, you’ll notice the -StaticIP argument will take an array. This is becausewe could have multiple IP addresses for the listener if the AG spans multiple subnets. Note, you can still only have one IP address per subnet, so keep this in mind as you provision your listener.

After the listener is created, we can view the listener in a few places. First is in SSMS under Availability Groups. The second is within the Failover Cluster Manager, as the cmdlet creates cluster resources. Finally, we could look at it using the provider:

SQLPS-19-2

Set-SqlAvailabilityGroupListener will only allow you to do one thing: Change the port the listener uses. You can not change addresses, only add and remove them. You also can not change the listener name, only remove it and create a completely new listener. To use this cmdlet, you’ll need the provider path or Smo.AvailabilityGroup object for the AG, specifically on the primary node.

Set-SqlAvailabilityGroupListener -Path SQLSERVER:\SQL\KIRK\DEFAULT\AvailabilityGroups\ENTERPRISE -Port 1433

Add-SqlAvailabilityGroupListenerStaticIp allows us to add additional static IP addresses to the listener. This cmdlet will also create cluster resources for these addresses, just like New-SqlAvailabilityGroupListener, and must be unique per subnet for the listener.

If you need to remove any of these objects, you’ll probably want to do it through the Failover Cluster Manager or the Failover Cluster cmdlets. You can use Remove-Item if you reference the provider path of the listener and this will drop the entire object. However, managing the IP addresses of the listener itself can only be done by managing the individual cluster resources.

Using these cmdlets will give us a functioning Availability Group and allow us to connect to it using the AG name. With this complete, there is one more step to make an AG 100% functional: install a database into the AG and enable it for synchronization. In the last post for this week, we will cover the cmdlets for enabling and managing databases within an AG.

A Month of SQLPS: Availability Group cmdlets

In the previous post, we covered how to create and manipulate Availability Group replicas. Assembling these replicas are necessary for building and using SQL Server’s AlwaysOn technology for high availability. Now it is on to the cmdlets in the SQLPS module that actually create the Availability Groups themselves. As always, we’ll start with looking at the cmdlets in the module:

Get-Command -Module SQLPS *SqlAvailabilityGroup

SQLPS-18-1

We talked about Join-SqlAvailabilityGroup in relation to the cmdlets for managing replicas. This cmdlet is important because while we can create replicas, they still need to be joined to the Availability Group. Calling this cmdlet is simply a matter of passing the provider path or the Smo.Server object that represents the node, then the Availability Group name:

Join-SqlAvailabilityGroup -Path SQLSERVER:\SQL\KIRK\DEFAULT -Name ENTERPRISE

This is necessary once the Availability Group is created, but what about actually creating it in the first place? For that we have the New-SqlAvailabilityGroup cmdlet. To use this, we need a couple things: the name of the Availability Group, the path or SMO.Server object for the primary node, and a collection of replicas.

New-SqlAvailabilityGroup -Name ENTERPRISE -Path SQLSERVER:\SQL\KIRK\DEFAULT -AvailabilityReplica $replicas

Again, even if we create this with the cmdlet, we still have to join the replicas. Make sure you keep that gotcha in mind. Otherwise, this is all we need to get a basic Availability Group up and running. Doesn’t seem hard, does it? Really, the bulk of the work is done by creating the replica objects.

If we want to change any settings for the Availability Group, we would use SqlSet-AvailabilityGroup. This is for changing settings like backup preference, failure condition levels, and the AG health check timeout. Now that an AG exists, the cmdlet requires the Smo.AvailabilityGroup object or the provider path for that AG:

Set-SqlAvailabilityGroup -Path SQLSERVER:\SQL\KIRK\DEFAULT\AvailabilityGroups\ENTERPRISE -AutomatedBackupPreference Secondary

Calling Remove-SqlAvailabilityGroup will destroy the AG with no extra action required:

Remove-SqlAvailabilityGroup -Path SQLSERVER:\SQL\KIRK\DEFAULT\AvailabilityGroups\ENTERPRISE

This is all pretty useful, but the strength of Availability Groups is fast failover to another node. Normally, to accomplish this you would connect to the node using SQL Server Management Studio and running the appropriate ALTER AVAILABILITY GROUP command. The Switch-SqlAvailabilityGroup cmdlet saves us a little bit of extra effort by avoiding the step of logging into the SQL Server. We can just call the cmdlet and specify the AG path within the node we want to fail to:

Switch-SqlAvailabilityGroup -Path SQLSERVER:\SQL\SPOCK\DEFAULT\AvailabilityGroups\ENTERPRISE

It’s important to note the difference in the path. Just as we want to run the SQL from the target node for the failover, we need to use the provider path for that target node.

We know the Test-SqlAvailabilityReplica will evaluate some Policy Based Management checks, and so will Test-SqlAvailabilityGroup. We can pass the usual arguments and get back a PowerShell.Hadr.AvailabilityGroupHealthState object with a HealthState property.

By covering these cmdlets, we know have a good foundation for how to get started with Availability Groups and Powershell. There are two other steps we need to complete our fully functioning AG: creating a listener and deploying a database. The next few posts will go over those cmdlets in detail, so you can understand the best way to automate the creation and management of this great piece of SQL Server technology.