Art of the DBA Rotating Header Image

Dynamic CSV Imports with #Powershell

A common task for data folks is loading comma separated values files into databases. It can be tedious, having to figure out column layouts, data formats, and sorting bad data. This sort of Extract, Transform, and Load (ETL) task is something we would do in SSIS or a similar loading tool, but those tools require us to review the data and have a good idea of what the staging table will look like. Most of the time with CSVs, we just need a quick dump of the file into a database table so we can work with it using T-SQL, which means that I don’t want to spend a lot of time figuring out what a stage table is going to look like.

I know SQL Server Management Studio will try and help you out with the Import Data task. I have used this pretty frequently myself. However, like any other GUI tool out there, you can not automate it. It builds a one time SSIS package (which you can save) and executes it, but if it does not save much time if I have to load multiple CSV files with differing formats.

We all know my weapon of choice is Powershell. I am sure there are other approaches to this problem and my ETL/BI pals are probably reading this post in dismay (if they are reading it at all!). However, I’m pretty comfortable with the patterns in Powershell to script this process, letting me quickly load multiple CSV files without having to do a lot of work.

All Around the Table

The challenge is getting the staging table in place. We need a process that can read the CSV header and build a CREATE TABLE statement for us. Once we have that, the load is actually pretty easy. Assuming the CSV has a header row, I then use this bit of Powershell code to figure out the different columns I’m going to load into:

$source = <Path to your source file>
$Header = (Get-Content $source | Select-Object -First 1).Split(',')

Two lines of Powershell and now I have a collection of all my column names as a string array. This is where the fun begins. Now, I can not assume that the column headers will play nice as SQL column names, so I need to do a little hygiene work. I will loop through the collection and strip out any non-alphanumeric characters:

$CleanHeader = @()
foreach($h in $Header){
$CleanValue = $h -Replace '[^a-zA-Z0-9_]',''
$CleanHeader += $CleanValue
}

I could use ForEach-Object here to simplify the code, but I expand it out in a foreach loop because I might add some other logic to the header name clean up. I want to keep it simple for this example. The result is a new collection that has names I can use to create a staging table.

Next up, I will take this new collection and build out a SQL statement. This is a matter of looping through the CleanHeader collection and using those values. Since we can’t really tell what the format will be, each table column will be VARCHAR(255).

$StagingTableName = ‘CSVFileLoad’
$sql = @("IF EXISTS (SELECT 1 FROM sys.tables WHERE name = '$StagingTableName') DROP TABLE [$StagingTableName];")
$sql += ("CREATE TABLE [$StagingTableName]($($CleanHeader[0]) VARCHAR(255)")
$CleanHeader[1..$CleanHeader.Length] | ForEach-Object {$sql += ",$_ VARCHAR(255)"}
$sql += ");"

The SQL format is a typical pattern:

  1. If the table name already exists, drop it (we’re doing a drop and replace of the data).
  2. Grab the very first column name in the collection and use it to start the CREATE TABLE.
  3. Loop through the remaining column names, putting a comma in front of each column.
  4. Close the CREATE TABLE statement with a parentheses and semicolon.

This block of code is the key, allowing me to create any table structure to import my data with.  Once I have it, I just execute it using Invoke-SqlCmd as I would any other T-SQL statement, and my staging table is now in place.

Stick the Landing

Once the staging table is in place, the load is actually fairly simple. You have lots of options, but the easiest one for my money is to build a BCP call and execute that. BCP is a simple utility that has been around for a while, mostly because it is effective. The build is not difficult:

$cmd = "bcp '$Database.dbo.[$StagingTableName]' in '$Source' -S'$SQLServerName' -F2 -T -c -t','"
Invoke-Expression $cmd

For those unfamiliar with the BCP syntax, all I do is declare the destination table, the key word ‘in’ to declare that I am loading data from a file to a SQL Server table, and then the SQL Server name. The remaining parameters set the following load options:

  • -F2: Start the load with the second row, skipping the header
  • -T: Use windows authentication to connect
  • -c: The input file is character data
  • -t’,’: The column terminator is a comma

This is how I do it, but there are plenty of other options. Allen White(@SqlRunr) has written about using the .Net methods to perform a Bulk Load. You could also use the BULK INSERT command run from an Invoke-SqlCmd call. There are probably a dozen ways to skin this particular cat. The choice is up to you.

Now For Your Parting Gift

As with many of these patterns that I blog about, I have a function I have written around it. This one is Import-CsvToSqlTable. This function has some additional pieces that are best discussed by reviewing the parameters:

  • InstanceName – SQL Server Instance you are going to load to.
  • Database – Database name you are going to load to.
  • SourceFile – Source file to load
  • SqlDataType – Data type the staging table columns will be created as. Defaults as VARCHAR(255).
  • StagingTableName – Table name you will create and load into.
  • Append – If declared, the staging table will not be dropped if it already exists.

The function wraps up all the different pieces of what we talked about above. With it wrapped in a function, we now can call it for a simple data load. For this load, I am using a file from https://catalog.data.gov/ for New York City demographics:

3-5-2016 11-37-15 AM

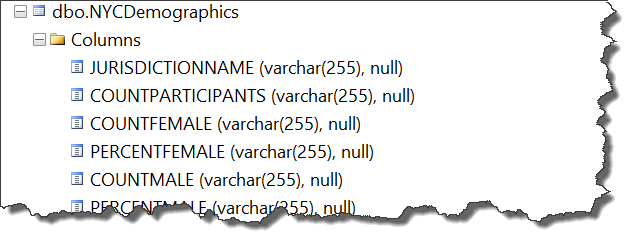
Nothing fancy and the output shows the instance, database, table, and count of rows in that table. If we look in SQL Server, we will see the table created with VARCHAR(255) columns as expected:

3-5-2016 11-39-19 AM

We can do more, though. Let’s say we know that the file contains numbers in all the columns. It might make more sense to load them into a FLOAT or a NUMERIC datatype. We’ll declare that now. I’m also going to declare the -Verbose so I can see the detail of how the function is processing the import:

3-5-2016 11-42-53 AM

3-5-2016 11-48-58 AM

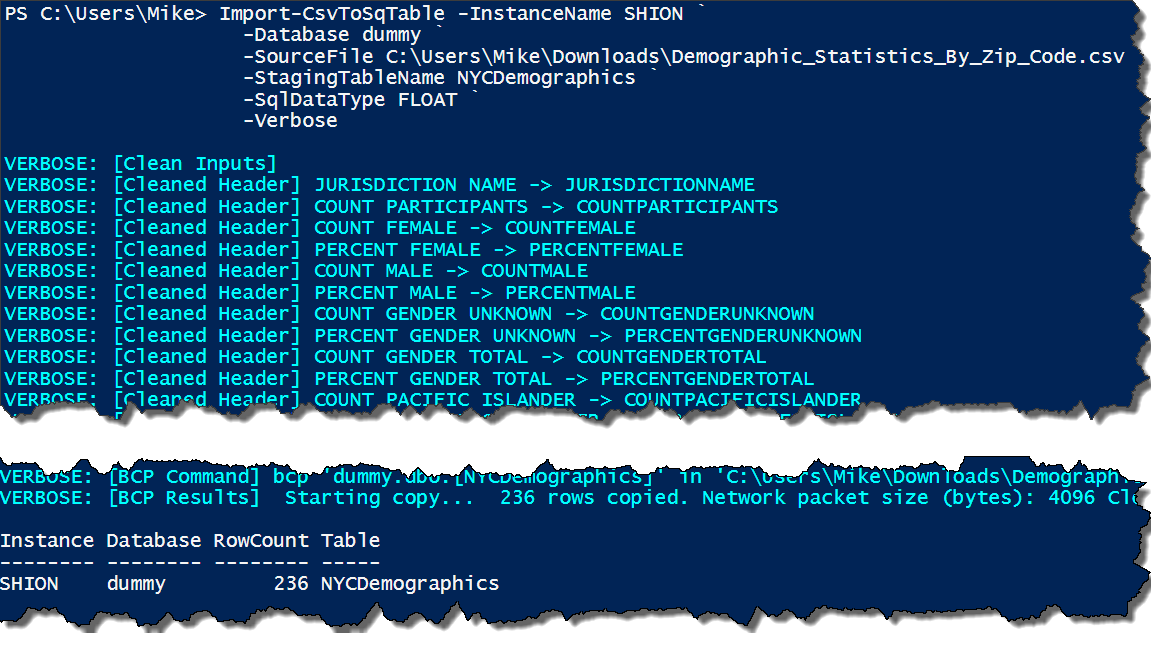
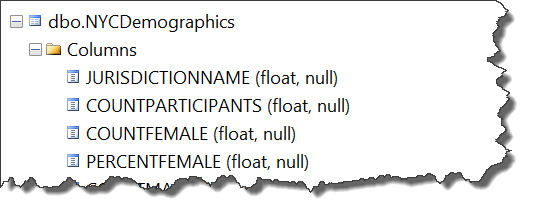
With the right parameters, not only do we have control over what we create, but we can see how it’s created and loaded into SQL Server. This can help with troubleshooting in case we try and load the wrong data type or there is some other error for the load.

This function can be useful for quick and dirty data loads, importing CSVs that we don’t want to waste a lot of time figuring out. I wrote it for this express purpose, because I did not want to get tied up clicking on buttons in the Import Data Wizard. However, I definitely do not recommend this as a full on replacement for ongoing ETL processes and standardized data loads. For any ongoing process where you know the format of your data files, there are much better options and approaches. As with any task, it is important that you use the right tool for the job, but it never hurts to understand your options.

Getting Database File Info with #Powershell

As database administrators, we are often obsessed with free space. Whether it’s on disk or in our database files, we know that if that precious resource runs out, everything we manage can come to a crashing halt. There are also the other hidden impacts, like if things slow down while files grow and possible downtime to additional storage to support the needs of our databases. This is all part of what a former manager of mine called “DBA 101” and staying on top of it is one of our higher priorities.

Fortunately, there’s plenty of tools for us to manage these metrics. It comes down a lot to personal choice. Usually this can be managed via some monitoring suite, but there are times we need a handy tool to answer questions quickly. For disks, I have a function I borrowed from the web and put into my profile called Get-FreeSpace. Using it, I can quickly answer questions about how much free space is available on any of my servers.

The Database Challenge

Databases are a little more difficult. Sure, we can use a variety of queries to gather this information and there are ways to get it. We could always use SSMS to look at a database’s properties. Personally, I like to use Glenn Berry’s(@GlennAlanBerry) DMV scripts. The problem is that it’s difficult to get a concise report across all of our databases with this. Sure, we can create scripts that execute the query against each database, looping through them all, but that’s a hassle. I want something simpler.

Once I hit these limits using T-SQL, I did some investigation to see if Powershell offered any better alternatives. It’s one of my learning tools for Powershell: take a T-SQL task I’m familiar with and redo it in Powershell to see if it is easier and/or better.

To do this, I dove into the SMO object model. This gets a little /Net-y, but the good news is there’s lots of properties we can use to get the information we are looking for. If we look at both the DataFile and LogFile classes, there are properties readily available for us. Both classes have UsedSpace and Size properties (both measured in KB), from which we can derive both available space and percentage used. All it takes is wrapping some collection and formatting logic around these objects and we’re good to go. You can see my full function up on GitHub.

Reporting on Database Free Space

I’ve done a couple new things with this function. The biggest is to build it for the pipeline. This is a significant step for me, because it makes the function more flexible. I always talk about how Powershell supports multi-server execution, so I try to build that into my functions when I can. this is no different. I also made the output a generic PSObject instead of a formatted table. This is key because it lets the user manage it as they need to, which is a database design concept that can be carried over to Powershell quite easily.

So let’s use it. Running it for a single instance is easy enough:

Get-FreeDBSpace -InstanceName ‘SHION’ | Format-Table

2-27-2016 1-23-35 PM

I use the Format-Table to give me this clean table style output, as the generic output is a list that can be hard to read. What’s cool here is that, with a single Powershell command, I can quickly report out all the necessary database file size info. It gets better, of course. Because I designed the function to take a pipeline, I can run it for multiple instances with ease:

$Instances = @(‘SHION’,’SHION\ALBEDO’)
$Instances | Get-FreeDBSpace | Format-Table

2-27-2016 1-33-48 PM

How cool is that? As an administrator, this can be invaluable when I’m evaluating an environment or instance. Still, this is a lot of information to parse. Let’s leverage the pipeline again and filter down the report to show all the files have less than 10 percent free (greater than 90% used):

$Instances | Get-FreeDBSpace | Where-Object {$_.PercUsed -gt 90} | Format-Table

2-27-2016 1-38-18 PM

How cool is that? Now we’ve got an easy report showing all our databases that could be tight on space. But wait, there’s more! We’re going to use the pipeline one last time, this time to output an HTML report showing us the information we just displayed to the screen:

$Instances | Get-FreeDBSpace | Where-Object {$_.PercUsed -gt 90} | ConvertTo-HTML | Out-File .\FreeDBSpace.htm

2-27-2016 1-44-27 PM

Easing Our Burdens

As you can see, there’s a lot of potential to how we can use this. The key to building any Powershell tool is making it as flexible and repeatable as possible. The building blocks are there, it is just a matter of how we assemble them.

You’ll often hear how you should use the right tool for the job. I love T-SQL and use it for many tasks, but this is a great example of how Powershell can complement T-SQL and give administrators a more robust way to manage their environments. Using this function, we can easily evaluate a new environment or manage our existing one. Our time is precious and tools like these can help us best use that valuable resource.

Three Things I Want From My Job

I’ve been off for a while and I apologize for that. The beginning of the year has been crazy and I am just now getting my feet back under me. The short version is I recently changed jobs and have started working for UpSearch(@UpSearchSQL) as a SQL Server Consultant. This is an exciting change for me, full of new challenges and opportunities.

Blah blah blah blah, right?

Without making light of the change, I know you all hear this every time someone starts a new gig. This post is not about that, but about some reflections I had about why I changed jobs, what satisfies me at work, and the reasons we do this stuff in the first place. I want to share these thoughts with you to hopefully help you broaden your perspective on why you are at your job and what it is that keeps you going back (besides the obvious paycheck).

Three Things

When it comes to our jobs, whether we’re interviewing for something new or looking back on our current position, we should have a list of what keeps us happy. After all, we measure and track statistics around our databases and compare them to a baseline. It should be no different for our careers. This list can be as detailed or broad as suits you, but you should have something. My list is actually pretty simple, consisting of three questions that I ask myself:

  • Am I compensated fairly?
  • Am I working on cool s#!t?
  • Am I respected?

These questions do not have simple answers, but they do have answers. As we go over each question, hopefully you start to see how they might apply to you.

Compensation

This probably seems the simplest. After all, we all get paid and we want to make sure our salary is competitive to the market, right? This definitely is something we should be thinking about and reviewing. It also takes a bit of self honesty about our capabilities and how they match to what is being paid for. Are we senior or mid-level talent? How much do we drive value for our employer? Salary is very much a two way street.  If we want to be paid fairly, we need to demonstrate our worth.

Of course, we also need to keep in mind that compensation is far more than just salary. I’ve worked jobs where I got paid pretty well, but had to fight to go to conferences like the PASS Summit. Some jobs had liberal vacation policies while others offered the minimum. When you consider your compensation, you have to ask yourself what keeps you happy from a larger perspective.

Coolness Factor

I’m the kind of guy that needs to be challenged. It is why I spend time blogging and presenting, as well as playing with different kinds of technology. This is how my work fulfills me. I could simply punch the clock, work from 8 to 5, and collect my check, but this wears thin pretty quickly. I need more in a job than just going through tasks by rote so I can go home at the end of the day.

This is why it is important that I get interesting work. I need problems to solve and challenges to overcome.  To be clear, I understand that I will have to do the tedious stuff as part of any job. Work like this needs to be balanced out, though. Heck, sometimes the challenge of managing the tedious stuff in a more efficient manner is engaging in and of itself. The key is that I want my job to help me grow, not allow me to tread water. Job satisfaction is measured on this growth.

R-E-S-P-E-C-T

This last item is the linchpin. For the longest time, I was happy with the first two items on this list. Then one day, I sat up and realized that I was getting worn down by my job. I couldn’t quite place my finger on why, because I was getting what I wanted out of compensation and the work was definitely cool and challenging. The problem was I was struggling with going into work every day and my motivation was rapidly draining.

The key, I realized, was a matter of respect. Whether it is peers, team members, or management, I need the people I work with to respect my time and my knowledge. This may seem a little arrogant, but it is important to recognize your own value. Companies hire me to be a database expert, and an expensive one when you boil it down. This means my time and opinion carry a certain amount of cost, and when that cost is being wasted because others in the company do not recognize that value, it becomes wearing.

Without trying to sound too negative, we need to understand our professional value. As with the compensation question, it takes a lot of self honesty to value ourselves appropriately. It is important to recognize that within ourselves. This is because it is an important factor for job satisfaction, because not only should we recognize that value in ourselves, we need others to realize it and respect it.

Can I get a little satisfaction over here?

Job satisfaction, while ultimately a binary yes or no answer, has a lot of degrees of measurement. After all, I can think of jobs I’ve had where the pay was fantastic but the environment sucked. Or where the entire team thought I was a rock star, but I was not working on interesting or engaging work. When I felt my job satisfaction going down, I could always track it back to one of these three items.

What is important here is that by understanding what satisfies you at a job, it gives you a tangible item to resolve. It might simply be a matter of going to your boss and telling him what the problem is. This gives you something tangible to work on with your employer and is fair to them, because chances are they don’t want to lose you and will work with you. It also may mean you need to find another job that fills that gap. In this case, when you sit down in an interview, you can have a conversation with the person across the table about what fulfills you.

Whatever your reasons are, it is important that you know why you get up in the morning (or other time) and go to work. Your reasons are probably different than mine, as these tend to be pretty personal. I hope that by giving you some insight into what job satisfaction means to me, it can help you build your own list of questions. Measure your job satisfaction, know what makes you happy, and then figure out how to get it.

Managing SQL Error Logs with #Powershell

Whenever a problem arises, the first question I will ask is “what’s the error message?” Error logs and messages are extremely helpful, even if they feel vague. Because of this, it is vital to know how to leverage the error logs in SQL Server whenever you are troubleshooting an issue. The challenge is managing these logs efficiently and parsing them in a effective way. Powershell can offer some useful tools for reading and manipulating your logs, especially if you want to collect information across multiple SQL Server instances.

I’m not the first person to write about these methods. Buck Woody(@BuckWoodyMSFT) covers the basic method well and Allen White(@SqlRunr) has his own post that goes into more detail. I want to provide a little more information and expand on how it can be useful to you.

Getting Started

Reading SQL Server error logs is pretty simple, but requires us to make use of the SMO objects and the .ReadErrorLog() method to get the data from the log. Let’s start by simply reading the SQL Server error log and see what the output looks like (I’ll be using the SQL Server provider for this):

(Get-Item SQLSERVER:\SQL\localhost\DEFAULT).ReadErrorLog()


1-23-2016 10-46-22 AM

Nothing too surprising here, so let’s dig a little deeper. As I reiterate whenever I talk to folks about Powershell, everything is a .Net object. With this in mind, let’s see what we’re dealing with:

$log = (Get-Item SQLSERVER:\SQL\localhost\DEFAULT).ReadErrorLog()
$log | Get-Member


1-23-2016 10-50-36 AM

Look at the output’s data type, which is a System.Data.DataRow object. This is useful to us because it is a strongly typed object, not just a collection of strings, giving us better access to the data within the log.  Now we can access the properties of the output and our data directly.

Notice the highlighted properties, which are the output columns. Let’s leverage these properties to filter our data:

$log | Where-Object {$_.Text -like '*Startup*'} | Sort-Object LogDate | Format-List Text


1-23-2016 11-06-13 AM

What’s going on here? First off, we take the object and filter out only rows where the Text column/property value is like ‘Startup’. Next we sort by the LogDate column/property to make sure the data displays oldest to newest. Finally, the output is formatted to show only the Text column/property. This is all possible because of the object model.

We could get more advanced with these patterns. Allen’s blog post shows some great techniques for filtering out error messages and DBCC calls. The key point to focus on here is the behavior of the output and how we can use objects to better parse our data. Understanding these patterns really open up the capabilities of Powershell and using it for reviewing your logs.

Beyond the Basics

A gotcha to be aware of with this method is that it will only read the current active log. Depending on the last time your service restarted or when you cycle your SQL error log, data you are looking for could be in an archived log. How do we load and read these? We can retrieve this information using an index value that corresponds to the older log file:

(Get-Item SQLSERVER:\SQL\localhost\DEFAULT).ReadErrorLog(0) | Select-Object -First 5
(Get-Item SQLSERVER:\SQL\localhost\DEFAULT).ReadErrorLog(1) | Select-Object -First 5


1-23-2016 11-19-20 AM

What if we want to collect all our error logs? Or filter all of our entries based on date, not which log they are in? This is actually easier than it sounds, it is just a matter of using methods. Specifically, we can find out how many archive logs there are by using .EnumErrorLogs(), which allows us to collate all of the logs into a single collection:

$logs = (Get-Item SQLSERVER:\SQL\localhost\DEFAULT).EnumErrorLogs()
$combinedlog = $logs | ForEach-Object {(Get-Item SQLSERVER:\SQL\localhost\DEFAULT).ReadErrorLog($_.ArchiveNo)} $combinedlog | Measure-Object -Property LogDate -Minimum -Maximum | Format-List Property,Count,Minimum,Maximum


1-23-2016 11-34-29 AM

Using the .EnumErrorLogs() method, we can get a collection of objects that represent all of the archived logs. From there, we just create a simple loop (using ForEach-Object) to read each error log and add the entries into a larger collection. Finally, we filter and manage this collection in the same way we would an individual error log.

Don’t Stop Now!

I started playing with this recently thanks to Josh Luedeman(@JoshLuedeman), who had asked me about reading the SQL Agent log. I knew, based on the earlier posts I linked, how to read the SQL Server log, but I was not sure if the same methods could be used for the Agent. The good news is….absolutely!

It turns out that the SQL Server Agent class, JobServer, supports all the same error log methods. This means that all of the patterns that we have covered can be applied to parse the Agent logs:

$agentlogs = (Get-Item SQLSERVER:\SQL\localhost\DEFAULT\JobServer).EnumErrorLogs()
$combinedagentlog = $agentlogs | ForEach-Object {(Get-Item SQLSERVER:\SQL\localhost\DEFAULT\).ReadErrorLog($_.ArchiveNo)}
$combinedagentlog | Sort-Object LogDate -Descending | Select-Object -First 10


1-26-2016 9-27-19 AM
This is great because it means we have access into some of the other error logs. We could even combine our log objects for one time parsing. There are lots of possibilities here. What you should consider is the nature of the problem you are solving or process you are automating. These patterns simply become additional tools at your disposal.

We have a lot of options for parsing objects in Powershell. The key is to understand how the object model behaves. This is what really sets Powershell apart from many other scripting languages: its object aware foundation. Understanding this will open up entire new levels of functionality for you and the tasks you want to script.

Set-SqlStartupParameters #Powershell Function

Here on the heels of my last two blog posts about the Smo.ManagedComputer class, I wanted to wrap up with a function I put together to help with managing startup parameters. It is the result of the work I did to figure out how to move the master db along with the inspiration I got from Shawn Melton’s(@wsmelton) blog post on the matter.

Looking back at the previous blog post, changing the the startup parameters through the SMO is pretty easy with the ManagedComputer class. In some ways, it is too easy. As Shawn calls out, you could easily overwrite the full string and remove the startup locations for your master database (and breaking your instance). This is where tool building can be such an aid, because by wrapping the change code in a function, we can build some safety mechanisms to protect us (or others) from doing harm when trying to make this sort of change. The function I wrote is not terribly long, but I’ll spare you the whole thing by letting you view it on GitHub. We’ll use our time better by going over how I constructed it while focusing on some of my tool building principles. 

The first is trying to build around multi-instance execution. You will note that my parameter block uses a string array called Instances ($Instances):

function Set-SQLStartupParameters{
  [cmdletbinding(SupportsShouldProcess=$true)]
  param([string[]] $Instance
       ,[string[]] $StartupParameters
)

This array will drive a foreach loop inside the function, allowing me to apply the same block of code to each instance name. There are a lot of situations when I am applying changes across multiple SQL instances and I want to keep the call simple.

The second parameter is also a string array, which is a collection of the startup parameters I want to apply. While the property in the SMO is a semi-colon delimited string and will ultimately be set that way, I find that using a string array makes the collection of parameters much more manageable and readable. It is important that any tool you create is not a struggle to use.

Next up, as we walk through the function, you will see some Write-Verbose statements:

Write-Verbose "Old Parameters for $i :"
Write-Verbose $wmisvc.StartupParameters

It is easy to write a script that can execute a bunch of things, but when it starts throwing out red error text you could have a debugging nightmare. By adding these statements, I can add logging information to the output so I can see things like the old startup parameters and the string that will be added to the service for the new parameters.

The final item to call out is the meat of the function. As it has been emphasized, altering these startup parameters can be very dangerous and could possibly break the instance if we leave out the -d, -e, or -l parameters or set them improperly. I wrote this function to capture the existing values of these parameters and, if they are not being changed, keep them.

$oldparams = $wmisvc.StartupParameters -split ';'
$newparams = @()
foreach($param in $StartupParameters){
  if($param.Substring(0,2) -match '-d|-e|-l'){
    $SystemPaths = $true
    $newparams += $param
    $oldparams = $oldparams | Where-Object {$_.Substring(0,2) -ne $param.Substring(0,2)}
  }
  else{
    $newparams += $param
  }
}

$newparams += $oldparams | Where-Object {$_.Substring(0,2) -match '-d|-e|-l'}

While not the most graceful approach, the logic is as follows. Start with the old parameter block and check each new parameter. If any of the sensitive parameters are specified, remove it from the old parameter set and use the new one. Once we have gone through the new ones, pull any remaining sensitive parameters from the old set and insert them into the new. This way we should always keep a value for the sensitive parameters.

The non-sensitive parameters are a different manner. They will not be retained, but instead overwritten. This means if you want to retain an existing trace flag, you will need to include it in your new parameter set when you call the function.

Now, what this does NOT do is insure these sensitive parameters are valid. This is up to the user to make sure that the files and paths are valid. I added a warning to the function that if these values are changed, the user needs to validate them, but the rest is on the person executing the call. This function will also not restart the service to apply the changes. Because we need to be sensitive about when our SQL Server services restart, I wanted to leave that in the control of the user.

Let’s look at some examples and see how this function works. If we want to add the trace flag to suppress successful backup messages, it’s just a simple line of code:

Set-SQLStartupParameters -Instance PICARD -StartupParameters '-T3226' -Verbose -WhatIf

12-12-2015 11-23-05 AM

By specifying the -Verbose switch, all the included verbose messages I built into the function will display. Using -Whatif then gives us a chance to see what is going to happen before we actually apply it. This becomes useful both for debugging and checking that what we are doing is really what we want to do.

If we remove the -WhatIf, the change will actually be applied:

Set-SQLStartupParameters -Instance PICARD -StartupParameters '-T3226' -Verbose

12-12-2015 11-27-43 AM

This gives us all the same information, but now actually applies the change. The function is written to warn us that, while the startup parameters have been changed, we still need to restart the instance.

What about moving our master database? Let’s use last week’s example and relocate the master database as part of a set:

#Set the params as a string array
$params = @('-dC:\DBFiles\MSSQLSERVER\master.mdf',
'-eC:\DBFiles\MSSQLSERVER\ERRORLOG',
'-lC:\MSSQLSERVER\mastlog.ldf')

Set-SQLStartupParameters -Instance PICARD -StartupParameters $params -Verbose

12-12-2015 11-34-23 AM

Because of how the function is built, it displays the additional warning that we have changed the sensitive parameters. While the function can not save us from everything, it will try and provide as much information as it can to help.

I have tried to share with you some of the things I think about when building my own functions. However, I also want to call out the importance of getting other opinions. While I wrote the code, I got a LOT of help from Shawn Melton in the way of code review. He was kind enough to look over my function and suggest a few things (like the -WhatIf flag). Building code is a team effort and having a supportive community is a great way to help you create your own tools.


Moving your Master Database with #Powershell

A common best practice that many administrators do not typically apply is moving your system databases out of the default location on the C: drive. This is recommended because this way your system databases will not affect or be impacted by whatever work the OS is doing. It is a way to reduce contention and protect your SQL installation from something going awry with the OS. And while moving databases like model, msdb, and tempdb are fairly straightforward, moving master can be a real challenge.

The reason for this difference is because of how SQL Server stores the location of those database files. For model, msdb, and tempdb, these locations are stored as with regular user databases: in master. This means we can relocate them in the usual way. Master is a trickier beast because SQL Server must have knowledge of its location before it starts. How it does this via the instances startup parameters. The parameters of -d and -l specify the instance’s data and log files (respectively) for the master database. This means, if we want to move our master database files, we need to change these startup parameters.

CAUTION: Changing these values can break your instance and prevent it from starting.

Normally, to change these values, we would use the Microsoft Management Console (mmc) for SQL Server:12-5-2015 12-07-30 PM

As with many GUI based operations, this is pretty much impossible to automate and opens the door to inconsistencies and errors. You definitely could not include this into a scripted SQL Server build process. What do we do?

My answer, unsurprisingly, is Powershell. The trick is how. If you do a Google search, you will find a lot of articles on changing registry keys. This is messy and I definitely do not feel comfortable with that approach. Fortunately there is a better way.

Last week I blogged about how you can use Smo.ManagedComputer class to update service accounts for your SQL Services. My friend Shawn Melton(@wsmelton) decided to explore the class a little more and discovered how you can change your startup parameters using this class. Shawn’s examples are focused around adding common trace flags to your instance, which is a typical practice. However, let us look at using this to move master.

We will get started by first showing the current startup parameters of our instance:

[System.Reflection.Assembly]::LoadWithPartialName('Microsoft.SqlServer.SqlWmiManagement')| Out-Null
$smowmi = New-Object Microsoft.SqlServer.Management.Smo.Wmi.ManagedComputer PICARD
($smowmi.Services | Where-Object {$_.Name -like 'MSSQL*'}).StartupParameters
'--------------------------------'
($smowmi.Services | Where-Object {$_.Name -like 'MSSQL*'}).StartupParameters -split ';'

12-5-2015 12-35-07 PM

The startup parameters are stored in the object as a single string, with each parameter separated by a semicolon. This is why, to make it easier to read, I pass the output to a -split parameter so we can see them in a string array.

To change this is simply a matter of changing the StartupParameter property of the service and apply it as Shawn describes in his post. We should be careful, because if we screw this up the SQL instance will NOT start. With that out of the way, let’s first script out changing the location of master:

#Set the params as a string array
$params = @('-dC:\DBFiles\MSSQLSERVER\master.mdf',
'-eC:\DBFiles\MSSQLSERVER\ERRORLOG',
'-lC:\MSSQLSERVER\mastlog.ldf')

#Get the Service
[System.Reflection.Assembly]::LoadWithPartialName('Microsoft.SqlServer.SqlWmiManagement')| Out-Null
$smowmi = New-Object Microsoft.SqlServer.Management.Smo.Wmi.ManagedComputer PICARD
$sqlsvc = $smowmi.Services | Where-Object {$_.Name -like 'MSSQL*'}

#Change the startup parameters
$sqlsvc.StartupParameters = $params -join ';'
$sqlsvc.Alter()

Just as if we had changed this in our management console, the changes will not take effect until we restart the service. In addition to restarting the service, we also need to relocate the master files to the new location, which can not be done while the instance is running. The next part of the script will go ahead and to these tasks for us:

#Stop SQL Service, move files, start SQL
$sqlsvc.Stop()
Invoke-Command -ComputerName PICARD -ScriptBlock{Move-Item 'C:\Program Files\Microsoft SQL Server\MSSQL12.MSSQLSERVER\MSSQL\DATA\master.mdf' 'C:\DBFiles\MSSQLSERVER\master.mdf'}
Invoke-Command -ComputerName PICARD -ScriptBlock{Move-Item 'C:\Program Files\Microsoft SQL Server\MSSQL12.MSSQLSERVER\MSSQL\DATA\mastlog.ldf' 'C:\DBFiles\MSSQLSERVER\mastlog.ldf'}
$sqlsvc.Start()

I want to call out that I use the Invoke-Command in here because I am running this script remotely, but the Move-Item cmdlets need to execute using local paths. Also note that while I changed the location of the SQL error logs, I do not have to move them. This is because a new error log is created every time SQL Server starts, so we just need to make sure the path name is correct.

Once this script is complete, we now have a SQL Service running with the master database in an entirely different location. This process can easily be added to a build script to further automate our SQL builds and help us adhere to best practices. Combining this with the SMO and its WMI classes help make the change easier and protect us (somewhat) from accidental damage. Hopefully this helps you in understanding and building better automation for your own environments.

Managing SQL Server Services with #Powershell

14711793077_7088d420cf_zManaging service accounts is one of those tedious jobs that tend to annoy me. Changing the passwords of these accounts regularly is a good security practice, but takes a lot of time and can be difficult to manage. In other words, a perfect task to automate with Powershell.

There are two ways to handle this task, both through the Windows Management Instrumentation(WMI). The first way uses the base WMI interface, which can be used to manage all Windows services. Using it is a little convoluted, but gets the job done:

$svc = Get-WmiObject -Class Win32_Service -ComputerName PICARD -Filter 'Name = "MSSQLSERVER"'
$svc.Change($Null,$Null,$Null,$Null,$Null,$Null,'sdf\sqlsvc2','P@$$w0rd',$Null,$Null,$Null)

This call is easy to decipher. Using the .Change() method of the service class, we can update the service account name and/or password (as well as other properties of the service). You probably noticed the number of arguments the .Change() method takes, which makes it cumbersome to use. The other gotcha is that the service still needs to be restarted in order for these changes to take affect. Depending on your need, these gotchas can be good or bad, but can be handled depending on how you code around it.

If you’ve managed services through the GUI, using this method probably makes you think of how you manage accounts through the services MMC console. However, most SQL Server folks will use the SQL Server Configuration console instead. These two methods are subtly different, where using the SQL Server Configuration console will handle some additional tasks (such as restarting the service) as part of its interface. If we want to manage our SQL Services in the same fashion, we can leverage a part of the SMO, the Wmi.ManagedComputer Wmi.Service classes.

To handle our services, we need an extra step or two, but it’s a little cleaner to write:

[System.Reflection.Assembly]::LoadWithPartialName('Microsoft.SqlServer.SqlWmiManagement')| Out-Null
$smowmi = New-Object Microsoft.SqlServer.Management.Smo.Wmi.ManagedComputer PICARD
$wmisvc = $smowmi.Services | Where-Object {$_.Name -eq $ServiceName}
$wmisvc.SetServiceAccount('sdf\sqlsvc2','P@$$w0rd')

We first need to load the SqlWmiManagement assembly, just like loading the SMO libraries if we were using that functionality(note: this library is loaded if you load the SQLPS module). Then we need to instantiate the Managed computer object and retrieve the specific service we want to alter. The final step is to just change the service account.

This works about the same as the base WMI approach, though we’re altering the service by using the same functionality as the SQL Server Configuration Manager. This means that once we change the service account, it will force a service restart. This is good and bad. The good is that it will apply the change immediately and you will know right away if the account change is valid. The bad is that you can not delay the service restart, so if you use this method you want to be sure it is a good time to restart your SQL Service.

I have built a function around using the second method that makes handling this process a little easier. Also, because I’m not a fan of passing passwords in plain text, I built the function to take a PSCredential object to keep my account information secure. In order to spare you the wall of text, you can view the full function on my GitHub repository.

The function can be loaded through a variety of methods, but once it is loaded calling it is simply a matter of creating the credential for the service account and calling the function:

$cred = Get-Credential 'Enter Service Account'
Set-SqlServiceAccount -Instance PICARD -ServiceAccount $cred -Service SqlServer

Creating functions allows us to abstract some of the messy bits and make our lives a little easier. In this case, my function handles the following:

  • Decoding the credential in a way to keep the account information secure.
  • Managing the service names based on the instance name (passed in the standard HOST\INSTANCE name format).
  • Restarting the SQL Server Agent service if it is not running after up restart the SQL Server service.
  • Accept a list of instances and process all of them.

This simplifies the changing of account information and gives us many opportunities for automating large scale password changes. For example, if you use a single service account for all your instances, changing it is a snap:

$servers = @('PICARD','RIKER','KIRK','SPOCK')

$cred = Get-Credential 'Enter Service Account'
Set-SqlServiceAccount -Instance $servers -ServiceAccount $cred -Service SqlServer

This simple pattern and function will not only make managing our security policy easier, but also more consistent. Using a simple list of servers from a text file, a database table, or even our Central Management Server and combining it with this function means we ensure that we are applying these changes to every server in the list. This is how we can build for automation, focusing on making simple tasks like this repeatable and consistent.

Quick hat tips out to the following folks:

Giving Thanks for Powershell Resources

turkey-rice-krispiesIt seems an appropriate time to write this post as this week is the American holiday for Thanksgiving, a time when we show appreciation for that which makes our lives better. I would like to thank some folks for the Powershell resources they’ve provided, resources that I’ve used to figure out the language. We all succeed by standing on the shoulders of giants and I can not thank these giants enough. Since I also get a lot of questions from folks about what are good resources to use for Powershell, I want to help them out by providing this list.

Don Jones(@concentrateddon) and Jeff Hicks(@JeffHicks)

Let’s face it: You are not going to get very far into Powershell without running into these two names. Don and Jeff have contributed so much to the Powershell community. While we could go on and on about all of their material, let me give you the top three hits.

Powershell in a Month of Lunches is the go-to book for learning Powershell. For a language that takes users time to get their brains around, this book makes it easy. By breaking Powershell fundamentals into 25+ one hour lessons, it will give you a gradual learning curve for understanding and using Powershell. If you don’t have it and are starting your Powershell journey, get it.

Powershell in Depth is a much larger book, but that’s because it is true to its title. Where Powershell in a Month of Lunches is a starter, easing the Powershell noob into how the language works, Powershell in Depth is a detailed reference manual. The book has many chapters that explore different aspects of the language, from basics of control flow and operators to the more involved topics of workflows and background jobs. I have this book for when I know what I want to do, but need to know how to make it work.

Powershell.Org is the Powershell community’s beating heart. While the other two resources I’ve listed can be used for studying and getting down the basics, this site provides a hub that contains articles, forums, and other helpful material for new and experienced users. The Powershell community is young, but growing rapidly. The best part is that the community has plenty of helpful folks willing to lend a hand.

Allen White(@sqlrnr)

Allen is a long standing member of the SQL community and has been a Microsoft MVP for many years. While he’s busy with his new job at SQL Sentry, his many blog posts on SQLBlog.com will still provide great code and patterns to DBAs looking to use Powershell. I’ve learned so much from Allen’s work that ‘thank you’ isn’t enough, but I try.

The great thing about Allen’s posts is that they are clear and understandable. The problem with Powershell is, much like other languages, scripts can easily spin out of control and become so convoluted that the purpose of them can be lost. Allen’s code is broken down so that you can understand and analyze each piece, taking away the valuable information and not getting drowned in if/else statements and SMO methods.

Ed Wilson(@ScriptingGuys)

If you’ve done any internet searches on Powershell, you have come across the Scripting Guys blog at some point. This fountain of information is a necessary stop on the World Wide Web for all Powershell enthusiasts. Ed often will provide nice little code snippets that we can learn from and build upon. Add into that the constant flow of other notable Powershell folks as guest bloggers, and you will learn numerous tips and tricks you can incorporate into your own code.  Ed’s conversational writing style makes the material less intimidating and the way he breaks posts up between tips and full discussions makes it easy to digest.

Microsoft Virtual Academy

We all learn in different ways, whether it is getting our hands dirty, studying books so we can digest information at our own pace, or listening to a lecture on the topic and watching an expert provide step-by-step examples. Most of us probably mix all three of these methods in one way or another. For those who prefer webinars and lectures, Microsoft’s Virtual Academy has many free videos for you that can walk you through many different topics within Powershell.

Sounds great, right? What’s even better is these sessions are given by none other than Jeffrey Snover(@jsnover) and Jason Helmick(@theJasonHelmick). Jeffrey, of course, is the father of Powershell and Technical Fellow at Microsoft. Jason is the CFO of Powershell.org and one of the original community members of the Powershell movement. Through the MVA courses, you are getting free training from two of the biggest names in and around Powershell.

Let me say that again so it sinks in: Through the MVA courses, you are getting free training from two of the biggest names in and around Powershell. (Hint:free)

The Tip of the Iceberg

This is by no means an exhaustive list of Powershell resources available to you. Instead, it is an answer to the question I hear after almost every presentation I give: Where do I start? There’s a lot to learn with Powershell and, like any other technical subject, you will be continuously improving your game. I just want to get you started in much the way I started.

Good luck!

Reporting on SQL Agent Jobs with #Powershell

SQL Agent jobs are a fundamental tool for managing our databases. Whether we are running regular backups, executing maintenance tasks, or performing a scheduled ETL process, being able to manage and run scheduled tasks is key to keeping our workload manageable. Of course, as our environment grows, keeping track of these jobs becomes harder and harder.

We can manage this growth by leveraging facets of Powershell. One aspect I continually advocate is Powershell’s ability to execute tasks easily across multiple servers. This means that our tools can easily adapt to the our growth. Additionally, since Powershell is a framework that supports different approaches, administrators can use a method most comfortable to them to accomplish their work.

Let’s take the case of reporting on failed jobs. Job failures usually mean that an administrator needs to troubleshoot an error, resolve it, and run the job again. Now, some jobs are critical and require immediate attention to fix. For this, the Agent provides error alerts and reporting that can execute at the time of failure. However, if it’s not as critical and can wait for someone to review it, we can build a reporting process that can be reviewed. I’d like to cover three techniques we can use in Powershell to accomplish this reporting and how you can leverage them yourself.

T-SQL and Powershell

The first technique is to simply combine a T-SQL query with some Powershell to execute across multiple instances and collect the results. Let’s start with the SQL query (borrowed from SQLMatters.com):

;WITH CTE_MostRecentJobRun AS
(
-- For each job get the most recent run (this will be the one where Rnk=1)
  SELECT job_id
    ,run_status
    ,run_date
    ,run_time
    ,RANK() OVER (PARTITION BY job_id ORDER BY run_date DESC,run_time DESC) AS Rnk
  FROM sysjobhistory
  WHERE step_id=0
)
SELECT
  @@SERVERNAME as Instance
  ,name AS [JobName]
  ,CONVERT(VARCHAR,DATEADD(S,(run_time/10000)*60*60 /* hours */
     +((run_time - (run_time/10000) * 10000)/100) * 60 /* mins */
     +(run_time - (run_time/100) * 100) /* secs */
  ,CONVERT(DATETIME,RTRIM(run_date),113)),100) AS [TimeRun]
FROM CTE_MostRecentJobRun MRJR
  JOIN sysjobs SJ ON MRJR.job_id=sj.job_id
WHERE Rnk=1
  AND run_status=0
  AND [enabled] = 1
ORDER BY name

Running this within SQL Server Management Studio is easy enough and the query is exactly what we would expect. We want to run this against multiple servers. Now with a few lines of Powershell, we can create a report across all of our instances:

#I've already put the query into the $sql string variable.
#Not displayed here to save space
$servers = @('PICARD','RIKER','SPOCK','KIRK')
$servers | ForEach-Object {Invoke-Sqlcmd -ServerInstance $_ -Database msdb -Query $sql}

11-14-2015 11-47-36 AM

Pretty simple and it is flexible enough that all we have to do is add servers to our named list and we’re off to the races. If you want to make it even more dynamic, you could always leverage Central Management Server to populate your server list.

The SMO

This is effective, but I struggle a little with the SQL query. It’s good, but suffers from the structure of the jobs tables in MSDB. We have to account for that and it makes the SQL query a little convoluted. It would be helpful if we could reference a simple data set like the Job Activity Monitor in SSMS.

Of course, this is a leading question on my part. There is a way to do this and it is by leveraging the SQL Server Management Objects (SMO). This .Net library is the API interface for working with SQL Server and is what SSMS is built on. Because it is a .Net library, we can also access it through Powershell.

What we want from the SMO are the Smo.Agent.JobServer and Smo.Agent.Job classes. These represent the SQL Server Agent jobs and allow us to interact with everything within it. Using this and some handy Select-Object calls, we can accomplish what we want without the long T-SQL query:

[System.Reflection.Assembly]::LoadWithPartialName('Microsoft.SqlServer.Smo') | Out-Null

$servers = @('PICARD','RIKER','SPOCK','KIRK')
$servers | ForEach-Object {(New-Object Microsoft.SqlServer.Management.Smo.Server $_).JobServer.Jobs |
    Where-Object {$_.LastRunOutcome -ne 'Succeeded'} |
    Select-Object @{Name='Server';Expression={$_.Parent.Name}},Name,LastRunDate
}

11-14-2015 12-19-32 PM

We’ve accomplished the same task, but now without the complicated SQL query. Granted, this method is predicated on understanding the SMO object model, but this can be figured out using Get-Member and the MSDN pages that describe the methods and properties. Because everything in Powershell is an object, we can do so much more with the information contained within.

The Provider

The third method is actually the same as using the SMO. The SQL Server provider is an additional layer of abstraction that lets us browse SQL Server components as if they were a file system. It uses the SMO to do its work, so it will be handled in a similar way and give us the same results as the pure SMO. However, we can skip some of the .Net instantiation techniques in favor of a simple directory lookup:

$servers = @('PICARD','RIKER','SPOCK','KIRK')
$servers | ForEach-Object {Get-ChildItem "SQLSERVER:\SQL\$_\DEFAULT\JobServer\Jobs\" |
    Where-Object {$_.LastRunOutcome -ne 'Succeeded'} |
    Select-Object @{Name='Server';Expression={$_.Parent.Name}},Name,LastRunDate
}

The output is exactly the same as the SMO, which makes sense because this method works in the same manner. However, because all the necessary libraries and objects are loaded when we load the provider (Import-Module SQLPS), we can skip the object instantiation. It removes another layer of complexity.

Wrapping Up

These three methods all give you the same amount of information, it’s up to you to decide which approach works best for your environment. For DBAs who want to work mostly with T-SQL and are still getting used to Powershell, the first option makes a lot of sense. For system administrators who have had SQL Server thrust upon them, the third option might work better as it doesn’t require any T-SQL knowledge. It’s all a matter of what is comfortable. However you want to work with your data, Powershell gives you the tools to get the information in a way that makes sense for you.

#TSQL2SDAY: You’re Gonna Cluster that GUID

370801205_efe0fa8d7d_zWelcome to the continuing blog party that is T-SQL Tuesday. This month’s host is Mickey Stuewe (@SQLMickey) with a challenge to blog about data modelling mistakes we’ve seen. Unfortunately, it’s an easy topic to blog about because proper data modelling often falls by the wayside in order to rapidly deliver applications. I’m not saying it should, but the fact of the matter is many developers are so focused on delivering functionality that they do not think about the long term implications of their design decisions.

One such mistake is the selection of Globally Unique Identifiers (GUIDs) for a data type. Developers love this data type for a lot of reasons, some of them very good. The fact that GUIDs are globally unique provides a way to keep data unique when migrating along with a nicely obfuscated surrogate key that can help protect user data. All in all, I can not really blame people for wanting to use this data type, but the problem is that SQL Server does not manage that data type very well behind the scenes.

The problems with GUIDs in SQL Server are fairly well documented. As a quick review for context, the issue is that since GUIDs are random values, it is hard to efficiently index them and these will rapidly fragment. This means slower inserts and more disk space taken up by the index. I created the following two tables (one with a GUID, one with an INT) and inserted 2000 rows into each:

create table GUIDTest(
    orgid uniqueidentifier default NEWID()
    ,orgname varchar(20)
    ,CONSTRAINT pk_GUIDTest PRIMARY KEY CLUSTERED (orgid));

create table NonGUIDTest(
    orgid int default NEXT VALUE FOR NonGuidSeq
    ,orgname varchar(20)
    ,CONSTRAINT pk_NonGUIDTest PRIMARY KEY CLUSTERED (orgid));

The results from sys.dm_db_index_physical stats tell the story from a fragmentation and size perspective:

11-7-2015 11-37-41 AM

So GUIDs are bad. With as much as has been written on this topic, it feels a bit like shooting fish in a barrell. However, GUIDs will find their way into databases because of their usefulness to the application layer. What I want to talk about is a common misconception around “solving” the GUID problem: clustering on a sequence ID but keeping the GUID in the table.

Let’s start by creating a new table to have a GUID and cluster on a sequence:

create table SeqGUIDTest(
    seqid int default NEXT VALUE FOR GuidSeq
    ,orgid uniqueidentifier default NEWID()
    ,orgname varchar(20)
    ,CONSTRAINT pk_SeqGUIDTest PRIMARY KEY CLUSTERED (seqid));

11-7-2015 11-48-28 AMAs expected, less fragmentation and size. This is good, right? It can be, but here’s the problem: the sequence is completely meaningless to our data and our queries will likely not use it (unless we build in additional surrogate abstraction to relate sequence to our GUID). Let’s compare query plans for our GUIDTest and SeqGuidTest tables where we query each for a specific orgid value:

11-7-2015 11-54-20 AM

The query where the GUID is a clustered index is far more efficient than the one against the table where we cluster on a sequence. This is because it can leverage the index, meaning we will get a seek instead of a scan. While clustering on a sequence field saves us on space and fragmentation, it ends up hurting us when trying to do data retrieval.

If we were tuning the query against SeqGuidTest, the next logical step for tuning would be to create a non-clustered index on orgid. This would improve the query, but in order to make it useful (and avoid key lookups), we would need to include all the columns of the table. With that, we have completely negated any benefit we got from clustering on a sequence column, because the situation is now:

  • A clustered index that is the table, thus using all that disk space.
  • A non-clustered index that also uses as much space as the table (it has all the columns in it as well).
  • The non-clustered index now has the same fragmentation problem we were trying to avoid on the clustered index.

So while trying to avoid a problem, we have made the problem worse.

There are two lessons here.  The first is the classic “it depends” case. There are no hard and fast rules to how we implement our databases. You need to be flexible in creating your design and understand the complete impact of your choices. Clustering on a GUID is not great, but in the above case it is far better than the alternative.

The second lesson is to understand your data and how it is going to be used. When we build tables and indexes, we need to be conscious of how our data will be queried and design appropriately. If we use abstractions like surrogate keys, then we need to make sure the design is built around that abstraction. In the above examples, we could cluster on a sequence key, but only if that sequence key has some sort of meaning in our larger database design. Building a better database is about understanding our relationships and appropriately modeling around them.

Thanks to Mickey for the great T-SQL Tuesday topic! Please check her blog for other great posts throughout the day.