There was a request over the Twitterverse for me to blog a little more on my experiences with VirtualBox, which I use for creating lab SQL Server boxes for demos and play around on. I figured I’d start with some tips and tricks on how I’ve configured networking for my virtual machines.
A brief word about my setup: I configure my environment so my virtual machines work like servers and I connect to them as if they were a remote computer. More or less how you should do it in your workplace, except that I have no domain controller. The biggest drawback so far is that I can’t do Windows authentication and I have to log into these SQL instances with a SQL login, but otherwise the setup works just dandy.
I’m going to retract some things I said in my previous Virtual Box post (almost a year ago, yeesh!). I had said that I thought bridged networking was the way to go. This would work fine in a controlled environment, but when I’m working on my laptop I like to keep my guests contained, so I go with a slightly different setup. First off, let’s review:
These are our Networking options in Virtual Box. If you want to know all the options, check out the Virtual Box documentation (it’s really quite good). You can have up to 4 different network adapters for your virtual machine, which gives you a lot of flexibility. Before I had one adapter set to bridged networking, now I make use of two adapters (before, I only used one) to give me a better setup.
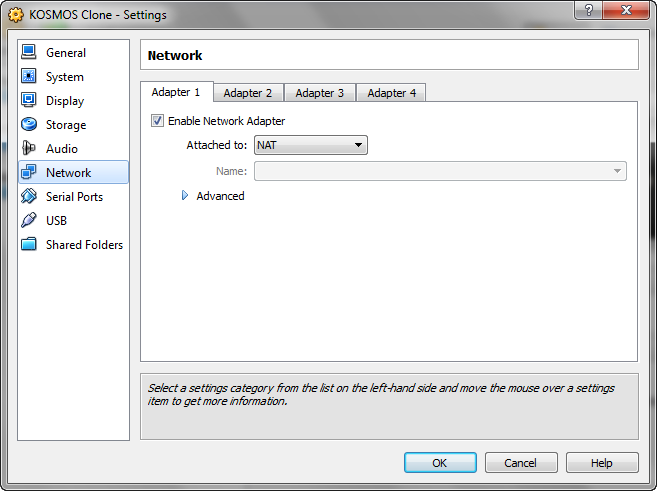
The first adapter is set simply to NAT (Natural Address Translation), which allows my virtual machine to pass through my network adapter straight to the intarwebz. This allows me to get all my updates and maintaining a level of insulation from the rest of my network. It’s easy enough to set up, simply enable the adapter and set the drop down to NAT.
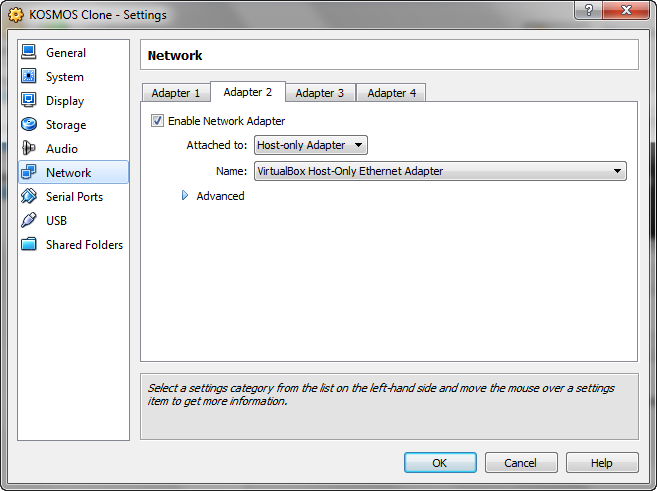
On the second tab, I set up a mini-network for my host computer and any other VMs I have on my host. To do this, I’ll enable the adapter and select “Host-Only Adapter”. VirtualBox has some special drivers that are installed to your host that allow for this communication. This allows me to allow for machine to machine communication without these machines interfering with my actual network.
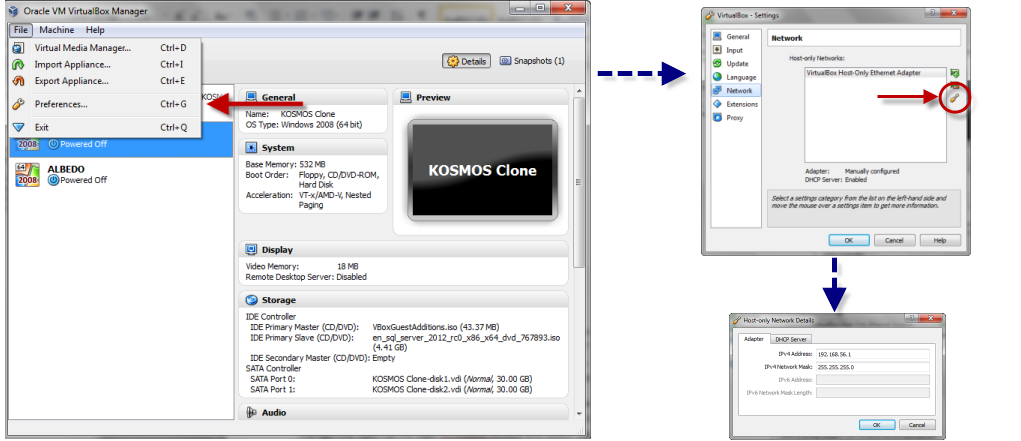
If you’re familiar with networking, you know that you have to have something managing the IP addresses and communication protocols. This is configured and handled by VirtualBox itself. To manage this, open up the main VirtualBox console and select “File->Preferences”. Within that preferences dialog, then select network. You’ll then see a configuration screen with a listing for the VirtualBox Host-Only Ethernet Adapter. You’ll also see a little screwdriver on the right which will allow you to edit your Ethernet settings.
Within these settings, you have a couple options for your Host Only network. On the first tab is your IP address and Subnet for your host machine. This is NOT the same as the IP Address for the rest of your network, this is only how your machine is visible to the mini-network you’re setting up for your VMs. On the second tab, you have DHCP server settings for your network. Basically, you are setting up your host machine to be the DHCP controller for your mini-network.
Now, 99% of the time you will not need to change any of the settings. I use the defaults and they work perfectly fine, but knowing where these settings are gives you some options. The biggest thing you’ll see here is the IP set your network will be based on (default 192.168.56.x), so when you start trying to communicate between machines, knowing what those IPs are will make them easier to fine.
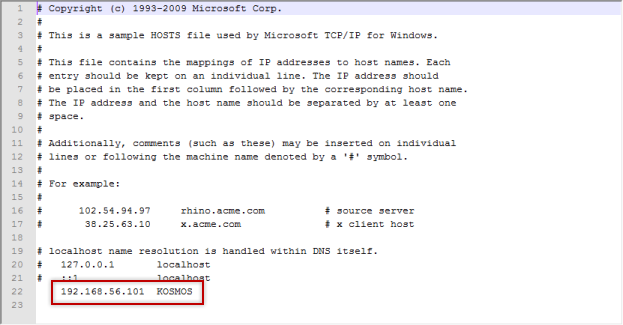
Now, what’s missing from this is some sort of DNS server so that you can reference your VMs by name. Unfortunately, to manage this, you need to go old school here and update your HOSTS file. You can find your HOSTS file buried in the Windows system directory, but once you’ve found it, it’s very simple to edit. In Windows 7, you can find it under C:\Windows\System32\drivers\etc and to view the contents, just open it up in Notepad (or be like me and use Notepad++) as Administrator.
WARNING: This is a SYSTEM file, take care in editing it and make a backup! 
Once you have file open, add a line with your guest machine’s IP and the name you will reference it by. As you can see, I have an entry in mine for KOSMOS at IP 192.168.56.101. The gotcha here is if you’re using DHCP, your guests might grab a different IP than what you have in your HOSTS file, so what I’ll typically do after I get my guest up and running is take the IP the machine grabs from DHCP and make it static.
So after all of this, I can fire up my VM hosting my SQL instance, and call the instance by name on my host. It may seem like a lot of work, but it’s not so bad for me once I get in the habit and makes my life much easier when working with my VMs.


 I’m tweeting!
Mike, great post. Can you talk more about why using two network interfaces(one NAT one host only) is better than creating a single bridged interface? it seems to me that this carries some additional configuration and complexity.
Does this still advice still hold true if you only anticipate having a single Virtual box machine?
Thanks
The reason for using the NAT+Host only is a matter of insulation for your VMs. If we use the setup I describe here, the only things the VM(s) can see is the host, the internet, and each other. So if you’re on a network that is shared with other machines (such as a corporate network or a public wireless), you are isolating your VM lab from everything else. If you create bridged connections, the VM is treated as an equal in the network, so just as all other machines can see the host, all other machines can also see your VMs. The option you choose is entirely dependent on how you want your VMs to interact with the rest of your network.
This applies regardless of the number of VMs you intend to use. Even if you only have one, if you don’t want that interacting with the rest of your network then I’d use the settings described above. Heck, if you don’t want the VM client interacting with anything at all except the internet, simply use NAT only. It all relies on your plan to use your VMs.
Ok, Thanks for the clarification.
[…] VirtualBox Networking […]
Thanks! this was exactly what I needed!
Great article.