Art of the DBA Rotating Header Image

SQL Server

A Month of SQLPS: The Provider

Next up in my series on the SQLPS module is to talk about the fundamentals of the provider. This is the core of the SQL Server module, providing an extension to the shell for managing and working with SQL Server. Providers intended togive administrators a file system-like interface for a part of the Windows ecosystem, allowing for a more intuitive way for managing parts of their environment.  

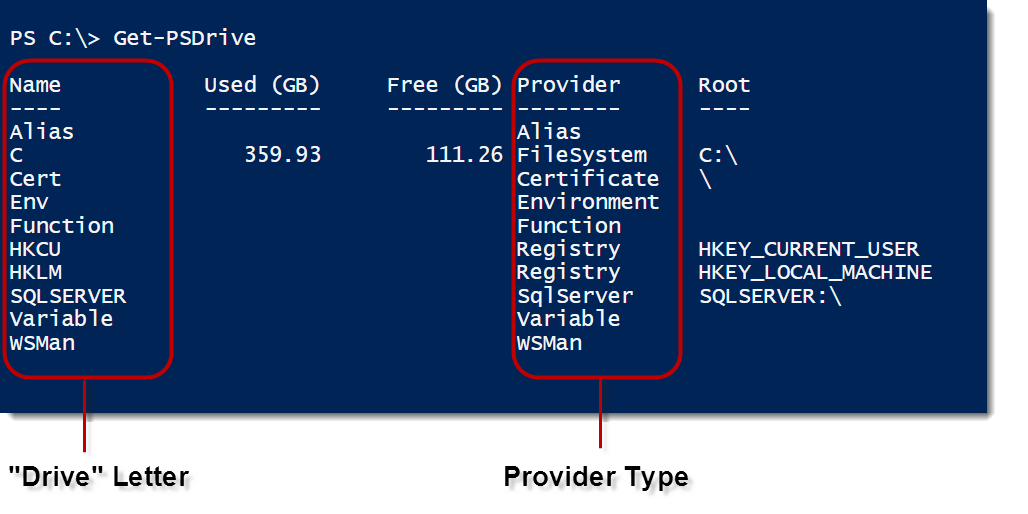
To list all your providers, just use Get-PSDrive:

GET-PSDrive

SQLPS-2-1

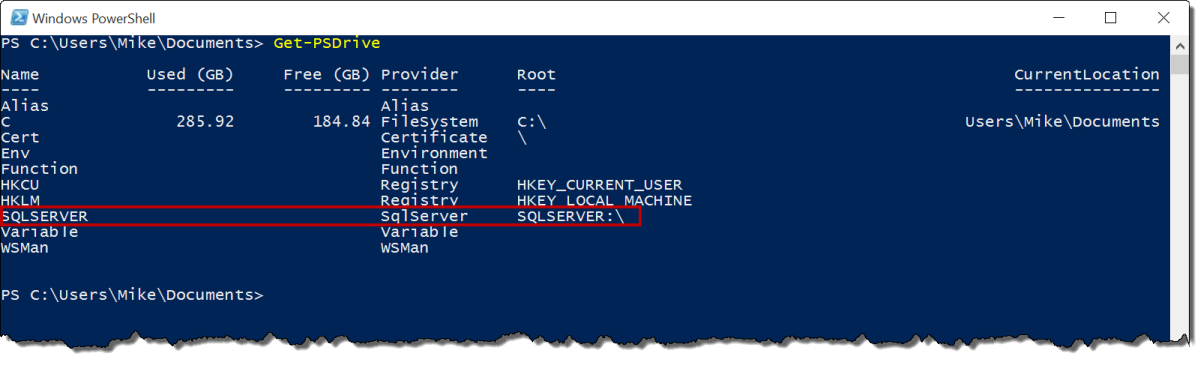
We have several different types of providers, including FileSystem, Environment, and Registry. SqlServer is  listed once you’ve imported the module. Once loaded, we can treat the SQL Server components as a file system, with many of the usual commands. Let’s switch to that drive and see what we have available to us:
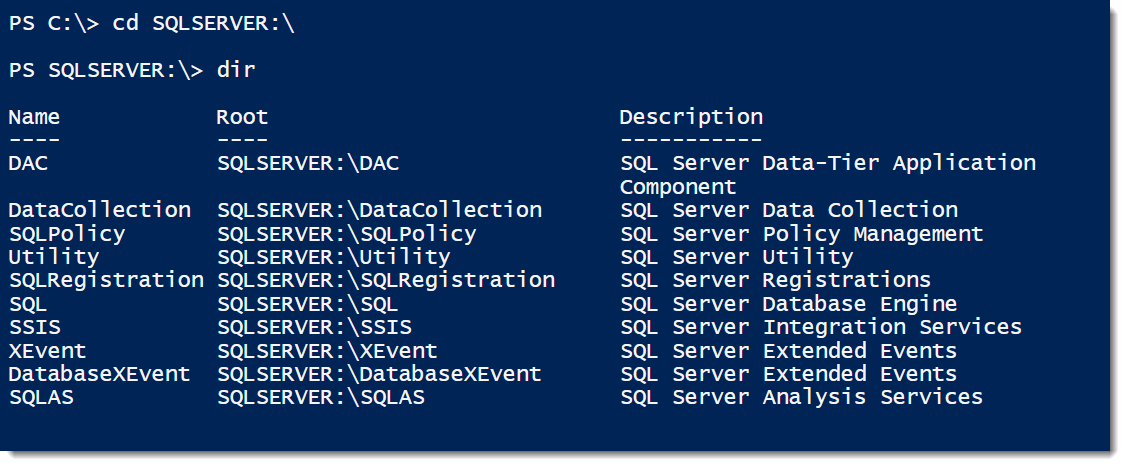
CD SQLSERVER:\
dir

SQLPS-2-2

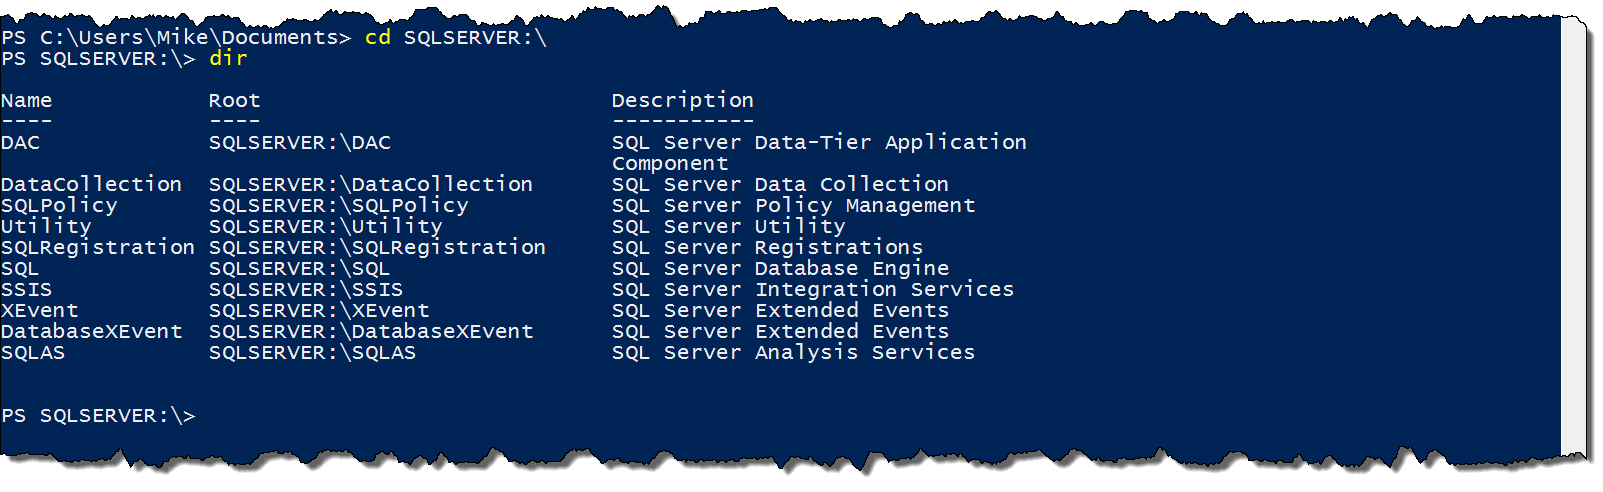
Right away we can see many familiar components. Each of these folders is a different part of the SQL Server stack where we can access and manage our environment. We’ll go ahead and browse into the SQL Engine to see what’s there:

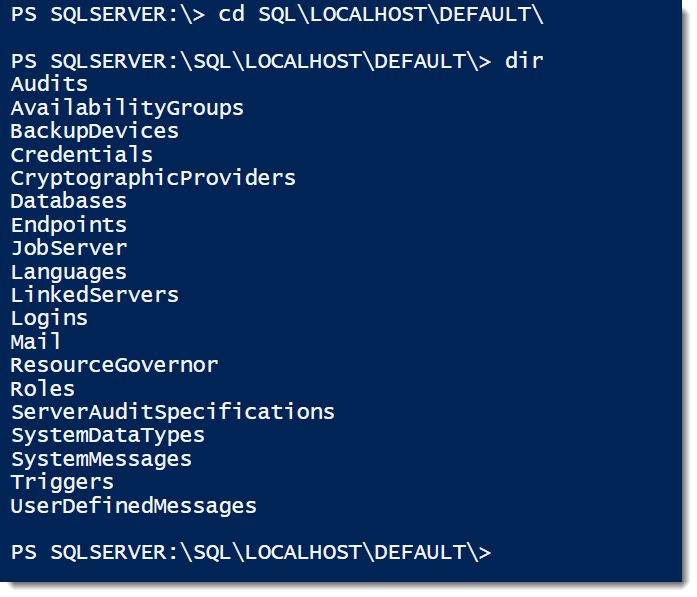
CD SQL
dir

CD SHION
dir

CD DEFAULT
dir

It’s that easy to start browsing around our SQL Servers.

Entering the ‘SQL’ folder means we will be working directly with the SQL Engine. Now, by default the provider will only list the local machine under the SQL folder, but we can access any SQL host from here. Just change your location to that machine name. Note, it’s the machine, not the SQL Server instance.

Once you’re in the target machine, the provider will list all instances on that server. Most of the time you’ll probably see DEFAULT, but if you’re using named instances, then those names will be listed. Next, we’ll move down into the instance itself to get all the components for the instance. It should look pretty familiar, since you probably see those components whenever you open up the object explorer in SSMS.

Powershell providers were written to provide an intuitive interface so that administrators wouldn’t get bogged down in trying to get to different parts of their environment, so it’s not surprising that navigating SQL Servers is easy. Take note of the this pattern:

SQLSERVER:\Folder\Machine\Instance\Components

This is the path for SQL Server components and is key to referencing objects with the SQL Server provider.

However, it’s still a little rough sailing. Since using the provider can involve remote servers, your experience will be bound by the ability to communicate with your SQL Instances. It also means that if you’re using tab complete or Intellisense in the Powershell ISE, it will likely not work with provider components because it will timeout when trying to communicate. You will need to rely more on your knowledge of your instances and some of the components than using auto-completion elements.

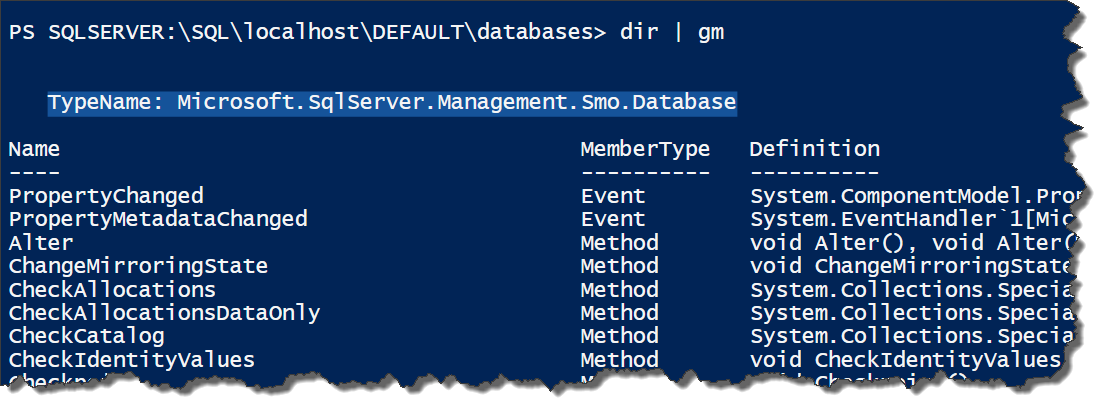
Why does this happen? It has to do with the provider’s fundamental building blocks the Server Management Objects (SMO). This is a standard .Net library and brings with it rich, consistent functionality that is used throughout the Microsoft ecosystem. In the next post, we’ll go into detail of the SMO and how it’s implemented in the provider, why this an advantage, and what considerations we need to keep in mind as we use it.

A Month of SQLPS: Getting Started

Time for me to get off the bench and start blogging again. What better way to go than to explore the oft-maligned SQL Server Powershell module, SQLPS. Over the course of the next month-ish, I want to explore the SQLPS module, the cmdlets it provides, and the functionality within the provider. We’ll look at the good and the bad within this module, seeing how we can leverage its functionality to our benefit.

Before we can start using SQLPS, we’ll need to get it installed and loaded. Installing the SQL Server Powershell tools is part of the SQL Server setup, included when you install the SQL Server components, but not separately declared. This is good and bad, because while it will always be available to you on a machine with SQL Server components (client or server), you don’t have the ability to control this.

Once installed, loading it is simple. Just open a Powershell session and use the Import-Module command:

SQLPS-1-1

Uh oh! A warning already? What’s that about? Don’t worry, a little investigation can show us what’s going on. Let’s run that same command with the -Verbose switch:

SQLPS-1-2

Using the -Verbose switch gives us a lot of additional detail and we can see what the problem is. Powershell uses a list of approved verbs, which can be listed using the Get-Verb cmdlet. However, when writing the SQLPS module, the SQL Server team included Encode-SqlName and Decode-SqlName for converting SQL Instance names to the SQLPS path syntax. Encode- and Decode- are not approved verbs, which is why we see that warning.

(Don’t worry about what path syntax is, we’ll cover that in this series.)

What does this mean? Not much, the module still gets loaded just fine. All Powershell is trying to do is warn you that you have some code that doesn’t match the language standards and could be hard for users to find. As we’re already pretty far down the path with the language, this warning probably won’t go away anytime soon. Now, you can have Powershell skip all that verb checking stuff with the -DisableNameChecking switch, but I don’t think it’s really necessary. I just accept the warning message for what it is.

Once the module loads, your Powershell session is put into the context of the SQL Server provider, SQLSERVER:\. This can be a bit of a gotcha because many file lookup patterns change once you are in the SQL Server provider. A notable example is you won’t be able to browse UNC paths until you are back in the context of a file system provider. This is why I recommend this pattern for loading the SQLPS module:

$pwd = Get-Location
Import-Module SQLPS
Set-Location $pwd

This simply captures your current working location and, once the SQLPS module is loaded, will switch you back to it.

It should be noted that the SQLPS module is only available on SQL Server 2012 or better and requires Powershell 2.0. Previous versions will require other logic to load the SQL Server snap-in. In general, I recommend always using the current client tools when possible, but this behavior could limit you if you are SQL Server 2008 R2 or earlier.

Feels a bit like a rough start, doesn’t it? This initial experience is one of the biggest challenges for DBAs getting into Powershell. It’s another language and since the first experience is filled with gotchas, it’s hard to embrace. The reason I want to call these out early, though, is to help you over that first hill. Over this series of posts, I hope to show you the ins and outs so you can effectively use the SQLPS module and not get tripped up on it.

#SQLPASS 2015 Board of Director’s Elections

Apologies for the unplanned blogging hiatus, but I’m back. While I’ve got a few technical post ideas bouncing around in my head, some events over the past two weeks have arisen that I want to blog on. If you’re hoping for more Powershell posts, do not despair! They will be along shortly.

Recently PASS took nominations for the annual Board of Directors election. This is an opportunity for members of the community to step up and volunteer their efforts on a global level to help shape and guide PASS, as well as act as a conduit for the community’s voice. Every year has a solid slate of candidates and this year is no different. In no particular order, they are:

As a community, we’ve got some tough decisions, as all four candidates are outstanding members of our #SQLFamily. Thanks to all of them for devoting so much time and effort to make our organization better. No matter the outcome of this election, the PASS community will be well served.

With all this being said, I wanted to share a little more with you about the new candidates and voice my support for them in this election. This is not to tell you how to vote, but to provide you some insight to who these gentlemen are so you can make a better informed decision. To be honest, I’m going to have a tough time myself.

Ryan_400x400Ryan

Ryan Adams is a PASS member I’ve known for a couple years now and very few people can compete with his passion and drive for building the community. Ryan is the President of the Performance PASS virtual chapter, helping guide and build that outlet into one of the stronger virtual resources out there. This is in addition to being a board member for the North Texas SQL Server Users Group, one of the largest PASS chapters out there. Add to this the fact that Ryan is an active community speaker, sharing his knowledge and passion at numerous PASS events. This makes it no surprise that he’s an active Microsoft MVP, as he’s an excellent community voice for SQL Server and the people who support it.

But that’s all out there on the Googles for you to find. You probably want to know what sets Ryan apart. I can tell you that there are very few people as driven and energetic about PASS as Ryan is. I’ve had several conversations with him and his passion is infectious. Combine this with his grassroots organizational experience and it is no surprise that he has thrown his name into the hat. Ryan is someone who not only knows what needs to be done, but also how to make it happen.

ArgenisFernandez250sqArgenis

Full disclosure before I get started: Argenis Fernandez is a close friend that I’ve known for several years. He’s had a tremendous impact on both my professional career and community participation. This shouldn’t discount any of want I would say about him and, hopefully, only strengthens these views.

I think most people have probably heard of Argenis at this point. He’s a Microsoft Certified Master and MVP. For a long time he’s been one of the strongest technical voices in the community. What sets Argenis apart is that he has a fantastic ability to connect with others. Anyone who has talked with Argenis knows that he genuinely cares about the success of those around him. He constantly mentors other and builds up those he talks with. In sports terms, he’s that super start that makes his team mates better.

My personal story relating to this is from two years ago, as I was just getting started with my speaking career. Argenis was in Denver on a consulting engagement and we were going to dinner. The conversation meandered, but at one point I mused about possibly taking the Microsoft certifications. Argenis simply looked at me and said “Dude, just take them. You can pass them.” As with most mentors, he didn’t just nudge or suggest, he outright shoved me. A year later, I had all five certs to get the MCSE Data Platform. I could tell you at least 10 other stories like this where Argenis motivated someone (not just myself).

The Election

This upcoming election, as I said, will be tough. While I spoke specifically about Ryan and Argenis, Tim and Jen have both demonstrated their commitment to PASS. Hopefully I have been able to fill in some gaps about why the new candidates should also receive your consideration.

What’s most important is that you vote. Last year I blogged about some issues I had with the direction PASS is going. This is your chance to influence that direction. The candidates have the opportunity to mold and shape PASS over the next several years, so these elections have tremendous impact. Over the next few weeks I’m sure you’ll get a chance to learn more about all four candidates, more than I have shared here. Take that opportunity. If you’re on Twitter, you can interact with them there and learn about the candidates yourself. And vote.

Desired SQL Configuration with #Powershell – Part 2

Last week, as part of T-SQL Tuesday 68, I introduced you to two Powershell functions for validating and setting your SQL Server configurations. While useful, they depend on some sort of configuration source, which begs the question: How do we get this source? This post covers the third function that will help you create your configuration source, using an existing server’s values and allowing you to use them directly or modify them as you see fit.

Get-SQLConfiguration

The concept of Get-SQLConfiguration is simple: Get the sys.configuration values of a SQL Server instance and export them as a hash table that can be used by the other functions. The additional criterion to consider is that Test-SQLConfiguration and Set-SQLConfiguration both use the SMO properties to do this, so our configuration source must also use these names. The result is a function that uses the SMO to perform its export:

function Get-SQLConfiguration{
param([string]$InstanceName='localhost'
  ,[string[]] $Filter
  )

$smosrv = new-object ('Microsoft.SqlServer.Management.Smo.Server') $InstanceName
$output = @()
if($Filter){
  $configs = $smosrv.Configuration | Get-Member -MemberType Properties | Where-Object {$Filter.Contains($_.Name)}
}
else{
  $configs = $smosrv.Configuration | Get-Member -MemberType Properties | Where-Object {$_.Name -ne 'Properties'}
}

foreach($config in $configs){
  $output += New-Object PSObject -Property ([Ordered]@{'Name'=$config.Name;
  'DesiredValue'=$smosrv.Configuration.$($config.Name).RunValue})
}

return $output

}

The function itself is not complex, but I did want to add one other feature to it. A simple export might be overwhelming, considering the number of configuration properties within SQL Server. Most of these will actually be left at their defaults. To aid us, I also added a Filter parameter that accepts an array of SMO configuration property names and will only export those properties.

There are a couple patterns to use this function. The simplest is to just run it for one server and use the output to check another:

$configurations=Get-SQLConfiguration -InstanceName PICARD
Test-SQLConfiguration -InstanceName RIKER -Configs $configurations

This call will essentially compare and find the differences between the two instances. If we wanted to get more specific, we could use our Filter parameter to only compare one or two configurations:

$configurations=Get-SQLConfiguration -InstanceName PICARD -Filter @('FillFactor')
Test-SQLConfiguration -InstanceName RIKER -Configs $configurations

It is also possible to store and manage these configurations by using the Get-SQLConfiguration function. Because we’re working with hash tables, we have a variety of storage options. The easiest to get started is to use the built in Export-CSV function and save our configurations as a delimited file (I like pipe, but commas will do):

Get-SQLConfiguration -InstanceName PICARD | Export-Csv -Path .\PicardConfig.cfg -NoTypeInformation

With the text file that is generated, we can go in and edit our configs, removing what we want and editing values we need to update. The result can then be stored in source control for tracking and audit purposes. We could even go as far as to load the configurations into a database table and call them from a central administrative server. There are a lot of possibilities.

The Code

While I’ve published the functions in these two blog posts, there’s an easier way to get ahold of them. These are part of my SQLConfiguration module published on GitHub, which you can download and use (along with my other SQL configuration functions). Please keep in mind this module and the code contained within should still be considered a work in progress and the functions are provided as is. The usual disclaimers apply, so be careful using it and test it thoroughly before making regular use of it. Of course, if you do find any issues, I would love to know about them so I can review and update my code.

There are many additional items that can be added to this. The largest that comes to mind is dynamic configuration values, as these functions consider your configs to be static. Items like minimum memory, maximum memory, and maximum degree of parallelism depend on the hardware configuration and there are various ways to calculate these values. There are also configurations not stored in this part of SQL Server, such as default database directories and SQL Server agent settings. These functions have plenty of room for enhancement. They’re a good start, however, to giving you additional tools to manage your environment, helping to make your SQL Server deployments more consistent and reliable.

#TSQL2SDAY 68: Desired SQL Server Configuration with #Powershell

Welcome to another month of T-SQL Tuesday, started by Adam Machanic(@adammachanic) and hosted this month by Andy Yun(@SqlBek). The topic for this month’s blog party is “Just say ‘NO’ to defaults!”, a call on what we have learned and how we manage SQL Server defaults in our environments. While you will probably find lots of posts out there on what you should or should not set your SQL Server configurations to, I wanted to share with you a post on some tools that can help you manage these configurations.

Management Overhead

Many database professionals, SQL Server or otherwise, learn very quickly that you don’t want to stick with your default settings. The database vendors usually try and set some general values that can apply to most situations, but these typically don’t last long in any enterprise. You probably have a set of configurations you change from the defaults whenever you install a new SQL Server instance.

The struggle, whether you have 5 SQL Servers or 500, is keeping these settings consistent. Sure, you can script out your changes (and should), but how do you manage the changes over time? What if someone changes a setting, how do you enforce your configurations? Or maybe someone else sets up an instance and doesn’t apply your scripts? It becomes an ugly problem to manage.

Since I’m a Powershell fan, I’m also a fan of Desired State Configuration. While the technology is still new on the scene, it’s quickly turning into an effective way to manage your server builds. When thinking about Andy’s topic and the problem of managing changes to your instance defaults, my ‘eureka’ moment was that the DSC model could easily be applied to managing these configurations. The result was three Powershell functions that provide tools you can use to control the settings in your environment.

Test-SQLConfiguration

The first function I wrote was to evaluate the configurations on an instance. To do this, I started with the assumption that I’d have a hash table of Config(name) and DesiredValue(value) pairs. Each pair would be the SMO Configuration Class property and the desired value I wanted to check. Then I would simply loop through each one and, if it did not match, I would add that to an output array. The function would then return a collection of configurations that did not match my desired state.

function Test-SQLConfiguration{
  param([string]$InstanceName='localhost'
    ,[Parameter(Mandatory=$true)][PSObject] $Configs
  )
  $smosrv = new-object ('Microsoft.SqlServer.Management.Smo.Server') $InstanceName
  $output = @()

  foreach($config in $configs){
    if($config.DesiredValue -ne $smosrv.Configuration.$($config.Name).RunValue){
      $output += New-Object PSObject -Property (@{'Configuration'=$config.Name;
                   'DesiredValue'=$config.DesiredValue;
                   'CurrentValue'=$smosrv.Configuration.$($config.Name).RunValue})
    }
  }
  return $output
}

To test this, I put together a very simple pipe-delimited file of configurations I wanted to check. These configuration names had to match the SMO property names (which aren’t difficult to acquire) and the resulting file and output looks like this:

SQLServerConfig.cfg
 Name|DesiredValue
 FillFactor|80
 MaxDegreeOfParallelism|4
 CostThresholdForParallelism|40
 XPCmdShellEnabled|0

SQLConfigure_1

This function provides a quick view of which SQL Server configurations don’t match my desired values. What’s cool is now I can then take this function and easily run it across my entire enterprise.

SQLConfigure_2
With this function, I’ve removed the burden of validating my SQL Server instance configurations. Since the output is an object, there’s many flexible options for reporting and collecting the information. Writing this to a text file is a snap or uploading it to a database table for ongoing auditing.

Set-SQLConfiguration

The next step, after we’ve checked configurations, is to correct the violations. This next function works much like Test-SQLConfiguration and takes the same two parameters as Test-SQLConfiguration. The difference is that the function will now alter the value and then reconfigure the instance to apply the change.

function Set-SQLConfiguration{
  param([string]$InstanceName='localhost'
    ,[Parameter(Mandatory=$true)][PSObject] $Configs
  )
  $smosrv = new-object ('Microsoft.SqlServer.Management.Smo.Server') $InstanceName
  $output = @()

  foreach($config in $configs){
    if($config.DesiredValue -ne $smosrv.Configuration.$($config.Name).RunValue){
        $row = New-Object PSObject -Property (@{'Configuration'=$config.Name;
               'DesiredValue'=$config.DesiredValue;
               'CurrentValue'=$smosrv.Configuration.$($config.Name).RunValue})
        $smosrv.Configuration.$($config.Name).ConfigValue = $Config.DesiredValue
        $smosrv.Configuration.Alter()
        $row | Add-Member -MemberType NoteProperty -Name 'ConfiguredValue' -Value $smosrv.Configuration.$($config.Name).RunValue
        $output += $row
        if($smosrv.Configuration.$($config.Name).IsDynamic -eq $false){$reboot=$true}
    }
  }

  if($reboot){Write-Warning 'Altered configurations contain some that are not dynamic. Instance restart is required to apply.'}

  return $output
}

SQLConfigure_3

Because the function is built to accept a hash table of configurations, we can use the same pipe-delimited file (or any delimited file) to update the instance. Note the warning with the output. Because not all configurations are dynamic, the function will alert you if a non-dynamic configuration was changed. If you change a non-dynamic configuration, you will need to restart the SQL Service to complete the change.

Wrap Up

The last challenge is building out the configurations to check against. The third function I wrote will handle that, but I felt like covering that functionality would make this blog post to long. Next week I will cover the Get-SQLConfiguration function, additional techniques for extending these functions, and then tell you where you can get the code. Please note that this code is in a work-in-progress state, so use with caution. However, this also means that if you have any suggestions, I’d love to hear them so I can turn this into a functional tool that the community can use.

Thanks again to Andy for a great T-SQL Tuesday topic. Keep your eye on his invite blog post and the #TSQL2SDAY hashtag on Twitter for other great contributions.

Checking Last Policy Based Management Execution

Contrary to popular belief, it’s not all about Powershell for me. Yeah, I do a lot with it and want to share that knowledge, but I’m still a SQL Server DBA and there are many challenges I encounter day to day where I use my other skills. Policy Based Management(PBM) is one of those areas where I need to apply this knowledge and solve problems.

A Dirty Window

My current shop makes heavy use of PBM for alerting and monitoring our environment. For more on using PBM, check out stuff by John Sterrett(@johnsterrett) or this book. It’s a very useful tool, but takes some getting used to. We have policies in place to alert on data file free space, last backups, database owners, and a host of other checks for the health and configuration of our environment. So many, in fact, that identifying what has failed can be a chore when things go wrong.

With PBM, it is very easy to know when a policy fails, but a lot more difficult to see exactly what has failed and why. Usually, the easiest way to see a failure is in SQL Server Management Studio (SSMS):

PBM_1

As you can see, this doesn’t tell us much. The next stop is the PBM history, which you can access by right clicking on the Management -> Policy Management node in SSMS and selecting ‘View History’:

PBM_2

The result opens up the SQL Server log viewer. As this is a simple example, it may not be clear to you, but the log viewer is a chore for history. If you have more than a few policies, you will have a lot of records to navigate and load, making troubleshooting extremely convoluted. When you’re a DBA looking to fix a problem, this is problematic. Fortunately, there is another way.

I Can See Clearly Now

Most of the information in SQL Server is stored in views. The SQL Server team has gone to great lengths with the Dynamic Management Objects (DMVs) to make sure most of the information displayed through the GUI is stored somewhere behind the scenes as a queryable object. With PBM, these system views are found in MSDB with the name dbo.syspolicy*. I dug in and found the following views that had the information I was looking for:

The query pattern from there is pretty typical: Show the most recent set of history records for a policy. The result is the following query:

;with last_pbm_execution as (
select
    policy_id
    ,max(history_id) as history_id
from
    msdb.dbo.syspolicy_policy_execution_history
where
    end_date > GETDATE()-1
group by
    policy_id
)
select
    p.name
    ,h.end_date
    ,case h.result when 1 then 'Success' else 'Failure' end result
    ,d.target_query_expression
    ,d.exception
    ,d.exception_message
    ,d.result_detail
from msdb.dbo.syspolicy_policies p
    join msdb.dbo.syspolicy_policy_execution_history h on (p.policy_id = h.policy_id)
    join last_pbm_execution lpe on (h.policy_id = lpe.policy_id and h.history_id = lpe.history_id)  
    left join msdb.dbo.syspolicy_policy_execution_history_details d on (h.history_id = d.history_id)
order by p.name

This query gives me a quick, easy to read report for the server of each policy and what the last result was. In the event of a failure, the target_query_expression, exception, exception_message, and result_detail columns give me the info about why the policy failed, helping me to fix it.

As DBAs we need quick answers and need to spend as little time as possible wading through logs of what went right just to get at what went wrong. This can be exacerbated when a tool doesn’t have good reporting right out of the box. Within SQL Server, we can overcome this by understanding the system views and the information stored there. That knowledge will help us get those quick answers, accelerating our troubleshooting and allowing us to make effective use of our tools.

#Powershell and SQL Server: SQLPS Challenges and Hurdles

Over the last two posts, I’ve covered what the SQLPS provider is and how you can get started with it. Now it’s time for other side of the story. If you’ve started working with the provider or done some reading on the web, various hurdles have probably popped up. These hurdles can frustrate and discourage you, so let’s discuss them before that happens.

Slower than Molasses in January

The initial complaint you’ll usually see with the provider is that it’s slow. Mind numbingly slow. So slow that it breaks tab completion in the ISE. Unfortunately, due to the way the provider was implemented using the SMO, we don’t have a lot of options

What can we do? Unfortunately, there are no magic workarounds to implement. This limitation is why you will see a lot of Powershell/SQL development either use the SMO directly or implement .Net code that avoids this completely. The challenge here is that these approaches can be too advanced for administrators who are not used to code development. My recommendation is to be patient with it. The provider is your entry point and is your starting point. As you get more comfortable with Powershell, you will find SMO and other .Net methods will perform better for you. Begin with understanding the language.

What You Least Expect

Another challenge with the provider is that sometimes it will behave in a fashion that doesn’t quite make sense. As with the speed, we’re tied to how the SQL Server team at Microsoft implemented the provider. It is, after all, an API and this means we can only use the it as it was written. What I struggle with is that there there are elements of the provider that weren’t thought all the way through and occasionally they catch me by surprise.

One example of this is an interesting piece of behavior I discovered recently with a several online colleagues (Paul Timmerman, Chris Sommer, Derik Hammer, and Johan Bijnens). Basically, we found that there was no real way to refresh a Central Management Server listing within an existing Powershell session. Once a CMS registry was populated in your provider session, you were stuck with it. If you made changes to your CMS in SSMS, you wouldn’t see those changes propagated until you opened a new Powershell session.

While frustrating, it’s not a show stopper. The challenge, however, is that there are other little land mines like this in the provider and they pop up when you least expect it. This particular issue is not really a problem because you can always save a script and re-open your host. However, it should behave a little more consistently and at least give the user the opportunity to execute a manual refresh of the cached object. I’m hoping that the SQL Server team will be able to address this in future versions of SQL Server.

The Mini-Shell

SQLPS_warts_1Speaking of things that behave not as you would expect, I want to cover the notorious mini-shell. If you have ever right clicked in Management Studio Object Explorer, you’ve probably seen a Start Powershell option.

The intent of this option is to open up a command window with the SQL provider already loaded. This shell also duplicates what SQL Server does if you ever run a Powershell script within a SQL Server Agent job step. What catches people by surprise is how it behaves. In SQL Server 2012 or prior, the host machine will load using Powershell version 1.0 or 2.0, no matter what version you have installed on the host machine. This can be annoying because modules won’t be automatically loaded and some cmdlets aren’t available to you. This was fixed in SQL 2014, so whatever version is installed on the host machine will be used.

While this can present a hurdle for developing scripts to be used in the SQL Agent, it will not block you completely. You can always double check this by starting the Powershell task in Management Studio and interrogating the $PSVersionTable system variable. Beyond that, I haven’t had much reason to use the mini-shell for any Powershell tasks and prefer to work in the ISE or the standard Powershell command window host.

A Fixer-Upper

The SQLPS provider is klunky. It suffers from a little neglect by the SQL Server team and some slapdash coding to implement it. In light of some of the Powershell tools provided for Windows Server, Exchange, and Active Directory, it’s pretty frustrating to see the SQLPS provider languish the way it has. I have some theories around that and I hope that someday I can talk with the product team to see what changes can be made.

However, it should be noted that if you’re just getting started with Powershell, the SQLPS provider is still the best place to start. If you’ve read my other posts, you know by now there has been an effort to make the provider an intuitive path for building automation around SQL Server. Don’t let the hurdles stop you,. The provider will let you get far enough on its own and help you develop patterns that you can later improve and enhance.

Please feel free to leave any comments below on your experience with the provider and other questions you may have regarding it.

#Powershell and SQL Server: Using the SQLPS Provider

In the previous post, I gave an overview of what the SQLPS provider is and how it works. Now I want to pull back the curtains a bit and demonstrate how you can navigate the provider and use it effectively for managing your SQL Server instances. For those new to Powershell, this can be an effective way to start using the language without a lot of “overhead” for learning syntax and methods.

Being Direct

Focusing on the concept that providers allow us to browse parts of the Windows stack as directory structure, let’s start by just reviewing what “directories” are available with SQLPS:

SQLPS_use_1

Right away you can see that there’s a lot of familiarity here, as we can see many components of SQL Server that we’re used to seeing. For the time being, let’s go straight into the SQL Database Engine and look around by browsing down into the SQL\LOCALHOST\DEFAULT path:

SQLPS_use_2Pay attention to the structure of the directory paths:

SQLPS_use_3

This pattern is used throughout the provider, offering a consistent structure for our objects. The next thing to notice is that the list of items under our instance is pretty standard and looks very much like what we would find under the object browser in SQL Server Management Studio. The provider is merely an abstraction for all the usual parts of SQL Server that we’re used to seeing.

Objects and Details

The most basic thing we can use the SQLPS provider for is getting lists of our SQL Server objects. Just like getting a directory listing of our files, we can list out our databases with a simple command:

SQLPS_use_4

Note the use of the -force flag. If you leave the -force flag off, the provider will only return user databases. Including this flag will display all databases, including the system databases.

What should also be noted is that there are many more fields here available to us, which we can see using Get-Member. As DBAs, a common question is when our databases were last backed up. Within the SMO, each database has the .LastBackupDate property that shows the last full backup, which we can easily include in our directory call:

SQLPS_use_5

Getting Things Done

While listing objects (and you can list logins, agent jobs, and other parts of your instance in much the same way) is effective, what else can we do? The key to the next step is recalling that objects within the provider are all SMO database objects.  All of these objects will have attendant properties and methods. We can leverage the properties to accomplish some pretty standard tasks.

One thing I tend to do with my databases is set the owner to ‘sa’. This common task is easy to do in T-SQL and I certainly don’t want to discourage that option, but it’s also an easy task to manage in Powershell by using the .SetOwner() method:

cd SQLSERVER:\SQL\LOCALHOST\DEFAULT\databases
$dbs = dir

foreach($db in $dbs){
$db.SetOwner('sa')
}

#List the directory contents again and look at the owner
dir

With these few lines, I can quickly change the owner of all my databases. How cool is that? Now, one note about permissions. Any actions you execute through the provider will use your current security context. Typically, DBAs will have enough permissions to perform these tasks, but if the account you connect to does not have rights for a task, it will fail.

And so much more

There are so many more examples of what we could use the provider for. Simply using directory lookups can provide a lot of flexibility, but there’s more we can do leveraging the methods and properties of the Provider objects. From this point, it can get very advanced and complex. Focus on the fact that SQLPS provider is a starting point, a place where can quickly get in and manage SQL Server with Powershell.

Next up is some of the warts of the SQLPS provider. A lot of folks who have been using the provider have run in to some challenges. In a lot of ways, how the SQLPS provider works is a little clumsy. This doesn’t mean you shouldn’t use it, but I do want to cover some of the frustrations so that you are aware of them and they don’t prevent you from effectively using this aspect of Powershell.

#Powershell and SQL Server: The SQLPS Provider

One of the key entry points for using Powershell and SQL Server is the SQLPS provider. If you’ve been reading my blog for any length of time, you’ve seen me make use of the provider for one task or another. It’s an incredibly useful tool and can help you manage some basic tasks in SQL Server without a lot of additional coding on your part.

The struggle that I see is there’s a lot of confusion about what the provider is and how it works. There are also challenges and gotchas around what the SQLPS provider does that frustrate both new and long time users of Powershell. I hope to provide some clarity over the next few posts as I review the basics of the SQLPS provider, how I’ve used it, and how to work around some of these challenges.

What are providers?

The idea of providers is a foundational concept in Powershell. They are fully documented over on MSDN, or directly in Powershell by using ‘Get-Help about_Providers’. Let me give you a starting point, though: the general idea is that providers extend different parts of the stack as file system paths in your shell. They give users an intuitive method to browse components like the registry, environment variables, and SQL Server as if they were directory structures.

You can start by using ‘Get-PSDrive’ from your favorite Powershell host. You’ll see something like this:

SQLPS_Intro_1

Note that I’ve called out the important bits here. You can consider the Name column the drive letter for each provider. The different types of providers are listed on the right. Understand that the drives we are used to seeing (C:\, E:\, etc.) are FileSystem providers and essentially equivalent to other providers, like environment variables. The trick is that the behavior of each provider is different once you start working within them, but accessing them works the same.

Using Providers

To use a different provider is just a matter of running some familiar commands. You can switch to a different provider by using “cd” and see what’s in the provider by using “dir” (which are aliases for Set-Location and Get-ChildItem). All pretty easy, right? Try this, for example:

cd Env:\
dir
Get-Content PATH

Already you can see how handy this is, as it gives us a much easier way to view the PATH variable than that tiny little GUI box under Environment Variables.

Let’s talk specifically about the provider for SQL Server. The provider is not part of Powershell by default and you have to load it. Doing this is straightforward, you just need to import the SQLPS module that is installed whenever you installed the SQL Server 2012+ client tools.

Import-Module SQLPS
#If you want to see what’s in the module, use this...
Get-Command -Module SQLPS

When you execute this command, you’ll get a warning about cmdlet names. You can safely ignore this, the provider has loaded and I’ll cover this message in a later post. A gotcha here is that if your client tools are previous to SQL 2012, you’ll need to load a snap-in. This is an obsolete method, so I strongly recommend you upgrade your client tools to SQL 2012 or better.

The Provider Foundation

Before we get into actually using the provider, we should review what makes the provider tick. Remember that everything in Powershell is a .Net object. Everything. With this in mind, we can look at the building blocks that create the SQL Server provider by using the trusty Get-Member cmdlet:

cd SQLSERVER:\SQL\localhost\DEFAULT\databases
dir | Get-Member

Don’t focus on the directory we are drilling into, we’ll cover that in the next post. You are going to get a sizeable output, but you should focus on the first part:

SQLPS_Intro_2

Notice that the typename is a Microsoft.SqlServer.Management.Smo.Database object. This shows us that the SQLPS provider is built on that long standing SQL Server Management Objects .Net library.

I call this out because if you browse the interwebz for examples of using Powershell and SQL Server, you’ll see a mix of code. Some folks will use the provider structure, others will instantiate .Net SMO objects. What you should understand is that these approaches use the same fundamental building blocks. The difference is that if you use the provider, you have some additional abstractions that SQLPS provides you (which means less code), whereas creating the SMO objects forgo them (translating to more code, but more control).

Moving Along

Providers give you a lot of flexibility within your shell experience. The intuitive nature of them allow for an easy entry into using Powershell, whether you have a coding background or not. This folds quite well into the initial intent of Powershell, which is to provide a useful scripting experience for administrators who do not have development experience.
In my next post, I will cover specifics for using the SQL Server Powershell provider. We will review the fundamentals and how these can be leveraged for common administrative tasks. If you have specific questions about the provider and how it can be used, I encourage you to leave these questions in the comments section so that I can answer them in a later post. If you prefer, you can also email your questions to ‘mike at this blog domain’.

#TSQL2SDAY 65 – TIL Edition: Whaddya mean there’s no endpoint?

This month’s T-SQL Tuesday is from Doc Mike Donnely(@SQLMD) with a simple premise: show us something you learned. Considering that working in the information technology field means we are always learning (or at least should be), blogging on this should be a snap. It’s a great fit for the #SQLNewBlogger challenge if you’re in on it, or just a nice reason to write if you’re not.

My tidbit is somewhat Powershell related, but touches on general setup of Availability Groups. If you read my early short series on automating SQL Server builds, I show you how you can build an Availability Group using Powershell. When I was testing it, the process works just fine for building the Availability Group, but I ran into problems when adding databases. When I went through the troubleshooting, I discovered that while you specify an endpoint in the Powershell cmdlet call, that cmdlet doesn’t actually create said endpoint. It just records the endpoint as part of the config.

This should not really come as a surprise. If you ever use the wizard in SQL Server Management Studio to create an Availability Group, it will script out commands to create the proper endpoint. I assumed that the Powershell cmdlet would work similar to the wizard, but it does not. This means I will have to add a step in my process to actually create the endpoint.

There are two ways to do this. The first is to simply use T-SQL in my script and pass it to either Invoke-SqlCmd or sqlcmd:

$endpointsql = @"
CREATE ENDPOINT [HADR_endpoint]
STATE=STARTED
AS TCP (LISTENER_PORT = 5022, LISTENER_IP = ALL)
FOR DATA_MIRRORING (ROLE = ALL, AUTHENTICATION = WINDOWS NEGOTIATE
, ENCRYPTION = REQUIRED ALGORITHM AES);
"@

Invoke-SqlCmd -ServerInstance 'NODE1' -Database 'master' -Query $endpointsql

The second option is to use the SMO to create an endpoint:

[System.Reflection.Assembly]::LoadWithPartialName("Microsoft.SqlServer.SMO") | Out-Null
$smonode = New-Object Microsoft.SqlServer.Management.Smo.Server ‘NODE1’

#create endpoint
if($smonode.Endpoints.Name -notcontains 'HADR_endpoint'){
    $EndPoint = New-Object Microsoft.SqlServer.Management.Smo.Endpoint($smonode, 'HADR_endpoint')
    $EndPoint.EndpointType = 'DatabaseMirroring'
    $EndPoint.ProtocolType = 'Tcp'
    $EndPoint.Protocol.Tcp.ListenerPort = 5022
    $EndPoint.Payload.DatabaseMirroring.ServerMirroringRole = 'All'
    $EndPoint.Payload.DatabaseMirroring.EndpointEncryption = 'Required'
    $EndPoint.Payload.DatabaseMirroring.EndpointEncryptionAlgorithm ='Aes'
    $EndPoint.Create()
    $EndPoint.Start()
}

The choice between these options is down to personal comfort, either one would be acceptable in my eyes. I lean towards the SMO method just because I’m likely to be using the SMO objects for other operations in a script.

The lesson here is the old line about assumptions being the mother of all screwups and why you should always understand what your tools are doing. If you get stuck in to using wizards all the time, you will not see what is happening under the covers. Using a tool is fine, even necessary, but you should always make sure you understand the mechanics of those tools in case something does not work as expected.

How can you learn those mechanics? Almost every action in SSMS can be scripted out into T-SQL. This key learning tool is something I always stress to new SQL Server folks. It is the easiest way to see what SQL Server is trying to do and helps build your skills. The next time you’re trying to do something in Management Studio, study the script, and teach yourself something new.

Update:

So there’s a third option and I’m mildly annoyed at myself for missing it. As Nic Cain(@SirSQL) points out in the comments, Microsoft provides cmdlets for endpoints. In keeping with the links above, here’s your use of them:

$endpoint = New-SqlHadrEndpoint HADR_Endpoint -Port 5022 -Path SQLSERVER:\SQL\NODE1\DEFAULT
Set-SqlHadrEndpoint -InputObject $endpoint -State "Started"

A LOT simpler using the SMO and remains consistent with the rest of the script. Probably the better way to go.  Thanks Nic!