Art of the DBA Rotating Header Image

Powershell

#TSQL2sDay: #Powershell and Extended Events

I’ll be the first to tell you I’m not a fan of extended events. The why is a whole other blog post unto itself, but since T-SQL Tuesday is all about learning, I figured I’d take a stab at things. Furthermore, since I like to talk about Powershell, it seems like a good opportunity to explore a little about how we can manage extended events through that language.

The SQLPS Provider

The simplest entry point into interfacing with SQL Server is the SQLPS provider. Yes, I know there’s a lot of gripes about it (and that’s yet ANOTHER blog post I’m working on). However, it’s still a good starting point. To load up the provider is easy:

Import-Module SQLPS

Providers in Powershell are nice because we get to interact with different parts of the stack as if they were file systems. When you load up the provider, you’ll get a SQLSERVER drive that you can do a directory lookup on.

XE_PosH_1

XE_PosH_2
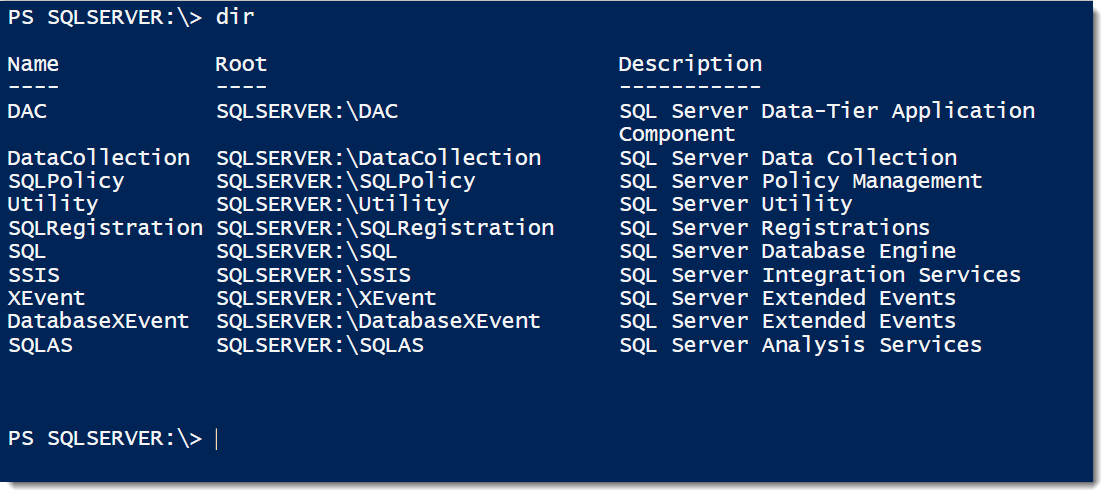
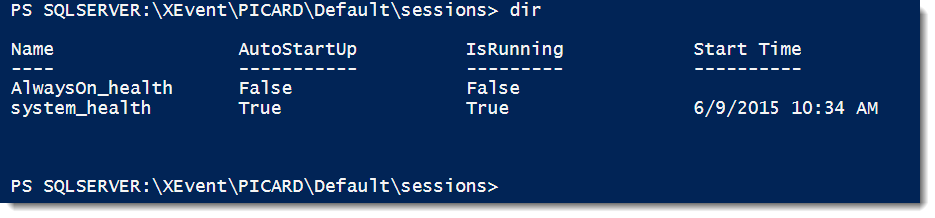
Notice how we have an XEvent folder? This is how we can start exploring our extended events. The format for the lookups is the standard format.  If we drill down, we start to see lookups that match what we see in Management Studio. Looking at SQLSERVER:\XEvent\PICARD\Default\sessions will give us a quick listing of all the sessions on that instance and if they’re running or not.

XE_PosH_3

Thinking Objectively

As we further explore this, we need to remember that everything in Powershell is an object. This specifically means that with the SQLPS provider, everything is an SMO object. By leveraging the trusted Get-Member cmdlet, we can quickly find out that we are dealing with Microsoft.SqlServer.Management.XEvent objects and the Session class. So what can we do with this?

First off, I found a bit of a gotcha when trying to assign these sessions to objects in Powershell. Normally, I’d just use Get-ChildItem on the name to populate the variable, but when I tried to do that I ended up with a string object. Not very useful. In order to get the proper assignment, I had to work around it a bit and ended up with this:

$xe = dir | Where-Object {$_.name -eq 'system_health'}
$xe |  gm

Why this is different from the usual ‘dir system_health’ is unknown, but is the result of how the SQL Server team implemented the provider (yes, another post for another time). However, now we have an object and can start leveraging some of the properties.  Here’s a couple examples of some of what you can look at:

XE_PosH_4
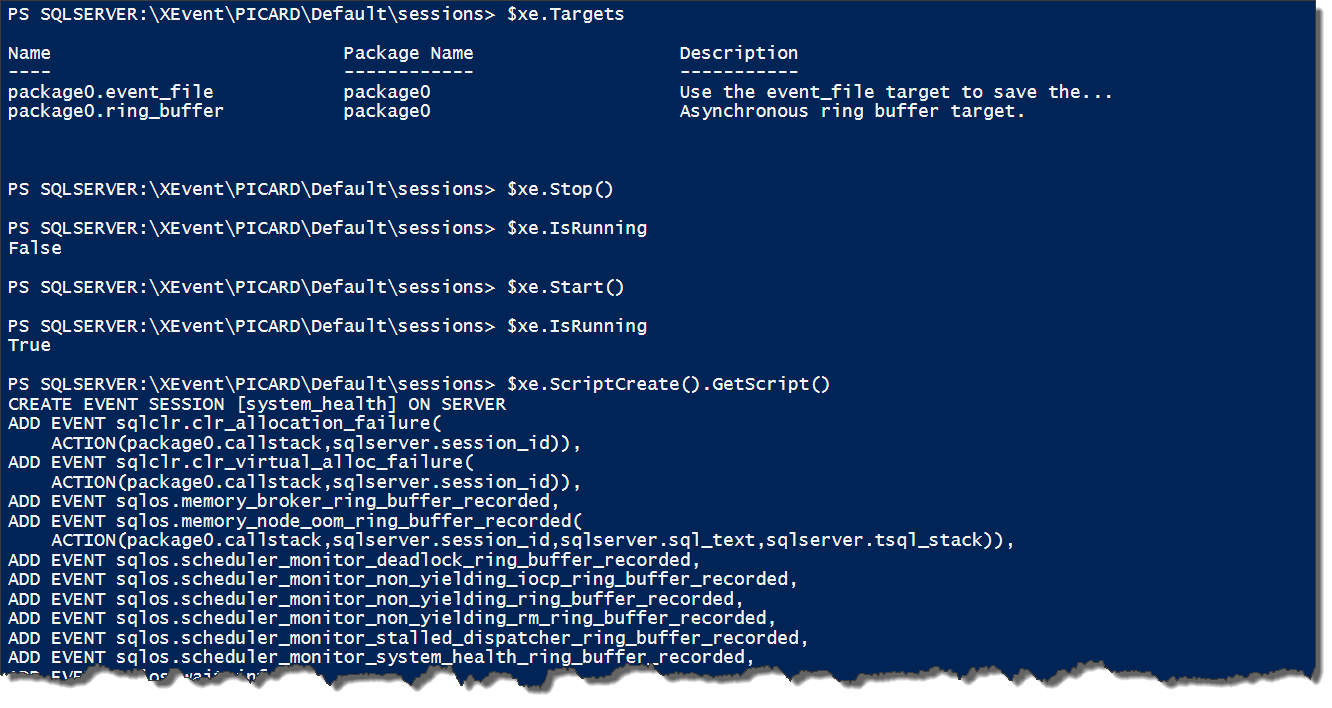
The calls I used for the above are:

$xe.Targets
$xe.Stop()
$xe.IsRunning
$xe.Start()
$xe.IsRunning
$xe.ScriptCreate().GetScript()

You’ll notice at least one funky bit of syntax here around scripting. While most SMO objects give you a .Script() method, these objects require you to first call a .ScriptCreate() (or alter or drop) method, which returns an ISfcScript script object. You then have to call that object’s .GetScript() method to actually generate your script. It’s a little bit of a long way around the horn, but you get there.

Practical Application

What can we do with this? I’ll be the first to admit that some of this is clunky, but much of that is probably my general unfamiliarity with this aspect of the provider and extended events in general. However, I can definitely start to see some specific use cases, such as:

  • Backing up existing custom sessions across my environment by scripting them out with a scheduled job.
  • Checking that all system_health sessions on my SQL Servers are running.
  • Executing a mass change to my extended events sessions using the methods.

To effectively leverage Powershell with extended events, we need to play to the language’s strengths. The focus here is on multi-server execution and scripting for consistency. This is also just a start. As you (and I) continue to explore this facet of the SQL Server provider, many other use cases and situations may show up.

Thanks out to Jes Borland(@grrl_geek) for hosting this month’s T-SQL Tuesday. Remember to watch the #tsql2sday tag for other great blog posts.

Your #Powershell Profile

Keeping with the theme of my last blog post, let’s talk a little more about Powershell basics. More specifically, let’s talk about the basics of reusing your Powershell scripts. Most DBAs have their library of scripts that they take with them from job to job, helping them be more effective at their job. Whether it’s SQL, Powershell, or some other language, experienced data professionals always make sure to retain their work for when they’ll need it again.

Enter the profile. This is actually a concept that’s been around for a long, long while in the *nix world. The concept is simple: There is a script that runs every time you start up a session in your shell, configuring your environment. Many times in *nix, this will configure system variables like PATH or HOME, but you can also use it to load custom functions and aliases within your shell.

The Microsoft team borrowed this concept when constructing the Powershell language. We have access to a profile (well, 4 of them) that help us configure and customize our own environments. Similar *nix, it’s a .ps1 script that runs every time you open a new session. This allows you a lot of flexibility for reuse of your code.

Getting Started

As linked above, there are 4 different types of profiles you can use. We won’t focus on these different profiles, but instead stay with the basic profile: the one that applies to the current user and the current host (in these examples, the ISE). To view your profile, open it up in your text editor of choice by referencing the $profile system variable:

ise $profile

If you don’t currently have a profile, you’ll probably get an error about the file not existing. To fix this, create the file:

New-Item -ItemType File -Path $profile -Force

Vioala! You now have a completely empty profile, which is what you will see when you try and open it again.

So Now What?

I can hear the internal dialog now:

“Woo hoo! A profile!”

“Ummm…yeah. That’s great. But what do we do with it?”

“…….”

“That’s what I was thinking, too.

I don’t want to leave you hanging, so let’s start making use of it. The first order of business with the profile is to use it for customizing your environment. Since I am a SQL DBA, I like  to load up the SQLPS module and the SMO objects. This means any time I’m in Powershell, I’ve got the SQL Server cmdlets and objects ready to go.

Next up, I have a function I wrote a while back for reporting on the available disk space on a server. It’s very handy and I use it almost every day. The code is not original, but I wrapped it in a function to save myself a LOT of typing. Usually, you’d package such a function in a module.  I ended putting it in my profile because it was easy. I also add to an alias to save myself even more typing.

This means I end up with a profile that looks a lot like this:

#load SMO library
[System.Reflection.Assembly]::LoadWithPartialName('Microsoft.SqlServer.SMO') | out-null

#Load SQLPS Module
Import-Module SQLPS -DisableNameChecking

#Set Aliases
New-Alias -Name gfs -Value Get-FreeSpace

function Get-FreeSpace{
<#
.SYNOPSIS
Uses WMI to get capacity and freespace for all disks/mounts on a host.

.DESCRIPTION
Uses WMI Win32_Volume to query logical disks and provide drive size and usage for all
logical disks and mountpoints.  If no parameter is given, localhost is used.  Otherwise
the host name should be passed.

Mike Fal (http://www.mikefal.net) 2012-10-10

.PARAMETER
host - Name of machine information is being queried from, defaults to localhost

.EXAMPLE
Get-FreeSpace "CCX-SQL-PRD-01"
#>

param([string] $hostname = ($env:COMPUTERNAME))
gwmi win32_volume -computername $hostname  | where {$_.drivetype -eq 3} | Sort-Object name `
| ft name,@{l="Size(GB)";e={($_.capacity/1gb).ToString("F2")}},@{l="Free Space(GB)";e={($_.freespace/1gb).ToString("F2")}},@{l="% Free";e={(($_.Freespace/$_.Capacity)*100).ToString("F2")}}

}

Now if I had just added this to my profile and wanted to load it into the current session, I’d just have to execute it, like so:

. $profile

This loads the profile, running it as if it were any other .ps1 script (because it is).

The Power of the Profile

Using this, I have a customized Powershell environment ready to go any time I start. It lets me use Powershell the way I want to, allowing me to extend my shell with my own custom code or pre-packaged modules that I need access to. I’ve talked several times before about building Powershell tools, but at some point we all need a toolbox. By leveraging the profile, you can start building your own custom Powershell toolbox that you can rely on.

Want to know more? You can learn about Powershell profiles right from the shell itself: Get-Help about_profiles. How cool is that?

Exploring #Powershell

Over the past months, I’ve devoted a lot of time to scripts and tips on using Powershell. While helpful, these articles assume a level of familiarity with Powershell that a lot of SQL Server administrators don’t have. I wanted to take some time to help out those who are looking for a place to start.

The great thing about Powershell is that the Microsoft team has put a lot of effort into building cmdlets that allow you to discover how to use the language. The term ‘cmdlets’ was invented by the Powershell team to help make the language distinct, but they’re essentially functions. Three cmdlets, in particular, will help teach you the language and discover how you can use it:

  • Get-Command
  • Get-Help
  • Get-Member

I like to refer to these cmdlets with the mildly cheesy name “The Holy Trinity of Powershell Self Discovery”.  Yes, that’s a mouthful. With such a clunky name, though, it is hard to forget about them. Because of the information they provide, not a day goes by where I use one of these cmdlets while working with Powershell.

Get-Command

The first of these three, Get-Command, is the cmdlet that lets you browse the cmdlet ‘directory’. While there are several arguments we can pass to this cmdlet, really all you should concern yourself with at the beginning is passing wildcard searches for cmdlets you might be looking for. If you keep in mind that there’s a defined list of Powershell verbs, Get-Command becomes a good way to find cmdlets.

For example, let’s say we wanted to find a cmdlets to add a Windows firewall rule. The best way to start is to simple filter all the cmdlets containing the word “firewall”:

Get-Command *firewall*

Quickly, you’ll get a list of 30 functions for manipulating different parts of the firewall. A lot easier to read that the full list of 1000+ Powershell cmdlets. But we want to filter our list down even more, so let’s improve our filter. Since we know we want a new rule, we can improve our wildcard search:

Get-Command New*firewall*rule

Our result is a single cmdlet, New-NetFirewallRule. Remember that anytime we create something in Powershell, the standard syntax will be “New-” and the noun. We add this into our wildcard search, plus the word “rule” to further filter down. Combine this all into how we use Get-Command, and we have a powerful way to search the language.

Get-Help

Once you find your cmdlet, though, how do you learn how to use it? Fortunately for us, the Powershell team took a page from the *nix world. For anyone who as worked in Unix or Linux, you’ve probably made heavy use of the ‘man’ pages. This is a built in help system to help describe shell commands. Powershell has its own system and you access it using Get-Help (conveniently aliased in Powershell as ‘man’).

Using our previous example, let’s learn about the New-NetFirewallRule cmdlet. The syntax is easy enough:

Get-Help New-NetFirewallRule

Running this will output text to the host window that describes the cmdlet. By default, we’ll see a synopsis, a description, and an outline of the parameters the cmdlet accepts. Extremely useful, but this is just scratching the surface. Get-Help will also accept additional arguments that can give you even more detail or functionality  if you want it:

  • -Examples – Examples of how the cmdlet gets used
  • -Detailed – Even more information on how the cmdlet functions
  • -Full – The entire help file for the cmdlet in question
  • -ShowWindow – Output the full help file to a separate windows
  • -Online – Open up the TechNet page for the cmdlet

But wait, there’s more! Two more awesome things about the Powershell help system are that you can find help on more than just cmdlets and it is constantly updated. Powershell contains a list of topics that you can read on to see how to use the language. These are all found with the text “about_” and you can get a listing of these using:

Get-Help about*

If you want to learn more about how to use variables, for example, you can look at the about_Variables topic and read the specifics about using Powershell variables. There are over 100 different topics in the help system for Powershell 4.0, baking your learning right into the language.

Of course, this information can change and update frequently. In order to keep pace with this rate of change, the Powershell team separated the help system from your standard Windows updates and made manageable online. This means if you ever think your help system is out of date, you only have to run the Update-Help cmdlet when connected to the internet and your local help system will get all the current information.

Get-Member

One of the strongest advantages of Powershell is that it is built on .Net. This means that everything in Powershell is a .Net object. To explore these objects and what they have to offer, you can use the Get-Member cmdlet to provide information about a cmdlet.

The use is pretty simple. Take your variable and pass it via the pipeline to Get-Member:

[string]$AString = ‘Tea. Earl Grey. Hot.’
$AString | Get-Member

What will follow is a list of the object type, methods, and properties you can leverage with that object. You get a comprehensive view of all the capabilities of the object.

If we go back a few posts, you can read how I compared sqlcmd with Invoke-SqlCmd. Get-Member was key to this comparison, because it allowed me to explore the outputs of both:

$query = ‘SELECT type,count(1) FROM sys.objects GROUP BY type;’
$cmdout = sqlcmd -Q $query
$invout = Invoke-Sqlcmd -Query $query

$cmdout | Get-Member
$invout | Get-Member

Comparing these two outputs shows us a lot about the difference between the two commands. We can see that the sqlcmd output is an array of System.Strings and Invoke-SqlCmd is a collection of System.Data.Datarow. For more on the importance of this difference, read my other blog post.  The key is to understand how you can explore and discover this difference using Get-Member.

A Compass and a Map

Understanding Powershell is a long road. There’s a lot of depth to it, providing a great deal of functionality. It can be easy to get lost in the details. While we live in the day and age of LMGTFY, it still helps to have some basic tools at our disposal to find our way through something new. Get-Command, Get-Help, and Get-Member are three cmdlets you will always have access to, helping you find your way to solving problems in Powershell.

#Powershell in Atlanta

SQL Saturday Atlanta is coming up in two weeks and I’ll be giving my Introduction to Powershell for SQL Server DBAs precon the day before the event. I’m extremely excited to offer this precon and get more SQL Server professionals exposed to Powershell. Think you might be interested? Here’s the synopsis:

Maybe you’ve only heard of Powershell. Maybe you’ve seen a little bit of Powershell code, but still don’t understand how it works. You’ve been telling yourself for months now that you need to learn it. Why wait? The time to get started with Powershell is now.

This full day session will help build your foundation for learning and using Powershell. While we will be focusing on using Powershell as a SQL Server Database Administrator (or Developer), much of the material will also review general use for system administrators. By attending this training, you will gain an understanding of what Powershell is, how you can use it in your day to day management of your environments, and what specific things can be done using Powershell in a SQL Server environment.

You can sign up on Eventbrite and use the discount code ‘Mike_Fal’ to save $15 off the registration fee.  The session will be held at the Georgia State University Alpharetta Center on May 15 from 9am to 5pm.

I hope to see you there!


Availability Groups, Agent Jobs, and #Powershell

My current gig has me working a lot with Availability Groups. I love the options they give me with their ability to failover fast and replicate my data to other servers. It is a lot of peace of mind for high availability and data protection. The price of all this comes from a much more complex system to manage and the extra considerations needed to have a properly deployed Availability Group.

One such consideration is your SQL Agent Jobs. It is pretty well documented that your server level objects must be replicated or created outside of the actual Availability Group process. It’s not difficult, but must be thought about and addressed when setting up a server. If you source control your management jobs, then it should be a simple matter of executing a script to create these jobs on a new server. There are cases, though, where either jobs get out of sync or are created outside of the source control process. When this happens, administrators need to copy these jobs to the other servers.

The common way to accomplish this is to simply script out the job in Managment Studio, then run the script on the other nodes. While effective, this is also manual and prone to error, such as forgetting a server.

By automating this process, we can ensure consistency.  You can use Powershell to leverage the SMO and the .Script() method to basically duplicate your Management Studio action.  However, by using this and incorporating it into a script, we can ensure our consistency.  The following function is a pretty basic use of this that allows you to copy a single job from a source server to any number of targets:

function Copy-SQLAgentJob{
  param([string]$Source
  ,[string[]]$Targets
  ,[string]$JobName)

#Load assemblies
[System.Reflection.Assembly]::LoadWithPartialName('Microsoft.SqlServer.SMO') | out-null

$smosource = New-Object Microsoft.SqlServer.Management.Smo.Server $Source
$JobScript = $smosource.JobServer.Jobs[$JobName].Script()

foreach($Target in $Targets){
 $smotarget = New-Object Microsoft.SqlServer.Management.Smo.Server $Target
 if($smotarget.JobServer.Jobs.Name -notcontains $JobName){
   $smotarget.Databases['msdb'].ExecuteNonQuery($JobScript)
    }
  }
}

All this function does is find the source job, script it out, and then run that job creation script against all the other targets. Simple enough. One thing to call out is I’ve specifically written this function to stay completely within the SMO. Normally, I would use Invoke-SqlCmd to execute the SQL script, but I thought it simpler to use the SMO .ExecuteNonQuery() method (which runs a SQL batch and does not expect a return).

Now let’s implement this for a hypothetical Availability Group to copy from one node to all the others:

$PrimaryNode = 'PICARD'
$nodes = (Get-ClusterNode -Cluster (Get-Cluster $PrimaryNode).Name | Where-Object {$_.Name -ne $PrimaryNode}).name
Copy-SQLAgentJob -Source $PrimaryNode -Targets $nodes -JobName 'Backup Databases - Powershell'

Of course, we could also use this in a much simpler fashion, such as deploying a new job across all of our servers. Remember the Central Management Server trick I’ve implemented in the past? We can fold that in here for an easy deployment once we’ve created the job on a single server in our environment.

$CMS=’PICARD’
$servers=@((dir "SQLSERVER:\SQLRegistration\Central Management Server Group\$CMS").Name)
$servers+=$cms

Copy-SQLAgentJob -Source $CMS -Targets $Servers -JobName 'Backup Databases - Powershell'

As always, the lesson learned here is to leverage our tools to make more our work more repeatable and consistent. While everything we have done here can be done in other methods, I prefer this because it minimizes the interaction needed to accomplish the task. The more any of us have to touch a process to get work done, the greater our risk of error. You’ve heard it before: consistency through automation, this time for SQL Agent jobs.


#TSQL2SDAY 65 – TIL Edition: Whaddya mean there’s no endpoint?

This month’s T-SQL Tuesday is from Doc Mike Donnely(@SQLMD) with a simple premise: show us something you learned. Considering that working in the information technology field means we are always learning (or at least should be), blogging on this should be a snap. It’s a great fit for the #SQLNewBlogger challenge if you’re in on it, or just a nice reason to write if you’re not.

My tidbit is somewhat Powershell related, but touches on general setup of Availability Groups. If you read my early short series on automating SQL Server builds, I show you how you can build an Availability Group using Powershell. When I was testing it, the process works just fine for building the Availability Group, but I ran into problems when adding databases. When I went through the troubleshooting, I discovered that while you specify an endpoint in the Powershell cmdlet call, that cmdlet doesn’t actually create said endpoint. It just records the endpoint as part of the config.

This should not really come as a surprise. If you ever use the wizard in SQL Server Management Studio to create an Availability Group, it will script out commands to create the proper endpoint. I assumed that the Powershell cmdlet would work similar to the wizard, but it does not. This means I will have to add a step in my process to actually create the endpoint.

There are two ways to do this. The first is to simply use T-SQL in my script and pass it to either Invoke-SqlCmd or sqlcmd:

$endpointsql = @"
CREATE ENDPOINT [HADR_endpoint]
STATE=STARTED
AS TCP (LISTENER_PORT = 5022, LISTENER_IP = ALL)
FOR DATA_MIRRORING (ROLE = ALL, AUTHENTICATION = WINDOWS NEGOTIATE
, ENCRYPTION = REQUIRED ALGORITHM AES);
"@

Invoke-SqlCmd -ServerInstance 'NODE1' -Database 'master' -Query $endpointsql

The second option is to use the SMO to create an endpoint:

[System.Reflection.Assembly]::LoadWithPartialName("Microsoft.SqlServer.SMO") | Out-Null
$smonode = New-Object Microsoft.SqlServer.Management.Smo.Server ‘NODE1’

#create endpoint
if($smonode.Endpoints.Name -notcontains 'HADR_endpoint'){
    $EndPoint = New-Object Microsoft.SqlServer.Management.Smo.Endpoint($smonode, 'HADR_endpoint')
    $EndPoint.EndpointType = 'DatabaseMirroring'
    $EndPoint.ProtocolType = 'Tcp'
    $EndPoint.Protocol.Tcp.ListenerPort = 5022
    $EndPoint.Payload.DatabaseMirroring.ServerMirroringRole = 'All'
    $EndPoint.Payload.DatabaseMirroring.EndpointEncryption = 'Required'
    $EndPoint.Payload.DatabaseMirroring.EndpointEncryptionAlgorithm ='Aes'
    $EndPoint.Create()
    $EndPoint.Start()
}

The choice between these options is down to personal comfort, either one would be acceptable in my eyes. I lean towards the SMO method just because I’m likely to be using the SMO objects for other operations in a script.

The lesson here is the old line about assumptions being the mother of all screwups and why you should always understand what your tools are doing. If you get stuck in to using wizards all the time, you will not see what is happening under the covers. Using a tool is fine, even necessary, but you should always make sure you understand the mechanics of those tools in case something does not work as expected.

How can you learn those mechanics? Almost every action in SSMS can be scripted out into T-SQL. This key learning tool is something I always stress to new SQL Server folks. It is the easiest way to see what SQL Server is trying to do and helps build your skills. The next time you’re trying to do something in Management Studio, study the script, and teach yourself something new.

Update:

So there’s a third option and I’m mildly annoyed at myself for missing it. As Nic Cain(@SirSQL) points out in the comments, Microsoft provides cmdlets for endpoints. In keeping with the links above, here’s your use of them:

$endpoint = New-SqlHadrEndpoint HADR_Endpoint -Port 5022 -Path SQLSERVER:\SQL\NODE1\DEFAULT
Set-SqlHadrEndpoint -InputObject $endpoint -State "Started"

A LOT simpler using the SMO and remains consistent with the rest of the script. Probably the better way to go.  Thanks Nic!

Effectively Using Invoke-SqlCmd

I really enjoy interacting with the SQL community on Twitter. Whether it is exchanging silly one line, sharing interesting articles and blog posts, or trying to answer a tricky problem, the conversation is always engaging. One such conversation that happened last week was a community member who was struggling with the output he wanted out of Invoke-SqlCmd. I was able to help him out, but the conversation got me thinking about how people use this cmdlet within their scripts and processes.

The focal point of the confusion is how Invoke-SqlCmd relates to sqlcmd.exe. Sqlcmd has been around since SQL 2005, replacing the antiquated osql executable. Many administrators have gotten used to the robustness of sqlcmd and how they can leverage it for their backend automation. I’ve used sqlcmd for many tasks over the years.

Then along came Powershell and Invoke-SqlCmd. This cmdlet, included with the SQL Server provider, is intended to cover a lot of the functionality that an administrator can find in sqlcmd, but now as part of Powershell. What people get hung up on is that Invoke-SqlCmd is not a direct replacement of sqlcmd and that it can’t (and shouldn’t) be used in the same way.

Thinking Differently

The challenge when thinking about sqlcmd versus Invoke-SqlCmd focuses on outputs. One of the cardinal rules of Powershell is that everything is an object. When comparing sqlcmd with Invoke-SqlCmd, this difference becomes quite stark. First, let’s look at sqlcmd’s output, capturing it into a variable and then examining the types that make up the output:

sqlcmd_out

Using the GetType() method, we can see that the collected output of sqlcmd is an array, with each element of the array being a string. What this means is that that each line of output from sqlcmd (including the header and the row count output) is a single string, with all column elements concatenated into that string. As you can imagine, this is clumsy to handle and would require a lot of ugly string parsing to separate out the elements.

Now let’s look at the same command using Invoke-Sqlcmd:

Invoke-SqlCmd_Out

Right off the bat, the output is noticeably different. Our total output object is now a DataRow, with the individual column being an Int32 type. You’ll note that there is no item count as well. This is because we have a singular object as output (which has no count or length properties). If we further investigate the output using Get-Member, we’ll find that the columns of our query are actual properties of the output object (in this case, Column1 since we didn’t name our column).

A New Perspective

This helps us because we can now start treating our outputs as data, not just a mass of text that has to be parsed. For example, let’s consider the following query:

SELECT
SERVERPROPERTY('InstanceName') as InstanceName
,SERVERPROPERTY('MachineName') as MachineName
,SERVERPROPERTY('ProductVersion') as SQLVersion
,SERVERPROPERTY('Edition') as SQLEdition
,SERVERPROPERTY('ProductLevel') as SQLReleaseLevel

If you want to make use of these values in Powershell and use sqlcmd, you would have to perform all sorts of string manipulations to separate out the values. To make it easy, we’d likely have each value a separate call to sqlcmd.exe. Using Invoke-SqlCmd changes the game, allowing you to easily access each column as a property of your output:

$sql=@"
SELECT
SERVERPROPERTY('InstanceName') as InstanceName
,SERVERPROPERTY('MachineName') as MachineName
,SERVERPROPERTY('ProductVersion') as SQLVersion
,SERVERPROPERTY('Edition') as SQLEdition,SERVERPROPERTY('ProductLevel') as SQLReleaseLevel
"@

$sqlstats = Invoke-Sqlcmd -Query $sql

cls

'Instance: ' + $sqlstats.InstanceName
'Host: ' + $sqlstats.MachineName
'Product Info: ' + $sqlstats.SQLVersion +'('+$sqlstats.SQLReleaseLevel+') - ' + $sqlstats.SQLEdition


ServerProperties

This ability to reference columns as properties gets even more powerful when we deal with larger data sets for our scripts. A common technique I use is to leverage a collection of databases to drive work I need to do. With my collection as a series of objects, each row element is easier to access and make use of for my processing. To see a detailed example of this, run the following commands and study the output of the Get-Member call:

$dbs = Invoke-Sqlcmd -Query 'select name,recovery_model_desc,page_verify_option_desc from sys.databases;'
$dbs | Get-Member

Data Driven Decisions

Invoke-SqlCmd lets you integrate your data with your scripts. When you make your outputs discrete objects, data becomes readily accessible for your automation. It allows you to move those clunky parts of your processing out of T-SQL and into Powershell, making your scripts more robust. You can use T-SQL for what T-SQL is good at, allowing Powershell to take over where appropriate.

This does not replace sqlcmd. Another key difference is Invoke-SqlCmd isn’t interactive, where sqlcmd is. If you have need of a command line tool for using SQL Server (you’re on Server Core or you need an emergency connection), sqlcmd will be your weapon choice.

The fuzzy area is around compiled SQL scripts you might use. Both Invoke-SqlCmd and sqlcmd.exe can accept these scripts and allow you to perform sqlcmd’s variable replacement for parameterizing scripts. Choosing which method you use, in my mind, comes back to outputs. If your script output is simply a matter of logging the entire execution of your script for later review, sqlcmd is a perfectly acceptable method. However, if you need to integrate your scripts into a larger process and make use of the that output within the script execution, Invoke-SqlCmd could be your better option.

Powershell is about options. Everyone has their own methods and patterns, the idea behind Powershell scripting is not to give you a one-size-fits-all solution, but to provide you the components for building your scripts. The challenge we all have is to make sure we’re using the right components in the right way, the proverbial “driving a screw with a hammer” problem. When presented with a new tool set, don’t try and use it the same way as other tools you’ve had in the past. Instead, learn the tool on its own so you can make the best use of it for your process.

Auditing SQL Execution Times With #Powershell

Last week, I was talking with another DBA on my team about our release process.  He was running a series of SQL scripts as part of a code release.  There were about 4 different scripts and, while he was running each one, he would log the start and stop time for each script execution in a text file. We both recognized this as a perfect opportunity for some Powershell automation and I figured I’d put something together.

The pattern for logging this kind of work isn’t terribly complex. We have about 3 steps:

  1. Record the start time
  2. Execute the SQL command or script
  3. Record the end time

The simplest way to express this in Powershell-ese would be:

$StartTime = Get-Date
Invoke-SqlCmd -ServerInstance localhost -Database YourDB -InputFile ‘.\YourSQLFile.sql’
$EndTime = Get-Date
$Duration = New-TimeSpan -Start $StartTime -End $EndTime

Simple, effective, and can then be recorded to any desired output, such as a text file or a database table. Why stop here? Whenever we build automation, we should focus on flexibility and doing the work up front. So let’s enhance this.

If you’ve been reading my blog, you’ve probably noticed that I like to make use of custom Powershell objects for reporting. Custom objects give you a flexible and effective way to generate output, as it allows you to present your results in a variety of ways. With this in mind, I put together the following wrapper function to take either a SQL command or script, execute that command or script, and capture the relevant data about the execution.

function Measure-SqlCmd{
   param($instancename
       ,$databasename = 'tempdb'
       ,[Parameter(ParameterSetName = 'SQLCmd',Mandatory=$true)]$Query
       ,[Parameter(ParameterSetName = 'SQLScript',Mandatory=$true)]$InputFile)

   $output = New-Object System.Object
   $errval = $null

   $output | Add-Member -Type NoteProperty -Name InstanceName -Value $instancename
   $output | Add-Member -Type NoteProperty -Name DatabaseName -Value $databasename
   $output | Add-Member -Type NoteProperty -Name StartTime -Value (Get-Date)

   if($sqlscript){
       $output | Add-Member -Type NoteProperty -Name SQL -Value $sqlscript
       $sqlout = Invoke-Sqlcmd -ServerInstance $instancename -Database $databasename -InputFile $InputFile -ErrorVariable errval
   }
   else{
       $output | Add-Member -Type NoteProperty -Name SQL -Value $sqlcmd
       $sqlout = Invoke-Sqlcmd -ServerInstance $instancename -Database $databasename -Query $Query -ErrorVariable errval
   }

   $output | Add-Member -Type NoteProperty -Name EndTime -Value (Get-Date)
   $output | Add-Member -Type NoteProperty -Name RunDuration -Value (New-TimeSpan -Start $output.StartTime -End $output.EndTime)
   $output | Add-Member -Type NoteProperty -Name Results -Value $sqlout
   $output | Add-Member -Type NoteProperty -Name Error -Value $errval

   return $output

}

At the core, we’re using the same pattern as declared above, but we’re just capturing other pieces of data and putting them into the properties of our custom object.  This allows us to do all sorts of stuff.  Let’s start with simply running our function:

Measure-SqlCmd -instancename 'localhost' -databasename 'demoPartition' -Query 'exec usp_loadpartitiondata;'

The results are a nice little object list, giving us the information about our SQL command:

Measure-SqlCmd

Handy, no? Well, now the fun begins. Let’s say we have a couple commands to execute and we want to output this to a comma separated values(.csv) file for logging. Because we did all the work upfront of making a function and the custom object, the rest becomes a snap:

$total = @()
$total += Measure-SqlCmd -instancename 'localhost' -databasename 'demoPartition' -Query 'exec usp_loadpartitiondata;'
$total += Measure-SqlCmd -instancename 'localhost' -databasename 'demoPartition' -Query 'exec usp_fragmentpartition;'
$total | Select-Object InstanceName,DatabaseName,StartTime,EndTime,SQL,RunDuration | Export-Csv -Path 'C:\Temp\ExecutionLog.csv' -NoTypeInformation

Measure-SqlCmd_results

The bonus of using this pattern is I can use the object collection for a variety of reporting methods.  Using Export-Csv, I can easily create my .csv log file. Another option is to use Chad Miller’s(@cmille19) Out-DataTable and Write-DataTable to record this info to a database table. We now have a flexible logging process to work with.

We also go back to the principle of tool building. Here’s a tool for SQL execution that I can use to give me a repeatable logging process. As I continue to say, automation is about consistency. We can use this logging method to automate SQL script and command executions across multiple instances, track them all in the same way, and then store or handle this appropriate to our process. The end result is tracking our work the same way, every time.

Using #Powershell to Measure SQL Transactions

4333013417_ca6f8904d3_zA common question that comes up for SQL Server administrators is “how do I measure performance”? This is a tough question and there are a variety of ways to do this.  Just off the top of my head, you could measure wait statistics, logical reads and writes for a query, or query duration. When we talk about system performance, we need more general metrics and the one that business folks tend to look at is transactions per second.

For SQL Server, this metric is captured within the SQL Server performance counters.  There are actually two counters you could use: Batch Requests/sec and Transactions/sec. There’s some significant differences between these two counters and this SQL Magazine article covers them both in great detail.  For my work, I like to go with Batch Requests/sec because it captures more transactions going on within the instance, making it a more informative value for measuring system performance.

What’s the best way to capture this? Setting up a perfmon data collection is pretty easy, but then we have to manage creating the collection, then manage the output, and making sense of it. This can be a bear to handle and take a fair amount of manual work to get in place, especially if we just need a quick check on what’s going on in the system.

Powershell provides the Get-Counter cmdlet to query Windows perfmon counters, allowing us rapid access to the information without a lot of hassle. With this cmdlet we can easily measure system performance:

Get-Counter -Counter '\SQLServer:SQL Statistics\Batch Requests/sec'

The output is a PerformanceCounterSampleSet object that is a collection of samples for the call. Using the above command only gives us a single sample, so that makes it simple. We’ll talk about multiple samples in a bit.


The key properties of a sample to focus on are:

  • Timestamp – When the sample was collected
  • RawValue – Running cumulative counter for the object
  • CookedValue – The “actual” value, based on the calculating the previous RawValue and the current RawValue.

For reference, if you’ve ever looked at these values in sys.dm_os_performance_counters you have seen the RawValue. This means you are also probably used to doing your own math to measuring these values. Powershell and the perfmon object model will do this math for us, making it easier for us to use.

How do we leverage this for quickly measuring our instance’s transaction performance? I’ve put together the following function to do this for me.  The approach is simple: I give it an instance name and a duration in seconds, and my code will build a Get-Counter call to calculate the Batch Requests/sec information on my instance.

function Get-SQLTxnCount{

param([string]$InstanceName='localhost'
,[int]$DurationSec)

$smo = new-object ('Microsoft.SqlServer.Management.Smo.Server') $InstanceName
$ComputerName = $smo.ComputerNamePhysicalNetBIOS

$Samples = [Math]::Ceiling($DurationSec/5)
$output = New-Object System.Object
if($smo.InstanceName -gt 0){
$Counters = @('\MSSQL`$'+$smo.InstanceName+':SQL Statistics\Batch Requests/sec')
}
else{
$Counters = @('\SQLServer:SQL Statistics\Batch Requests/sec')
}

$Txns = Get-Counter -ComputerName $ComputerName -Counter $Counters -SampleInterval 5 -MaxSamples $samples
$Summary=$Txns.countersamples | Measure-Object -Property CookedValue -Minimum -Maximum -Average

$output | Add-Member -type NoteProperty -name InstanceName -Value $smo.DomainInstanceName
$output | Add-Member -type NoteProperty -name AvgTxnPerSecond -Value $Summary.Average
$output | Add-Member -type NoteProperty -name MinTxnPerSecond -Value $Summary.Minimum
$output | Add-Member -type NoteProperty -name MaxTxnPersecond -Value $Summary.Maximum
return $Output
}

Get-SQLTxnCount -InstanceName 'PICARD' -DurationSec 30

This function expands on the simple Get-Counter call in a couple ways.  First, I make sure I’ve narrowed the counters to only the specific named instance I want to measure. The second change is to the duration of the test and calculation of  how many 5 second samples will be collected over that duration. Finally, I create a custom output with the Measure-Object cmdlet to show the minimum, maximum, and average Batch Requests/sec for my samples.  This all comes together as a simple transactional measurement for my instance.

This isn’t a replacement for detailed benchmarks and analysis. For this, I recommend some of what Laerte Junior(@LaerteSQLDBA) has written. He has a much more detailed overview of Get-Counter and using it with SQL Server that I would highly recommend (P.S. His article gave me my start on this function).  Benchmarks are extremely important and necessary to make the information coming out of my function useful.

Just like a carpenter has his square or tape measure, this function lets me measure my SQL Server with just a few keystrokes. I still need the full context of what’s happening on my instance, but at least I’ll know the dimensions without a lot effort or additional work. I challenge you to start thinking about your own Powershell in the same way. Don’t think of simply creating scripts, consider how you can take your work and build out your own squares, calipers, or other tools to improve your skills as a craftsman.

Building Availability Groups with #Powershell

A couple weeks ago, I went over automating your SQL Server builds. That’s the kind of process that will benefit many SQL Server administrators. But why stop there?  I say that the more we can automate, the better.  So now let’s talk about automating another aspect of building SQL Servers: availability groups.

Availability groups were the killer feature in SQL 2012 and saw more enhancements with SQL 2014. In my opinion, this is a key feature that allows SQL Server to step into the horizontally scalable world. The problem is that it is not an easy feature to set up or configure. Availability groups have a lot of pitfalls and gotchas to navigate. This is where automation comes in as our ally to build a consistent, repeatable process to deal with these hurdles. Remember, automation is primarily about consistency and we can achieve that by scripting out as much of our build process as possible.

As before, let’s talk about the process we’re going to automate:

  1. Build a Windows failover cluster consisting of two nodes.
    1. The two nodes will already have SQL Server installed.
    2. We will add a file share witness into the cluster (because an even number of quorum votes is bad).
    3. The cluster will be simple, so we will skip things like heartbeat networks and other more advanced configurations.
  2. Build an availability group across both nodes of the cluster.
    1. Availability group will use standard endpoints
    2. Both nodes will be configured for synchronous commit and automatic failover
    3. Create a listener with a static IP address.

Building the Cluster

To ease the scripting process, Microsoft provides several cmdlets in the Failover Cluster module.  Using these, we can create our cluster.

Import-Module FailoverClusters

New-Cluster -Name 'NC1701' -StaticAddress '192.168.10.100' -NoStorage -Node @('PICARD','RIKER')| Set-ClusterQuorum -FileShareWitness '\\hikarudc\qwitness'

As you can see, the cluster creation is pretty easy. Keep in mind this is an extremely simple cluster with none of the usual items we include in production. While you can use this process for your production environment, make sure you work with a clustering expert to define all the additional configurations you will need to build in to make your cluster stable. I also want to call out that I created the fileshare for the witness outside of this script as well.

Before we proceed, I want to validate the cluster.  As with everything else we will use Powershell:

Test-Cluster -Name ‘NC1701’

Firewall Ports

An easy thing to overlook is the firewall ports for availability group communication. I know, I forget it all the time! We need to open up 1433 for SQL Server and listener communication and port 5022 for the availability group endpoints.  Some quick Powershell resolves this for us:

Invoke-Command -ComputerName RIKER -ScriptBlock {New-NetFirewallRule -DisplayName 'SQL Server' -LocalPort 1433 -Direction Inbound -Protocol TCP}
Invoke-Command -ComputerName PICARD -ScriptBlock {New-NetFirewallRule -DisplayName 'SQL Server' -LocalPort 1433 -Direction Inbound -Protocol TCP}

Invoke-Command -ComputerName RIKER -ScriptBlock {New-NetFirewallRule -DisplayName 'AG Endpoint' -LocalPort 5022 -Direction Inbound -Protocol TCP}
Invoke-Command -ComputerName PICARD -ScriptBlock {New-NetFirewallRule -DisplayName 'AG Endpoint' -LocalPort 5022 -Direction Inbound -Protocol TCP}

Building the Availability Group

Microsoft provides some cmdlets for building availability groups in the SQLPS module. The process is fairly straightforward, since we’re only declaring two synchronous nodes with automatic failover. If we were to have additional nodes, we would need to put in additional logic for determining which nodes would perform which roles.

Import-Module SQLPS -DisableNameCheckin
$AGName = 'ENTERPRISE'
$PrimaryNode = 'PICARD'
$IP = '192.168.10.101/255.255.255.0'
$replicas = @()

$cname = (Get-Cluster -name $PrimaryNode).name
$nodes = (get-clusternode -Cluster $cname).name

$sqlperms = @"
use [master];
GRANT ALTER ANY AVAILABILITY GROUP TO [NT AUTHORITY\SYSTEM];
GRANT CONNECT SQL TO [NT AUTHORITY\SYSTEM];
GRANT VIEW SERVER STATE TO [NT AUTHORITY\SYSTEM];
"@

foreach($node in $nodes){
    Enable-SqlAlwaysOn -Path "SQLSERVER:\SQL\$node\DEFAULT" -Force
    Invoke-Sqlcmd -ServerInstance $node -Database master -Query $sqlperms
    $replicas += New-SqlAvailabilityReplica -Name $node -EndpointUrl "TCP://$($node):5022" -AvailabilityMode 'SynchronousCommit' -FailoverMode 'Automatic' -AsTemplate -Version 12
}

New-SqlAvailabilityGroup -Name $AGName -Path "SQLSERVER:\SQL\$PrimaryNode\DEFAULT" -AvailabilityReplica $replicas

$nodes | Where-Object {$_ -ne $PrimaryNode} | ForEach-Object {Join-SqlAvailabilityGroup -path "SQLSERVER:\SQL\$_\DEFAULT" -Name $AGName}

New-SqlAvailabilityGroupListener -Name $AGName -staticIP $IP -Port 1433 -Path "SQLSERVER:\Sql\$PrimaryNode\DEFAULT\AvailabilityGroups\$AGName"

There are a couple cmdlets we’re using to make this all work:

  • Enable-SQLAlwaysOn enables Always On with the SQL Server service. This must be done before we can create our AGs.
  • New-SqlAvailabilityReplica creates a SMO object that represents our node for the availability group. We signify that we are creating SMO objects by using the -AsTemplate switch. Without that switch, the cmdlet would try creating the actual replica, which we can’t do since the availability group doesn’t actually exist at this point.
  • New-SqlAvailabilityGroup requires two items: the primary node the availability group will be created on (declared as a SQL provider path) and the collection of replica nodes.  Running the cmdlet will create the availability group and join the replicas to it.
  • Join-SqlAvailabilityGroup is used to join the replicas to the availability group. Weirdly enough, when you create the availability group, it won’t join the other replicas, so we have to take an additional step to join the non-primary nodes.

You’ll note we wrap the replica process in a foreach loop built on the Get-ClusterNode output. I use this approach so that, no matter how many nodes my cluster contains, I can add them all without explicit calls to the node names. The loop will add the SMO objects to a collection that will eventually represent all the nodes for the availability group (in this case, only two).

A gotcha to call out is the SQL Statement I execute on each node. When working on this, I kept encountering error 41131. It surprises me, because I believe these permissions should be granted when you enable Always On for the service. However, most of the time this does not happen, so I’ve included the SQL Statement to guarantee that my permissions are correct for creating the availability group

Once we’ve created the availability group, we need to create the listener. To do this, we need the listener name, the port we will use, the static IP that will be assigned to the listener name, and the availability group (declared as the provider path). To ease the implementation, I use the availability group name as the listener name and port 1433. This actually takes the longest of the steps, because the cmdlet has to validate the IP isn’t already in use, but as long as the address is available your listener will be created and your availability group built.

 At this point, you should have a functional availability group and can add databases to it.

Another approach

The interesting thing about these cmdlets is they all work using the SMO and related objects. That means that if you want a more controlled approach where you get down and dirty with the code, you can go that route. Thomas Stringer(@sqllife) has a great post on this method and I actually was going down that route originally.

The question I had to ask myself was if it was worth re-inventing the wheel for my availability group builds. I’m not a big fan of how the SQLPS cmdlets rely on the SQL Server provider. Additionally, if you build your script using Thomas’ method, your script will work anywhere you have .Net and doesn’t rely on you installing the SQL Server client tools to get SQLPS. However, using the SMO/.Net method means I have to do a lot more work to get my script running, where the SQLPS cmdlets have taken care of most of that work for me.

Which approach should you use? That’s for you to decide, but I encourage you to look at both methods and evaluate which approach works better for you. When all was said and done, I went with the SQLPS cmdlets because it meant I didn’t have to spend a lot of time writing additional code.

Just as with our SQL Server build process, we’re building consistency and repeatability into our environment. The added benefit is, using this script, I can create my availability group in about a minute. While I may not be creating availability groups often, my script ensures that when I do create them I can maintain my build standards and keep my systems aligned.