Art of the DBA Rotating Header Image

SQL Server

What’s CHECKDB doing in my database restore?

Recently I was doing some work with a friend around some database restores. It was pretty routine stuff. However, after one restore my friend came across something in the SQL Error Log that caught him by surprise. As part of the restore, there was a CHECKDB message for the restored database:

My friend’s first reaction was “why is SQL Server doing a DBCC CHECKDB as part of the restore?” He was concerned, because CHECKDB is a pretty hefty operation and this could really impact the restore time if he had to wait on a CHECKDB to complete. But the other confusing thing was that the date for the CHECKDB didn’t match up with the restore timing.

A Clean Start

Now I was pretty sure that the SQL restore didn’t actually run a CHECKDB, but I needed an explanation for this message. I figured I’d start with good old AdventureWorks2014 to test through the process. Also, since I needed to get in the guts of the restore, I broke out a few undocumented trace flags:

DBCC TRACEON(3014);
DBCC TRACEON(3604);
DBCC TRACEON(3605);

Trace flag 3014 is the important on, as it provides the details on what actually happens during a database restore. Once I turned these flags on, I ran an initial restore of the AdventureWorks2014 database to the name of AW2014_BASE and reviewed the output from TF 3014. I focused on everything from when the database was brought online to the completion of the restore.

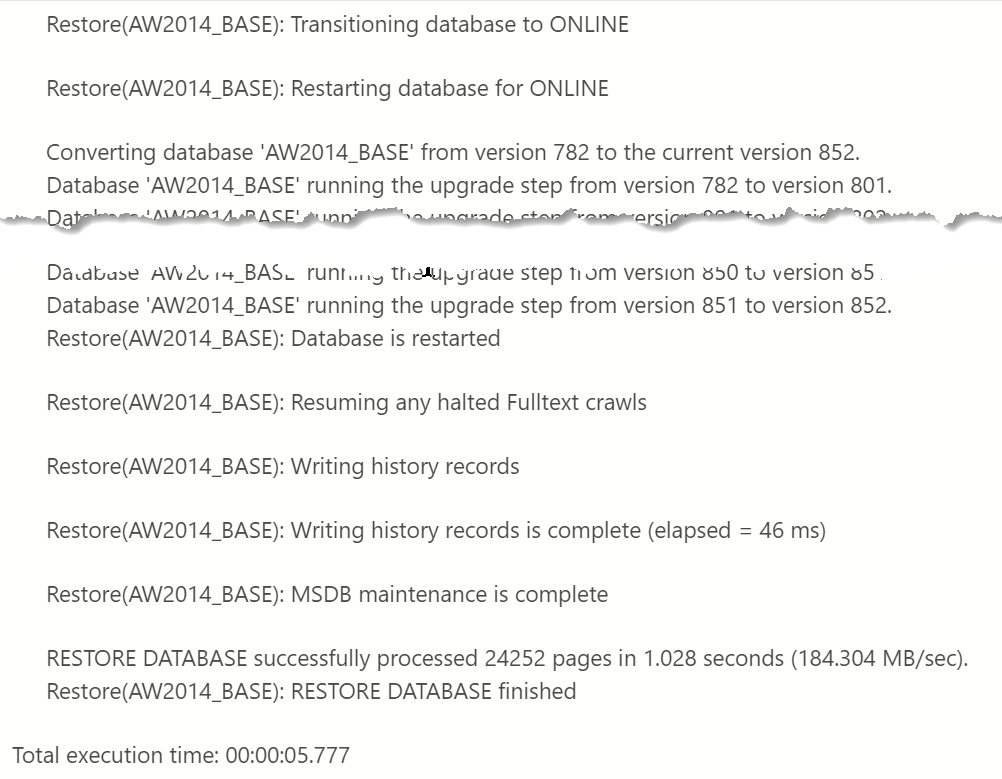
Notice that no where in this output do we see evidence of a CHECKDB command. So far, so good, right?

Checking our CHECKDB

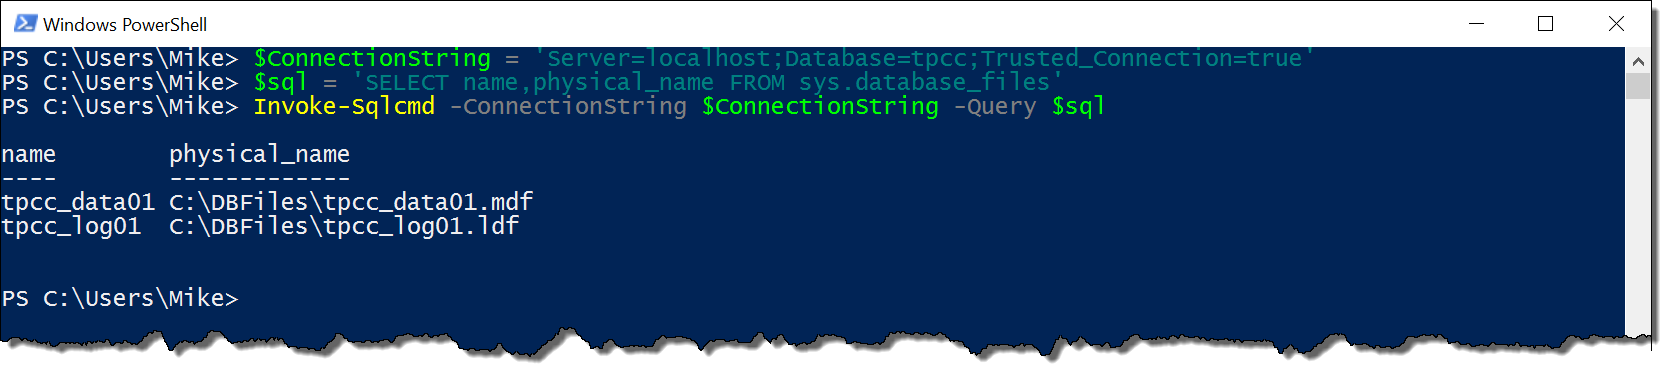
My suspicion at this point is that the CHECKDB message found in a database restore was actually unrelated to the restore itself. The next step was to actually run a DBCC CHECKDB against my test database (and capture the time the DBCC was run).

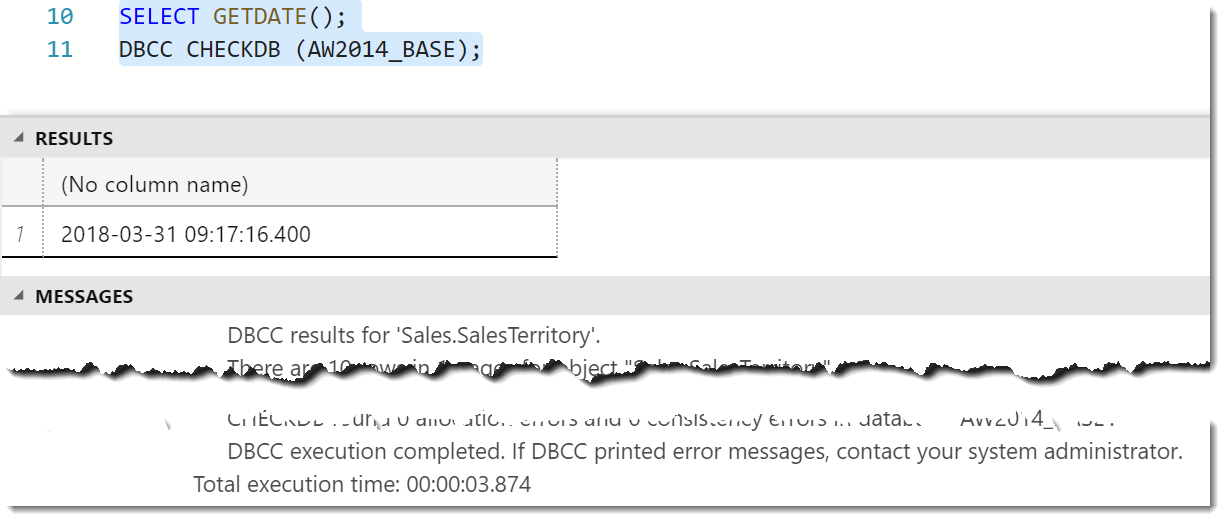
With this completed, it was time to do another backup and restore with my trace flags enabled to see what I got.

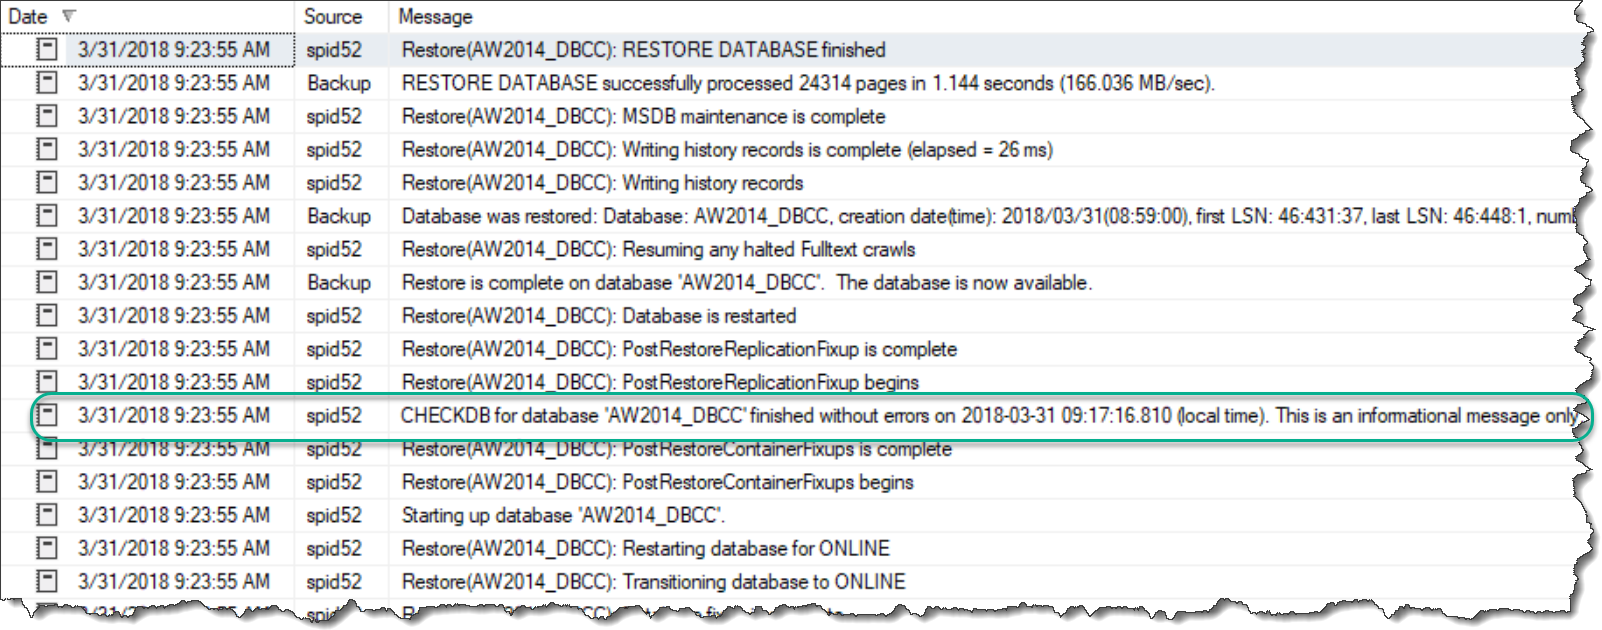
Lo and behold, our CHECKDB message is back. But what’s going on? Why did it appear here but not in the first restore? The key (as you might have already guessed) is to look at the datetime for the CHECKDB in the error log: 2018-03-31 09:17:16. This matches the time we actually ran DBCC prior to our backup. In fact, if we review the message output from the restore (and not the error log messages) for the same restore span, you’ll see there are no actual CHECKDB messages within the restore.

Mystery Solved

The answer here is pretty simple. When you restore a database, SQL Server is trying to help you by telling you the last time the database had a CHECKDB run against it. That’s actually why the message says “his is an informational message only; no user action is required.” However, for many folks not familiar with the process can be confused and jump to the conclusion that SQL Server is doing more than it should be. The key to clearing up these misconceptions is to use our tools to lift up the hood and see what’s going on internally. Once you look at these details, it’s pretty clear to see what’s happening and become better informed on how SQL Server works.

The 2018 SQL Backup Survey

Last year I joined on to Rubrik to help them sell their SQL Server database product. It’s been a fun challenge and definitely interesting working in the vendor space instead of having to field 3AM calls because something broke. This means that I talk to a lot of people about SQL backups and restores, especially about the challenges that your average data professional runs into. However, I based a lot of this conversation off of my anecdotal experience as a DBA. Being a data person, it felt a little awkward talking about these things in the absence of data.

This leads me to last week. In order to have some data, I decided to run an informal backup survey targeted at the SQL community. The results floored me: 344 of you decided to take my short survey. This really helps me understand some of the trends out there and now I want to share those results with you.

Before I get started, I want to first thank each and every person who responded from the bottom of my heart. This data is the result of your participation. Secondly, I want to underscore the “informal” nature of this. There’s a lot of holes that can probably be poked in the process, but I think the data is still useful and can give people insight into the trends.

I’ve posted raw data along with a few tools out on GitHub, where you are welcome to download and play with it. The tools include:

  • Two SQL scripts that create and process the data into a simple data warehouse schema.
  • An SSIS package (created by the SQL import wizard) that loads the raw data into the staging table
  • A PowerBI report that has a couple basic charts built off of the data.
  • A SQL 2016 SP1 backup of the database where I processed the .csv.

Note, my data warehousing/PowerBI skill set is nowhere as strong as others. I built something that was familiar to me and let me get at the data. I’m sure someone can build something better. Which is why I’ve made it public.

The Environment

As far as parsing out the data, let’s look at the questions and how people responded. The first questions were around how many SQL Servers(instances) and databases most people manage:

I think what’s interesting here is that the vast majority of folks out there manage a LOT of servers (36% have 100+ servers). Contrast this to a more balanced distribution across the database counts. This becomes even more interesting when contrasted against the data volumes:

The majority of shops out there manage less than 25TB of total data, with most of these databases clocking in at 5TB or less. While 5TB is still a lot of data, this does mean that (when comparing this to the numbers above) most of the respondents manage “wide” environments, with more databases that are smaller in size. This becomes even more interesting when looking at the size of DBA teams:

As you can see, the VAST majority (80%+) of companies employ teams of 5 DBAs or less. This means that in these wider environments, DBAs are responsible for a lot of objects. To me, this means that we have a lot of touchpoints to manage from a data protection standpoint.

SQL Use

Other interesting tidbits filter in with the questions on how SQL is used. Starting with just the versions of SQL in use, it’s not really surprising that Microsoft’s mainstream supported versions are in use out there:

I was a little surprised at the SQL 2000/2005 number, but not shocked. I know how hard it is to phase out some of those legacy platforms.

Nothing really surprising when it comes to feature use either:

I did hope to see compression higher because of the performance impacts it has, but the rest of these values file in line with my expectations.

When it comes the High Availability/Disaster Recovery options, we also shouldn’t be too surprised:

Availability Groups have been a strong offering from Microsoft and something they’ve marketed hard. This has resulted in solid adoption, but it’s only a little higher than Failover Cluster instances. I’m also not surprised by the Log Shipping use, because let’s be honest. It just works.

The final piece of data around backup tooling is of significant importance to me:

Almost 35% of you use some sort of community scripts, over 15% more than the next entry. This is significant because it means that most shops out there are relying on code that the SQL community provides for free. Think about that in context of other software platforms. Most are going to rely on purchased tools, but so many of us are comfortable with these community scripts that we entrust our company’s most important asset to them.

I was a little surprised at how high Enterprise Platform usage was, considering how many DBAs take a dim view of them. I think what also surprised me was that Vendor Software (Idera, Red Gate, etc.) was so low. Overall, we can definitely see where DBAs find value for running and managing their backups.

The Pain

The last question was more of a free form entry around what’s bugging people when managing backups. I’ll let folks browse it on their own, but here’s what I found interesting:

  • ~21% of the responses referenced concerns about having enough space for their backups.
  • Several respondents were frustrated by needing to build out reporting/management solutions.
  • There were many concerns about having access to backups or being able to restore them in an emergency (mostly due to lack of space to either store enough backups or test them).

Wrapping It All Up

There’s probably a lot of different possible conclusions that can be leapt to from this data, certainly outside the ones I made. I’m certainly not claiming this survey as anything definitive, merely some interesting observations made from a healthy community response. Hopefully you also find the data interesting and I hope it sheds some light on to what’s happening out there in the wide world of SQL Server.

Before I go, a couple shout outs:

  • Meagan Longoria (@mmarie) for telling me how and why my data visualizations sucked. Seriously, though, don’t hold what you find in the PowerBI report against her. :)
  • Chris Lumnah (@clumnah) for helping me refine the survey questions.
  • All the folks who shared the survey link, helping me get to 344 responses.
  • The 344 of you who DID respond, helping make this survey into something worthwhile

Query Plan Analysis with #PowerShell

A couple years ago I wrote a blog post on shredding query plans with XML. At the time, it was just an experiment. I investigated how to parse XML and a query plan without any real goal or purpose other than “what can I do with this?” Then I left it alone and didn’t come back to it.

At least not until recently. Fast forward a few years when I’m trying to tune a large SQL batch process that had a loop. It wasn’t a very pretty process and it worked, mostly, but it could definitely benefit from some performance love. The trick was trying to quantify the changes I made within. A common way to quantify this is to check logical reads. The lower your logical reads, the less “work” is typically done in your query. The trick was capturing all the executions within the loop and summing all the logical reads across a single batch execution.

At first I went to Plan Explorer. This is a great tool and had a lot of information, but what it was missing was the ability to sum up all my logical reads across the entire batch execution. I could look at each individual query, but to add these values up was going to be tedious and painful. Two things I hate.

At this point, I figured why not give PowerShell a shot? After all, I knew that the query plan was an XML doc and I could easily traverse that using the XML functionality built into the language. That combined with a little XQuery (which I’m terrible at, by the way) should solve my problem.

Armed with this knowledge, I charged ahead. Everything worked more or less as expected, but the one piece I missed from my previous blog post was using the XML namespace. See, you need the namespace so the XML pieces in PowerShell know what to query. I floundered with this for a bit until I found Jonathan Kehayias(@SqlPoolBoy) post on sanitizing query plans.

Once you have the namespace set, the rest becomes easy. To go with my previous example, the following statements allowed me to sum and compare logical reads across all statements executed in the batch:

#Read in query plan XML into XML objects
$old = Get-Content C:\Users\Mike\Documents\oldQueryPlan.sqlplan
$new = Get-Content C:\Users\Mike\Documents\newExecutionPlan.sqlplan

#Set namespace manager
$nsMgr = new-object 'System.Xml.XmlNamespaceManager' $old.NameTable;
$nsMgr.AddNamespace("sm", 'http://schemas.microsoft.com/sqlserver/2004/07/showplan');

#Query all nodes and then sum ActualLogicalReads
'Old Plan Logical Reads: ' + `
($old.SelectNodes("//sm:RunTimeCountersPerThread",$nsMgr) | Measure-Object -Property ActualLogicalReads -Sum).Sum
'New Plan Logical Reads: ' + `
($new.SelectNodes("//sm:RunTimeCountersPerThread",$nsMgr) | Measure-Object -Property ActualLogicalReads -Sum).Sum

Once the pattern is down, the use is pretty straightforward. There’s also more options accessible to you. If we just look at the RunTimeCountersPerThread node, we can compare other values such as Rows, Scans, and CPU time. We could really get crazy and extract all the different statements within the batch. There are numerous possibilities for analysis and review.

I’m not here to tell you that you should start using PowerShell to automate query tuning. Query performance is an art form and requires a lot of case-by-case analysis. However, like any great carpenter, it’s good to know the capabilities of your tool set. Understanding the options available to you not only helps you be more effective, but can also provide answers you may not have had access to.

Stuck in SQLPS

maxresdefaultA month and a half ago, with a lot of fanfare and maybe a little confetti, the SQL Server Tools Team released an update to SQL Server Management Studio that massively updated the SQL Server Powershell experience. As I blogged, this is a big deal and long overdue. I am extremely happy that this is finally getting some attention in Redmond.

However, once the dust settled and I had a chance to dig into things, I discovered that not all was rainbows and candy. The truth of the matter is that SQLPS is not so easily replaced. We are still going to be burdened with using the old module for at least the short term. This means at least being comfortable with the foibles of the old module.

Bundled With SSMS

The first real issue with the new SqlServer Powershell module is that is part of the SQL Server Management Studio install. I’ve long lamented the fact that you can’t install Powershell components separately. This means you’re limited to installing this only in locations where you can install SSMS 2016. Microsoft probably thinks you should be installing SSMS2016 EVERYWHERE, but even if you run on the bleeding edge this is a problem if you’re using Windows Server Core (no GUI, no SSMS).2016-08-11_14-41-38

I have not figured out any workaround to this. It’s possible to copy the module folder from a good install to somewhere else, but I’m nervous about that since something could be missed. This means that, until we can install this separately, users are stuck running SQLPS on servers without management studio. Yes, this means SQL 2016 without SSMS as well.

Not Recognized by SQL Agent

The second issue is that even if you do install SSMS 2016, SQL Agent won’t recognize and give you access to the new module if you use a PowerShell job step. When you create a PowerShell job step, the script in that job step runs within a specific context. It’s hidden from you, but whenever that script runs the first thing that happens is SQL Server launches sqlps.exe.

3285_72b386224056bf940cd5b01341f65e9dSqlps.exe is a “mini-shell”, which configures a few things to support SQL Server and PowerShell together. The important piece here is that the executable is hard coded to use the SQLPS module. Now, sqlps.exe is deprecated and going away, but only in a future SQL Server release. This means if you’re using anything previous to this release (having no idea when the release will happen), you are going to be forced to use the SQLPS module if you are creating a Powershell script job step.

How can you get around this? This is a trick that’s been around for a while. I try to avoid it since it adds additional layers to running PowerShell in an agent job, but it does work. What you do is create a CmdExec agent job and call the Powershell executable to run your task. This approach gives you a LOT more control on how PowerShell is working in your environment, but takes some extra work. Hat tip:Derik Hammer (@sqlhammer)

Stuck In The Past

pastLike I said before, I’m excited and happy the SQL Server Tools Team is improving the PowerShell experience for SQL Server. It has been a long time coming and I hope it continues. This is why it makes the above items SO frustrating, because while all these updates are being made, most of the user base won’t be able to use them. In a world where SQL Server installations still run on 2000 and 2005, it can take a long while to upgrade your core installation to take advantage of these improvements.

Normally, I’d be ok with this. I know that when I use an earlier version of SQL Server, I don’t get the shiny new toys. With SQLPS, though, it’s different. For all these years the experience has been klunky and problematic. While some of this klunky-ness finally got fixed back in March, most of us are still stuck with the workarounds because we do not have a way to install the updates.

What can you do about it? I’m glad you asked. Currently there are two Connect items that address these directly:

You can also make your voice heard on the community Trello board. As users, we’re at the mercy of Microsoft for updating this stuff and making it available to us. The goal is to raise awareness of these issues and let the development teams know how important they are. I will definitely give Microsoft credit for being more responsive to user feedback.


Out With The SQLPS, In With The SqlServer

This month, the SQL Server tools team released an updated version of the SQL Server PowerShell module. It is a huge leap forward for using PowerShell and SQL Server together, with the tools team making a serious commitment to correcting the sins of the past. While we still have a long way to go, this is a promising path. At this time next year, I’m certain the PowerShell/SQL Server experience will be in the best place it has ever been.

Before I share my thoughts, let me give you some relevant links. You know, in case you missed something.

Not Playing Nice

Now for my turn! First off, I want to call out that with the July 2016 update we have a new module. SqlServer replaces SQLPS, which means that all the old functionality in the old module exists in the new one (along with some nice little fixes). What I discovered is that this also means you can’t use both modules at the same time. I ran into this because my profile automatically loaded SQLPS for me. When I went to import SqlServer, I got some unpleasant red text:

2016-07-09_12-39-26

Basically, it’s a typing conflict with the SMO. Now, there’s no real reason why you should be running both modules side by side, but be aware that if you have anything that automatically loads SQLPS, you’re going to have problems. Fortunately there’s an easy way to fix this without having to restart your session:

Remove-Module SQLPS
Import-Module SqlServer

However, there’s another monkey wrench, especially for those of us using PowerShell scripts in SQL Agent jobs. Even with the release of SQL 2016 (which was just before these changes were made), SQL Agent still runs sqlps.exe and loads the SQLPS module. To check this, I made a simple agent job that executes:

Get-Module | Out-File C:\Temp\AgentPSModules.txt

The resulting output shows us the issue plain as day:

2016-07-09_12-50-13

There are ways around this, of course. The key here is awareness and I’m sure that we’ll see the SQL tools team get an update to this when possible.

Invoke-SqlCmd: Now with more flexibility!

Enough of the bad news, let’s talk about some of the improvements. As I mentioned earlier, Laerte Junior blogged about some of the updates to Invoke-SqlCmd. These changes really help make the cmdlet more useful for managing and working with outputs. However, I want to look at one specific addition more closely: connection strings!

I’ve always found the biggest limitation of Invoke-SqlCmd was that I couldn’t specify connection string parameters. This was a significant issue when working with multi-subnet Availability Groups, because I couldn’t specify MultiSubnetFailover=True, a key connection string parameter. Now I can, along with a host of other options.

Using it is pretty simple. Just declare a connection string as you would with any other application and pass it to the -ConnectionString parameter:

$ConnectionString = 'Server=localhost;Database=tpcc;Trusted_Connection=true'
$sql = 'SELECT name,physical_name FROM sys.database_files'
Invoke-Sqlcmd -ConnectionString $ConnectionString -Query $sql

2016-07-09_13-05-37

This new parameter opens up a whole new range of possibilities. I love that Microsoft is providing multiple paths to work with their tools. This means that if you’re a .NET guy who is more comfortable with connection strings, you don’t have to constantly keep looking up all the different flags and parameters of Invoke-SqlCmd. Also, if you have a situation which can not be addressed by those standard flags, you can always use the standard .NET connection string parameters and get the job.

(And yeah, I’m excited about this because it was my Connect item. :D )

Providing for the Provider

The last thing I want to touch on are a couple updates to the SQL Server provider. Now, the provider definitely has a bad name out there, but it can be a very useful tool for exploring and gathering SQL Server objects you want to work with. Since it is based on the SMO, it makes SQL Server object manipulation easier by giving you more options to collect your objects.

An important facet of the provider is that it behaves like a file system. How many of us have deleted files from the command line? Have you also used a PowerShell one-liner to delete old files, like backups? If you have, you might be familiar with two parameters: -WhatIf and -Confirm. These two switch parameters are extremely helpful because they can keep you from cutting yourself with that sharp PowerShell knife.

With the July 2016 update, the SQL Server provider now supports the use of these two switches. While using them may not be a common situation, it’s good to know that they are there. After all, it could be handy if you wanted to clean up some items from the command line, like maybe a junk database. Now you can both check what you’re going to do before you do it, along with getting a confirmation question when you go for the actual delete:

2016-07-09_13-21-52

While this may not seem like a big deal, it’s another example of how the SQL tools team is trying to get the SQL Server PowerShell module up to the standards of other PowerShell implementations. For all of us who struggle daily with technical debt, I’m sure you can understand how significant this is.

Early Days

I know the SQL Server PowerShell module still has a bad reputation with a lot of folks out there. Honestly, it’s well deserved. The SQL Server Tools team is out to fix that and everything we’ve seen over the last 3-4 months shows that commitment. A lot of this has to do with the effort put forth by the SQL Server community and the ongoing Trello board where the community is working with the tools team to suggest and prioritize changes. Want to help? Join us by contributing changes and voting up the current suggestions. Microsoft wants to make this your product and this is how we can help.

#TSQL2SDAY: SQL 2016 Direct Seeding

It’s been awhile since I’ve written a T-SQL Tuesday post, but thanks to Michael Swart(@MJSwart) for hosting this month’s edition. The request is simple enough: blog about some aspect of SQL Server 2016. This is actually a good opportunity for me to write about a feature I’ve been meaning to get to for some time now and just haven’t had the chance.

As I tell many people, I’ve been working with SQL Server since 1999 (version 7.0) and I can’t remember being more excited about a SQL Server release. 2016 has SO many cool features, but more than that, they are features that many people who use SQL Server have been asking for a while now. It is hard for me to simply blog about one feature since there are so many. However, there has been an improvement to Availability Groups that has not gotten a lot of coverage and I think it is a game changer, especially for those of us who have to manage AGs on a day to day basis: direct seeding.

Setting Up Replicas

In SQL Server 2012 and 2014, creating an Availability Group could take a significant amount of work. One of the more tedious tasks is setting up your replica databases. This is because that you need to restore your database to your replica node in a state close enough to the primary to allow synchronization to happen. It can take several log backup restores to hit that magic window where you can join the database on the secondary node. Then, you get to do it again on the next replica!

Enter direct seeding in 2016. With this feature you no longer have to do any of the restores. You simply create your replicas with direct seeding enabled, then when you add a database to the AG, SQL Server will directly seed the database to your replica nodes. It’s surprisingly simple.

How do we enable this magic? It’s part of the AG replica creation. We still need the prerequisites, so we’ll start with the following:

  • Create a cluster
  • Enable AlwaysOn for the SQL Service
  • Create endpoints and grant permissions on those endpoints
  • The database we’re adding must be in FULL recovery mode

I, unsurprisingly, have a Powershell script that will set this all up for me. Then we can create the Availability Group with the direct seeding setting. Currently, this is only supported using T-SQL (go wizard or Powershell support), but the syntax is documented in MSDN. Let’s start by creating our Availability Group:

CREATE AVAILABILITY GROUP [ENTERPRISE]
FOR
REPLICA ON 'PICARD' WITH (
 ENDPOINT_URL = 'TCP://PICARD:5022', 
 AVAILABILITY_MODE = SYNCHRONOUS_COMMIT, 
 FAILOVER_MODE = AUTOMATIC,
 SEEDING_MODE = AUTOMATIC
),
'RIKER' WITH (
 ENDPOINT_URL = 'TCP://RIKER:5022', 
 AVAILABILITY_MODE = SYNCHRONOUS_COMMIT, 
 FAILOVER_MODE = AUTOMATIC,
 SEEDING_MODE = AUTOMATIC
)
LISTENER 'ENTERPRISE' (WITH IP (('10.10.10.101','255.255.255.0')))

ALTER AVAILABILITY GROUP [ENTERPRISE] GRANT CREATE ANY DATABASE

--Run these on the secondary node
ALTER AVAILABILITY GROUP [ENTERPRISE] JOIN
ALTER AVAILABILITY GROUP [ENTERPRISE] GRANT CREATE ANY DATABASE


There are two important lines to call out here:

  • SEEDING_MODE = Automatic
  • ALTER AVAILABILITY [ENTERPRISE] GRANT CREATE DATABASE

The SEEDING_MODE is what enables direct seeding, but we need to grant the AG permission to create databases on the node as well. Then we add the database to the AG. At this point, though, we only have node. It’s time to add a second node and watch the magic happen.

Hands Off

Once we’ve created the AG, we just add the database to it:

ALTER AVAILABILITY GROUP [ENTERPRISE]
ADD DATABASE [WideWorldImporters]

Once we’ve done this, SQL Server takes over and pushes the database out to the secondary replicas:

2016-06-14_10-27-36

That’s it! SQL Server handles all the replication for you. All is not sunshine and rainbows, however. There are still some gotchas to keep in mind:

  • You need to create the Availability Group with all its replicas at the start. You can not add replicas at a later point (I thought I had done this, but more recent testing was not working).
  • The AG must also be set up before you add any databases. You can add the database as part of the AG creation or after, but you have to have all your nodes configured before adding the database to allow direct seeding to work.
  • This is a data operation, so we “canna’ change tha’ laws a’ physics, Captain!” If you add a database to an AG with direct seeding, SQL Server still has to copy all the bits and bytes across the wire to the nodes. Which means nodes in other geographical locations could be a problem.

Overall, direct seeding is pretty cool, but still feels a little raw to me. Personally I’d like to be able to seed to a replica I add to the cluster if I desire, but that does not work right now. The lack of GUI and Powershell support (both cmdlets and SMO) is also disappointing. I can still use it, but I’d rather have a simpler way to do it.

For some additional reading, Erik Darling wrote about the exact same feature for T-SQL Tuesday as I did, so it gives you another view at it. Otherwise, that’s it for me on this T-SQL Tuesday. Thanks to Michael Swart for hosting this month. Make sure you check out the rest of the T-SQL Tuesday posts!

Azure SQL Databases with #Powershell: Exporting and Importing

Previously we went over how Azure handles regular backups of your Azure SQL Databases. It is such a huge weight off an administrator’s shoulders when we only have to worry about restoring a database if something goes wrong. While many DBAs might struggle with letting go of the need to control and manage their backups, I think most of us will embrace the freedom from the tedium and worry of keeping an eye on this part of our disaster recovery.

There still is a need to take a backup of some sort. Over my career, while I have used backups for protecting my data, I have also used them for other tasks. Sometimes it is to snapshot the data at a point in time, such as before a code release or a major change. Other times a backup can serve as a great template for creating a new application database, especially if you have a federated database model. Whatever your use case, there are times we would need to snapshot a database so we can restore from it.

Exports

One approach would be to just mark down the time you want to use as your backup and restore from there, but this approach could be difficult to control and be tricky to automate. Azure offers us a better option: exporting the Azure SQL database in question to blob storage. We can restore (or, more precisely, import) this export to a new database.

To run an export is a simple call to the Start-AzureSqlDatabaseExport cmdlet. Just like the restore cmdlet, it will start the process in the Azure environment, running in the background while we do other work. To run an export, we need the following information:

  • Azure SQL database to export
  • The administrative login for the server hosting your Azure SQL Database (which we will define as a SQL Server storage context)
  • The storage container information

The only mildly frustrating thing with the export we need to use cmdlets from both the Azure module and the AzureRM module (assuming your storage blob is deployed using the resource manager model). Because of this, make sure you run Add-AzureAccount and Login-AzureRMAccount before you get started.

We first need to create a connection context for our Azure SQL Database instance, using a credential for our admin login and the server name/

$cred = Get-Credential
$sqlctxt = New-AzureSqlDatabaseServerContext -ServerName msfazuresql -Credential $cred

Once we have established our SQL connection context, we will then need to set our storage context using a combination of AzureRM and Azure cmdlets.

$key = (Get-AzureRmStorageAccountKey -ResourceGroupName Test -StorageAccountName msftest).Key1
$stctxt = New-AzureStorageContext -StorageAccountName msftest -StorageAccountKey $key

Now we can then start the export. Notice, we need a name for the export, used in the BlobName parameter.

$exp = Start-AzureSqlDatabaseExport -SqlConnectionContext $sqlctxt -StorageContext $stctxt -StorageContainerName sqlexports -DatabaseName awdb -BlobName awdb_export

Since this only starts the export, we need a way to check on the status. We can check using Get-AzureSqlDatabaseImportExportStatus. Oddly enough, the status cmdlet requires the username and password to be passed separately and does not take a credential object.

Get-AzureSqlDatabaseImportExportStatus -RequestId $exp.RequestGuid -ServerName msfsqldb -Username $cred.UserName -Password $cred.GetNetworkCredential().Password

And then there is our blob.

2016-05-14_11-23-48

There are two gotchas to keep in mind with both the export and the status. The first is you can not overwrite an existing blob, so make sure your blob name is unique (or get rid of the old one). Also, you can not check on the status of an export that has finished. If you get an error, chances are your export has completed.

Imports

Once we have our export, we now have a “backup file” we can create new databases from. All we need to do is run an import of our blob. Just as for our export, we need some information for our import, which we will (unsurprisingly) run with Start-AzureSqlDatabaseImport.

  • The storage container and blob that we will import from
  • A destination server and credentials for the server
  • The name for our database

Now, since we are creating a new Azure SQL Database with the import, the process needs to define a service objective. By default, it will import the database at standard 0 (S0), but you can defined a higher or lower edition if you want. To simplify things, we will go with the defaults and use the contexts from above, so all we really need to do to kick off the import is:

Start-AzureSqlDatabaseImport -SqlConnectionContext $sqlctxt -StorageContext $stctxt -StorageContainerName sqlexports -DatabaseName awdb_imp -BlobName awdb_export

Which, when completed, gives us a new Azure SQL Database created from our export blob:

2016-05-14_11-56-01

The Secret Sauce

What makes this black voodoo magic work? Is this some proprietary technique Microsoft has snuck in on us? Surprisingly, this is a bit of technology that have existed for sometime now as part of SQL Server Data Tools called BACPACs. A BACPAC is essentially a logical backup of a database, storing the schema and data as SQL statements.

This differs from a typical SQL Server backup, which stores your database pages directly in a binary format. Because of this, native backups are smaller and can be made/restored faster. However, they are more rigid, as you can only restore a native backup in specific scenarios. A logical backup, since it is a series of SQL statements, can be more flexible.

I don’t know why Microsoft went with BACPACs over some native format, but because they did,we can also migrate a database from on-premise SQL Server to Azure SQL database. This is a follow up to a common question I get: “How can I copy my database up to Azure SQL Database?” I want to look at this in my next post. Tune in next week, where we will create a BACPAC with regular SQL Server database and migrate it up to Azure SQL Database. 

Azure SQL Databases and #Powershell: Database Restores

logoAzureSqlA database administrator’s first priority is to ensure their datais protected in the event of a disaster. Typical scenarios range from someone forgetting a WHERE clause to completely losing the data center that houses our servers. We are charged with thinking through all the possible scenarios and making sure we can support our company’s Recovery Time and Recovery Point Objectives (RTO and RPO). This sort of responsibility is a lot why being DBA is a tough job.

Owning our servers gives us a lot of control of how our disaster recovery is constructed, but also a lot of responsibility. This can be a real challenge. We already know that cloud services, like Azure SQL Database, take that responsibility away by managing the infrastructure behind the scenes. These services also provide much of the disaster recovery protection, which is much more comprehensive and (in most cases) cost effective. In this post, we will review these options and how they can be managed using Powershell.

A Big investment

The most fundamental form of disaster recovery is database backups and restores. Typically setting up backups is a lot of work. DBAs need to make sure there’s enough storage available for backups, create schedules that accommodate business operations and support RTOs and RPOs, and implement jobs that execute backups according to those schedules. On top of that, there is all the work that has to be done when backups fail and making sure disk capacity is always large enough. There is a huge investment that must be made, but it is a necessary one, as losing a database can spell death for a company.

This is one of the HUGE strengths of Azure SQL Database. Since it a service offering, Microsoft has already built out the backup infrastructure for you. All that stuff we talked about in the previous paragraph? If you use Azure SQL Database, you do not have to do any of it. At all.

What DBAs still need to manage is being able to restore databases if something happens. This is where Powershell comes into play. While we can definitely perform these actions using the portal, it involves a lot of clicking and navigation. I would much rather run a single command to run my restore.

Executing a Restore

Before we get started, we need to first load up the classic Azure module. While our work so far has been done with the AzureRM module, there are many Azure SQL Databases tasks that can only be managed using the Azure module and database restores are one of them. Unfortunately, it also means we have to login to our Azure account a second time, as authentication is managed separately between the modules. Using Add-AzureAccount is just like Login-AzureRMAccount and will bring up a graphical dialog for you to sign in with.

Import-Module Azure
Add-AzureAccount

2016-05-07_12-25-46

To restore a database, first we just need three things to start: the server where the original database came from, the name of the database we want to restore, and a name to restore the database as. When you restore an Azure SQL Database, you have to create a database that does not already exist, so there is no WITH REPLACE option. Starting the restore is then just a matter of calling the right cmdlet:

Start-AzureSqlDatabaseRestore -SourceServerName msfazuresql -SourceDatabaseName msfsqldb -TargetDatabaseName msfsqldb-restore

2016-05-07_12-37-34

This only initiates the database restore operation and we have to wait for it to complete. To check on the status, we can use another Powershell cmdlet to display that information.

Get-AzureSqlDatabaseOperation -ServerName msfazuresql -DatabaseName msfsqldb-restore | Sort-Object LastModifyTime -Descending | Select-Object -First 1

2016-05-07_12-57-24

All the pipeline calls are there to filter out additional operations and only show the most recent, as the cmdlet returns all restore operations that have ever happened for that server and database. It is difficult to predict how long a restore will take, as this is all handled behind the scenes. I have not tested restore times, but my test databases usually take a few minutes to restore.

There are other options we can declare, depending on how we want to manage our restore, including:

  • Point in time within a minute of when we want to recover.
  • An optional destination server that we want to restore the database
  • A dropped database as our source

One other gotcha to be aware of, albeit a minor one, is that you can not perform a restore of an Azure SQL Database until 15 minutes after the creation of the database. This should not be a concern for most, but it can get in the way of rapidly spinning up databases for demo purposes (ask me how I know!).

Other Scenarios

Simple database restores is the entry point for most recovery scenarios. There are other options for disaster recovery as well as managing copies of your database. There are other options within the platform to support these scenarios. In the next post, I want to dive into a couple cmdlets that we can use to copy our Azure SQL Database as well as make a “backup file” to Azure blob storage that can be used to store a copy of our database in a particular state.

Azure SQL Databases with #Powershell: Managing your Databases

I meant to write this post a month ago, but then life happened. This is a continuation of my short series on Azure SQL Database and how you can manage it with Powershell. If you want, you can go back and read the previous two posts: Getting started and creating your database.

Administrative Access

Now I’d like to show you how to connect to the database, but since it’s been so long since I’ve looked at this demo, I’ve forgotten my administrative password! While it would be simple to blow away the Azure SQL server and database, there are many situations where this is not possible. Fortunately we have an easy way to reset the administrative password using the cmdlets.

$pw = ConvertTo-SecureString -AsPlainText -Force '********'
Set-AzureRmSqlServer -ResourceGroupName MSFAzureSQL -ServerName msfazuresql -SqlAdministratorPassword $pw

Walking through this, we just need to create a secure string for our password and then use the Set-AzureRmSqlServer cmdlet and pass the secure string to -SqlAdministratorPassword argument. Easy as that and we don’t even need to know what the previous password was. With this in mind, I also want to call out that you can only change the password and not the admin login name. While this is not such a big deal, be aware that once you have an admin login name, you are stuck with it.

Connecting and Querying

Armed with our reset password, now we can query the database. The easiest way for you to do this is to connect to your database with SQL Server Management studio:2016-04-30_10-20-41

Remember that your server name will be what you named it followed by “.database.windows.net”. You must have SQL Server Authentication selected, and then just enter your login and password. SSMS will then connect up to your Azure SQL Database and the rest is very much like managing your on premises databases.

What about using Powershell? Again, not all that different. Let’s run a basic query to get some information about our database using Invoke-SqlCmd:

$sql = @"
SELECT
DATABASEPROPERTYEX ( 'msfsqldb' , 'Edition' ) as Edition
,DATABASEPROPERTYEX ( 'msfsqldb' , 'ServiceObjective' ) as ServiceTier
,DATABASEPROPERTYEX ( 'msfsqldb' , 'Version' ) as Version
,convert(bigint,DATABASEPROPERTYEX ( 'msfsqldb' , 'MaxSizeInBytes' ))/1024/1024/1024 as MaxSizeGB

GO
"@

Invoke-Sqlcmd -ServerInstance msfazuresql.database.windows.net -Database msfsqldb -Username msf -Password '*********' -Query $sql

2016-04-30_10-39-00

As you can see, working with Azure SQL Database after it has been created and configured is not much different than your typical SQL Server installation. There is a lot of writing out there on features and use of Azure SQL Database, so I will skip that here. The best place to start is Grant Fritchey(@GFritchey) and his Azure blog posts.

Remaining Flexible

The last item I want to cover here is managing your database size. One of the promises of the cloud and Azure is the flexibility to change your resources as your needs demand and not be stuck on whatever hardware you purchased when you first built your data center. There are a couple items you should consider when first creating your Azure SQL Database, but the great thing is that you are not tied into many of those options permanently.

There are several service tiers available to you, with a mix between standard and premium offerings. Obviously, each service tier has a different price point, so how do you know what is the right choice for your database? What complicates this is you have a mystery metric for performance: Database Transaction Units. Ostensibly this is the number of transactions per second your database should be able to provide, but there’s more to it than that. My general recommendation is you should base your choice on features you need and user connections you expect. If you find, after that, you have a performance bottleneck, you can adapt upwards incrementally.

How do you make this change? It is just one line of Powershell:

Set-AzureRmSqlDatabase -ResourceGroupName MSFAzureSQL -ServerName msfazuresql -DatabaseName msfsqldb -RequestedServiceObjectiveName 'S1' 

Then it is off to the races. The actual operation is not instantaneous and Azure needs some time to allocate the resources and adjust the settings on its side. The great news here is this does not interfere with the operation of your database at all and it will be available while the resizing happens. Existing connections will be maintained and even queries that are running will continue to run. The end result will simply be:

2016-05-01_18-18-03

Ease of Use

As you can see, we can manage the access and scale of Azure SQL Database with a few straightforward commands. While these changes can also be managed through the web portal, I find the Powershell approach to not only be simpler, as we can skip all the browsing through blade windows and troublesome clicks. While these actions are not really ones we would automate, using the cmdlets can also ensure that our actions can be more precise and consistent.

In my next post, I want to cover a topic near and dear to the hearts of DBAs everywhere: database restores. While backups for Azure SQL Database are managed for us, we need the ability to restore our data to a point and time of our choosing. Fortunately this is fairly easy to accomplish with Powershell. Stay tuned and I promise you will not have to wait another month for me to demonstrate this.

Azure SQL Databases with #Powershell: Components

As with any project, before we can start, we need to know what we have to work with. Last post, we went over loading the Azure RM module and getting connected to our Azure account. Before I go over how you create the Azure SQL databases, I’d like to talk first about exactly what we will create first. It’s the old adage: measure twice, cut once.

The very first thing to create is an Azure Resource Group, as we are going to create our Azure SQL Database using the Azure Resource Manager deployment model. There’s nothing really fancy about this, just that it is a container that can house multiple resources. This resource group can house any Azure resource, not just our databases. Creating one using Powershell is simple, we just need to know what to call it and which Azure region to create it in:

New-AzureRmResourceGroup -Name MSFAzureSQL -Location ‘West US’

Once we have our resource group, we can start deploying our Azure SQL database components.

Parallels

From a logical standpoint, working with Azure SQL databases is not very different from setting up a SQL Server instance and database in your environment. There are 3 main components we will need to deploy:

  • A server
  • A database
  • A firewall (server or database)

3-20-2016 7-27-15 PM

Starting with the server, there are only a few things we need to know. The first is a server name so we can identify and connect to it. After that, we need to know what version of Azure SQL databases we want. There are two options here, 11 and 12. Yes, those are fairly abstract numbers, though version 12 is currently what is being updated and has many of the features that will be included in SQL 2016. Finally we need to create an administrative login, the equivalent of the sa login found in all SQL Servers. This all boils down to just two lines of Powershell:

$cred = Get-Credential
New-AzureRmSqlServer -ResourceGroupName MSFAzureSQL -Location ‘West US’ -ServerName msfazuresql -SqlAdministratorCredentials $cred -ServerVersion '12.0'

Running this, in my opinion, beats all the clicking and selecting you have to do in the portal.

Next up, we need to create our database. As with creating a server, we need a name for the database. We also need the resource group and server name we are creating the database in. We will then need to declare a service level objective. While there is a performance aspect to this selection, it more rests on what sort of connection load you will have, what kind of features you need, and what sort of disaster recovery support you require. The nice thing about selecting a service level is their easy to change once you have your database. Finally, we need to select an edition (again, relates to features). To deploy, our command looks like this:

New-AzureRmSqlDatabase -ResourceGroupName MSFAzureSQL -ServerName msfazuresql -Edition Standard -DatabaseName msfsqldb -RequestedServiceObjectiveName 'S0'

Security and Access

The final component to create is a firewall. By default, your Azure SQL Database has its access blocked to anything outside of it. Yes, this includes your access via management studio. To open this access, we need to create firewall rules that allow specific IP addresses to connect. There are two types of firewall rules we can use, server and database. These are what you would guess. The server rule allows access from that address to any database in your server, where the database rule only works for that database.

For our purposes, the server rule will work just fine. Creating a database rule is not really different, it just applies to a different scope. To create a rule, we need the resource group name, server name, rule name, and an IP address range. For this, we will use a trick I picked up from John Milner(@JFRMilner) to get our external IP and create a firewall rule for it:

$localIP = (Invoke-WebRequest ifconfig.me/ip).Content.trim()
New-AzureRmSqlServerFirewallRule -ResourceGroupName MSFAzureSQL -ServerName msfazuresql -FirewallRuleName 'msffirewall' -StartIpAddress $localIP -EndIpAddress $localIP

Now, there is also a special firewall rule we can use. This one is handy because it will make your database accessible to all Azure services. This saves you the headache of creating separate rules for websites, PowerBI, or any other service you want to use. Just call the firewall rule cmdlet with -AllowAllAzureIPs:

New-AzureRmSqlServerFirewallRule -ResourceGroupName MSFAzureSQL -ServerName msfazuresql -AllowAllAzureIPs

Fully Functional

With that, we now have a functioning Azure SQL database. To connect to it, you just need to use the servername along with database.windows.net as your connection string, along with the admin login you created. Put it into management studio and you are good to go:

3-21-2016 5-04-05 PM

Oh, you want the full script?

New-AzureRmResourceGroup -Name MSFAzureSQL -Location ‘West US’

$cred = Get-Credential
New-AzureRmSqlServer -ResourceGroupName MSFAzureSQL -Location ‘West US’ -ServerName msfazuresql -SqlAdministratorCredentials $cred -ServerVersion '12.0'

New-AzureRmSqlDatabase -ResourceGroupName MSFAzureSQL -ServerName msfazuresql -Edition Standard -DatabaseName msfsqldb -RequestedServiceObjectiveName 'S0'

$localIP = (Invoke-WebRequest ifconfig.me/ip).Content.trim()
New-AzureRmSqlServerFirewallRule -ResourceGroupName MSFAzureSQL -ServerName msfazuresql -FirewallRuleName 'msffirewall' -StartIpAddress $localIP -EndIpAddress $localIP
New-AzureRmSqlServerFirewallRule -ResourceGroupName MSFAzureSQL -ServerName msfazuresql -AllowAllAzureIPs

As you can see, deploying an Azure SQL database is a pretty simple process, it is just a matter of knowing what you need.  Next up, we will go over how you can manage and alter your Azure SQL Database. After all, the cloud promises us flexibility and using Powershell makes it easy.