Art of the DBA Rotating Header Image

sql scripts

Effectively Using Invoke-SqlCmd

I really enjoy interacting with the SQL community on Twitter. Whether it is exchanging silly one line, sharing interesting articles and blog posts, or trying to answer a tricky problem, the conversation is always engaging. One such conversation that happened last week was a community member who was struggling with the output he wanted out of Invoke-SqlCmd. I was able to help him out, but the conversation got me thinking about how people use this cmdlet within their scripts and processes.

The focal point of the confusion is how Invoke-SqlCmd relates to sqlcmd.exe. Sqlcmd has been around since SQL 2005, replacing the antiquated osql executable. Many administrators have gotten used to the robustness of sqlcmd and how they can leverage it for their backend automation. I’ve used sqlcmd for many tasks over the years.

Then along came Powershell and Invoke-SqlCmd. This cmdlet, included with the SQL Server provider, is intended to cover a lot of the functionality that an administrator can find in sqlcmd, but now as part of Powershell. What people get hung up on is that Invoke-SqlCmd is not a direct replacement of sqlcmd and that it can’t (and shouldn’t) be used in the same way.

Thinking Differently

The challenge when thinking about sqlcmd versus Invoke-SqlCmd focuses on outputs. One of the cardinal rules of Powershell is that everything is an object. When comparing sqlcmd with Invoke-SqlCmd, this difference becomes quite stark. First, let’s look at sqlcmd’s output, capturing it into a variable and then examining the types that make up the output:

sqlcmd_out

Using the GetType() method, we can see that the collected output of sqlcmd is an array, with each element of the array being a string. What this means is that that each line of output from sqlcmd (including the header and the row count output) is a single string, with all column elements concatenated into that string. As you can imagine, this is clumsy to handle and would require a lot of ugly string parsing to separate out the elements.

Now let’s look at the same command using Invoke-Sqlcmd:

Invoke-SqlCmd_Out

Right off the bat, the output is noticeably different. Our total output object is now a DataRow, with the individual column being an Int32 type. You’ll note that there is no item count as well. This is because we have a singular object as output (which has no count or length properties). If we further investigate the output using Get-Member, we’ll find that the columns of our query are actual properties of the output object (in this case, Column1 since we didn’t name our column).

A New Perspective

This helps us because we can now start treating our outputs as data, not just a mass of text that has to be parsed. For example, let’s consider the following query:

SELECT
SERVERPROPERTY('InstanceName') as InstanceName
,SERVERPROPERTY('MachineName') as MachineName
,SERVERPROPERTY('ProductVersion') as SQLVersion
,SERVERPROPERTY('Edition') as SQLEdition
,SERVERPROPERTY('ProductLevel') as SQLReleaseLevel

If you want to make use of these values in Powershell and use sqlcmd, you would have to perform all sorts of string manipulations to separate out the values. To make it easy, we’d likely have each value a separate call to sqlcmd.exe. Using Invoke-SqlCmd changes the game, allowing you to easily access each column as a property of your output:

$sql=@"
SELECT
SERVERPROPERTY('InstanceName') as InstanceName
,SERVERPROPERTY('MachineName') as MachineName
,SERVERPROPERTY('ProductVersion') as SQLVersion
,SERVERPROPERTY('Edition') as SQLEdition,SERVERPROPERTY('ProductLevel') as SQLReleaseLevel
"@

$sqlstats = Invoke-Sqlcmd -Query $sql

cls

'Instance: ' + $sqlstats.InstanceName
'Host: ' + $sqlstats.MachineName
'Product Info: ' + $sqlstats.SQLVersion +'('+$sqlstats.SQLReleaseLevel+') - ' + $sqlstats.SQLEdition


ServerProperties

This ability to reference columns as properties gets even more powerful when we deal with larger data sets for our scripts. A common technique I use is to leverage a collection of databases to drive work I need to do. With my collection as a series of objects, each row element is easier to access and make use of for my processing. To see a detailed example of this, run the following commands and study the output of the Get-Member call:

$dbs = Invoke-Sqlcmd -Query 'select name,recovery_model_desc,page_verify_option_desc from sys.databases;'
$dbs | Get-Member

Data Driven Decisions

Invoke-SqlCmd lets you integrate your data with your scripts. When you make your outputs discrete objects, data becomes readily accessible for your automation. It allows you to move those clunky parts of your processing out of T-SQL and into Powershell, making your scripts more robust. You can use T-SQL for what T-SQL is good at, allowing Powershell to take over where appropriate.

This does not replace sqlcmd. Another key difference is Invoke-SqlCmd isn’t interactive, where sqlcmd is. If you have need of a command line tool for using SQL Server (you’re on Server Core or you need an emergency connection), sqlcmd will be your weapon choice.

The fuzzy area is around compiled SQL scripts you might use. Both Invoke-SqlCmd and sqlcmd.exe can accept these scripts and allow you to perform sqlcmd’s variable replacement for parameterizing scripts. Choosing which method you use, in my mind, comes back to outputs. If your script output is simply a matter of logging the entire execution of your script for later review, sqlcmd is a perfectly acceptable method. However, if you need to integrate your scripts into a larger process and make use of the that output within the script execution, Invoke-SqlCmd could be your better option.

Powershell is about options. Everyone has their own methods and patterns, the idea behind Powershell scripting is not to give you a one-size-fits-all solution, but to provide you the components for building your scripts. The challenge we all have is to make sure we’re using the right components in the right way, the proverbial “driving a screw with a hammer” problem. When presented with a new tool set, don’t try and use it the same way as other tools you’ve had in the past. Instead, learn the tool on its own so you can make the best use of it for your process.

Auditing SQL Execution Times With #Powershell

Last week, I was talking with another DBA on my team about our release process.  He was running a series of SQL scripts as part of a code release.  There were about 4 different scripts and, while he was running each one, he would log the start and stop time for each script execution in a text file. We both recognized this as a perfect opportunity for some Powershell automation and I figured I’d put something together.

The pattern for logging this kind of work isn’t terribly complex. We have about 3 steps:

  1. Record the start time
  2. Execute the SQL command or script
  3. Record the end time

The simplest way to express this in Powershell-ese would be:

$StartTime = Get-Date
Invoke-SqlCmd -ServerInstance localhost -Database YourDB -InputFile ‘.\YourSQLFile.sql’
$EndTime = Get-Date
$Duration = New-TimeSpan -Start $StartTime -End $EndTime

Simple, effective, and can then be recorded to any desired output, such as a text file or a database table. Why stop here? Whenever we build automation, we should focus on flexibility and doing the work up front. So let’s enhance this.

If you’ve been reading my blog, you’ve probably noticed that I like to make use of custom Powershell objects for reporting. Custom objects give you a flexible and effective way to generate output, as it allows you to present your results in a variety of ways. With this in mind, I put together the following wrapper function to take either a SQL command or script, execute that command or script, and capture the relevant data about the execution.

function Measure-SqlCmd{
   param($instancename
       ,$databasename = 'tempdb'
       ,[Parameter(ParameterSetName = 'SQLCmd',Mandatory=$true)]$Query
       ,[Parameter(ParameterSetName = 'SQLScript',Mandatory=$true)]$InputFile)

   $output = New-Object System.Object
   $errval = $null

   $output | Add-Member -Type NoteProperty -Name InstanceName -Value $instancename
   $output | Add-Member -Type NoteProperty -Name DatabaseName -Value $databasename
   $output | Add-Member -Type NoteProperty -Name StartTime -Value (Get-Date)

   if($sqlscript){
       $output | Add-Member -Type NoteProperty -Name SQL -Value $sqlscript
       $sqlout = Invoke-Sqlcmd -ServerInstance $instancename -Database $databasename -InputFile $InputFile -ErrorVariable errval
   }
   else{
       $output | Add-Member -Type NoteProperty -Name SQL -Value $sqlcmd
       $sqlout = Invoke-Sqlcmd -ServerInstance $instancename -Database $databasename -Query $Query -ErrorVariable errval
   }

   $output | Add-Member -Type NoteProperty -Name EndTime -Value (Get-Date)
   $output | Add-Member -Type NoteProperty -Name RunDuration -Value (New-TimeSpan -Start $output.StartTime -End $output.EndTime)
   $output | Add-Member -Type NoteProperty -Name Results -Value $sqlout
   $output | Add-Member -Type NoteProperty -Name Error -Value $errval

   return $output

}

At the core, we’re using the same pattern as declared above, but we’re just capturing other pieces of data and putting them into the properties of our custom object.  This allows us to do all sorts of stuff.  Let’s start with simply running our function:

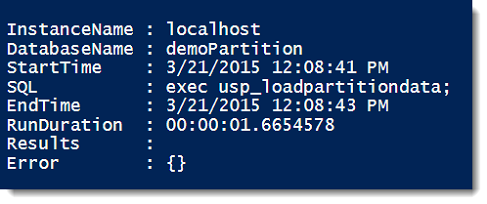
Measure-SqlCmd -instancename 'localhost' -databasename 'demoPartition' -Query 'exec usp_loadpartitiondata;'

The results are a nice little object list, giving us the information about our SQL command:

Measure-SqlCmd

Handy, no? Well, now the fun begins. Let’s say we have a couple commands to execute and we want to output this to a comma separated values(.csv) file for logging. Because we did all the work upfront of making a function and the custom object, the rest becomes a snap:

$total = @()
$total += Measure-SqlCmd -instancename 'localhost' -databasename 'demoPartition' -Query 'exec usp_loadpartitiondata;'
$total += Measure-SqlCmd -instancename 'localhost' -databasename 'demoPartition' -Query 'exec usp_fragmentpartition;'
$total | Select-Object InstanceName,DatabaseName,StartTime,EndTime,SQL,RunDuration | Export-Csv -Path 'C:\Temp\ExecutionLog.csv' -NoTypeInformation

Measure-SqlCmd_results

The bonus of using this pattern is I can use the object collection for a variety of reporting methods.  Using Export-Csv, I can easily create my .csv log file. Another option is to use Chad Miller’s(@cmille19) Out-DataTable and Write-DataTable to record this info to a database table. We now have a flexible logging process to work with.

We also go back to the principle of tool building. Here’s a tool for SQL execution that I can use to give me a repeatable logging process. As I continue to say, automation is about consistency. We can use this logging method to automate SQL script and command executions across multiple instances, track them all in the same way, and then store or handle this appropriate to our process. The end result is tracking our work the same way, every time.

Growing Log Files Responsibly

One of the commonly referenced blogs out there is Kimberly Tripp’s(@KimberlyLTrippseminal post on Virtual Log Files.  If you haven’t read it yet, I highly recommend it.  It provides a good description of one of those quirks with your log files and how you should manage it.

Of course, while folks are familiar with this, it’s often not a practice that gets followed.  Why?  Because it’s hard to manage.  Usually it’s just easier to set the autogrowth settings and let the log find its own size.  This is where I hope I can help you out.

Just like anything we do, if we need to execute it more than once it should be script.  As such, I figured I’d share a T-SQL script I’ve put together for growing my log files out in 8GB chunks.  I’ve used this quite a bit when managing my own systems for when I either need to expand a log file or I need to resize it after an accidental blowout.

--Set variables
declare @dbname sysname = 'test'
,@limit int = 32000
,@filename sysname
,@currsize int
,@growth int
,@v_sql nvarchar(1000)

--Get initial settings
select @currsize = convert(int,floor(size/128.0))
,@filename = name
,@growth = 8000
from sys.master_files
where database_id = db_id(@dbname) and file_id = 2

--Grow file
while @currsize < @limit
begin
  select @growth = CASE WHEN @limit - @currsize < 8000 THEN @limit - @currsize ELSE 8000 END
  select @currsize += @growth
  select @v_sql = N'alter database '+@dbname+' modify file (name='+@filename+',size='+convert(nvarchar(10),@currsize)+'MB);'
  exec sp_executesql @v_sql
end

This is a fairly handy script and pretty easy to follow.  I set the database name and limit, then let the loop keep adding 8000 MB chunks until I get to the size I want.  No strange black voodoo magic, right?  That part is next.

Hopefully everyone reading this blog knows that I’m a big fan of Powershell.  If not, well…I’m a big fan of Powershell.  So I gave myself a little challenge to re-write that T-SQL script as a Powershell function to see how it would work.  Here’s the end result:

#load assemblies
[System.Reflection.Assembly]::LoadWithPartialName('Microsoft.SqlServer.SMO') | out-null
$ErrorActionPreference = 'Inquire'

function Expand-SqlLogFile{
  param(
  [string]$InstanceName = 'localhost',
  [parameter(Mandatory=$true)][string] $DatabaseName,
  [parameter(Mandatory=$true)][int] $LogSizeMB)

#Convert MB to KB (SMO works in KB)
[int]$LogFileSize = $LogSizeMB*1024

#Set base information
$srv = New-Object -TypeName Microsoft.SqlServer.Management.Smo.Server $InstanceName
$logfile = $srv.Databases[$DatabaseName].LogFiles[0]
$CurrSize = $logfile.Size

#grow file
while($CurrSize -lt $LogFileSize){
  if(($LogFileSize - $CurrSize) -lt 8192000){$CurrSize = $LogFileSize}
  else{$CurrSize += 8192000}
  logfile.size = $CurrSize
  $logfile.Alter()
  }
}
#Call the function
Expand-SqlLogFile -DatabaseName 'test' -LogSizeMB 35000

You’ll note that it’s about the same number of lines, does more or less the same thing.  For those of you familiar with the SMO, you’ll also know that at behind the scenes all it’s doing is running T-SQL.  So why write it this way?

First, it’s an interesting challenge just to help understand Powershell and how to write it.  It’s these kind of challenges that help me learn and expand my knowledge.  The second, though, is to explore the differences between the methods.  We know in the IT field, you can solve a problem in any number of ways.  While I love Powershell, I wouldn’t use it everywhere.  The only way to know where to draw the line, though, is to experiment and solve the same problem in different ways.

TIL: Broken Log Chains

Something that always bites me in the butt from time to time is restoring a database in full recovery model and forgetting to do a full right away.  Then I find out shortly when my log backups start failing and spamming me with error messages.  I’m fairly certain this has happened to you, as well.  It’s an easy thing to forget, especially when you’re dealing with non-critical databases.

Humans are typically bad at remembering things.  That’s why we make task lists, have calendar reminders, document processes, and script for automation.  We either have to remind ourselves to do something or (my preference) build something that’s smart enough to correct our oversight.  So when I found a way to do this with broken log chains, I was pretty happy.

The key was a new dynamic management view (DMV) I discovered.  Most people who know me know I love the DMVs and all the information they can provide.  My new discovery is the sys.database_recovery_status view, which provides recovery info for all the databases.  The key field is the last_log_backup_lsn field, which will be NULL if the log chain has somehow been broken.

What’s cool about this is now we have a programmatic way we can use to validate if a full backup needs to be performed.  By adding a quick check to a log backup script, we can make sure we never have a broken log chain.  A quick and dirty way would be:

if (select last_log_backup_lsn from sys.database_recovery_status where database_id = db_id(‘foo’)) is NULL
begin
    backup database [foo] to disk=<<path to full backup>>
end

backup log [foo] to disk=<<path to log backup>>

This is obviously the most simple approach you can use, but the pattern is the important piece.  By combining this with your standard backup scripts (please tell me you have standard backup scripts), you can always ensure that you never get an error because you forgot a full backup.

Because your script will remember for you.


T-SQL Tuesday #39 – A PoSH Post #tsql2sday

This month’s T-SQL Tuesday is graciously hosted by Wayne Sheffield(@DBAWayne) and is a topic near to my heart: Powershell.  I’ve blogged about Powershell before, occasionally sharing some code.  I’m excited to share some more and fit it into the blog party.

earlgreyI hate clicking buttons in Windows.  It’s inefficient for me, especially considering I grew up typing commands at a prompt.  Also, I’m one of those lazy DBAs, so when I get a chance to kick off a script to do work while I’m drinking some Earl Grey, I’ll jump at it.  This is not only why I’m a fan of Powershell, but I’m also a huge proponent of unattended SQL installs.

In my environment, I have a six node failover cluster which hosts all of the company’s SQL instances.  This means that whenever I have to install a new instance to the cluster, I need to perform a cluster node install 5 times.  Suffice to say, this is tedious.  So I said to myself:

“Self, isn’t there a better way to do this?”

“Quite right!  Unattended installs are easy, we just have to run the node install once, take that .ini to the other machines, and we can do 4 command line installs!”

“I don’t know, self.  It’s not like much is changing between instance installs, so running setup twice (once for the full install and once for the first cluster node) still seems like to much work.  To the PoSH mobile!”

See, a lot of my scripting experience comes from the *nix world.  Search and replace logic is pretty easy using sed and awk.  The beauty of Powershell is that, since everything is an object, I don’t even have to mess with that funky syntax.  I can just leverage the .replace() method of a regular ol’ string variable.  This lead me to the following solution:

  • Create a template .ini file for adding a node.  This template contains all my basic node options and stubs for the replaceable values.
  • Write a Powershell script that takes that template and some inputs from me, does some basic search and replace, then spits out a custom .ini for my cluster node install.
  • Use that .ini for the /CONFIGURATIONFILE parameter in an install and *bam*.

I won’t bore you with the whole template file, you can download it and look at it here.  Where the real “magic” (such as it is) is the following(downloadable):


<#
.SYNOPSIS
   Creates an .ini for adding a cluster node based off of the add_node_template.ini
.DESCRIPTION
   Takes the add_node_template.ini and performs a text replace to insert passed values
	 for Server, Instance, and service account information.
.PARAMETER <paramName>
   -server - Server name of the virtual network name
	 -instance - Named instance name
	 -sqlsvc - SQL Server Service account
	 -sqlpwd - SQL Server Service password
	 -agtsvc - SQL Server Agent account
	 -agtpwd - SQL Server Agent password
.EXAMPLE
   .\Create-NodeIni.ps1 -server "FOO" -instance "BAR01" -sqlsvc "EMINENT\sqlsvc" -sqlpwd "password" -agtsvc "EMINENT\sqlasvc" -agtpwd "password"
#>

param([parameter(Mandatory=$true)][string] $server,
      [parameter(Mandatory=$true)][string] $instance,
			[parameter(Mandatory=$true)][string] $sqlsvc,
			[parameter(Mandatory=$true)][string] $sqlpwd,
			[parameter(Mandatory=$true)][string] $agtsvc,
			[parameter(Mandatory=$true)][string] $agtpwd)

$output="$server`_$instance`_addnode.ini"

(Get-Content "add_node_template.ini") | Foreach-Object{
	$_ -replace "<SRV>",$server `
		-replace "<INST>",$instance `
		-replace "<AGTACCT>",$agtsvc `
		-replace "<AGTPWD>",$agtpwd `
		-replace "<SQLACCT>",$sqlsvc `
		-replace "<SQLPWD>",$sqlpwd } | Set-Content $OUTPUT

While there’s a lot going on here, it’s the last seven lines where the work gets done. The Get-Content comandlet reads in the template file, then gets piped to the Foreach-Object commandlet to process each line of the file. This works because when you make a text file a string object in Powershell, it becomes a multi-value array where each line is an array member. Then the script executes several different replaces (wherever it finds matches for my stubs) on each member. The result is piped to the Set-Content commandlet, writing out the new post-replace array out to a new file.

It’s a simple trick, but with this I not only save myself a ton of time by generating files for SQL installs, I also make my installations consistent. Every node install is run with the same options and selections. Human error is reduced and increased tea time is provided. Future enhancements would be to update my templates so I can generate the initial SQL install .ini, but since I do so few instance installs, it’s not really worth the effort at this point. Plus, it looks like someone is already working on that.

Enjoy the rest of T-SQL Tuesday. Plenty of great people are contributing and the great thing about Powershell is there are so many ways it can be used. I hope that our scripts will not only get you excited about learning Powershell yourself, but give you some great ideas on how you can leverage it for your own success.

Finding Orphan Logins

Cleaning up old security info is always something that’s hard to stay on top of.  Employees who leave or change responsibilities can make it difficult to track which logins need to remain in our instances.  The best way to manage this is by using Active Directory groups and managing access from the group level instead of by explicit login.  However, because of the communication and organization that’s required to set up these groups in the first place, it’s not uncommon to find ourselves managing explicit logins in our severs.

The unfortunate side effect is this typically results in orphaned logins within our SQL Servers.  A question on how to manage this came up recently on dba.stackexchange.com and, while I couldn’t find a way to answer the specific question (because it was focused around finding orphaned logins in SQL 2000), I was able to come up with a handy utility script for 2005+ that makes use of xp_logininfo.  It’s not a complex script and provides a list of the actual drop login statements you can execute as part of your cleanup.

declare @user sysname
declare @domain varchar(100)

--store total output
declare @return table
(login_name sysname
,sql_statement varchar(max)
,error_msg varchar(100))

--Store output of xp_logininfo
declare @junk table
(a_name sysname NULL
,a_type char(8) NULL
,priv char(9) NULL
,m_login sysname NULL
,p_path sysname NULL)

--Declare domain you are checking
set @domain = 'FOO'

declare recscan cursor for
select name from sys.server_principals
where type = 'U' and name like @domain+'%'

open recscan
fetch next from recscan into @user

while @@fetch_status = 0
begin
	begin try
		insert into @junk
		exec xp_logininfo @user
	end try
	begin catch
		--Error on sproc because login does not exist
		insert into @return
		values(@user,'drop login '+convert(varchar,@user),ERROR_MESSAGE())
	end catch

	fetch next from recscan into @user
end

close recscan
deallocate recscan

select * from @return

A couple notes on this script:

  • It currently doesn’t handle removing the logins from individual databases.  I have another script I use to do that and will be working on combining the two.
  • I don’t automatically execute the drop login because I’m paranoid.  :)  By providing a list, I can review the logins, along with the error message output, and verify that I want to remove them

Hopefully this little utility script can help you with login management in your environments.

Some Backup Info

So I’ve been pretty bad about blogging lately.  I don’t buy in much to excuses and so I have none to offer.  Just got away from me (something I’ll talk about shortly when I review my 2012 goals).  Anyway, let’s talk about something a little more useful to you, the reader.

A couple weeks ago, I gave a short presentation on MSDB’s BackupSet.  It was a fun little presentation and gave me a chance to share with the Boulder SQL user group one of my favorite tables.  Why one of my favorites?  Simply because there’s so much useful information packed in there, particularly when it comes to the critical job of monitoring your backups.  If you haven’t looked at it, I highly recommend that you check it out.

While developing the presentation, I put together a handy query that I wanted to share.  It’s very useful for not only showing you when your latest backups were, but also the size and location of those backups:

select
  bs.database_name
  ,bs.backup_finish_date
  ,bs.backup_size/1024.0/1024.0 [backup_size_mb]
  ,bs.compressed_backup_size/1024.0/1024.0 [compressed_size_mb]
  ,datediff(ss,backup_start_date,backup_finish_date) [backup_time]
  ,((bs.backup_size/1024.0/1024.0)/(datediff(ss,backup_start_date,backup_finish_date)+1)) [mb_per_second]
  ,1.0-(bs.compressed_backup_size*1.0/bs.backup_size) [compression_ratio]
  ,bm.physical_device_name
from
  msdb.dbo.backupset bs
  join msdb.dbo.backupmediafamily bm on (bs.media_set_id = bm.media_set_id)
  join (select database_name
          ,max(backup_finish_date) last_backup
        from msdb.dbo.backupset
        where type = 'D'
        group by database_name) lb on (bs.database_name = lb.database_name and bs.backup_finish_date = lb.last_backup)
where type = 'D'

The Tools to Survive

Last week, I blogged about monitoring backups, service status, and disk space usage. These are the keys to survival for you and your databases. There are several ways that these can be monitored and there are many third party tools that you can use for these tasks. However, third party tools are often not an option.  Fortunately, you can also make use of SQL and Powershell to handle basic monitoring. Here’s a couple scripts that you can use in your environments.

Overdue Backups

The backupset table makes it easy to know when your backups are being taken. By making use of a couple queries, you can find out if your databases are actually being backed up and take appropriate action. This particular script is designed to check for any databases that haven’t had a full backup (type=’D’) in the last three days and email out an alert if any are found.

with db_fulls(dbname,last_backup)
as
(select
	database_name,
	max(backup_start_date)
from
	msdb.dbo.backupset
where
	type='D'
group by
	database_name)
select
	d.name,
	d.recovery_model_desc,
	df.last_backup
into #results
from
	sys.databases d
	left join db_fulls df on (d.name = df.dbname)
where
	isnull(df.last_backup,'1/1/1900') < dateadd(dd,-3,getdate()) 

if (select count(*) from #results) > 1
begin
	DECLARE @tableHTML  VARCHAR(MAX)
	,@emailrecip varchar(200)

	--SET YOUR EMAIL ADDRESS HERE
	set @emailrecip = 'you@yourcompany.com'

	SET @tableHTML =
		N'</pre>
<h1>Overdue Backup Report</h1>
<pre>
' +
		N'</pre>
<h2>No full backups in the last 3 days</h2>
<pre>
' +
		N'</pre>
<table width="1250" border="1">' + N'
<tbody>
<tr>
<th align="left" width="40%">Database</th>
<th align="left" width="30%">Recovery Model</th>
<th align="left" width="30%">Last Backup</th>
</tr>
' + CAST ( ( SELECT td = rtrim(name), '', td = rtrim(recovery_model_desc), '', td = isnull(convert(varchar(100),rtrim(last_backup),100),'NO BACKUP'), '' 
from #results order by name FOR XML PATH('tr'), TYPE ) AS VARCHAR(MAX) ) + N'</tbody>
</table>
<pre>
' ;

	exec msdb.dbo.sp_send_dbmail
		@recipients = @emailrecip,
		@subject = 'Overdue Backup Report',
		@body = @tableHTML,
		@body_format = 'HTML' ;
end

drop table #results

The basics here can also be modified for your particular needs. In my own environment, I use this and a second script that monitors for log backups(type=’L’). I schedule the full backups to run every morning. For the log backups, I run the report every 4 hours and alert me if a database hasn’t had a log backup in the last 12 hours.

Stopped Services

It’s hard to monitor SQL Services from SQL Server itself, so for this task I turned to Powershell. By making use of the Get-Service commandlet, you can collect all service related information from a computer. Add some functionality for email, and you can build a handy little service monitoring script.

$srvlist = Get-Content $args[0]
$report=@()

foreach ($server in $srvlist)
{
	try
	{
          $svcs=Get-Service -ComputerName $server | where {$_.name -like "*SQL*"}
		foreach ($svc in $svcs)
		{
			$output = New-Object System.Object
			$output | Add-Member -type NoteProperty -name Instance -value $server
			$output | Add-Member -type NoteProperty -name SvcName -value $svc.Name
			$output | Add-Member -type NoteProperty -name DisplayName -value $svc.DisplayName
			$output | Add-Member -type NoteProperty -name Status -value $svc.Status
			$report+=$output
		}
	}
	catch
	{
		$output = New-Object System.Object
		$output | Add-Member -type NoteProperty -name Instance -value $server
		$output | Add-Member -type NoteProperty -name SvcName -value "No_Service_Collected"
		$output | Add-Member -type NoteProperty -name DisplayName -value "No Service Collected - COLLECTION ERROR"
		$output | Add-Member -type NoteProperty -name Status -value "ERROR"
		$report+=$output
	}
}

#Set these for your environment
$smtp="yourmail.server.com"
$from="SvcAlert@yourserver.com"
$to="You@yourcompany.com"

if(($report | where {$_.Status -ne "Running"}).Length -gt 0)
{
	[string]$body=$report|where{$_.Status -ne "Running"}| ConvertTo-HTML
	Send-MailMessage -To $to -from $from -subject "Service Monitor Alert!" -smtpserver $smtp -body $body -BodyAsHtml
}

To call this script, you’ll want a text file that contains a list of your servers (passed through as an argument to the script).  Then, run the script as a Windows Scheduled Task.  I recommend setting it up to check the status regularly every few minutes, running from a different computer than your SQL Server. This guards against your monitoring process failing in case your SQL Server shuts down. You will also need to ensure that whatever account the task runs under has remote access to your SQL Server.

Free Space

There is actually quite a bit written about this particular topic. There are two ways you can go about this, depending on whether or not you want to monitor your space from within SQL Server or externally. One option is to use xp_fixeddrives for querying data from directly within SQL Server. If you’ve upgraded to SQL 2008 R2 SP1, you can also make use of sys.dm_os_volume_stats. Personally, I lean more towards making use of Powershell (again) because of the flexibility it gives me. For this, there’s several options, but a good place to start is this script off of Simple Talk. Any of these choices will give you the information you need.

With these basic tools, you can start monitoring your systems for continued operation as well as being alerted when critical issues arise.  From here, you can then move to monitor other aspects of your server and database health.

A Temporary Configuration

A couple weeks ago, I participated in T-SQL Tuesday #26 with a trick to dynamically build a script for doing your restores. In the spirit of that laziness, I wanted to share with you another script I have for configuring Tempdb. There’s not much special here and you could use any other scripting language to get the same result, but the idea is to automate the bulk of the task so that you can save yourself some work as well as creating consistent processes for your database configurations.

--Configure TempDB
--Turn off nasty rowcount
SET NOCOUNT ON

--Declare some variables
declare @files int,
  @path varchar(max),
  @totalsize_gb float,
  @v_sql varchar(max),
  @filesize_mb int,
  @logsize_mb int,
  @currfile int

--Set these to configure tempdb
set @files = 8
set @path = 'T:\TempDB\'
set @totalsize_gb = 40

--script calculates individual file sizes
select @filesize_mb=FLOOR((@totalsize_gb*1024)/(@files)),@logsize_mb = FLOOR(@totalsize_gb*1024)* .25

--Build your config script
set @v_sql ='use tempdb
dbcc shrinkfile (tempdev,100)

alter database tempdb
modify file
(NAME=tempdev,
FILENAME='''+@path+'tempdb.mdf'',
SIZE='+CONVERT(nvarchar(10),@filesize_mb)+'MB,
FILEGROWTH=512MB,
MAXSIZE=UNLIMITED)

alter database tempdb
modify file
(NAME=templog,
FILENAME='''+@path+'templog.ldf'',
SIZE='+CONVERT(nvarchar(10),@logsize_mb)+'MB,
FILEGROWTH=512MB,
MAXSIZE=UNLIMITED)

'
set @currfile = 1

while @currfile < @files
begin
set @v_sql = @v_sql + 'alter database tempdb
add file
(NAME=tempdb'+CONVERT(nvarchar(10),@currfile)+',
FILENAME='''+@path+'tempdb'+CONVERT(nvarchar(10),@currfile)+'.ndf'',
SIZE='+CONVERT(nvarchar(10),@filesize_mb)+'MB,
FILEGROWTH=512MB,
MAXSIZE=UNLIMITED)

'

set @currfile = @currfile+1

end

select @v_sql = @v_sql + char(10)+'--Verify your configuration!'+char(10) + 'select name,size/128.0 [size_mb],physical_name from sys.database_files'

print(@v_sql)

PRINT '/***RESTART SERVER***/'

There are three things we want to declare up near the top, and that is number of files, location of the files, and total size of the files. Without getting into the larger discussion of how many files you should have (for those wondering, start at Paul Randal’s(b|t) blog post on it), this script will help you make all your files consistent.

Some other notes about things I have set:

  • The total file size is total data file size. Log file size is in addition to this, so plan accordingly.
  • I’ve got the log file calculation to size to 25% of the total data files.
  • I’ve got autogrowth on all files set to half a GB (512 MB).

These settings are completely personal preference, so your miles may vary. If you have different practices, by all means implement those. The point here, as with my RESTORE script, it to pre-build most of your configuration script so that you only have to tweak a couple things.


P.S. It should be noted that I call out a DBCC SHRINKFILE on tempdb.  The idea of this script is your running it either while configuring a server or during a maintenance period.  Shrinking a live tempdb can cause corruption, so only execute this script when you’re planning on restarting the server and rebuilding tempdb as part of your configuration.  (Thanks to Vicky Harp (b) for reminding me about that.)

T-SQL Tuesday(#tsql2sday) #26 – Lazy Restore Commands

I missed out on T-SQL Tuesday #25 (Tips ‘n Tricks) on the first go around, so I’m glad that with #26 I get another crack at it. Mine is pretty simple, but has saved me a lot of time when doing database restores. Whether I’m getting a database back online or (more likely) moving a database to another instance, I don’t want to be bothered for digging around to get my restore going.

As a DBA, I am two things:

  1. I hate using the GUI. Clicking through countless windows is for the birds and I would much rather type three commands than click ‘Next’ three times.
  2. I’m lazy. So those three commands? I write them once and save ‘em to a file so I can run them over and over and over….etc. Automation FTW!

So, restores. We all do them and they can get irritating. I know one of the most annoying things is relocating the files with MOVE when you’re bringing the database up on a different server. This is why a lot of folks use the GUI, because SQL Server can handle that behind the scenes and, if you really want, you can script it out. Well I’ve got another way.

You know you can RESTORE WITH FILELIST to get the database files within a backup. Why not take that a step further and capture it in a table? Then, once it’s in a table, we can use a little bit of SQL coding to give us a template to generate our restore command. Take a look:

--Turn off annoying rowcount
SET NOCOUNT ON

--Some variables
declare @v_restore varchar(1000)
declare @v_backup varchar(1000)
declare @v_sql varchar(max)
declare @datadir varchar(1000)
declare @logdir varchar(1000)

--Set backup file location, database name
set @v_backup = 'C:\demo\test.bak'
set @v_restore='Test_demo'
set @datadir = 'C:\Restore\Data'
set @logdir = 'C:\Restore\Log'

--Storage table

declare @restorelist table
(LogicalName nvarchar(128)
,PhysicalName nvarchar(260)
,Type char(1)
,FileGroupName nvarchar(128)
,Size numeric(20,0)
,MaxSize numeric(20,0)
,Fileid tinyint
,CreateLSN numeric(25,0)
,DropLSN numeric(25, 0)
,UniqueID uniqueidentifier
,ReadOnlyLSN numeric(25,0)
,ReadWriteLSN numeric(25,0)
,BackupSizeInBytes bigint
,SourceBlocSize int
,FileGroupId int
,LogGroupGUID uniqueidentifier
,DifferentialBaseLSN numeric(25,0)
,DifferentialBaseGUID uniqueidentifier
,IsReadOnly bit
,IsPresent bit
,TDEThumbprint varchar(100)) –-Be careful, this last field (TDEThumbprint) isn’t in 2k5

--Capture the file list
insert into @restorelist
exec('RESTORE FILELISTONLY FROM DISK='''+@v_backup+'''')

--Build your restore command
select @v_sql = 'RESTORE DATABASE '+@v_restore+' '+char(10)+'FROM DISK=''' +@v_backup+ ''''+ CHAR(10)+'WITH '
select @v_sql = coalesce(@v_sql,'')+'MOVE '''+logicalname +
''' TO '''+CASE when type='L' then @logdir else @datadir end +'\'+ right(physicalname,charindex('\',reverse(physicalname))-1)+''',' + char(10)
from @restorelist

--display the restore command, trim trailing comma and char(10)
print substring(@v_sql,1,LEN(@v_sql)-2)

So that’s a lot of stuff! Well, not really. If you look at it, most of the script is taken up defining the file list table. Change your variables at the top, run the script, and copy the output into another window…BAM! There’s your restore command. And if it’s not perfect, you only need to make one or two changes to the output to clean it up.

This is not the only sproc output you can capture. The biggest lesson from this trick is you should think about other system stored procedures and look for opportunities where you can grab outputs to make your life easier. Help yourself look like a hero and get more sleep by taking advantage of what’s in SQL.

Thanks to Dave Howard(b|t) for offering folks a second chance to share for T-SQL #26!