Art of the DBA Rotating Header Image

automation

Availability Groups, Agent Jobs, and #Powershell

My current gig has me working a lot with Availability Groups. I love the options they give me with their ability to failover fast and replicate my data to other servers. It is a lot of peace of mind for high availability and data protection. The price of all this comes from a much more complex system to manage and the extra considerations needed to have a properly deployed Availability Group.

One such consideration is your SQL Agent Jobs. It is pretty well documented that your server level objects must be replicated or created outside of the actual Availability Group process. It’s not difficult, but must be thought about and addressed when setting up a server. If you source control your management jobs, then it should be a simple matter of executing a script to create these jobs on a new server. There are cases, though, where either jobs get out of sync or are created outside of the source control process. When this happens, administrators need to copy these jobs to the other servers.

The common way to accomplish this is to simply script out the job in Managment Studio, then run the script on the other nodes. While effective, this is also manual and prone to error, such as forgetting a server.

By automating this process, we can ensure consistency.  You can use Powershell to leverage the SMO and the .Script() method to basically duplicate your Management Studio action.  However, by using this and incorporating it into a script, we can ensure our consistency.  The following function is a pretty basic use of this that allows you to copy a single job from a source server to any number of targets:

function Copy-SQLAgentJob{
  param([string]$Source
  ,[string[]]$Targets
  ,[string]$JobName)

#Load assemblies
[System.Reflection.Assembly]::LoadWithPartialName('Microsoft.SqlServer.SMO') | out-null

$smosource = New-Object Microsoft.SqlServer.Management.Smo.Server $Source
$JobScript = $smosource.JobServer.Jobs[$JobName].Script()

foreach($Target in $Targets){
 $smotarget = New-Object Microsoft.SqlServer.Management.Smo.Server $Target
 if($smotarget.JobServer.Jobs.Name -notcontains $JobName){
   $smotarget.Databases['msdb'].ExecuteNonQuery($JobScript)
    }
  }
}

All this function does is find the source job, script it out, and then run that job creation script against all the other targets. Simple enough. One thing to call out is I’ve specifically written this function to stay completely within the SMO. Normally, I would use Invoke-SqlCmd to execute the SQL script, but I thought it simpler to use the SMO .ExecuteNonQuery() method (which runs a SQL batch and does not expect a return).

Now let’s implement this for a hypothetical Availability Group to copy from one node to all the others:

$PrimaryNode = 'PICARD'
$nodes = (Get-ClusterNode -Cluster (Get-Cluster $PrimaryNode).Name | Where-Object {$_.Name -ne $PrimaryNode}).name
Copy-SQLAgentJob -Source $PrimaryNode -Targets $nodes -JobName 'Backup Databases - Powershell'

Of course, we could also use this in a much simpler fashion, such as deploying a new job across all of our servers. Remember the Central Management Server trick I’ve implemented in the past? We can fold that in here for an easy deployment once we’ve created the job on a single server in our environment.

$CMS=’PICARD’
$servers=@((dir "SQLSERVER:\SQLRegistration\Central Management Server Group\$CMS").Name)
$servers+=$cms

Copy-SQLAgentJob -Source $CMS -Targets $Servers -JobName 'Backup Databases - Powershell'

As always, the lesson learned here is to leverage our tools to make more our work more repeatable and consistent. While everything we have done here can be done in other methods, I prefer this because it minimizes the interaction needed to accomplish the task. The more any of us have to touch a process to get work done, the greater our risk of error. You’ve heard it before: consistency through automation, this time for SQL Agent jobs.


Using #Powershell to Measure SQL Transactions

4333013417_ca6f8904d3_zA common question that comes up for SQL Server administrators is “how do I measure performance”? This is a tough question and there are a variety of ways to do this.  Just off the top of my head, you could measure wait statistics, logical reads and writes for a query, or query duration. When we talk about system performance, we need more general metrics and the one that business folks tend to look at is transactions per second.

For SQL Server, this metric is captured within the SQL Server performance counters.  There are actually two counters you could use: Batch Requests/sec and Transactions/sec. There’s some significant differences between these two counters and this SQL Magazine article covers them both in great detail.  For my work, I like to go with Batch Requests/sec because it captures more transactions going on within the instance, making it a more informative value for measuring system performance.

What’s the best way to capture this? Setting up a perfmon data collection is pretty easy, but then we have to manage creating the collection, then manage the output, and making sense of it. This can be a bear to handle and take a fair amount of manual work to get in place, especially if we just need a quick check on what’s going on in the system.

Powershell provides the Get-Counter cmdlet to query Windows perfmon counters, allowing us rapid access to the information without a lot of hassle. With this cmdlet we can easily measure system performance:

Get-Counter -Counter '\SQLServer:SQL Statistics\Batch Requests/sec'

The output is a PerformanceCounterSampleSet object that is a collection of samples for the call. Using the above command only gives us a single sample, so that makes it simple. We’ll talk about multiple samples in a bit.


The key properties of a sample to focus on are:

  • Timestamp – When the sample was collected
  • RawValue – Running cumulative counter for the object
  • CookedValue – The “actual” value, based on the calculating the previous RawValue and the current RawValue.

For reference, if you’ve ever looked at these values in sys.dm_os_performance_counters you have seen the RawValue. This means you are also probably used to doing your own math to measuring these values. Powershell and the perfmon object model will do this math for us, making it easier for us to use.

How do we leverage this for quickly measuring our instance’s transaction performance? I’ve put together the following function to do this for me.  The approach is simple: I give it an instance name and a duration in seconds, and my code will build a Get-Counter call to calculate the Batch Requests/sec information on my instance.

function Get-SQLTxnCount{

param([string]$InstanceName='localhost'
,[int]$DurationSec)

$smo = new-object ('Microsoft.SqlServer.Management.Smo.Server') $InstanceName
$ComputerName = $smo.ComputerNamePhysicalNetBIOS

$Samples = [Math]::Ceiling($DurationSec/5)
$output = New-Object System.Object
if($smo.InstanceName -gt 0){
$Counters = @('\MSSQL`$'+$smo.InstanceName+':SQL Statistics\Batch Requests/sec')
}
else{
$Counters = @('\SQLServer:SQL Statistics\Batch Requests/sec')
}

$Txns = Get-Counter -ComputerName $ComputerName -Counter $Counters -SampleInterval 5 -MaxSamples $samples
$Summary=$Txns.countersamples | Measure-Object -Property CookedValue -Minimum -Maximum -Average

$output | Add-Member -type NoteProperty -name InstanceName -Value $smo.DomainInstanceName
$output | Add-Member -type NoteProperty -name AvgTxnPerSecond -Value $Summary.Average
$output | Add-Member -type NoteProperty -name MinTxnPerSecond -Value $Summary.Minimum
$output | Add-Member -type NoteProperty -name MaxTxnPersecond -Value $Summary.Maximum
return $Output
}

Get-SQLTxnCount -InstanceName 'PICARD' -DurationSec 30

This function expands on the simple Get-Counter call in a couple ways.  First, I make sure I’ve narrowed the counters to only the specific named instance I want to measure. The second change is to the duration of the test and calculation of  how many 5 second samples will be collected over that duration. Finally, I create a custom output with the Measure-Object cmdlet to show the minimum, maximum, and average Batch Requests/sec for my samples.  This all comes together as a simple transactional measurement for my instance.

This isn’t a replacement for detailed benchmarks and analysis. For this, I recommend some of what Laerte Junior(@LaerteSQLDBA) has written. He has a much more detailed overview of Get-Counter and using it with SQL Server that I would highly recommend (P.S. His article gave me my start on this function).  Benchmarks are extremely important and necessary to make the information coming out of my function useful.

Just like a carpenter has his square or tape measure, this function lets me measure my SQL Server with just a few keystrokes. I still need the full context of what’s happening on my instance, but at least I’ll know the dimensions without a lot effort or additional work. I challenge you to start thinking about your own Powershell in the same way. Don’t think of simply creating scripts, consider how you can take your work and build out your own squares, calipers, or other tools to improve your skills as a craftsman.

Building Availability Groups with #Powershell

A couple weeks ago, I went over automating your SQL Server builds. That’s the kind of process that will benefit many SQL Server administrators. But why stop there?  I say that the more we can automate, the better.  So now let’s talk about automating another aspect of building SQL Servers: availability groups.

Availability groups were the killer feature in SQL 2012 and saw more enhancements with SQL 2014. In my opinion, this is a key feature that allows SQL Server to step into the horizontally scalable world. The problem is that it is not an easy feature to set up or configure. Availability groups have a lot of pitfalls and gotchas to navigate. This is where automation comes in as our ally to build a consistent, repeatable process to deal with these hurdles. Remember, automation is primarily about consistency and we can achieve that by scripting out as much of our build process as possible.

As before, let’s talk about the process we’re going to automate:

  1. Build a Windows failover cluster consisting of two nodes.
    1. The two nodes will already have SQL Server installed.
    2. We will add a file share witness into the cluster (because an even number of quorum votes is bad).
    3. The cluster will be simple, so we will skip things like heartbeat networks and other more advanced configurations.
  2. Build an availability group across both nodes of the cluster.
    1. Availability group will use standard endpoints
    2. Both nodes will be configured for synchronous commit and automatic failover
    3. Create a listener with a static IP address.

Building the Cluster

To ease the scripting process, Microsoft provides several cmdlets in the Failover Cluster module.  Using these, we can create our cluster.

Import-Module FailoverClusters

New-Cluster -Name 'NC1701' -StaticAddress '192.168.10.100' -NoStorage -Node @('PICARD','RIKER')| Set-ClusterQuorum -FileShareWitness '\\hikarudc\qwitness'

As you can see, the cluster creation is pretty easy. Keep in mind this is an extremely simple cluster with none of the usual items we include in production. While you can use this process for your production environment, make sure you work with a clustering expert to define all the additional configurations you will need to build in to make your cluster stable. I also want to call out that I created the fileshare for the witness outside of this script as well.

Before we proceed, I want to validate the cluster.  As with everything else we will use Powershell:

Test-Cluster -Name ‘NC1701’

Firewall Ports

An easy thing to overlook is the firewall ports for availability group communication. I know, I forget it all the time! We need to open up 1433 for SQL Server and listener communication and port 5022 for the availability group endpoints.  Some quick Powershell resolves this for us:

Invoke-Command -ComputerName RIKER -ScriptBlock {New-NetFirewallRule -DisplayName 'SQL Server' -LocalPort 1433 -Direction Inbound -Protocol TCP}
Invoke-Command -ComputerName PICARD -ScriptBlock {New-NetFirewallRule -DisplayName 'SQL Server' -LocalPort 1433 -Direction Inbound -Protocol TCP}

Invoke-Command -ComputerName RIKER -ScriptBlock {New-NetFirewallRule -DisplayName 'AG Endpoint' -LocalPort 5022 -Direction Inbound -Protocol TCP}
Invoke-Command -ComputerName PICARD -ScriptBlock {New-NetFirewallRule -DisplayName 'AG Endpoint' -LocalPort 5022 -Direction Inbound -Protocol TCP}

Building the Availability Group

Microsoft provides some cmdlets for building availability groups in the SQLPS module. The process is fairly straightforward, since we’re only declaring two synchronous nodes with automatic failover. If we were to have additional nodes, we would need to put in additional logic for determining which nodes would perform which roles.

Import-Module SQLPS -DisableNameCheckin
$AGName = 'ENTERPRISE'
$PrimaryNode = 'PICARD'
$IP = '192.168.10.101/255.255.255.0'
$replicas = @()

$cname = (Get-Cluster -name $PrimaryNode).name
$nodes = (get-clusternode -Cluster $cname).name

$sqlperms = @"
use [master];
GRANT ALTER ANY AVAILABILITY GROUP TO [NT AUTHORITY\SYSTEM];
GRANT CONNECT SQL TO [NT AUTHORITY\SYSTEM];
GRANT VIEW SERVER STATE TO [NT AUTHORITY\SYSTEM];
"@

foreach($node in $nodes){
    Enable-SqlAlwaysOn -Path "SQLSERVER:\SQL\$node\DEFAULT" -Force
    Invoke-Sqlcmd -ServerInstance $node -Database master -Query $sqlperms
    $replicas += New-SqlAvailabilityReplica -Name $node -EndpointUrl "TCP://$($node):5022" -AvailabilityMode 'SynchronousCommit' -FailoverMode 'Automatic' -AsTemplate -Version 12
}

New-SqlAvailabilityGroup -Name $AGName -Path "SQLSERVER:\SQL\$PrimaryNode\DEFAULT" -AvailabilityReplica $replicas

$nodes | Where-Object {$_ -ne $PrimaryNode} | ForEach-Object {Join-SqlAvailabilityGroup -path "SQLSERVER:\SQL\$_\DEFAULT" -Name $AGName}

New-SqlAvailabilityGroupListener -Name $AGName -staticIP $IP -Port 1433 -Path "SQLSERVER:\Sql\$PrimaryNode\DEFAULT\AvailabilityGroups\$AGName"

There are a couple cmdlets we’re using to make this all work:

  • Enable-SQLAlwaysOn enables Always On with the SQL Server service. This must be done before we can create our AGs.
  • New-SqlAvailabilityReplica creates a SMO object that represents our node for the availability group. We signify that we are creating SMO objects by using the -AsTemplate switch. Without that switch, the cmdlet would try creating the actual replica, which we can’t do since the availability group doesn’t actually exist at this point.
  • New-SqlAvailabilityGroup requires two items: the primary node the availability group will be created on (declared as a SQL provider path) and the collection of replica nodes.  Running the cmdlet will create the availability group and join the replicas to it.
  • Join-SqlAvailabilityGroup is used to join the replicas to the availability group. Weirdly enough, when you create the availability group, it won’t join the other replicas, so we have to take an additional step to join the non-primary nodes.

You’ll note we wrap the replica process in a foreach loop built on the Get-ClusterNode output. I use this approach so that, no matter how many nodes my cluster contains, I can add them all without explicit calls to the node names. The loop will add the SMO objects to a collection that will eventually represent all the nodes for the availability group (in this case, only two).

A gotcha to call out is the SQL Statement I execute on each node. When working on this, I kept encountering error 41131. It surprises me, because I believe these permissions should be granted when you enable Always On for the service. However, most of the time this does not happen, so I’ve included the SQL Statement to guarantee that my permissions are correct for creating the availability group

Once we’ve created the availability group, we need to create the listener. To do this, we need the listener name, the port we will use, the static IP that will be assigned to the listener name, and the availability group (declared as the provider path). To ease the implementation, I use the availability group name as the listener name and port 1433. This actually takes the longest of the steps, because the cmdlet has to validate the IP isn’t already in use, but as long as the address is available your listener will be created and your availability group built.

 At this point, you should have a functional availability group and can add databases to it.

Another approach

The interesting thing about these cmdlets is they all work using the SMO and related objects. That means that if you want a more controlled approach where you get down and dirty with the code, you can go that route. Thomas Stringer(@sqllife) has a great post on this method and I actually was going down that route originally.

The question I had to ask myself was if it was worth re-inventing the wheel for my availability group builds. I’m not a big fan of how the SQLPS cmdlets rely on the SQL Server provider. Additionally, if you build your script using Thomas’ method, your script will work anywhere you have .Net and doesn’t rely on you installing the SQL Server client tools to get SQLPS. However, using the SMO/.Net method means I have to do a lot more work to get my script running, where the SQLPS cmdlets have taken care of most of that work for me.

Which approach should you use? That’s for you to decide, but I encourage you to look at both methods and evaluate which approach works better for you. When all was said and done, I went with the SQLPS cmdlets because it meant I didn’t have to spend a lot of time writing additional code.

Just as with our SQL Server build process, we’re building consistency and repeatability into our environment. The added benefit is, using this script, I can create my availability group in about a minute. While I may not be creating availability groups often, my script ensures that when I do create them I can maintain my build standards and keep my systems aligned.


#Powershell and Automating SQL Server Builds-Part 3

Hopefully you’ve seen over the last two posts some basic techniques for automating and codifying your SQL Server builds.  There’s just two more items I want to cover here, questions you’re probably asking yourself already.

The build script

Let’s start with reviewing the whole build script to this point. While I wouldn’t recommend running this in production yourself, the finalized version looks something like this:

Run this from the install binary location
[Reflection.Assembly]::LoadWithPartialName(“System.Web”)
$SAPassword = [System.Web.Security.Membership]::GeneratePassword(16,4)
.\setup.exe /CONFIGURATIONFILE=<config file location> /SAPASSWORD=$SAPassword /IACCEPTSQLSERVERLICENSETERMS

#Configure the OS
New-Item -ItemType Directory G:\MSSQL\Data
New-Item -ItemType Directory H:\MSSQL\Logs
New-Item -ItemType Directory I:\MSSQL\TempDB

#Configure Instant File Initialization
$svcaccount = 'SDF\sqlsvc'
secedit /export /areas USER_RIGHTS /cfg C:\templocalsec.cfg
$privline = Get-Content C:\templocalsec.cfg | Select-String 'SeManageVolumePrivilege'
(Get-Content C:\templocalsec.cfg).Replace($privline,"$privline,$svcaccount") | Out-File C:\newlocalsec.cfg
secedit /configure /db secedit.sdb /cfg C:\newlocalsec.cfg

#Open the firewall for 1433
New-NetFirewallRule -DisplayName "Allow SQL Server" -Direction Inbound –LocalPort 1433 -Protocol TCP -Action Allow

#Set Server configurations
$smosrv = new-object ('Microsoft.SqlServer.Management.Smo.Server') localhost
$smosrv.Configuration.MaxServerMemory.ConfigValue = 4000
$smosrv.Configuration.MinServerMemory.ConfigValue = 2000
$smosrv.Configuration.MaxDegreeOfParallelism.ConfigValue = 4
$smosrv.Configuration.OptimizeAdhocWorkloads.ConfigValue = 1
$smosrv.DefaultFile = 'G:\MSSQL\Data'
$smosrv.DefaultLog = 'H:\MSSQL\Logs'
$smosrv.Alter()

#disable sa
$smosrv.Logins['sa'].Disable()

Next Steps

After this, we should consider deploying maintenance jobs, restoring databases, or building out things like availability groups. While I don’t cover these here, keep in mind these tasks can be scripted out as well.  I encourage you to consider how you could do this.  For example, if you leverage either Ola Hallengren’s scripts or the new Minion Reindex from the Midnight DBAs(@MidnightDBA), you have another piece you can automate. The key is that you have a repeatable process.

At Xero we have all our maintenance jobs as part of our administrative database deployment. This is handled through SQL Server Data Tools and .dacpacs. We achieve consistency and deployment speed by managing that solution and deploying the administrative database project. By maintaining the database in source control we manage our tool set, keeping it standardized.  When we add or update it, we can apply the changes out to our environment. This also means when we build a new server, we have a standardized way to install our admin tools with a minimum of muss and fuss.

The Point

Automation is more about consistency than speed, but speed is a nice side benefit. By assembling these components into a single script, we have a repeatable build process for any SQL Server in our environment. Our instances will be built the same way, every time, so long as we aren’t changing our script. The bonus is, since it’s all scripted, there’s no fumbling with wizards, dialog boxes, and making sure we type in the right values, so it all just happens. And in a matter of minutes. At Xero, I can take a server from nothing to ready for databases in about 20 minutes using these techniques.

Now, we could go pretty crazy with how we build our automation script. In fact, there’s some pretty cool tools out there that will help you with this. I’ll let you do that on your own. Just make sure that, before you do, you know all the steps you have to build your SQL Server. It’s fine and dandy to be able to script out things, but without a plan or process to automate first, most of the scripts you could write won’t do you much good because you can’t use them again.

P.S. HUGE thanks out to Melody Zacharias(@SQLMelody) for helping me with this series of posts.

#Powershell and Automating SQL Server Builds-Part 2

When last we left our heroes, we were discussing how best to go about building SQL Servers quickly and consistently using Powershell.  The thing is, we hadn’t quite gotten to the Powershell part yet and only really covered the build process plus installing SQL Server.  Let’s change that and move on to the next steps.

Configure the OS

It’s time to flex Powershell. Because Powershell works directly with the OS, it makes it really easy to perform tasks that SQL Server isn’t so good at. Let’s start with creating three directories for our database files:

New-Item -ItemType Directory G:\MSSQL\Data
New-Item -ItemType Directory H:\MSSQL\Logs
New-Item -ItemType Directory I:\MSSQL\TempDB

This assumes that our sysadmins have built the box with those LUNs. There are, of course, ways to script that out as well, but we’ll skip over that for the sake of brevity.

Enabling Instant File Initialization is a little tricky, because editing the local security policy is not something Powershell can do directly. Insert a harumph here. Anyway, we can do some tricks using the secedit tool. This technique, borrowed from Kyle Neier(@Kyle_Neier), basically dumps out the local security policy to a text file, updates it, then re-imports it to the local security policy. Kyle provides  a full function to use, but you can boil it down to the following script:

$svcaccount = 'SDF\sqlsvc'
secedit /export /areas USER_RIGHTS /cfg C:\templocalsec.cfg
$privline = Get-Content C:\templocalsec.cfg | Select-String 'SeManageVolumePrivilege'
(Get-Content C:\templocalsec.cfg).Replace($privline,"$privline,$svcaccount") | Out-File C:\newlocalsec.cfg
secedit /configure /db secedit.sdb /cfg C:\newlocalsec.cfg

As a quick aside, you might want to consider working with your sysadmins to actually set this permission in your domain Group Policy. Means you’ll get it without having to configure it yourself.

Finally, we want to make sure we open the firewall for port 1433:

New-NetFirewallRule -DisplayName "Allow SQL Server" -Direction Inbound –LocalPort 1433 -Protocol TCP -Action Allow

Configuring SQL Server

Now with the OS configured, it’s time to configure our SQL Server. For this, we’re going to leverage our friend and pal, the .Net SMO. As with many things in the SMO, the beauty of it is that we get a consistent API to interface with our SQL Server. For our purposes, we want to look at the Configurations collection of the Microsoft.SqlServer.Management.Smo.Server object. In here we can find everything you’d find in the sys.configurations view through T-SQL. Now let’s configure our max and min memory, max degree of parallelsim, and optimize for ad hoc queries.

$smosrv = new-object ('Microsoft.SqlServer.Management.Smo.Server') localhost
$smosrv.Configuration.MaxServerMemory.ConfigValue = 4000
$smosrv.Configuration.MinServerMemory.ConfigValue = 2000
$smosrv.Configuration.MaxDegreeOfParallelism.ConfigValue = 4
$smosrv.Configuration.OptimizeAdhocWorkloads.ConfigValue = 1
$smosrv.Alter()

Simple enough, right? You can get pretty fancy and add all sorts of logic to calculate these values, giving you a flexible setup script.

You could just as easily write these as a T-SQL script for a series of sp_configure executions to set your values. I’ve done it and know plenty of people who do. There are two reasons I’m moving away from this. The first is that some of my configurations, such the default database directories, need some specialized techniques (usually involving xp_regedit or something similar) to implement in T-SQL. I don’t like that approach because the extended stored procedures are usually unsupported and can have lots of issues. Powershell is much more graceful and (the second reason), using it across the board gives me a common interface for my configuration management.

In fact, let’s look at the default database directory settings. As stated, if you want to do this programatically in T-SQL, you are going to need to use xp_regedit to update the registry keys. Using the SMO is much, much easier:

$smosrv.DefaultFile = 'G:\MSSQL\Data'
$smosrv.DefaultLog = 'H:\MSSQL\Logs'
$smosrv.Alter()

Piece of cake, right? One last thing to do now, and that is disable the sa account:

$smosrv.Logins['sa'].Disable()

And we’re done!

To be concluded…

This builds the core of our server, but there’s a couple more odds and ends to discuss.  We’ll wrap up tomorrow with a few things, like how to handle maintenance jobs and other administrative tools.  We’ll also talk a little bit about the “why” of all of this.  Stay tuned for the thrilling conclusion!

(Well, I think it’s thrilling.)

#Powershell and Automating SQL Server Builds

Last week, my friend John Morehouse(@SQLrUs) and I had a bit of twitter banter about breaking and fixing things. Of course, my joke is usually “I have a script for that”, to which John replied:

Amusingly enough, I kind of do. It’s not quite the way you would think, though. Lately I’ve had a different attitude about “fixing” things in my environments, because sometimes it takes waaaaaaay more time to try and repair stuff than to just build it from scratch. Especially if you are scripting out your processes and automating your builds. This is what I would say to John;  if he walked in to my data center and abused my poor server with a wooden implement, I’d simply build a new one.

Before we get much further here, let’s talk about the fine print. Everything I’m going to talk about doesn’t get around backups, DBCC checks, or other processes we need to address as DBAs. We’re not talking about the data here, simply the server that hosts it all. It’s still vital that you do your due diligence to protect your data.

Building SQL Servers

So let’s talk about building our SQL Servers. Firstly, you should always have a defined build process for your environments even if you haven’t had a chance to automate or script it. Checklists and runbooks are the starting points for consistency in any IT shop and if you don’t have them, make them.

For our purposes, let’s assume the following build process. This is pretty basic and there’s lots of possible elements we could have, but I want to start simple. Here’s what we’re going to do:

  1. Install SQL Server
  2. Configure the OS
    1. Directory structures
    2. Instant File Initialization
    3. Open the firewall for SQL Server
  3. Configure SQL Server
    1. Configure max and min server memory, our maxdop setting, and optimize for adhoc queries
    2. Set default database directories
    3. Disable the sa account

I’m not going to give you a comprehensive script at this time, but instead show you how so you can use the same tricks in your environment. The reason for this is that everyone builds their servers a little differently, but if you define and script your process, you can  have your servers built and configured in 15-20 minutes.

Install SQL Server

This step is actually the easiest and has been around for a while, but I want to add a few twists to it. I always install SQL Server using a configuration.ini file. By using this approach, you can install your SQL Servers the same way, every time. You’ll find plenty of articles on the Googles on how to do this, so I won’t dive into it, but I want to address the matter of passwords.

The problem with using the .ini file is most folks (and this includes me) will put the passwords in plaintext in the file. This has numerous bad security implications. Depending on how accessible this file is, you could be giving away your service account and sa passwords and not even know it.

One step I take to manage this is I no longer include my sa password in the file, but instead randomly generate it when I install SQL Server. I went down this path because my friend Argenis Fernandez(@DBArgenis) got me thinking about how the sa account really gets used. The fact of the matter is that I rarely, if ever, log in to the server as sa. In my opinion, no one should even be using that account. This is why I will disable the account on my servers. I’m going to forgo the debate about whether this is a good idea or not (plenty of opinions on either side), but instead just work on the assumption that I need to provide some password to the account for the install. I still want a strong password, though, so I use the following code in Powershell to create my password and pass it as a command line switch. Feel free to read more up on the System.Web.Security.Membership GeneratePassword method for the details on how this works:

[Reflection.Assembly]::LoadWithPartialName(“System.Web”)
$SAPassword = [System.Web.Security.Membership]::GeneratePassword(16,4)
.\setup.exe /CONFIGURATIONFILE=<config file location> /SAPASSWORD=$SAPassword /IACCEPTSQLSERVERLICENSETERMS

This gets my install complete and, honestly, is the longest part of the process. There are ways to cheat around that, but I’ll save that for another post.

To Be Continued…

When I first started writing this, I figured it would be a quick post. Suddenly I found I was at 5 pages and going. So we’re going to break it up to make it a little more manageable.  Tune in tomorrow when we cover configuring the OS and SQL Server itself.

Dynamically Extracting .dacpacs With #Powershell

As DBAs, backing up our databases isn’t quite enough.  We also want to back up our schemas for additional protection.  And while we could go through some complex scripting to actual write out all those schema objects, Microsoft has given us a handy tool with SQL Server Data Tools and Visual Studio to capture these schemas.

I’m talking about sqlpackage.  I hadn’t used this before I got to my current job, but it really is a snap.  Using sqlpackage (in conjunction with managing your database through a Visual Studio project), you can easily deploy or script out database code changes.  You can also extract your schema with a few simple commands, like so:

sqlpackage.exe /action:extract /targetservername:localhost /targetdatabasename:dummy /targetfile:someawesome.dacpac

So this is great and all, but when you’ve got dozens or even hundreds of databases, you need a quick and efficient way to run this command.  Since this is a command line operation, Powershell becomes the natural way to do this.  Here’s a simple script that will allow you to extract all the user database schemas from a server:

#extract all your database schemas as dacpacs
$server = 'PICARD'

$dbs = Invoke-Sqlcmd -ServerInstance $server -Database tempdb -Query 'SELECT name FROM sys.databases WHERE database_id >4'

foreach($db in $dbs.name){
$cmd = "& 'C:\Program Files (x86)\Microsoft SQL Server\120\DAC\bin\sqlpackage.exe' /action:Extract /targetfile:'C:\dacpacs\$db.dacpac' /SourceServerName:$server /SourceDatabaseName:$db"

Invoke-Expression $cmd
}

Let’s look at two things in play here.  The first is the use of the ‘&’, which is the call operator.  This takes a string expression you create and then executes it.  In this case, we build out the expression with that operator.  Then we use item number two, Invoke-Expression, to run the expression we built.  The rest is pretty simple.

This is a quick and dirty version of it, but we could get a lot fancier.  In fact, Gianluca Sartori(@spaghettidba) has a very nice blog post where he provides a function to do this.  My own function (which looks pretty similar) goes a little something like this:

function Export-SQLDacPacs{
    param([string[]] $Instances = 'localhost',
          [string] $outputdirectory=([Environment]::GetFolderPath("MyDocuments"))
)

#get the sqlpackage executable
$sqlpackage = (get-childitem C:\ -Recurse | Where-Object {$_.name -eq 'sqlpackage.exe'} |Sort-Object LastWriteTime | Select-Object -First 1).FullName

#declare a select query for databases
$dbsql = @"
SELECT name FROM sys.databases
where database_id >4 and state_desc = 'ONLINE'
"@

#loop through each instance
foreach($instance in $Instances){
    #set processing variables
    $dbs = Invoke-Sqlcmd -ServerInstance $instance -Database tempdb -Query $dbsql
    $datestring =  (Get-Date -Format 'yyyyMMddHHmm')
    $iname = $instance.Replace('\','_')

    #extract each db
    foreach($db in $dbs.name){
        $outfile = Join-Path $outputdirectory -ChildPath "$iname-$db-$datestring.dacpac"
        $cmd = "& '$sqlpackage' /action:Extract /targetfile:'$outfile' /SourceServerName:$instance /SourceDatabaseName:$db"
        Invoke-Expression $cmd
        }
    }
}

Export-SQLDacPacs -instances 'PICARD' 

What’s cool is with this is a function, we can now extend it and do some really cool things.  Remember that CMS lookup we used last week?  Let’s use it here:

$CMS=’PICARD’
$servers=@((dir "SQLSERVER:\SQLRegistration\Central Management Server Group\$CMS").Name)

$servers+=$cms
Export-SQLDacPAcs -Instances $servers

And now I have a script to extract all my user database schemas from all the instances in my enterprise.  How cool is that?  Now I can put this into an agent job or a Windows scheduled task and have a regular schema extract, giving me an extra layer of protection for my systems.

Making SQL Backups better with #Powershell

SQL Server backups are a key part of any database administrator’s job and one of the first items that will get automated in an environment. In my career, I have seen a number of different approaches to this task, usually a combination of T-SQL and SQL Agent Jobs. When using these, you usually have two different approaches. The first is to create a single script to dynamically identify your databases and back them up serially. The second is to create multiple agent jobs, one for each database, that can execute in parallel, but must be created as static jobs.

Either approach presents us with some hurdles. The first enables us to dynamically handle adding databases to the server, but the backups must be executed serially. Serial backups can extend maintenance windows by not making efficient use of our resources. The second gives us the ability to run our backups in parallel, but leaves us with multiple jobs that are static and must be managed as new databases are added. Neither of these options are really ideal.

What if there was a third way?

Enter Powershell Jobs. While I usually don’t advocate database backups using Powershell (because they can be handled quite well with native T-SQL), I have come across a handy technique using Powershell Jobs and T-SQL to allow me to dynamically create backup statements and execute them in parallel. This allows me to find that intersection between minimal management and increased efficiency for my database backup management.

So what are Powershell Jobs?  They are a mechanism within Powershell for creating background jobs that can execute independent of the session that initiates them. Using this functionality, we can start multiple executions of any Powershell command in parallel, allowing them to run while other tasks execute. To find out more, you can read the documentation by running Get-Help about_Jobs or look them up on MSDN.

Start-Job is the key to this technique. To implement, I first use T-SQL code to get my databases for backup, much like I would when using pure T-SQL. Using this T-SQL, I will create an array of databases to be backed up and use that array to build a script block. This script block will contain a call to Invoke-SqlCmd for each backup statement, which can then be used with Start-Job to execute each backup job.

$dbs = Invoke-Sqlcmd -ServerInstance localhost -Database tempdb -Query "SELECT name FROM sys.databases WHERE database_id > 4"
$datestring =  (Get-Date -Format 'yyyyMMddHHmm')

foreach($db in $dbs.name){
    $dir = "C:\Backups\$db"
    if(!(Test-Path $dir)){New-Item -ItemType Directory -path $dir}
    
    $filename = "$db-$datestring.bak"
    $backup=Join-Path -Path $dir -ChildPath $filename
    $sql = "BACKUP DATABASE $db TO DISK = N'$backup'"
    $cmd = "Invoke-Sqlcmd -ServerInstance localhost -Database tempdb -Query `"$sql`" -QueryTimeout 6000;"
    $cmd += "Get-ChildItem $dir\*.bak| Where {`$_.LastWriteTime -lt (Get-Date).AddMinutes(-10)}|Remove-Item;"
    [scriptblock]$cmdblock = [ScriptBlock]::Create($cmd)
    Start-Job $cmdblock
}

In addition to using Powershell to create jobs, we also get some bonus features. For example, I can use Test-Path to validate my backup directories exist (and create them if they don’t).

(!(Test-Path $dir)){New-Item -ItemType Directory -path $dir}

Backup paths are big deal for SQL Server, because if that path doesn’t exist, we get an ugly backup error.  When using a T-SQL script for backups, administrators still need some additional step to create the backup directories. This is a task that is much easier using Powershell.
We can also leverage Powershell for deleting old backups by adding the following line:

$cmd += "Get-ChildItem $dir\*.bak| Where {`$_.LastWriteTime -lt (Get-Date).AddMinutes(-10)}|Remove-Item;"

Deleting files is something SQL Server is also particularly bad at. I’ve had a lot of sleepless nights that were the result of old backup files not being cleaned up. By leveraging this one line in the script block, the job will delete any full backups older than 10 minutes. We could change this window or be more elegant as our needs require, but the end result is that we only keep the most recent backup file.

What’s nice is that the script can be easily extended for log backups without a lot of retrofitting. I make four changes for this. The first is to filter our database query to ignore any databases in SIMPLE mode, as they can’t have their log files backed up.

$dbs = Invoke-Sqlcmd -ServerInstance localhost -Database tempdb -Query "SELECT name FROM sys.databases WHERE database_id &gt; 4 AND recovery_model_desc != 'SIMPLE'"

The second is change the backup command from BACKUP DATABASE to BACKUP LOG.

$sql = "BACKUP LOG $db TO DISK = N'$backup'"

Next, I change the backup file extension from .bak to .trn, because I prefer to distinguish my backup file types in this manner.

$filename = "$db-$datestring.trn"

Finally I change the retention period for the delete step to 2 days, so I can keep transaction logs on disk in the event I need them for recovery.

$cmd += "Get-ChildItem $dir\*.trn| Where {`$_.LastWriteTime -lt (Get-Date).AddDays(-2)}|Remove-Item;"

The end result is this script, which works much like our full backup script:

The end result is this script, which works much like our full backup script:

$dbs = Invoke-Sqlcmd -ServerInstance localhost -Database tempdb -Query "SELECT name FROM sys.databases WHERE database_id > 4 AND recovery_model_desc != 'SIMPLE'"
$datestring =  (Get-Date -Format 'yyyyMMddHHmm')

foreach($db in $dbs.name){
    $dir = "C:\Backups\$db"
    if(!(Test-Path $dir)){New-Item -ItemType Directory -path $dir}
    
    $filename = "$db-$datestring.trn"
    $backup=Join-Path -Path $dir -ChildPath $filename
    $sql = "BACKUP LOG $db TO DISK = N'$backup'"
    $cmd = "Invoke-Sqlcmd -ServerInstance localhost -Database tempdb -Query `"$sql`" -QueryTimeout 6000;"
    $cmd += "Get-ChildItem $dir\*.trn| Where {`$_.LastWriteTime -lt (Get-Date).AddDays(-2)}|Remove-Item;"
    [scriptblock]$cmdblock = [ScriptBlock]::Create($cmd)
    Start-Job $cmdblock
}

So how do we use this in SQL Server? We can stick with the previous pattern of using SQL Server Agent Jobs. Since SQL Server 2008, Agent Jobs have supported a Powershell step. To implement that step, we would create our same backup job in the Agent as before, but now instead of creating a T-SQL step we can create a Powershell step and insert our script, like so:

MSF_AddJobStep_PoSHBackups

There is one additional piece of code we have to add to make it work, however. The way Agent Jobs operate is that once the script completes and our background jobs are initiated, the Agent Job step stops and closes our parent session. When this happens, the remote jobs we just kicked off get canceled and our backups don’t happen. We need to add a logic check to keep the Agent Job running until the background jobs are no longer running. This is simple and only requires the following code to accomplish our task:

$jobs = 1
while($jobs -gt 0){$jobs = (get-job | where {$_.State -eq 'Running'} | Measure-Object).Count}

With this in place, we can now schedule and run our backup task as we would have before, except now we have a more dynamic and more efficient Powershell script to do it with. We can also do the same with our log backup script as well.

Overall these are very basic scripts and could be enhanced, but the core functionality is what you should focus on. The emphasis is on making the best use of our tools and resources in the most efficient way possible. This approach is also nice for SQL Server administrators as the script is primarily a wrapper for T-SQL backup commands that we all know and love. For those SQL Server folks who are still getting their feet wet with Powershell, this is a very intuitive way to start using the syntax and get some quick bang-for-your-buck.


DSC – The Custom SQL Resource

Last post I gave the rundown of Desired State Configuration and how it worked, but I skipped over the “secret sauce” around SQL Server. Of course, that was the tease to get you to come back for this week’s post.  Let’s dig in to the process and see how we can use DSC to install SQL Server without ever having to log in to the box.

Installing the Resource

The first thing to understand is that your custom resource will be contained within a Powershell module.  This means it lives in your WindowsPowershell\Modules directory.  The structure of the resource is specific and requires a couple pieces:

  • <Folder – Your Resource Name>
    • Your Resource Name.psd1 (Powershell Data file describing the module)
    • Folder – DSCResources (Contains all resources in the module
      • Folder – Your Resource Name (folder containing your specific custom resource)
        • Your Resource Name schema file (descibes the resource)
        • Your Resource Name script

Now, if you’re using the Resource Designer toolkit, these will all get created for you.  I highly recommend doing that, because you miss one piece and you’ll be bashing your head against this for a week or so.  Ask me how I know.  :)

Another thing to setup is your execution policy.  As this is a custom script, the local server needs to it is trustworthy.  I set the execution policy to RemoteSigned for this (Set-ExecutionPolicy RemoteSigned).  If you don’t do this, you’ll get an invisible failure, where your configuration will fail but you will have no feedback on the reason.  Again, ask me how I know!

Custom Resource

When you actually create the resource script, you need three functions:

  • Get-TargetResource
  • Test-TargetResource
  • Set-TargetResource

Get-TargetResource is the function that will return the resource you’re checking for.  It returns a hash table to represent the key values of the resource.  Test-TargetResource is a boolean check, returning true if the resource exists, false if it does not.  Set-TargetResource does all the work, as it is the function that is called if the resource needs to be created.  You can have other internal functions if you want to further modularize your process, but these three must exist for DSC to work.  The internal operations must be written by you, but as long as the names and outputs are consistent you are set.

The other key piece is not in the resource itself, but up in the data file describing your module.  Within that file you need to have a GUID set for the module so that the DSC engine can reference it when it is installed on other machines.  I tripped up on this many times, so be careful.

cSqlInstall

VPn1q6NSo let’s talk about the resource I constructed.  As I said in my previous post, I was frustrated with the limitations of the Microsoft resource.  The biggest limitation was the inability to use a config file, which is pretty much how I do SQL installs now.  So that’s how I approached writing mine, leveraging the .ini file for most of the installation detail.

 The resource accepts the following parameters:

  • InstanceName – (required) The name of the instance you plan to install, MSSQLSERVER if you want the default.
  • InstallPath – (required) The UNC path for where the setup files are.
  • ConfigPath – (required) The UNC path for the config.ini file.
  • UpdateEnabled – Boolean, defaults to false.  If true, the setup will check for and attempt to install available SPs and CUs.
  • UpdatePath – If UpdateEnabled is true, this is the path where the update files reside.
  • MixedMode – Boolean, defaults to false.  If set to true, the install will set authentication to mixed mode and create ‘sa’ with a randomly generated password.

I’ve tried to keep the parameters to a minimum and allow for customization to happen within the the config file.  The biggest gap right now is that the service accounts and their passwords will be contained in plain text in that file.  Ideally, you’d use managed service accounts to get around this, but I still am working on setting those up.

We then look at the functions within the resource.  Get-TargetResource should return a hash table, so what will return from this resource is the InstanceName, InstallPath, and ConfigPath.  This is because these are the required parameters for the function, but really we only care about the InstanceName.   To get that, it’s a simple check of the services on the target machine to find a service with the desired InstanceName.  If we find it, it returns that name.  If we don’t, it returns NULL.

Test-TargetResource is a lot simpler.  Since we want a boolean, all we do is use Get-TargetResource to get the resource hash table.  Then we check the hash table’s InstanceName with the desired InstanceName.  If they match, we return true and indicate the resource exists.  If they don’t match, the resource doesn’t exist and we return false.

Set-TargetResource is fairly straightforward.  Using these arguments along with some default ones, the resource will build out a call to setup.exe.  Once this string is built, the resource will invoke the setup.exe call just like any other unattended install.  After the setup run is complete, the script finds the most recent Summary.txt file and checks it to see if the installation was successful.  If the install was successful, it restarts the server and we’re done.  Otherwise, it will report an error.

Work To Be Done

There’s still some other gaps in the code that I will be working on.  First, it assumes the local machine account that the Local Configuration Manager runs under has permissions to the file shares for the SQL install.  If your environment is more locked down, this could be a problem.  There’s also the issue of logging that still needs to be addressed, because the current logging is not useful.  All of these items (and others that come up) will be addressed eventually.

I also plan to add other resources to this.  I’d like to get one to handle service pack and cumulative updates outside of the SQL install so that you can use it to keep everything to the correct version as well.  I’ve posted the code to my GitHub repository  As with the other scripts there, it is a work in progress and can use a fair amount of improvement.  If you have any suggestions or recommendations for this code, I’d love to hear of them.

Desired State Configuration

As a DBA, I’m always concerned with consistency in my environments.  From maintenance to code deploy, I want things to be done the same way every single time.  Usually this is a process question, making sure that you harness the power of check lists and repeatable steps.  You then make it better by wrapping your process in scripts and leveraging other tools.

When I go into a new shop, one of the first things I usually have to do is bolt down the server build process.  Most environments will manually build servers, where an engineer goes in and manually installs the appropriate packages and features.  Then a DBA will install SQL Server, adding maintenance jobs and deploying admin databases.  Even with building scripts and sketching out steps, there will be a lot of spots where configurations can be missed and the process can breakdown.  Fortunately, we now have a tool in Powershell that helps us solve these problems.

You might have heard of Chef or Puppet.  Well, now Powershell has its own answer for managing server configurations:  Deired State Configuration or DSC.  DSC is an engine included in Windows Management Framework 4 that allows folks like us to create declarative configurations for our servers which can then be acted on by our servers.  This brings the next level of automation, infrastructure as code, to our servers.

How does it work?

The process for DSC relies on two things:  Your configuration and your resources.  You create a configuration, which specifies the resources you want (or don’t want).  You then use DSC via Powershell to deploy the configuration to a target server, which then runs the configuration through a Local Configuration Manager (LCM) to check those resources.  If those resources are present, the LCM takes note and moves on.  If the resources is not present as declared in the configuration, the LCM will then attempt to install or configure the resource as specified in the configuration file.

Simple, eh?  It’s meant to be that way.  The idea is to have an intuitive way to deploy servers in a standardized method, whether it’s 1 or 100 (or 1000 for that matter).  It’s also meant to be flexible.  DSC ships with some basic resources (things like File, Windows Feature, and Registry Key), but because it’s built in Powershell you have the ability to create your own resources.  This means the sky’s the limit with what you can do.

What do I need?

Let’s dig a little more into the detail of how DSC works.  First off, if we want to use DSC, we need a couple things:

  • Windows Management Framework 4.0 on all machines involved
  • Permissions to run custom scripts on the targets (if we’re using custom resources, more on this later)
  • Custom resources need to be deployed to the target ahead of deploying the configuration

Note I call out some requirements around custom resources.  These are scripts you write yourself.  We’ll talk about those in a bit, just file these bits away for later reference.

Now, the configuration.  This is a configuration I created for deploying a base installation of SQL Server, so the resources are designed around that.  Here’s the script:

Configuration SQLServer{
   param([string[]] $ComputerName)

   Import-DscResource -Module cSQLResources

   Node $ComputerName {

       File DataDir{
           DestinationPath = 'C:\DBFiles\Data'
           Type = 'Directory'
           Ensure = 'Present'
       }

       File LogDir{
           DestinationPath = 'C:\DBFiles\Log'
           Type = 'Directory'
           Ensure = 'Present'
       }

       File TempDBDir{
           DestinationPath = 'C:\DBFiles\TempDB'
           Type = 'Directory'
           Ensure = 'Present'
       }

       WindowsFeature NETCore{
           Name = 'NET-Framework-Core'
           Ensure = 'Present'
           IncludeAllSubFeature = $true
           Source = 'D:\sources\sxs'
       }

       cSQLInstall SQLInstall{
           InstanceName = 'MSSQLSERVER'
           InstallPath = '\\HIKARU\InstallFiles\SQL2014'
           ConfigPath = '\\HIKARU\InstallFiles\SQL2014\SQL2014_Core_DSC.ini'
           UpdateEnabled = $true
           UpdatePath = '\\HIKARU\InstallFiles\SQL2014\Updates'
           DependsOn = @("[File]DataDir","[File]LogDir","[File]TempDBDir","[WindowsFeature]NETCore")
       }
   }
}

SQLServer -ComputerName MISA

 This looks like (and is) a Powershell function, just a special one using the ‘Configuration’ key word.  When you call the function, it will create a special file for the Node(s) declared within the configuration, a Managed Object Format (.mof) file.  This is a standardized file type that defines our configuration.  Note, this file is not Windows specific, as the design for DSC is to ultimately be used with non-Windows OS machines and hardware.  It’s the .mof that will be deployed to our target machines and acted upon by the LCM.

 Next up in the file, the Node.  This is the target for our configuration.  You’ll see that in the script, it is parameterized as an array, meaning we can run the script for as many different targets as we want, we just have to pass the array of machine names we want.  We could also have multiple nodes within the configuration script, if we wanted this configuration to have different types of targets.

 Within the Node section, we have our resource declarations.  This is the meat, the pieces of code that identify what needs to be configured.  The nice thing is reading them is fairly intuitive.  Let’s look first at the File resource.  These three declarations are for my default directories.  I have to declare specify that it is a directory (the Type), the path (the DestinationPath), and that is must exist (Ensure = Present).  As an aside, I could get a lot more involved with the File resource, copying things from a net share down to the target if I wanted, things like config files or web source directories.

 The Windows Feature resource is also easy to understand.  Using this, I can make sure certain Windows features exist on the target.  Since I’m using this particular configuration to install SQL Server, I’ve declared that I want the Net-Framework-Core feature installed.  This is a prerequisite for installing SQL Server.

 Finally, I have the cSQLInstall resource.  I’m going to save the explanation of this detailed custom resource for the next blog post, but I want to call attention to the DependsOn argument.  With this, we can declare prerequisites for our resources.  This give us some additional resilience for our install, allowing us to create some precedence within the configuration.

Where do I run it from?

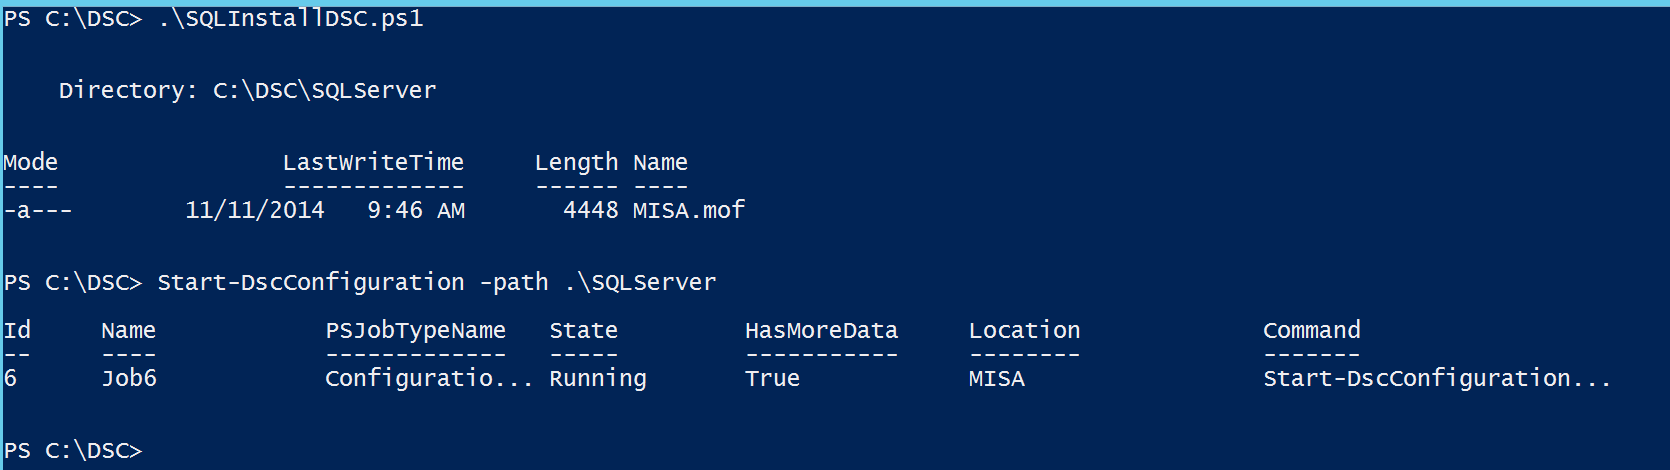
Once you have the configuration written, you simply need to run it.  It will create a directory named after your configuration and contain a .mof file for each node within it.  The next step is to use the Start-DscConfiguration cmdlet and call the path where all our files live.  After that, a Powershell background job kicks off and DSC handles the rest.

Start-DSCConfiguration

Any not cool parts?

So not everything is unicorns and rainbows with DSC.  First off, it’s a stone cold female canine to debug, because it’s difficult to capture any logging around it.  Many times I would try and run something and it would fail before it even entered my script.  Most of this was around my custom stuff, but it was extremely frustrating. 

As for the custom scripts, DSC is still fairly immature.  Microsoft has some resource kits out there, but most of the resources in there are pretty weak.  The SQL resource provided has several gaps, such as being designed specifically for SQL 2012 and not being able to use .ini files.  So you’re probably going to write resources on your own, which has a LOT of gotchas.  You’re going to want to start with the Resource Designer Tool, which will solve most of the gotchas for you.

 Also, since it’s immature, there’s not a lot written about it.  Especially for SQL Server.  Powershell.org and MSDN are going to be your best bets for help, but this is a brave new world.  Be prepared to walk a fair amount of the way on your own.  If you want to start, go with this book from Don Jones.

 Infrastructure as code is the future.  DSC gives us intuitive tools with a straightforward interface (once your resources are written, of course) to make our environments more consistent and easier to manage.  I’m super excited about this feature and will be blogging more about it in the weeks to come.  Definitely stay tuned for next week, where I’ll walk through my custom SQL Server resource (and tell you where you can get the code yourself).  Also, hit me up if you’ve got questions or any experiences of your own around DSC, I’d love to hear about them.