Art of the DBA Rotating Header Image

A Month of SQLPS – Common Powershell cmdlets in SQLPS

One of the reasons to create a provider is so administrators have a common interface for using a section of the Windows ecosystem. Whether it’s the file system, the registry, or some other slice of the stack, you should be able to use a provider to browse, explore, and manipulate that part of Windows in the same way as you can in other providers. Because each part of the ecosystem is different, each provider will have its own way of functioning. A file or directory is simply not the same as a registry key. This means that some cmdlets will be implemented and some will not, all depending on how the provider is built.

With the SQL Server provider, there are only a handful of common cmdlets implemented:

  • Get-Location: Gets the current node.
  • Set-Location: Changes the current node.
  • Get-ChildItem: Lists the objects stored at the current node.
  • Get-Item: Returns the properties of the current item.
  • Rename-Item: Renames an object.
  • Remove-Item: Removes an object.

None of these are surprise, as they provide most of the basic navigation and retrieval of the provider. You probably know these cmdlets better by their aliases:

Set-Location SQLSERVER:\SQL
cd SQLSERVER:\SQL

Get-Location
pwd

Get-ChildItem SQLSERVER:\SQL\localhost\DEFAULT\Databases
dir SQLSERVER:\SQL\localhost\DEFAULT\Databases

As you can probably guess, if these cmdlets weren’t included, we’d have a pretty tough time getting around the provider. They are also core to our provider experience, so most users don’t even think about them. Having the cmdlets may not seem like a big deal, but without them we’d be stuck. It’s all about that common navigation experience.

Of these cmdlets, Get-ChildItem is most commonly used to work with objects in the provider. We’ve already covered how we can combine Get-ChildItem with either Select-Object or Format-Table to view specific properties of our objects. Add to this Get-Item, which covers the same function, just up a level, allowing us to work directly with a specific object:

Get-Item SQLSERVER:\SQL\localhost\DEFAULT\Databases\AdventureWorks2012 | Format-List Name,Version,CompatibilityLevel,LastBackupDate,ActiveConnections

SQLPS-4-1

This small handful of functions let us get around. We can use Set-Location to browse to the path we need to work in, then leverage Get-Item and Get-ChildItem to acquire objects and work with them. The benefit here is we can use the same syntax for reviewing database objects, files, or environment variables. This common experience eases the use of Powershell and helps administrators move from one stack to another.

There are two other cmdlets on this list that I want to talk about, along with another one that is conspicuously missing. What we’ve covered here handles navigation, but the remaining cmdlets are more about object manipulation. In my next post, we’ll dive a little into those, why they are there, and what’s missing.

A Month of SQLPS: SMO Building Blocks

So far, we’ve covered how to start up SQLPS and some of how we can navigate within the provider. These are the first few steps along the path of using SQL Server and Powershell together. Next is to understand how it works behind the scenes. SQLPS makes a lot more sense once you understand how it’s constructed.

A key concept of Powershell is that everything in it is an object, specifically a .Net object. Everything. I stress this to new users of the language because so much of Powershell’s strength comes from this foundation. For people using other scripting languages, such as Korne or Bash, artifacts are simple strings or integers. Objects add an entirely new level of functionality to the language, giving scripters access to properties and methods for their scripts.

To see what the SQL provider is built on is a simple matter of using Get-Member to interrogate the components:

Get-ChildItem 'SQLSERVER:\SQL\localhost\DEFAULT\databases' | Get-Member

SQLPS-3-1

Note the object type, a Microsoft.SqlServer.Management.Smo.Database object. This is part of the SQL Server Management Objects (SMO) .Net library, an API that’s been around since 2002. What does this mean? That the way SQLPS interacts with SQL Server and its components is the same as if we were using almost any other SQL Server tool out there, including our age old standby, SQL Server Management Studio. There’s not strange voodoo magic going on here.

Because of this foundation on objects, we can leverage their methods and properties for our specific purposes. For example, let’s do a directory lookup on the path we use above:

dir 'SQLSERVER:\SQL\localhost\DEFAULT\databases'

SQLPS-3-2

Unsurprisingly, we get a listing of our databases, but the output columns are predefined. This is baked into formatting definitions within the provider, displaying these properties by default. That’s key, all the displayed columns are properties of the SMO database object. So what if we wanted to show different columns? It’s just a matter of displaying the properties we want:

dir 'SQLSERVER:\SQL\localhost\DEFAULT\databases' | Format-Table name,createdate,lastbackupdate

SQLPS-3-3

We could then start to leverage the methods to automate many of our tasks. Say, for example, you wanted to script off your instance’s logins. While we could use the script task within management studio, we could also use Powershell and the SMO’s .Script() method to accomplish the same task:

dir 'SQLSERVER:\SQL\localhost\DEFAULT\logins' | ForEach-Object {$_.Script() | Out-file C:\TEMP\logins.sql -Append}

SQLPS-3-4

Note that this is exactly the same as if you had scripted these objects out in SSMS. This is because both tools are using the same .Net libraries under the hood. There’s very little difference between these tools, except the interface. This means that, as you make the transition from one tool to the other, you can expect similar behaviors.

Properties and methods are the secret sauce of Powershell and open up many avenues for automation and script writing that we’ll explore as we continue this series. The emphasis here is to understand that using the SQLPS provider isn’t a whole different from other tools you’re used to using. Next up, we’ll start talking about some of the standard Powershell cmdlets available to us in the SQLPS module and how we can use them.

A Month of SQLPS: The Provider

Next up in my series on the SQLPS module is to talk about the fundamentals of the provider. This is the core of the SQL Server module, providing an extension to the shell for managing and working with SQL Server. Providers intended togive administrators a file system-like interface for a part of the Windows ecosystem, allowing for a more intuitive way for managing parts of their environment.  

To list all your providers, just use Get-PSDrive:

GET-PSDrive

SQLPS-2-1

We have several different types of providers, including FileSystem, Environment, and Registry. SqlServer is  listed once you’ve imported the module. Once loaded, we can treat the SQL Server components as a file system, with many of the usual commands. Let’s switch to that drive and see what we have available to us:

CD SQLSERVER:\
dir

SQLPS-2-2

Right away we can see many familiar components. Each of these folders is a different part of the SQL Server stack where we can access and manage our environment. We’ll go ahead and browse into the SQL Engine to see what’s there:

CD SQL
dir

CD SHION
dir

CD DEFAULT
dir

It’s that easy to start browsing around our SQL Servers.

Entering the ‘SQL’ folder means we will be working directly with the SQL Engine. Now, by default the provider will only list the local machine under the SQL folder, but we can access any SQL host from here. Just change your location to that machine name. Note, it’s the machine, not the SQL Server instance.

Once you’re in the target machine, the provider will list all instances on that server. Most of the time you’ll probably see DEFAULT, but if you’re using named instances, then those names will be listed. Next, we’ll move down into the instance itself to get all the components for the instance. It should look pretty familiar, since you probably see those components whenever you open up the object explorer in SSMS.

Powershell providers were written to provide an intuitive interface so that administrators wouldn’t get bogged down in trying to get to different parts of their environment, so it’s not surprising that navigating SQL Servers is easy. Take note of the this pattern:

SQLSERVER:\Folder\Machine\Instance\Components

This is the path for SQL Server components and is key to referencing objects with the SQL Server provider.

However, it’s still a little rough sailing. Since using the provider can involve remote servers, your experience will be bound by the ability to communicate with your SQL Instances. It also means that if you’re using tab complete or Intellisense in the Powershell ISE, it will likely not work with provider components because it will timeout when trying to communicate. You will need to rely more on your knowledge of your instances and some of the components than using auto-completion elements.

Why does this happen? It has to do with the provider’s fundamental building blocks the Server Management Objects (SMO). This is a standard .Net library and brings with it rich, consistent functionality that is used throughout the Microsoft ecosystem. In the next post, we’ll go into detail of the SMO and how it’s implemented in the provider, why this an advantage, and what considerations we need to keep in mind as we use it.

A Month of SQLPS: Getting Started

Time for me to get off the bench and start blogging again. What better way to go than to explore the oft-maligned SQL Server Powershell module, SQLPS. Over the course of the next month-ish, I want to explore the SQLPS module, the cmdlets it provides, and the functionality within the provider. We’ll look at the good and the bad within this module, seeing how we can leverage its functionality to our benefit.

Before we can start using SQLPS, we’ll need to get it installed and loaded. Installing the SQL Server Powershell tools is part of the SQL Server setup, included when you install the SQL Server components, but not separately declared. This is good and bad, because while it will always be available to you on a machine with SQL Server components (client or server), you don’t have the ability to control this.

Once installed, loading it is simple. Just open a Powershell session and use the Import-Module command:

SQLPS-1-1

Uh oh! A warning already? What’s that about? Don’t worry, a little investigation can show us what’s going on. Let’s run that same command with the -Verbose switch:

SQLPS-1-2

Using the -Verbose switch gives us a lot of additional detail and we can see what the problem is. Powershell uses a list of approved verbs, which can be listed using the Get-Verb cmdlet. However, when writing the SQLPS module, the SQL Server team included Encode-SqlName and Decode-SqlName for converting SQL Instance names to the SQLPS path syntax. Encode- and Decode- are not approved verbs, which is why we see that warning.

(Don’t worry about what path syntax is, we’ll cover that in this series.)

What does this mean? Not much, the module still gets loaded just fine. All Powershell is trying to do is warn you that you have some code that doesn’t match the language standards and could be hard for users to find. As we’re already pretty far down the path with the language, this warning probably won’t go away anytime soon. Now, you can have Powershell skip all that verb checking stuff with the -DisableNameChecking switch, but I don’t think it’s really necessary. I just accept the warning message for what it is.

Once the module loads, your Powershell session is put into the context of the SQL Server provider, SQLSERVER:\. This can be a bit of a gotcha because many file lookup patterns change once you are in the SQL Server provider. A notable example is you won’t be able to browse UNC paths until you are back in the context of a file system provider. This is why I recommend this pattern for loading the SQLPS module:

$pwd = Get-Location
Import-Module SQLPS
Set-Location $pwd

This simply captures your current working location and, once the SQLPS module is loaded, will switch you back to it.

It should be noted that the SQLPS module is only available on SQL Server 2012 or better and requires Powershell 2.0. Previous versions will require other logic to load the SQL Server snap-in. In general, I recommend always using the current client tools when possible, but this behavior could limit you if you are SQL Server 2008 R2 or earlier.

Feels a bit like a rough start, doesn’t it? This initial experience is one of the biggest challenges for DBAs getting into Powershell. It’s another language and since the first experience is filled with gotchas, it’s hard to embrace. The reason I want to call these out early, though, is to help you over that first hill. Over this series of posts, I hope to show you the ins and outs so you can effectively use the SQLPS module and not get tripped up on it.

Helping Your #Powershell With Twitter

Today I had a bit of a Twitter conversation with some SQL folks I know that were looking for Powershell help. It’s a common enough thing, of course. The trick is, we SQL people are so used to having the #sqlhelp hashtag as our first line of defense for figuring out problems that it’s weird for us to not have something like that for our other hurdles. Where most of these hash tags bombard you with spam and noise, this one is almost pure signal, so we often forget how good we have it.

PoSHHelp_TweetDeckOther communities would like to capture that magic as well. I know those of us using Powershell want our own hash tag for help. Well, now we’re going to try. Some of the notables already use #PoSHHelp, but not a lot of people pay attention. A group of us want to change that. I’ve already added a column for it in my TweetDeck and will keep my eye out for Powershell questions I can help with. Folks like Shawn Melton(@wsmelton), Adam Bertram(@adbertram), Derik Hammer(@SQLHammer), Rob Sewell(@fade2black), Boe Prox(@proxb), and others will be looking for your Powershell problems and try to assist you over Twitter with the same care and grace as SQLHelp.

It’s going to take some work, but we’ll try and apply the same ground rules to this hash tag:

  1. Questions should fit into 140 characters.
  2. If they don’t, put your question and information on another site (like ServerFault.com) and link to it.
  3. DO NOT SPAM THE HASH TAG. This is important, because in order to make it useful it needs to be kept clean. Don’t use it to advertise your blog posts or articles, but only for Q&A.
  4. Don’t be a dick, a.k.a. Wheaton’s Law. It’s all too easy to let the anonymity of the internet get the better of us. Be polite and respectful to those using and accidentally mis-using the hash tag.

Also, there are some people who also use #PowershellHelp. I’m going to watch this too, but I would encourage you to use #PoSHHelp instead. Mostly because it’s shorter and will give you more room for your question.

So, if you have a problem…

And if no one else can help…

And if you have a Twitter account, maybe you can tweet your question to…

nRhfnZ0


#SQLPASS 2015 Board of Director’s Elections

Apologies for the unplanned blogging hiatus, but I’m back. While I’ve got a few technical post ideas bouncing around in my head, some events over the past two weeks have arisen that I want to blog on. If you’re hoping for more Powershell posts, do not despair! They will be along shortly.

Recently PASS took nominations for the annual Board of Directors election. This is an opportunity for members of the community to step up and volunteer their efforts on a global level to help shape and guide PASS, as well as act as a conduit for the community’s voice. Every year has a solid slate of candidates and this year is no different. In no particular order, they are:

As a community, we’ve got some tough decisions, as all four candidates are outstanding members of our #SQLFamily. Thanks to all of them for devoting so much time and effort to make our organization better. No matter the outcome of this election, the PASS community will be well served.

With all this being said, I wanted to share a little more with you about the new candidates and voice my support for them in this election. This is not to tell you how to vote, but to provide you some insight to who these gentlemen are so you can make a better informed decision. To be honest, I’m going to have a tough time myself.

Ryan_400x400Ryan

Ryan Adams is a PASS member I’ve known for a couple years now and very few people can compete with his passion and drive for building the community. Ryan is the President of the Performance PASS virtual chapter, helping guide and build that outlet into one of the stronger virtual resources out there. This is in addition to being a board member for the North Texas SQL Server Users Group, one of the largest PASS chapters out there. Add to this the fact that Ryan is an active community speaker, sharing his knowledge and passion at numerous PASS events. This makes it no surprise that he’s an active Microsoft MVP, as he’s an excellent community voice for SQL Server and the people who support it.

But that’s all out there on the Googles for you to find. You probably want to know what sets Ryan apart. I can tell you that there are very few people as driven and energetic about PASS as Ryan is. I’ve had several conversations with him and his passion is infectious. Combine this with his grassroots organizational experience and it is no surprise that he has thrown his name into the hat. Ryan is someone who not only knows what needs to be done, but also how to make it happen.

ArgenisFernandez250sqArgenis

Full disclosure before I get started: Argenis Fernandez is a close friend that I’ve known for several years. He’s had a tremendous impact on both my professional career and community participation. This shouldn’t discount any of want I would say about him and, hopefully, only strengthens these views.

I think most people have probably heard of Argenis at this point. He’s a Microsoft Certified Master and MVP. For a long time he’s been one of the strongest technical voices in the community. What sets Argenis apart is that he has a fantastic ability to connect with others. Anyone who has talked with Argenis knows that he genuinely cares about the success of those around him. He constantly mentors other and builds up those he talks with. In sports terms, he’s that super start that makes his team mates better.

My personal story relating to this is from two years ago, as I was just getting started with my speaking career. Argenis was in Denver on a consulting engagement and we were going to dinner. The conversation meandered, but at one point I mused about possibly taking the Microsoft certifications. Argenis simply looked at me and said “Dude, just take them. You can pass them.” As with most mentors, he didn’t just nudge or suggest, he outright shoved me. A year later, I had all five certs to get the MCSE Data Platform. I could tell you at least 10 other stories like this where Argenis motivated someone (not just myself).

The Election

This upcoming election, as I said, will be tough. While I spoke specifically about Ryan and Argenis, Tim and Jen have both demonstrated their commitment to PASS. Hopefully I have been able to fill in some gaps about why the new candidates should also receive your consideration.

What’s most important is that you vote. Last year I blogged about some issues I had with the direction PASS is going. This is your chance to influence that direction. The candidates have the opportunity to mold and shape PASS over the next several years, so these elections have tremendous impact. Over the next few weeks I’m sure you’ll get a chance to learn more about all four candidates, more than I have shared here. Take that opportunity. If you’re on Twitter, you can interact with them there and learn about the candidates yourself. And vote.

Desired SQL Configuration with #Powershell – Part 2

Last week, as part of T-SQL Tuesday 68, I introduced you to two Powershell functions for validating and setting your SQL Server configurations. While useful, they depend on some sort of configuration source, which begs the question: How do we get this source? This post covers the third function that will help you create your configuration source, using an existing server’s values and allowing you to use them directly or modify them as you see fit.

Get-SQLConfiguration

The concept of Get-SQLConfiguration is simple: Get the sys.configuration values of a SQL Server instance and export them as a hash table that can be used by the other functions. The additional criterion to consider is that Test-SQLConfiguration and Set-SQLConfiguration both use the SMO properties to do this, so our configuration source must also use these names. The result is a function that uses the SMO to perform its export:

function Get-SQLConfiguration{
param([string]$InstanceName='localhost'
  ,[string[]] $Filter
  )

$smosrv = new-object ('Microsoft.SqlServer.Management.Smo.Server') $InstanceName
$output = @()
if($Filter){
  $configs = $smosrv.Configuration | Get-Member -MemberType Properties | Where-Object {$Filter.Contains($_.Name)}
}
else{
  $configs = $smosrv.Configuration | Get-Member -MemberType Properties | Where-Object {$_.Name -ne 'Properties'}
}

foreach($config in $configs){
  $output += New-Object PSObject -Property ([Ordered]@{'Name'=$config.Name;
  'DesiredValue'=$smosrv.Configuration.$($config.Name).RunValue})
}

return $output

}

The function itself is not complex, but I did want to add one other feature to it. A simple export might be overwhelming, considering the number of configuration properties within SQL Server. Most of these will actually be left at their defaults. To aid us, I also added a Filter parameter that accepts an array of SMO configuration property names and will only export those properties.

There are a couple patterns to use this function. The simplest is to just run it for one server and use the output to check another:

$configurations=Get-SQLConfiguration -InstanceName PICARD
Test-SQLConfiguration -InstanceName RIKER -Configs $configurations

This call will essentially compare and find the differences between the two instances. If we wanted to get more specific, we could use our Filter parameter to only compare one or two configurations:

$configurations=Get-SQLConfiguration -InstanceName PICARD -Filter @('FillFactor')
Test-SQLConfiguration -InstanceName RIKER -Configs $configurations

It is also possible to store and manage these configurations by using the Get-SQLConfiguration function. Because we’re working with hash tables, we have a variety of storage options. The easiest to get started is to use the built in Export-CSV function and save our configurations as a delimited file (I like pipe, but commas will do):

Get-SQLConfiguration -InstanceName PICARD | Export-Csv -Path .\PicardConfig.cfg -NoTypeInformation

With the text file that is generated, we can go in and edit our configs, removing what we want and editing values we need to update. The result can then be stored in source control for tracking and audit purposes. We could even go as far as to load the configurations into a database table and call them from a central administrative server. There are a lot of possibilities.

The Code

While I’ve published the functions in these two blog posts, there’s an easier way to get ahold of them. These are part of my SQLConfiguration module published on GitHub, which you can download and use (along with my other SQL configuration functions). Please keep in mind this module and the code contained within should still be considered a work in progress and the functions are provided as is. The usual disclaimers apply, so be careful using it and test it thoroughly before making regular use of it. Of course, if you do find any issues, I would love to know about them so I can review and update my code.

There are many additional items that can be added to this. The largest that comes to mind is dynamic configuration values, as these functions consider your configs to be static. Items like minimum memory, maximum memory, and maximum degree of parallelism depend on the hardware configuration and there are various ways to calculate these values. There are also configurations not stored in this part of SQL Server, such as default database directories and SQL Server agent settings. These functions have plenty of room for enhancement. They’re a good start, however, to giving you additional tools to manage your environment, helping to make your SQL Server deployments more consistent and reliable.

#TSQL2SDAY 68: Desired SQL Server Configuration with #Powershell

Welcome to another month of T-SQL Tuesday, started by Adam Machanic(@adammachanic) and hosted this month by Andy Yun(@SqlBek). The topic for this month’s blog party is “Just say ‘NO’ to defaults!”, a call on what we have learned and how we manage SQL Server defaults in our environments. While you will probably find lots of posts out there on what you should or should not set your SQL Server configurations to, I wanted to share with you a post on some tools that can help you manage these configurations.

Management Overhead

Many database professionals, SQL Server or otherwise, learn very quickly that you don’t want to stick with your default settings. The database vendors usually try and set some general values that can apply to most situations, but these typically don’t last long in any enterprise. You probably have a set of configurations you change from the defaults whenever you install a new SQL Server instance.

The struggle, whether you have 5 SQL Servers or 500, is keeping these settings consistent. Sure, you can script out your changes (and should), but how do you manage the changes over time? What if someone changes a setting, how do you enforce your configurations? Or maybe someone else sets up an instance and doesn’t apply your scripts? It becomes an ugly problem to manage.

Since I’m a Powershell fan, I’m also a fan of Desired State Configuration. While the technology is still new on the scene, it’s quickly turning into an effective way to manage your server builds. When thinking about Andy’s topic and the problem of managing changes to your instance defaults, my ‘eureka’ moment was that the DSC model could easily be applied to managing these configurations. The result was three Powershell functions that provide tools you can use to control the settings in your environment.

Test-SQLConfiguration

The first function I wrote was to evaluate the configurations on an instance. To do this, I started with the assumption that I’d have a hash table of Config(name) and DesiredValue(value) pairs. Each pair would be the SMO Configuration Class property and the desired value I wanted to check. Then I would simply loop through each one and, if it did not match, I would add that to an output array. The function would then return a collection of configurations that did not match my desired state.

function Test-SQLConfiguration{
  param([string]$InstanceName='localhost'
    ,[Parameter(Mandatory=$true)][PSObject] $Configs
  )
  $smosrv = new-object ('Microsoft.SqlServer.Management.Smo.Server') $InstanceName
  $output = @()

  foreach($config in $configs){
    if($config.DesiredValue -ne $smosrv.Configuration.$($config.Name).RunValue){
      $output += New-Object PSObject -Property (@{'Configuration'=$config.Name;
                   'DesiredValue'=$config.DesiredValue;
                   'CurrentValue'=$smosrv.Configuration.$($config.Name).RunValue})
    }
  }
  return $output
}

To test this, I put together a very simple pipe-delimited file of configurations I wanted to check. These configuration names had to match the SMO property names (which aren’t difficult to acquire) and the resulting file and output looks like this:

SQLServerConfig.cfg
 Name|DesiredValue
 FillFactor|80
 MaxDegreeOfParallelism|4
 CostThresholdForParallelism|40
 XPCmdShellEnabled|0

SQLConfigure_1

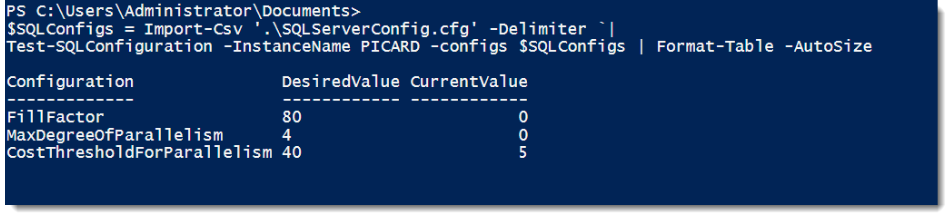
This function provides a quick view of which SQL Server configurations don’t match my desired values. What’s cool is now I can then take this function and easily run it across my entire enterprise.

SQLConfigure_2
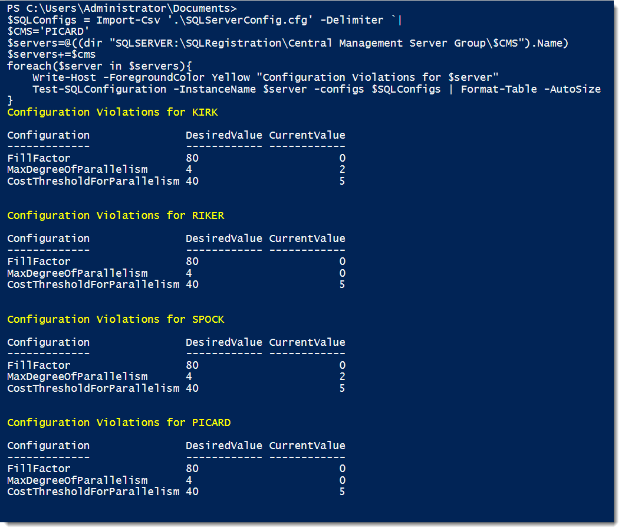
With this function, I’ve removed the burden of validating my SQL Server instance configurations. Since the output is an object, there’s many flexible options for reporting and collecting the information. Writing this to a text file is a snap or uploading it to a database table for ongoing auditing.

Set-SQLConfiguration

The next step, after we’ve checked configurations, is to correct the violations. This next function works much like Test-SQLConfiguration and takes the same two parameters as Test-SQLConfiguration. The difference is that the function will now alter the value and then reconfigure the instance to apply the change.

function Set-SQLConfiguration{
  param([string]$InstanceName='localhost'
    ,[Parameter(Mandatory=$true)][PSObject] $Configs
  )
  $smosrv = new-object ('Microsoft.SqlServer.Management.Smo.Server') $InstanceName
  $output = @()

  foreach($config in $configs){
    if($config.DesiredValue -ne $smosrv.Configuration.$($config.Name).RunValue){
        $row = New-Object PSObject -Property (@{'Configuration'=$config.Name;
               'DesiredValue'=$config.DesiredValue;
               'CurrentValue'=$smosrv.Configuration.$($config.Name).RunValue})
        $smosrv.Configuration.$($config.Name).ConfigValue = $Config.DesiredValue
        $smosrv.Configuration.Alter()
        $row | Add-Member -MemberType NoteProperty -Name 'ConfiguredValue' -Value $smosrv.Configuration.$($config.Name).RunValue
        $output += $row
        if($smosrv.Configuration.$($config.Name).IsDynamic -eq $false){$reboot=$true}
    }
  }

  if($reboot){Write-Warning 'Altered configurations contain some that are not dynamic. Instance restart is required to apply.'}

  return $output
}

SQLConfigure_3

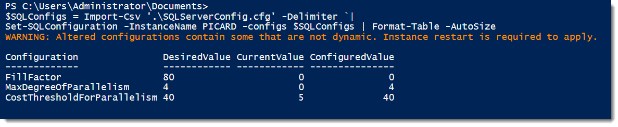
Because the function is built to accept a hash table of configurations, we can use the same pipe-delimited file (or any delimited file) to update the instance. Note the warning with the output. Because not all configurations are dynamic, the function will alert you if a non-dynamic configuration was changed. If you change a non-dynamic configuration, you will need to restart the SQL Service to complete the change.

Wrap Up

The last challenge is building out the configurations to check against. The third function I wrote will handle that, but I felt like covering that functionality would make this blog post to long. Next week I will cover the Get-SQLConfiguration function, additional techniques for extending these functions, and then tell you where you can get the code. Please note that this code is in a work-in-progress state, so use with caution. However, this also means that if you have any suggestions, I’d love to hear them so I can turn this into a functional tool that the community can use.

Thanks again to Andy for a great T-SQL Tuesday topic. Keep your eye on his invite blog post and the #TSQL2SDAY hashtag on Twitter for other great contributions.

Speaking Updates – July 2015

This is a short break from my usual blog posts to share some information on upcoming presentations I’m giving that might interest you.

Performance Palooza – Virtual Performance Chapter

Coming up in two weeks (July 23), I’ll be part of the annual Performance Palooza that is run by the Performance PASS Virtual Chapter. I’m pretty excited, as this will be a new session I’ve built from some work I’ve been doing on benchmarking SQL Server.

SQL SERVER BENCHMARKING: THE POWERSHELL SPEEDOMETER

How fast do you think you were going? The only way to be sure is to have a reliable way to measure your performance. The challenge with SQL Server is that there are many aspects of your stack that you need to measure and understand. Powershell, with its ability to access and report on all these different levels, can give you a robust tool to benchmark your SQL Server. This session will cover benchmarking methodologies, the tools Powershell offers for capturing performance information, and will demonstrate how you can use them to measure performance statistics. After attending this session, you will understand how to effectively use Powershell to measure your database speed.

RSVP here if you’re interested: https://attendee.gotowebinar.com/register/6348286936653801474

Upcoming Precons

I’ve had the opportunity to present my Introduction to Powershell for SQL Server DBAs now at both SQL Saturday Albuquerque and SQL Saturday Atlanta. This has been a great time for me and I’ve already had comments from attendees of how they’ve used Powershell in their current jobs. If you plan on attending either SQL Saturday Omaha or SQL Saturday Denver, you have an opportunity to learn some Powershell and add this robust tool to your skill set.

Introduction to Powershell for SQL Server DBAs

This full day session will help build your foundation for learning and using Powershell.  While we will be focusing on using Powershell as a SQL Server Database Administrator (or Developer), much of the material will also review general use for system administrators.  By attending this training, you will gain an understanding of what Powershell is, how you can use it in your day to day management of your environments, and what specific things can be done using Powershell in a SQL Server environment.

RSVP to either of these links if you are interested:

IT/DEV Connections – Las Vegas, NV #ITDevCon

ITnDevConnections_logo_TylerOptimized_236x59I’m super excited to be speaking at this year’s IT/DEV Connections Conference in Las Vegas. This is a huge opportunity for me to share some of the useful Powershell techniques that I’ve built out in my work environments. I will be presenting two sessions:

There are TONS of great speakers at this event, so it’s a huge learning opportunity for attendees and will be a great time.

PASS Summit 2015 – Seattle, WA #PASSSummit2015

I'm Speaking Graphic_LargeThe grandaddy of ’em all. I’m honored to be part of this year’s Summit speaker line up. This is the premiere SQL Server conference and will be my fifth year in attendance. I’ll be speaking on a Powershell topic that will not only help out a lot of DBAs with their day-to-day work, but will also give you some insights in to how I think the world of database infrastructure is changing with the two magic buzzwords of “DevOps” and “the Cloud”. If you’re the kind of DBA that has to manage the struggles of deploying and maintaining SQL Servers in a highly-available environment or a large enterprise, this session can make your life a whole lot easier.

PowerShell and the Art of SQL Server Deployment

In today’s tech world, IT professionals are driven to perform tasks faster and more consistently. Automation is the watchword for our success, whether we are deploying SQL Server to private virtual clouds or public platforms such as Azure IaaS. This session focuses on rapidly creating and configuring SQL Servers, using PowerShell and desired state configuration. You will see practical examples of how to create repeatable builds of SQL Server that can be deployed in a matter of minutes. We will also review how these techniques can be applied to both public and private cloud platforms, helping to ensure success in any situation.

Even if you don’t want to attend my session, you should seriously consider registering for the Summit. It’s the largest pure-SQL Server conference in the world and has been a tremendous boost for my career over these past five years. And now I get to speak there! (How cool is that)

Checking Last Policy Based Management Execution

Contrary to popular belief, it’s not all about Powershell for me. Yeah, I do a lot with it and want to share that knowledge, but I’m still a SQL Server DBA and there are many challenges I encounter day to day where I use my other skills. Policy Based Management(PBM) is one of those areas where I need to apply this knowledge and solve problems.

A Dirty Window

My current shop makes heavy use of PBM for alerting and monitoring our environment. For more on using PBM, check out stuff by John Sterrett(@johnsterrett) or this book. It’s a very useful tool, but takes some getting used to. We have policies in place to alert on data file free space, last backups, database owners, and a host of other checks for the health and configuration of our environment. So many, in fact, that identifying what has failed can be a chore when things go wrong.

With PBM, it is very easy to know when a policy fails, but a lot more difficult to see exactly what has failed and why. Usually, the easiest way to see a failure is in SQL Server Management Studio (SSMS):

PBM_1

As you can see, this doesn’t tell us much. The next stop is the PBM history, which you can access by right clicking on the Management -> Policy Management node in SSMS and selecting ‘View History’:

PBM_2

The result opens up the SQL Server log viewer. As this is a simple example, it may not be clear to you, but the log viewer is a chore for history. If you have more than a few policies, you will have a lot of records to navigate and load, making troubleshooting extremely convoluted. When you’re a DBA looking to fix a problem, this is problematic. Fortunately, there is another way.

I Can See Clearly Now

Most of the information in SQL Server is stored in views. The SQL Server team has gone to great lengths with the Dynamic Management Objects (DMVs) to make sure most of the information displayed through the GUI is stored somewhere behind the scenes as a queryable object. With PBM, these system views are found in MSDB with the name dbo.syspolicy*. I dug in and found the following views that had the information I was looking for:

The query pattern from there is pretty typical: Show the most recent set of history records for a policy. The result is the following query:

;with last_pbm_execution as (
select
    policy_id
    ,max(history_id) as history_id
from
    msdb.dbo.syspolicy_policy_execution_history
where
    end_date > GETDATE()-1
group by
    policy_id
)
select
    p.name
    ,h.end_date
    ,case h.result when 1 then 'Success' else 'Failure' end result
    ,d.target_query_expression
    ,d.exception
    ,d.exception_message
    ,d.result_detail
from msdb.dbo.syspolicy_policies p
    join msdb.dbo.syspolicy_policy_execution_history h on (p.policy_id = h.policy_id)
    join last_pbm_execution lpe on (h.policy_id = lpe.policy_id and h.history_id = lpe.history_id)  
    left join msdb.dbo.syspolicy_policy_execution_history_details d on (h.history_id = d.history_id)
order by p.name

This query gives me a quick, easy to read report for the server of each policy and what the last result was. In the event of a failure, the target_query_expression, exception, exception_message, and result_detail columns give me the info about why the policy failed, helping me to fix it.

As DBAs we need quick answers and need to spend as little time as possible wading through logs of what went right just to get at what went wrong. This can be exacerbated when a tool doesn’t have good reporting right out of the box. Within SQL Server, we can overcome this by understanding the system views and the information stored there. That knowledge will help us get those quick answers, accelerating our troubleshooting and allowing us to make effective use of our tools.