
Last week, as I watched the Twitters, I saw an interesting blog post from Julie Koesmarno(@MsSQLGirl) about creating alerts for Azure SQL Database. These are cool because one of the many things I get asked about when talking about Azure SQL Database is “how do I monitor this darn thing?” With these alerts, you can monitor performance, capacity, and security settings, setting up either email notifications or webhook responses.
Now, me being me, I tweeted out that it would be cool to do this in PowerShell. I say this not just being a geek about the language, but also because if you want to live in the cloud you need to up your automation and scripting game. PowerShell is the way to manage your Azure resources, especially if you want to set up consistent alerts for all your Azure SQL Databases. Julie pointed me to some examples that, while not specific for Azure SQL Database, got me moving in the right direction. I’d like to share some of that learning here.
The cmdlets
To start, we need to know what cmdlets are at our disposal. You’re going to need the Azure and AzureRM modules first (I recommend using the Powershell gallery installation) and then we just need to use PowerShell’s command syntax to find what we’re looking for. Using Get-Command, just do a wildcard search around ‘Azure’ and ‘Alert’ as my search terms.
Get-Command *Azure*Alert*
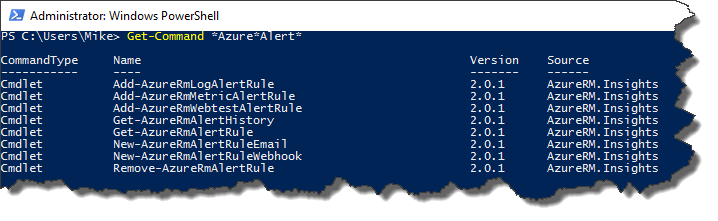
It’s not a long list, but we don’t need much to get our work done. It should be noted that these are generic and can be used across all Azure resources.
Because these cmdlets are generic, we have to identify the specific metrics we can monitor for Azure SQL Database. Fortunately, these are discoverable using the Get-AzureRmMetricDefinition, which is not listed but part of the AzureRM.Insights module (use Get-Command -Module AzureRM.Insights). To use it, we need to know our Azure resource ID, which we can derive from three pieces of information: the resource group, the server name, and the database name.
$ResourceGroup = 'IntroAzureSql'
$server = 'msf-sqldb'
$db = 'MSFADMIN'
$rid = (Get-AzureRmResource -ResourceGroupName $ResourceGroup -ResourceName "$server/$db").ResourceID
Get-AzureRmMetricDefinition -ResourceId $rid | Format-Table
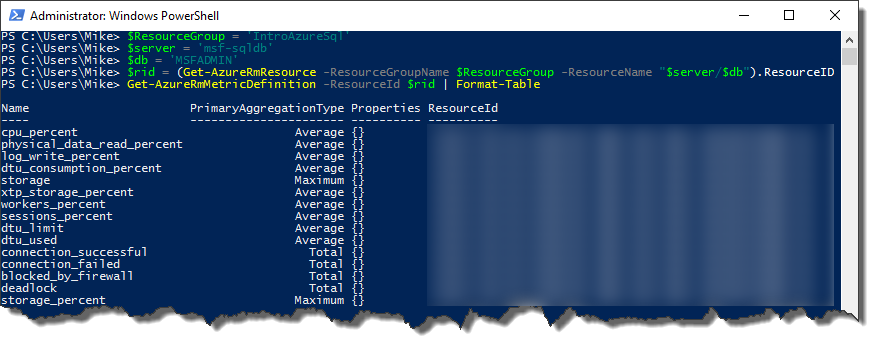
Most of these Name values match what Julie listed in her post, but the nice thing is if we ever get new ones, we can look them up with this method.
Creating an Alert
So let’s get down to brass tacks and actually create an alert. To do this, we need some info first:
- The Resource Group we will create the alert in.
- An Azure location where the alert will live.
- An Azure SQL Database server and database we are creating the alert for.
- What metric we will monitor and what is the threshold we will be checking.
- (optional) An email to send an alert to.
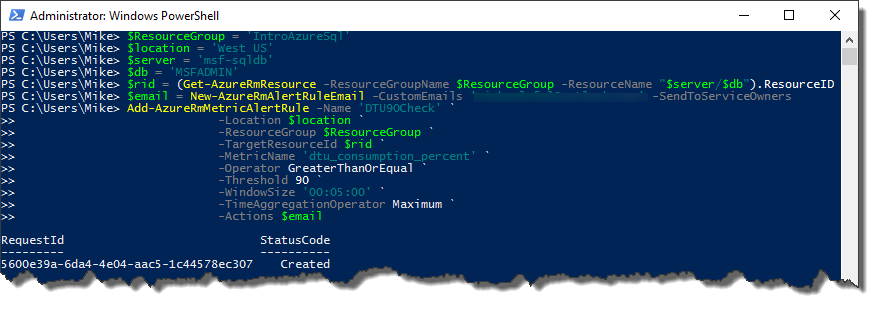
With this, here’s the settings I’m going with:
Resource Group – IntroAzureSql
Location – West US
Server – msf-db
Database – MSFADMIN
Alert – dtu_consumption_percent greater than 90 (Flag if more than 90% DTU usage)
There are a couple other considerations for creating an alert. The first is a time window the alert will check against. This window can be anywhere from five minutes to a full day. The second is what aggregation of the metric we will check (i.e. total, average, maximum). You’ll want to use values and aggregations that make sense, but for the example alert, we’ll check the maximum value over a 5 minute window.
Once we have everything in place, we will call the New-AzureRmAlertRuleEmail cmdlet to create our email notification and Add-AzureRmMetricAlertRule cmdlet to create our alert:
$ResourceGroup = 'IntroAzureSql'
$location = 'West US'
$server = 'msf-sqldb'
$db = 'MSFADMIN'
$rid = (Get-AzureRmResource -ResourceGroupName $ResourceGroup -ResourceName "$server/$db").ResourceID
$email = New-AzureRmAlertRuleEmail -CustomEmails 'mfal@dummy.com' -SendToServiceOwners
Add-AzureRmMetricAlertRule -Name 'DTU90Check' `
-Location $location `
-ResourceGroup $ResourceGroup `
-TargetResourceId $rid `
-MetricName 'dtu_consumption_percent' `
-Operator GreaterThanOrEqual `
-Threshold 90 `
-WindowSize '00:05:00' `
-TimeAggregationOperator Maximum `
-Actions $email
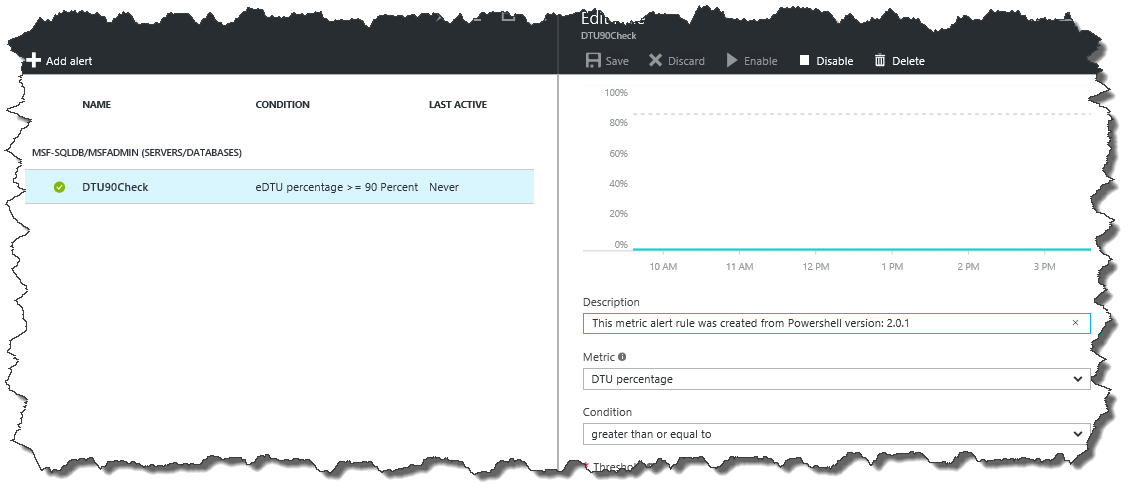
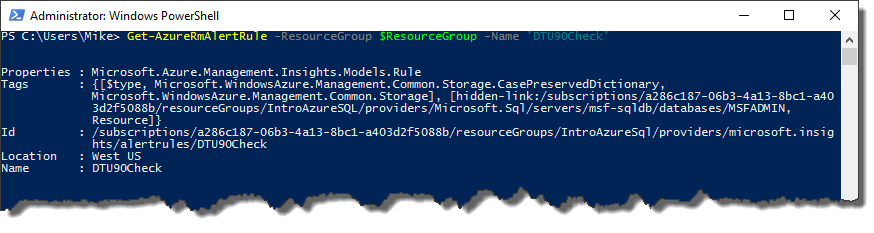
And now we can look at our shiny new alert using either the portal or Get-AzureRmAlertRule:
To get a rid of an alert is easy, too, just call Remove-AzureRmAlertRule:
Remove-AzureRmAlertRule -ResourceGroup $ResourceGroup -Name 'DTU90Check'

Where To Now?
As you can see managing alerts in PowerShell isn’t all that difficult. The question is “why”? Hopefully you can already see the value, especially if you want to standardize your Azure SQL Database environment. By having all your alerts scripted out, you can apply them in a consistent fashion. This can be part of a larger automation process that helps scale out your environment as necessary. Regardless of how you manage it, using PowerShell can significantly decrease your management time for your Azure environment.
Thanks again to Julie for giving me the inspiration to figure this out!


 I’m tweeting!