Art of the DBA Rotating Header Image

SQL Server

The Tools to Survive

Last week, I blogged about monitoring backups, service status, and disk space usage. These are the keys to survival for you and your databases. There are several ways that these can be monitored and there are many third party tools that you can use for these tasks. However, third party tools are often not an option.  Fortunately, you can also make use of SQL and Powershell to handle basic monitoring. Here’s a couple scripts that you can use in your environments.

Overdue Backups

The backupset table makes it easy to know when your backups are being taken. By making use of a couple queries, you can find out if your databases are actually being backed up and take appropriate action. This particular script is designed to check for any databases that haven’t had a full backup (type=’D’) in the last three days and email out an alert if any are found.

with db_fulls(dbname,last_backup)
as
(select
	database_name,
	max(backup_start_date)
from
	msdb.dbo.backupset
where
	type='D'
group by
	database_name)
select
	d.name,
	d.recovery_model_desc,
	df.last_backup
into #results
from
	sys.databases d
	left join db_fulls df on (d.name = df.dbname)
where
	isnull(df.last_backup,'1/1/1900') < dateadd(dd,-3,getdate()) 

if (select count(*) from #results) > 1
begin
	DECLARE @tableHTML  VARCHAR(MAX)
	,@emailrecip varchar(200)

	--SET YOUR EMAIL ADDRESS HERE
	set @emailrecip = 'you@yourcompany.com'

	SET @tableHTML =
		N'</pre>
<h1>Overdue Backup Report</h1>
<pre>
' +
		N'</pre>
<h2>No full backups in the last 3 days</h2>
<pre>
' +
		N'</pre>
<table width="1250" border="1">' + N'
<tbody>
<tr>
<th align="left" width="40%">Database</th>
<th align="left" width="30%">Recovery Model</th>
<th align="left" width="30%">Last Backup</th>
</tr>
' + CAST ( ( SELECT td = rtrim(name), '', td = rtrim(recovery_model_desc), '', td = isnull(convert(varchar(100),rtrim(last_backup),100),'NO BACKUP'), '' 
from #results order by name FOR XML PATH('tr'), TYPE ) AS VARCHAR(MAX) ) + N'</tbody>
</table>
<pre>
' ;

	exec msdb.dbo.sp_send_dbmail
		@recipients = @emailrecip,
		@subject = 'Overdue Backup Report',
		@body = @tableHTML,
		@body_format = 'HTML' ;
end

drop table #results

The basics here can also be modified for your particular needs. In my own environment, I use this and a second script that monitors for log backups(type=’L’). I schedule the full backups to run every morning. For the log backups, I run the report every 4 hours and alert me if a database hasn’t had a log backup in the last 12 hours.

Stopped Services

It’s hard to monitor SQL Services from SQL Server itself, so for this task I turned to Powershell. By making use of the Get-Service commandlet, you can collect all service related information from a computer. Add some functionality for email, and you can build a handy little service monitoring script.

$srvlist = Get-Content $args[0]
$report=@()

foreach ($server in $srvlist)
{
	try
	{
          $svcs=Get-Service -ComputerName $server | where {$_.name -like "*SQL*"}
		foreach ($svc in $svcs)
		{
			$output = New-Object System.Object
			$output | Add-Member -type NoteProperty -name Instance -value $server
			$output | Add-Member -type NoteProperty -name SvcName -value $svc.Name
			$output | Add-Member -type NoteProperty -name DisplayName -value $svc.DisplayName
			$output | Add-Member -type NoteProperty -name Status -value $svc.Status
			$report+=$output
		}
	}
	catch
	{
		$output = New-Object System.Object
		$output | Add-Member -type NoteProperty -name Instance -value $server
		$output | Add-Member -type NoteProperty -name SvcName -value "No_Service_Collected"
		$output | Add-Member -type NoteProperty -name DisplayName -value "No Service Collected - COLLECTION ERROR"
		$output | Add-Member -type NoteProperty -name Status -value "ERROR"
		$report+=$output
	}
}

#Set these for your environment
$smtp="yourmail.server.com"
$from="SvcAlert@yourserver.com"
$to="You@yourcompany.com"

if(($report | where {$_.Status -ne "Running"}).Length -gt 0)
{
	[string]$body=$report|where{$_.Status -ne "Running"}| ConvertTo-HTML
	Send-MailMessage -To $to -from $from -subject "Service Monitor Alert!" -smtpserver $smtp -body $body -BodyAsHtml
}

To call this script, you’ll want a text file that contains a list of your servers (passed through as an argument to the script).  Then, run the script as a Windows Scheduled Task.  I recommend setting it up to check the status regularly every few minutes, running from a different computer than your SQL Server. This guards against your monitoring process failing in case your SQL Server shuts down. You will also need to ensure that whatever account the task runs under has remote access to your SQL Server.

Free Space

There is actually quite a bit written about this particular topic. There are two ways you can go about this, depending on whether or not you want to monitor your space from within SQL Server or externally. One option is to use xp_fixeddrives for querying data from directly within SQL Server. If you’ve upgraded to SQL 2008 R2 SP1, you can also make use of sys.dm_os_volume_stats. Personally, I lean more towards making use of Powershell (again) because of the flexibility it gives me. For this, there’s several options, but a good place to start is this script off of Simple Talk. Any of these choices will give you the information you need.

With these basic tools, you can start monitoring your systems for continued operation as well as being alerted when critical issues arise.  From here, you can then move to monitor other aspects of your server and database health.
Thursday Bonus Series – Core Mechanics, Part Three

So here we are. After installing Server Core and configuring it, we’re ready to install SQL 2012. Fortunately, this is the easy part. We only have two steps and both are things that have been common actions for many years now.

The first step is to install the .Net 4.0 libraries. SQL Server requires these and they’re currently not part of the Windows configuration/setup. We’ll need to head out to MSDN and download the standalone .Net 4.0 installer for Server Core. You’ll need to do this on a separate machine since you won’t have access to a web browser on your core machine itself, but it’s not a large file(~50 MB). Once you have it, copy it over to your core machine and run the executable. The install should take 5-10 minutes and then you’re ready for SQL Server.

Step two is something I’ve done a lot of and strive to make a habit in most of my SQL Server environments: an unattended install. For those of you unfamiliar, this is simply the practice of installing SQL Server from the command line using a configuration file. This is actually how SQL Server is typically installed, you’re just building your configuration file as you click through the GUI. Read up on it on MSDN.

For my install, I’m just going to use the sample configuration.ini file found on MSDN, with only a couple adjustments for my environment and a couple additional flags. I won’t go through the whole file, but here are a couple key options that are used:

  • QUIET=TRUE – You *must* have this set, as any other option requires GUI elements of the install and your install action will fail. Like I said earlier, Server Core hears ya’, Server Core don’t care. We’re flying without visuals here, folks.
  • IAcceptSQLServerLicenseTerms=TRUE – Typical license agreement acceptance, but since we don’t have a GUI with a checkbox, we need to indicate our acceptance in our configuration file.
  • TCPENABLED=1 – By default, SQL Server won’t enable TCP communication. So instead of going into the configuration tools after the fact, we’re going to enable it in our setup with this flag.
  • SECURITYMODE=SQL – I rarely see servers that are Windows authentication only, but SQL Server uses that mode by default. We need to use this option in order to set mixed mode authentication. This also means we MUST use the SAPWD option to declare our SA password.

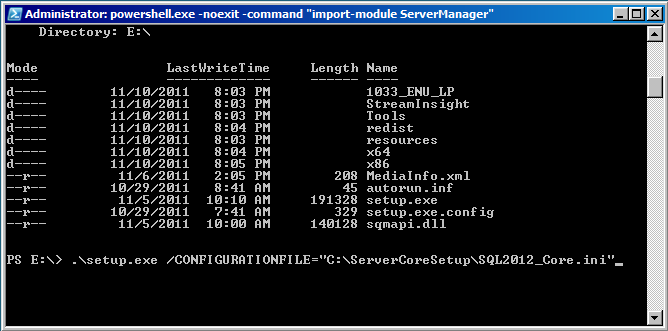
Once we have this, it’s a simple matter of running setup.exe and declaring the configuration file. With my VM, I’ve mounted the SQL 2012 RC0 image to my E:. From here, it’s one line and off we go. 

Now we just wait for SQL to install, which should take 5-10 minutes depending on your system. Once it’s complete, then we can fire up SQL Server Management Studio and connect to our brand new instance.

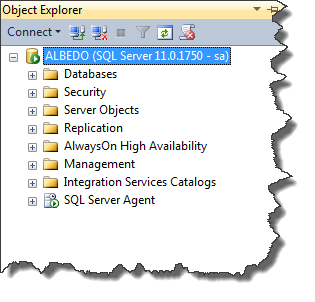
After this, it’s just SQL Server folks. Everything we’re used to doing, whether it’s using T-SQL or the Object Explorer, we’ve done before. It’s just now we’re doing it on a box that has a smaller OS footprint, leaving us with a happier place for our SQL Instance to live.

With our install complete, I want to leave you with a couple extra tips. Keep in mind that while the server itself has no GUI, we can still use MMC snap-ins to connect to the server remotely and manage it. This way, if you need to change firewall rules, add users, or any other management task, you can still use the tools your familiar with. Also, by forcing remote administration, you’re adding an additional level of security to your systems.

While AlwaysOn and many of the business intelligence features are being highly touted, I’m pretty excited about this bit of functionality in SQL 2012’s feature set. There’s a lot of power here for automation, security, and performance (all things I love), so I’m going to be pushing this where ever I can. Hopefully you can benefit from it as well.


Thursday Bonus Series – Core Mechanics, Part 2

Previously on Art of the DBA, I walked you through a basic install and setup of Windows 2008 Server Core. Now that we have our server setup with an OS, a name, and an IP, it’s time to prep it so we can install SQL 2012. Let’s get started, shall we?

Left-Right-Left-Right-A-B-Select-Start

Before we get too far, I have a cheat I confess to. A lot of these commands I am going to run are saved in scripts to spare myself from typing commands. As I’ve mentioned previously, I’m lazy and the beauty of automation is having scripts. So the first thing I’ll do is open up the firewall so I can copy my scripts down:

netsh firewall set service fileandprint enable

This command enables file and print sharing. Now, normally this will be off (and I tend to turn it off when I’m done), but for the initial setup I want to be able to get at the machines local drives and put my scripts there.

The second thing to do is to activate Windows. Just because we’re using Server Core doesn’t mean Microsoft doesn’t care about us registering the OS, even if they make it harder. Go ahead and run:

SLMgr.vbs -ipk <<Serial Key>>
SLMgr.vbs –ato

The first command will load your serial key into the machine, the second command will communicate with Microsoft to validate your key and activate your machine.

Great, with all that out of the way, let’s get to the fun stuff.

Configuring your Console

Full disclosure, I’m still pretty new to Powershell. Oh, I’m no stranger to scripting (VB scripts as well as Korn/Bash are in my repertoire) and, as we’ve discussed, I love the command line. But I’m still getting used to the syntax and all the different calls. This means that I want to make sure Powershell is loaded and set as my default shell for my Server Core installation. To do this, I’ll run the following script:

REM Install base packages
REM install .Net
start /w ocsetup NetFx2-ServerCore

REM Install powershell and modules
start /w ocsetup MicrosoftWindowsPowerShell
start /w ocsetup ServerManager-PSH-Cmdlets

The comments explain what’s going on, but let’s touch on a couple of things. First is ocsetup, which is a command line utility to install Windows components. What I am using it here for is to first install my basic .Net libraries, then Powershell and Powershell’s ServerManager commandlets. Once that’s all installed, I restart the machine and then fire up powershell itself (by typing ‘powershell’ and the command prompt) so I can wrap up the rest of the configuration.

Finishing touches

With powershell running, we can start on our final steps. First, I will set my script execution policy so I can run scripts (and save myself some effort):

set-executionpoilicy remotesigned

For more on what this means, here’s a link. With this in place, I can now execute my final steps, using the following script:

#Run from Powershell, configure powershell
import-module ServerManager
enable-psremoting

#configure powershell as default shell
set-itemproperty "HKLM:\Software\Microsoft\Windows NT\CurrentVersion\WinLogon" shell 'powershell.exe -noexit -command "import-module ServerManager"'

This script will go ahead and import the ServerManager commandlets for the current session (commandlets are not loaded automatically). This makes our life easier for setup. The next command then allows for remote powershell script execution. While I don’t use it for this job, it’s nice to have. Finally, I make a registry key change so that when I log on in the future, it will use Powershell as my default shell.

Finally, we configure our Windows features and firewall:

#Install x64 components
Get-WindowsFeature WoW64-NetFx*,WoW64-Powershell | Add-WindowsFeature

#update firewall
netsh advfirewall set currentprofile settings remotemanagement enable
netsh advfirewall firewall add rule name="SQL Server(1433)" dir=in action=allow protocol=TCP localport=1433

With this, I add all the necessary .Net and Powershell libraries I’ll want for future use. Then I enable the remote management settings in the firewall, along with opening up port 1433 for SQL Server.

And with that, we’re ready to actually install SQL 2012, which I will cover in the next post! Stay tuned!

Thursday Bonus Series: Core Mechanics Part One

I’m not sure how many folks out there have heard of Server Core yet. The quick and dirty is that it’s a version of Windows Server that has most of the GUI elements stripped out. No, Microsoft didn’t develop this version for technological masochists (like me), but wanted to provide administrators with a Server installation that was leaner, meaner, and more secure. By taking out the graphical portions, you get some nice benefits for your environment, including a smaller footprint for your install, tighter security, and reduced security patching (look at how many of those updates fix bugs with IE).

Up until SQL 2012, SQL Server was too dependent on the graphical libraries in Windows to run on Server Core. Now with the next version, we get the support to install SQL Server to Core, something I’m pretty excited about it. I went ahead and created a VM installation of Core with SQL 2012 and then provide some blog posts to walk you through the process so that hopefully you can do the same in your lab environment.

First things first

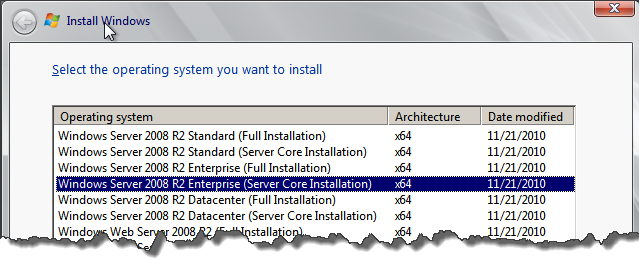
Before we do anything, we must (of course) get Core installed on a VM. For information on setting up a blank VM, check out my virtualization posts. Then just fire up the machine with your OS install and make the usual selections. Well, usual until you get to the install version:

I’ve gone ahead and selected the 2008 R2 Enterprise version, Server Core installation. There’s also corresponding Core installations for the other versions, so go with what works for you. Once you click ‘Next’ here, the install will happily churn along (go progress bar, go) until it’s ready for you to enter an administrator password. Once that’s set, you’ll boot into the OS and see…

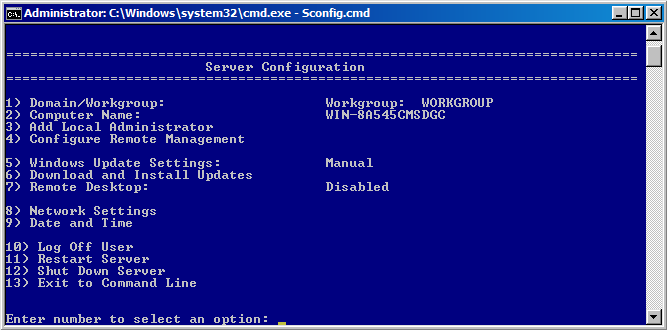
BAM! Command line! “But wait!” you say, “There’s so much to do before I’m ready for this!” Server Core hears ya’, Server Core don’t care. Fear not, though, because with Server Core, we get a utility that allows us to do some of the basic configuration of your machine. Just type ‘SConfig.cmd’ at the prompt and you’ll see:

Ah, much more comfortable, right? The utility is easy to use, just select and option and respond to the prompts. Using this utility, I’ll do the following:

  • Change my computer name to ‘ALBEDO’
  • Update Windows with all current patches
  • Go into Network Settings and set my IP as 192.168.56.102 (Static)
  • Confirm that my date and time settings are correct.
  • Create a local admin account – ‘mfal’ (Because only bad people use the default Administrator)

This is just the start, of course. We still have several things to do to prep our machine for SQL 2012. In the next post, I’ll cover the basic OS setup, including setting up Powershell as our default shell, enabling the firewall to support SQL Server, and making sure we have the correct Windows features installed.


Excuse me sir, are you using that partition?

So last week we had to puzzle out a little weirdness at work. One of our development teams is working to implement partitioning and they came to us about their scheme. They had applied a partitioning scheme, but it wasn’t being used by their queries. Their scheme was pretty simple, but the oddity was that they had partitioned on a nvarchar(10) field. Best practice is to use an integer, though I’ve seen date fields used as well. Though I knew that you could partition on a character field, I usually avoided it.

Now, using an nvarchar field shouldn’t have altered the query process that much, right? This is where it got odd, because what we were seeing was that a query on that partition scheme was still querying across all partitions. Here’s the query and what we were seeing in the query plan:

One of the advantages of partitioning is to improve query performance with range scans, so that the engine will only query across partitions. However, even though our query was specifically using the partition key, the engine was still querying across all partitions for its result. And we were specifically using a nvarchar value for the query criteria, so it shouldn’t be doing any sort of conversion, right? Well, that’s where you (and we, as well) would be wrong. We tried the query again, this time with an explicit conversion to nvarchar(10):

Bang! By converting it to the same datatype as the partition key, the query engine can now properly take advantage of our partitioning. The results are further reinforced by looking at the query costs of our two queries:

  • Query 1: 0.0131291
  • Query 2: 0.0032831

What just happened?

What’s going on behind the scenes is that in query 1 our predicate datatype does not match the datatype of our partition key. The SQL Server engine sees the query predicate of CUSTOMERID=N’2’ as an nvarchar(4000), not as an nvarchar(10). Just take away the “N” in front of our string value and have it declared as a character string and force an implicit conversion. Then, if you look at the query operator, you’ll see SQL Server do a CONVERT_IMPLICIT to nvarchar(4000), not a nvarchar(10).

I also went through this exercise using varchar as my datatype and got the same results. If I simply declared the predicate as CUSTOMERID=’2’, my query would seek across all partitions. If I used CUSTOMERID=convert(varchar(10),’2’), then I would only have the one active partition.

I’m not sure if this is a bug or working as intended, but there’s definitely a couple of lessons we can take from this:

  1. To best take advantage of querying across partitions, you need to make sure your query criteria is explicitly the same datatype as your partition key. Otherwise, the engine can’t make use of your partitioning.
  2. Obviously character strings have some weirdness about them for partitioning, so it’s best to avoid them for partition keys.
  3. Mike is weird for geeking out about this stuff. Seriously. My co-workers gave me some odd looks as we were puzzling this out.


A Temporary Configuration

A couple weeks ago, I participated in T-SQL Tuesday #26 with a trick to dynamically build a script for doing your restores. In the spirit of that laziness, I wanted to share with you another script I have for configuring Tempdb. There’s not much special here and you could use any other scripting language to get the same result, but the idea is to automate the bulk of the task so that you can save yourself some work as well as creating consistent processes for your database configurations.

--Configure TempDB
--Turn off nasty rowcount
SET NOCOUNT ON

--Declare some variables
declare @files int,
  @path varchar(max),
  @totalsize_gb float,
  @v_sql varchar(max),
  @filesize_mb int,
  @logsize_mb int,
  @currfile int

--Set these to configure tempdb
set @files = 8
set @path = 'T:\TempDB\'
set @totalsize_gb = 40

--script calculates individual file sizes
select @filesize_mb=FLOOR((@totalsize_gb*1024)/(@files)),@logsize_mb = FLOOR(@totalsize_gb*1024)* .25

--Build your config script
set @v_sql ='use tempdb
dbcc shrinkfile (tempdev,100)

alter database tempdb
modify file
(NAME=tempdev,
FILENAME='''+@path+'tempdb.mdf'',
SIZE='+CONVERT(nvarchar(10),@filesize_mb)+'MB,
FILEGROWTH=512MB,
MAXSIZE=UNLIMITED)

alter database tempdb
modify file
(NAME=templog,
FILENAME='''+@path+'templog.ldf'',
SIZE='+CONVERT(nvarchar(10),@logsize_mb)+'MB,
FILEGROWTH=512MB,
MAXSIZE=UNLIMITED)

'
set @currfile = 1

while @currfile < @files
begin
set @v_sql = @v_sql + 'alter database tempdb
add file
(NAME=tempdb'+CONVERT(nvarchar(10),@currfile)+',
FILENAME='''+@path+'tempdb'+CONVERT(nvarchar(10),@currfile)+'.ndf'',
SIZE='+CONVERT(nvarchar(10),@filesize_mb)+'MB,
FILEGROWTH=512MB,
MAXSIZE=UNLIMITED)

'

set @currfile = @currfile+1

end

select @v_sql = @v_sql + char(10)+'--Verify your configuration!'+char(10) + 'select name,size/128.0 [size_mb],physical_name from sys.database_files'

print(@v_sql)

PRINT '/***RESTART SERVER***/'

There are three things we want to declare up near the top, and that is number of files, location of the files, and total size of the files. Without getting into the larger discussion of how many files you should have (for those wondering, start at Paul Randal’s(b|t) blog post on it), this script will help you make all your files consistent.

Some other notes about things I have set:

  • The total file size is total data file size. Log file size is in addition to this, so plan accordingly.
  • I’ve got the log file calculation to size to 25% of the total data files.
  • I’ve got autogrowth on all files set to half a GB (512 MB).

These settings are completely personal preference, so your miles may vary. If you have different practices, by all means implement those. The point here, as with my RESTORE script, it to pre-build most of your configuration script so that you only have to tweak a couple things.


P.S. It should be noted that I call out a DBCC SHRINKFILE on tempdb.  The idea of this script is your running it either while configuring a server or during a maintenance period.  Shrinking a live tempdb can cause corruption, so only execute this script when you’re planning on restarting the server and rebuilding tempdb as part of your configuration.  (Thanks to Vicky Harp (b) for reminding me about that.)

T-SQL Tuesday(#tsql2sday) #26 – Lazy Restore Commands

I missed out on T-SQL Tuesday #25 (Tips ‘n Tricks) on the first go around, so I’m glad that with #26 I get another crack at it. Mine is pretty simple, but has saved me a lot of time when doing database restores. Whether I’m getting a database back online or (more likely) moving a database to another instance, I don’t want to be bothered for digging around to get my restore going.

As a DBA, I am two things:

  1. I hate using the GUI. Clicking through countless windows is for the birds and I would much rather type three commands than click ‘Next’ three times.
  2. I’m lazy. So those three commands? I write them once and save ‘em to a file so I can run them over and over and over….etc. Automation FTW!

So, restores. We all do them and they can get irritating. I know one of the most annoying things is relocating the files with MOVE when you’re bringing the database up on a different server. This is why a lot of folks use the GUI, because SQL Server can handle that behind the scenes and, if you really want, you can script it out. Well I’ve got another way.

You know you can RESTORE WITH FILELIST to get the database files within a backup. Why not take that a step further and capture it in a table? Then, once it’s in a table, we can use a little bit of SQL coding to give us a template to generate our restore command. Take a look:

--Turn off annoying rowcount
SET NOCOUNT ON

--Some variables
declare @v_restore varchar(1000)
declare @v_backup varchar(1000)
declare @v_sql varchar(max)
declare @datadir varchar(1000)
declare @logdir varchar(1000)

--Set backup file location, database name
set @v_backup = 'C:\demo\test.bak'
set @v_restore='Test_demo'
set @datadir = 'C:\Restore\Data'
set @logdir = 'C:\Restore\Log'

--Storage table

declare @restorelist table
(LogicalName nvarchar(128)
,PhysicalName nvarchar(260)
,Type char(1)
,FileGroupName nvarchar(128)
,Size numeric(20,0)
,MaxSize numeric(20,0)
,Fileid tinyint
,CreateLSN numeric(25,0)
,DropLSN numeric(25, 0)
,UniqueID uniqueidentifier
,ReadOnlyLSN numeric(25,0)
,ReadWriteLSN numeric(25,0)
,BackupSizeInBytes bigint
,SourceBlocSize int
,FileGroupId int
,LogGroupGUID uniqueidentifier
,DifferentialBaseLSN numeric(25,0)
,DifferentialBaseGUID uniqueidentifier
,IsReadOnly bit
,IsPresent bit
,TDEThumbprint varchar(100)) –-Be careful, this last field (TDEThumbprint) isn’t in 2k5

--Capture the file list
insert into @restorelist
exec('RESTORE FILELISTONLY FROM DISK='''+@v_backup+'''')

--Build your restore command
select @v_sql = 'RESTORE DATABASE '+@v_restore+' '+char(10)+'FROM DISK=''' +@v_backup+ ''''+ CHAR(10)+'WITH '
select @v_sql = coalesce(@v_sql,'')+'MOVE '''+logicalname +
''' TO '''+CASE when type='L' then @logdir else @datadir end +'\'+ right(physicalname,charindex('\',reverse(physicalname))-1)+''',' + char(10)
from @restorelist

--display the restore command, trim trailing comma and char(10)
print substring(@v_sql,1,LEN(@v_sql)-2)

So that’s a lot of stuff! Well, not really. If you look at it, most of the script is taken up defining the file list table. Change your variables at the top, run the script, and copy the output into another window…BAM! There’s your restore command. And if it’s not perfect, you only need to make one or two changes to the output to clean it up.

This is not the only sproc output you can capture. The biggest lesson from this trick is you should think about other system stored procedures and look for opportunities where you can grab outputs to make your life easier. Help yourself look like a hero and get more sleep by taking advantage of what’s in SQL.

Thanks to Dave Howard(b|t) for offering folks a second chance to share for T-SQL #26!

Brushing up on your (backup) history

Backups are huge, right? As administrators, they should never be far from our minds. Backups are one of the cornerstones of disaster recovery and safeguarding our data. It only makes sense that we want to keep an eye on when backups happen and if they’re successful. Recently, I’ve been making a lot of use of a simple little query that shows me how my backups are doing:

SELECT
  database_name,
  type,
  max(backup_start_date) last_backup
FROM
  msdb.dbo.backupset
GROUP BY
  database_name,
  type

Yes, this is a VERY straightforward query, no hidden magic here. But with this one little SELECT statement, I have been able to quickly establish if my backups are getting run, what specific databases may have problems, and where I need to focus my troubleshooting. By breaking it down by database and type, I am also able determine whether or not my log backups are running (key to out of control log growth), if I’m properly maintaining my recovery chain, and what backups are going to be necessary to restore my database.

Unlocking the secrets

The key is the the backupset table in msdb. This table stores the history of all successful backup operations on the server(emphasis on successful). It’s not just native SQL backups, but those by third party tools as well, so we can have insight in to any backups (or lack of) that are happening. I first came across this table working with Brent Ozar’s(b|t) Blitz script. Brent introduces this query as part of his server take over to establish whether or not your backups are being taken, which is the primary reason I check it. Backing up our data is vital and not doing this would probably be an RGE. If nothing else, this table says “Hey dummy, I need you to look at something!”

If we dig in a little more, though, we can find other useful information. Take the backup_start_date and backup_finish_date fields. By using another simple query, we can then see how our backups perform over time:

SELECT
  database_name,
  backup_start_date,
  datediff(mi,backup_start_date,backup_finish_date) backup_duration,
  backup_size/(datediff(mi,backup_start_date,backup_finish_date)+1) bytes_per_minute
FROM
  msdb.dbo.backupset

Backup duration is a handy metric for base-lining our systems. After all, if our backups start taking longer and longer, it could be an indication of resource contention. If we’re backing up to local disk, we could be choking our throughput. If we’re backing up to a network share, we could be seeing increased bandwidth usage. Also, our databases could just be getting bigger and might require more resources to support them. By including the backup_size field, we can see if longer backups are the result of simply backing up more data or if there might be something else to it.

If we use the backup_size field and its sibling, the compressed_backup_size field, we can gain some additional insights. Since backups will grow in relation to how much the database grows, this gives us a quick and dirty way to report on those growth patterns. Ideally, you’d want to be track the actual database size, but if you don’t have something to capture that historically, this will work in a pinch. Additionally, by combining it with the compressed backup size, you can get an idea of how much space you’re saving if you use the WITH COMPRESSION option in SQL 2008. A quick gotcha here: This will not show the benefits of compression using third party backup tools. Both fields will show the fully compressed backup size if you’re using something like Red Gate SQL Backup, Quest LiteSpeed, or Idera’s SQL Safe.

Cleaning up after yourself

Now not everything with this table is sunshine and rainbows. Maintaining this history is one of the more commonly overlooked areas of SQL Server administration. Ever wonder why your msdb database keeps growing and growing over time? Bingo, it’s because your backupset table keeps increasing with all the additional history stored inside it. What you want to do is schedule a regular run of sp_delete_backuphistory to keep your history to a relevant period. What that time frame is depends on your database size and needs, though I personally go with 90 days as my default.

Those who don’t learn from history…

Successful database administrators are the ones who make monitoring a part of their practice. With it, we can be proactive with our systems and solve problems before they occur. The great thing about the backupset table is that it’s a very easy way to start checking up on your instances, leveraging information that is already a part of the SQL Server core functionality. You don’t need any fancy tools or complex systems, just a few basic queries to get started understanding how your servers, databases, and systems perform on a day to day basis.

In the land of Jazz and Meat

I’ve been on the SQL Saturday kick lately.  Truly, these are great events that really tell you what the SQL community is all about, even more so than the Summit.  This time I was at SQL Saturday Kansas City, getting my community involvement on.  The best thing about these events is you get to interact with folks who are getting their first taste of the SQL community, which gets me really excited to share and enjoy.

I was tapped to present on two sessions, my SQL Server Security session (which I’ve done several times now) and my new Query Plan Primer session, where I do a basic rundown of reading query plans and some of the operators we can find within.  Both went well, though I’ve got my presentations lined up to be ~60 minutes each and the KC folks slotted the sessions to be 75 minutes.  This worked out well becuase I got into some good Q & A time with the audience in the remaining time.

I’m getting more and more comfortable with the whole presentation thing. It’s a ton of fun and really stretches my learning.  As I’ve told many people, the act of building a presentation really drives you, getting you to study up on the subject matter.  Open Q & A time is also a bonus, because while you can read all that material and build a nice little presentation, having 30 people quiz you on it is even better because it forces you to think about the subject from different angles.

I also attended a couple sessions that were good.  But it worked in Dev! with the illustrious Randy Knight(b|t) was great fun.  Randy’s a heck of a speaker and was able to express some of the cardinal development sins we find in our production environments in a straightforward, understandable way.  His presentation is that kind that needs to be given at any shop with a serious developer presence.  I caught a solid powershell session by Mike Lynn(t) that was a good introduction to the fundamentals of the language.  Finally, I learned about service broker from Sanil Mhatre(b|t).  Service broker is one of those cool solutions that has a lot to offer, but it’s hard to find the right problem for it to solve.

The KC group did a solid job with the event, from a comfortable speaker dinner, to an excellent event venue, and wrapped it all up with smooth exection.  Shout outs to Bill Graziano(b|t), Bill Fellows(b|t), Kris Nessa(b|t), Andy Cross, and everyone I couldn’t remember.  You guys have got this <<redacted>> DOWN.  I’ll definitely try to be out for next year.

A month of #sqlawesomesauce

Woof.  Can’t believe I got through October.  No, scratch that.  I can’t believe I scheduled so MUCH for October.  Really, I should know better, but when life hands you a plate of coolness, you dive in with both hands.  Yeah, we’ve all had those times when we go a little overboard on the things we like and end up paying for it, but is it ever not worth it???

So what happened?  Well, I had two SQL events this month that I thoroughly enjoyed.  In reverse order, I did two presentations and enjoyed awesome barbecue at SQL Saturday 101.  But before that, I made it to the SQL PASS Summit.  There’s no way I can properly convey how much fun this all was, but I’ll give you guys the quick hits as best I can.  I’m going to break the wrap ups into a two parter, just because I talk to much to assault you with THAT wall of text.

Climbing the Summit

So I finally made it.  The PASS Summit.  The big hoop-de-doo.  Was it worth it?  HELLS YES.  By the end, I was felt like my brain and body had been put through a meat grinder, but I knew more and was ready to do more when I got back to my job on Monday.

Before we start talking about the details, I want to impress upon you almost how overwhelming the summit is.  There’s so much going on that if/when you go, you’re going to be running non-stop for the hours you are awake.  Starting at breakfast, then the key notes, then the sessions, then the lunch, then more sessions, then the after parties…..woof.  It’s crazier than an unhappy on-call week.  But believe me when I say it’s absolutely worthwhile.

Sessions

Tagging along with the previous comment, you may look at the schedule and want to attend something in each time slot,but it ain’t gonna happen.  There’s to much other stuff going on outside of the presentations for you to make everything.  I tried to make about 75% of the time slots.  The highlights were:

  • Internals of TempDB with Bob Ward – This session about broke my brain, but it was a good pain.  Bob really drilled into what goes on in TempDB.  While the information may not have a direct impact on my day to day work, it was still plenty valuable.
  • Bug or Feature with Itzik Ben-Gan – Man, Ben-Gan is an AWESOME speaker.  Funny, clear, and concise.  I hope he does a pre-con next year because I absolutely want to hear him for more than just an hour.  This particular session was a good insight in to how T-SQL is interpreted by the engine and covers a lot of those odd situations you might see with odd code.
  • Are you a linchpin? with the superstars – This was a panel discussion on professional development by all the big names:  LaRock, Ozar, Misner, and others.  It was a nice back and forth discussion about taking charge of your career.  I especially liked Kevin Kline commenting on “what adjectives do you want people to describe you with”, which got me thinking about many things.  More on that later.

The biggest problem with the sessions is that there are so many great ones to choose from, so you’ll definitely want to get the DVDs after all is said and done.  Pick the ones you REALLY want to go to and make sure you leave some downtime in between.

Keynotes

This was mostly a disappointment for me.  The first day’s keynote was a big letdown with product announcements.  I know everyone was hoping for a concrete Denali (now 2012) release date, and unfortunately when that didn’t come everything else seemed weak.  Some of the Hadoop stuff was mildly interesting, but I would have been a lot more interested if I had first seen the Dewitt keynote which really explained just what the big deal with Hadoop was.  Much of the BI/reporting stuff was lost on me.  So much so that I decided to sleep in a little the next day and skip the Thursday keynote.

Friday was a different story.  I had been hearing everyone talk about how awesome Dewitt was and I was looking forward to it, but I was also wondering if anything could live up to the hype.  Fear not, gentle reader, it lived up and then some.  Dewitt spoke on Big Data, explaining NoSQL databases and how they matched up to the traditional relational database systems.  Overall, it was very enlightening.  I went in sort of knowing what NoSQL was, I came out having no questions about it.  Very eye opening and I would recommend the keynote to anyone wondering what NoSQL was and how it does its work.

Networking

The parties and socializing were mostly hit with a couple misses.  On Monday, the event at Lowell’s was a great start to the week because I was able to reconnect with many of my SQL friends nationwide.  Tuesday was a mix, because the first timers stuff was very well done.  The organizers really went out of their way to welcome in the new class.  I got to meet many of my personal SQL heroes, mostly through random chance.  Of course, what I love about the SQL community is that every person was so approachable.  I’ve yet to encounter elitism at any event.

Wednesday night and Thursday night was nothing truly official, just hanging out with different groups of folks.  There were only a couple real regrets:

  •  Not getting out to hang with the SQL Karaoke crowd.
  •  Not shooting better pool at the Tap House.
  •  To many friends to hang out with, not enough time.

Odds and Ends

Here’s a few random hits from the week of what worked and didn’t work:

  • Using a tablet for notes as opposed to paper or a PC was a big win.  Lugging a PC would have been a big hassle and the tablet really gave me good consolidation of my notes electronically.
  •  Bring business cards!  I didn’t hand out that many, but they are a huge networking tool!
  •  Next year, I need to leave on Saturday.  Leaving Friday night was a drag socially and physically.
  •  Make sure to plan a day ahead of the conference to do some touristy things.  Seattle is a great town, get a chance to experience some of it and don’t wrap everything up in the conference.

Maybe size is everything!

I just want to get this across:  The summit is huge!  Just like it can’t be described in one or even two blog posts, it’s almost more than one person can attend.  It’s enriching and a great experience, but you really have to pace yourself and realize that you’re not going to be able to get to everything.  And that’s fine, because everything you do go to will benefit you in some way.

Oh, and one last thing.  I know a lot of people struggle with paying for this and trying to talk their companies into sending them.  I have the same problem.  In fact, so much so that I sent myself.  That’s right, I was totally self funded.  That meant I had to be careful on some stuff and not go to pre-cons like I wanted to, but trust me when I say I got my money’s worth.  I want my company to send me since it’s to their benefit as well, but when everything is said and done, this is another investment in my career that I am happy and willing to make.

See you next year!