
I meant to write this post a month ago, but then life happened. This is a continuation of my short series on Azure SQL Database and how you can manage it with Powershell. If you want, you can go back and read the previous two posts: Getting started and creating your database.
Administrative Access
Now I’d like to show you how to connect to the database, but since it’s been so long since I’ve looked at this demo, I’ve forgotten my administrative password! While it would be simple to blow away the Azure SQL server and database, there are many situations where this is not possible. Fortunately we have an easy way to reset the administrative password using the cmdlets.
$pw = ConvertTo-SecureString -AsPlainText -Force '********'
Set-AzureRmSqlServer -ResourceGroupName MSFAzureSQL -ServerName msfazuresql -SqlAdministratorPassword $pw
Walking through this, we just need to create a secure string for our password and then use the Set-AzureRmSqlServer cmdlet and pass the secure string to -SqlAdministratorPassword argument. Easy as that and we don’t even need to know what the previous password was. With this in mind, I also want to call out that you can only change the password and not the admin login name. While this is not such a big deal, be aware that once you have an admin login name, you are stuck with it.
Connecting and Querying
Armed with our reset password, now we can query the database. The easiest way for you to do this is to connect to your database with SQL Server Management studio: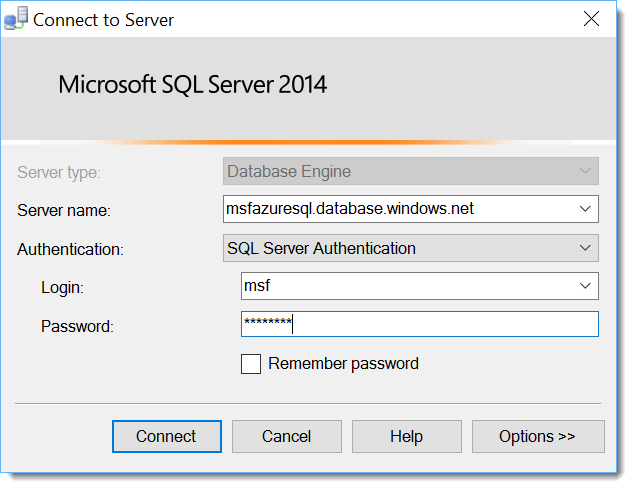
Remember that your server name will be what you named it followed by “.database.windows.net”. You must have SQL Server Authentication selected, and then just enter your login and password. SSMS will then connect up to your Azure SQL Database and the rest is very much like managing your on premises databases.
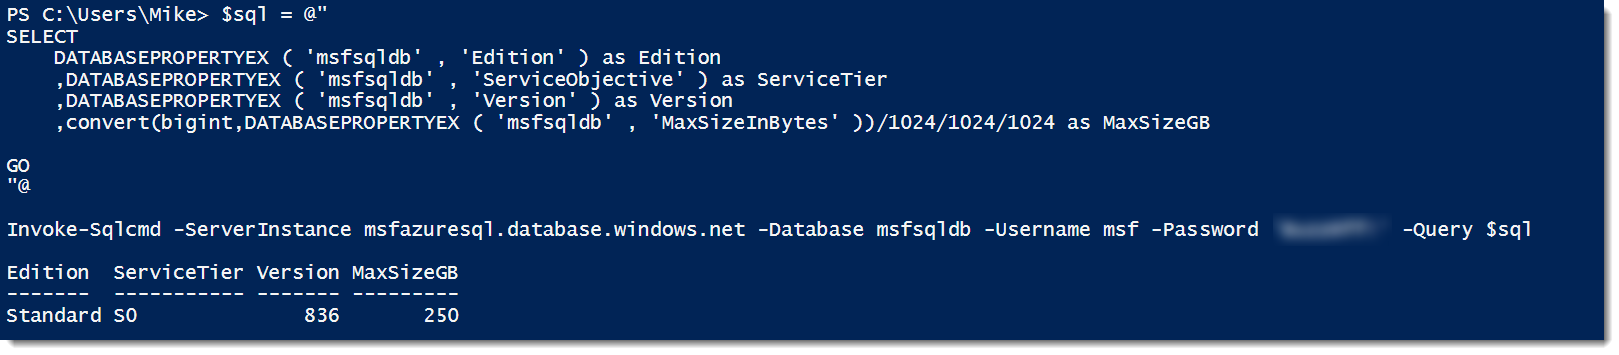
What about using Powershell? Again, not all that different. Let’s run a basic query to get some information about our database using Invoke-SqlCmd:
$sql = @"
SELECT
DATABASEPROPERTYEX ( 'msfsqldb' , 'Edition' ) as Edition
,DATABASEPROPERTYEX ( 'msfsqldb' , 'ServiceObjective' ) as ServiceTier
,DATABASEPROPERTYEX ( 'msfsqldb' , 'Version' ) as Version
,convert(bigint,DATABASEPROPERTYEX ( 'msfsqldb' , 'MaxSizeInBytes' ))/1024/1024/1024 as MaxSizeGB

GO
"@

Invoke-Sqlcmd -ServerInstance msfazuresql.database.windows.net -Database msfsqldb -Username msf -Password '*********' -Query $sql
As you can see, working with Azure SQL Database after it has been created and configured is not much different than your typical SQL Server installation. There is a lot of writing out there on features and use of Azure SQL Database, so I will skip that here. The best place to start is Grant Fritchey(@GFritchey) and his Azure blog posts.
Remaining Flexible
The last item I want to cover here is managing your database size. One of the promises of the cloud and Azure is the flexibility to change your resources as your needs demand and not be stuck on whatever hardware you purchased when you first built your data center. There are a couple items you should consider when first creating your Azure SQL Database, but the great thing is that you are not tied into many of those options permanently.
There are several service tiers available to you, with a mix between standard and premium offerings. Obviously, each service tier has a different price point, so how do you know what is the right choice for your database? What complicates this is you have a mystery metric for performance: Database Transaction Units. Ostensibly this is the number of transactions per second your database should be able to provide, but there’s more to it than that. My general recommendation is you should base your choice on features you need and user connections you expect. If you find, after that, you have a performance bottleneck, you can adapt upwards incrementally.
How do you make this change? It is just one line of Powershell:
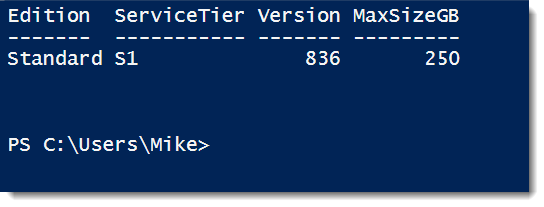
Set-AzureRmSqlDatabase -ResourceGroupName MSFAzureSQL -ServerName msfazuresql -DatabaseName msfsqldb -RequestedServiceObjectiveName 'S1'
Then it is off to the races. The actual operation is not instantaneous and Azure needs some time to allocate the resources and adjust the settings on its side. The great news here is this does not interfere with the operation of your database at all and it will be available while the resizing happens. Existing connections will be maintained and even queries that are running will continue to run. The end result will simply be:
Ease of Use
As you can see, we can manage the access and scale of Azure SQL Database with a few straightforward commands. While these changes can also be managed through the web portal, I find the Powershell approach to not only be simpler, as we can skip all the browsing through blade windows and troublesome clicks. While these actions are not really ones we would automate, using the cmdlets can also ensure that our actions can be more precise and consistent.
In my next post, I want to cover a topic near and dear to the hearts of DBAs everywhere: database restores. While backups for Azure SQL Database are managed for us, we need the ability to restore our data to a point and time of our choosing. Fortunately this is fairly easy to accomplish with Powershell. Stay tuned and I promise you will not have to wait another month for me to demonstrate this.

 I’m tweeting!
[…] (size etc) when you move downwards, so be careful. Again this can be done manually or with powershell. Let’s say you need to do a high volume load. Bump your service tier, then once you are done, […]