As with any project, before we can start, we need to know what we have to work with. Last post, we went over loading the Azure RM module and getting connected to our Azure account. Before I go over how you create the Azure SQL databases, I’d like to talk first about exactly what we will create first. It’s the old adage: measure twice, cut once.
The very first thing to create is an Azure Resource Group, as we are going to create our Azure SQL Database using the Azure Resource Manager deployment model. There’s nothing really fancy about this, just that it is a container that can house multiple resources. This resource group can house any Azure resource, not just our databases. Creating one using Powershell is simple, we just need to know what to call it and which Azure region to create it in:
New-AzureRmResourceGroup -Name MSFAzureSQL -Location ‘West US’
Once we have our resource group, we can start deploying our Azure SQL database components.
Parallels
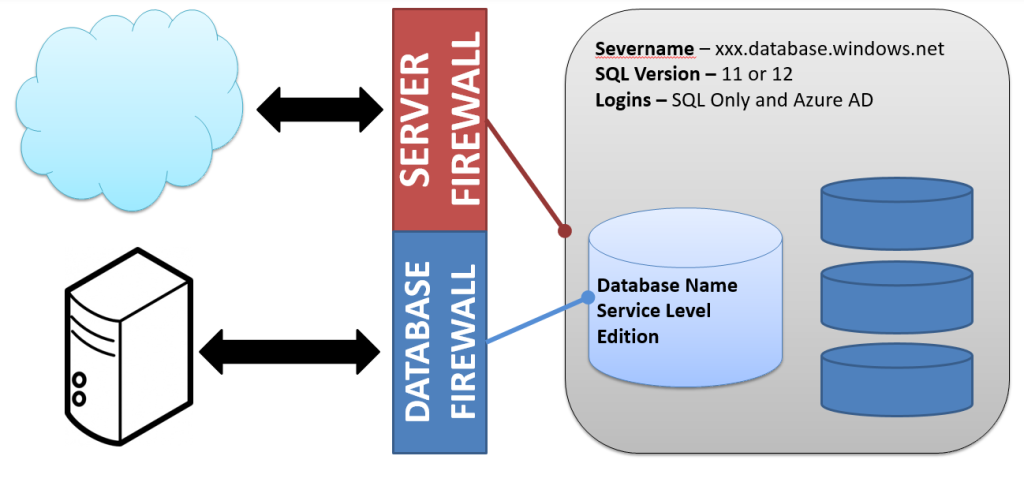
From a logical standpoint, working with Azure SQL databases is not very different from setting up a SQL Server instance and database in your environment. There are 3 main components we will need to deploy:
- A server
- A database
- A firewall (server or database)
Starting with the server, there are only a few things we need to know. The first is a server name so we can identify and connect to it. After that, we need to know what version of Azure SQL databases we want. There are two options here, 11 and 12. Yes, those are fairly abstract numbers, though version 12 is currently what is being updated and has many of the features that will be included in SQL 2016. Finally we need to create an administrative login, the equivalent of the sa login found in all SQL Servers. This all boils down to just two lines of Powershell:
$cred = Get-Credential
New-AzureRmSqlServer -ResourceGroupName MSFAzureSQL -Location ‘West US’ -ServerName msfazuresql -SqlAdministratorCredentials $cred -ServerVersion '12.0'
Running this, in my opinion, beats all the clicking and selecting you have to do in the portal.
Next up, we need to create our database. As with creating a server, we need a name for the database. We also need the resource group and server name we are creating the database in. We will then need to declare a service level objective. While there is a performance aspect to this selection, it more rests on what sort of connection load you will have, what kind of features you need, and what sort of disaster recovery support you require. The nice thing about selecting a service level is their easy to change once you have your database. Finally, we need to select an edition (again, relates to features). To deploy, our command looks like this:
New-AzureRmSqlDatabase -ResourceGroupName MSFAzureSQL -ServerName msfazuresql -Edition Standard -DatabaseName msfsqldb -RequestedServiceObjectiveName 'S0'
Security and Access
The final component to create is a firewall. By default, your Azure SQL Database has its access blocked to anything outside of it. Yes, this includes your access via management studio. To open this access, we need to create firewall rules that allow specific IP addresses to connect. There are two types of firewall rules we can use, server and database. These are what you would guess. The server rule allows access from that address to any database in your server, where the database rule only works for that database.
For our purposes, the server rule will work just fine. Creating a database rule is not really different, it just applies to a different scope. To create a rule, we need the resource group name, server name, rule name, and an IP address range. For this, we will use a trick I picked up from John Milner(@JFRMilner) to get our external IP and create a firewall rule for it:
$localIP = (Invoke-WebRequest ifconfig.me/ip).Content.trim()
New-AzureRmSqlServerFirewallRule -ResourceGroupName MSFAzureSQL -ServerName msfazuresql -FirewallRuleName 'msffirewall' -StartIpAddress $localIP -EndIpAddress $localIP
Now, there is also a special firewall rule we can use. This one is handy because it will make your database accessible to all Azure services. This saves you the headache of creating separate rules for websites, PowerBI, or any other service you want to use. Just call the firewall rule cmdlet with -AllowAllAzureIPs:
New-AzureRmSqlServerFirewallRule -ResourceGroupName MSFAzureSQL -ServerName msfazuresql -AllowAllAzureIPs
Fully Functional
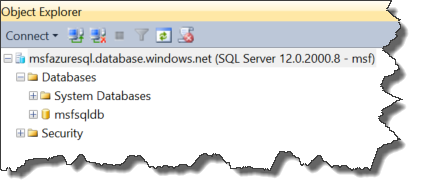
With that, we now have a functioning Azure SQL database. To connect to it, you just need to use the servername along with database.windows.net as your connection string, along with the admin login you created. Put it into management studio and you are good to go:
Oh, you want the full script?
New-AzureRmResourceGroup -Name MSFAzureSQL -Location ‘West US’

$cred = Get-Credential
New-AzureRmSqlServer -ResourceGroupName MSFAzureSQL -Location ‘West US’ -ServerName msfazuresql -SqlAdministratorCredentials $cred -ServerVersion '12.0'

New-AzureRmSqlDatabase -ResourceGroupName MSFAzureSQL -ServerName msfazuresql -Edition Standard -DatabaseName msfsqldb -RequestedServiceObjectiveName 'S0'

$localIP = (Invoke-WebRequest ifconfig.me/ip).Content.trim()
New-AzureRmSqlServerFirewallRule -ResourceGroupName MSFAzureSQL -ServerName msfazuresql -FirewallRuleName 'msffirewall' -StartIpAddress $localIP -EndIpAddress $localIP
New-AzureRmSqlServerFirewallRule -ResourceGroupName MSFAzureSQL -ServerName msfazuresql -AllowAllAzureIPs
As you can see, deploying an Azure SQL database is a pretty simple process, it is just a matter of knowing what you need. Next up, we will go over how you can manage and alter your Azure SQL Database. After all, the cloud promises us flexibility and using Powershell makes it easy.


 I’m tweeting!
Nice Post and thanks for the pingback!